
[Frontend] TIL Frontend project - Overview of CSS part 2

FASTCAMPUS Frontend Project
Overview of CSS - part 2
패스트캠퍼스 - 프론트엔드 웹 개발의 모든 것 초격차 패키지 Online 과정
🧩 What I Should Learn?
- Pseudo-class 2
- Pseudo-element
- Attribute Selector
- Style Inheritance
- CSS Specificity
🎯 What I learned today
CSS Pseudo-class part 2
:first-child
The :first-child CSS pseudo-class represents the first element among a group of sibling elements.
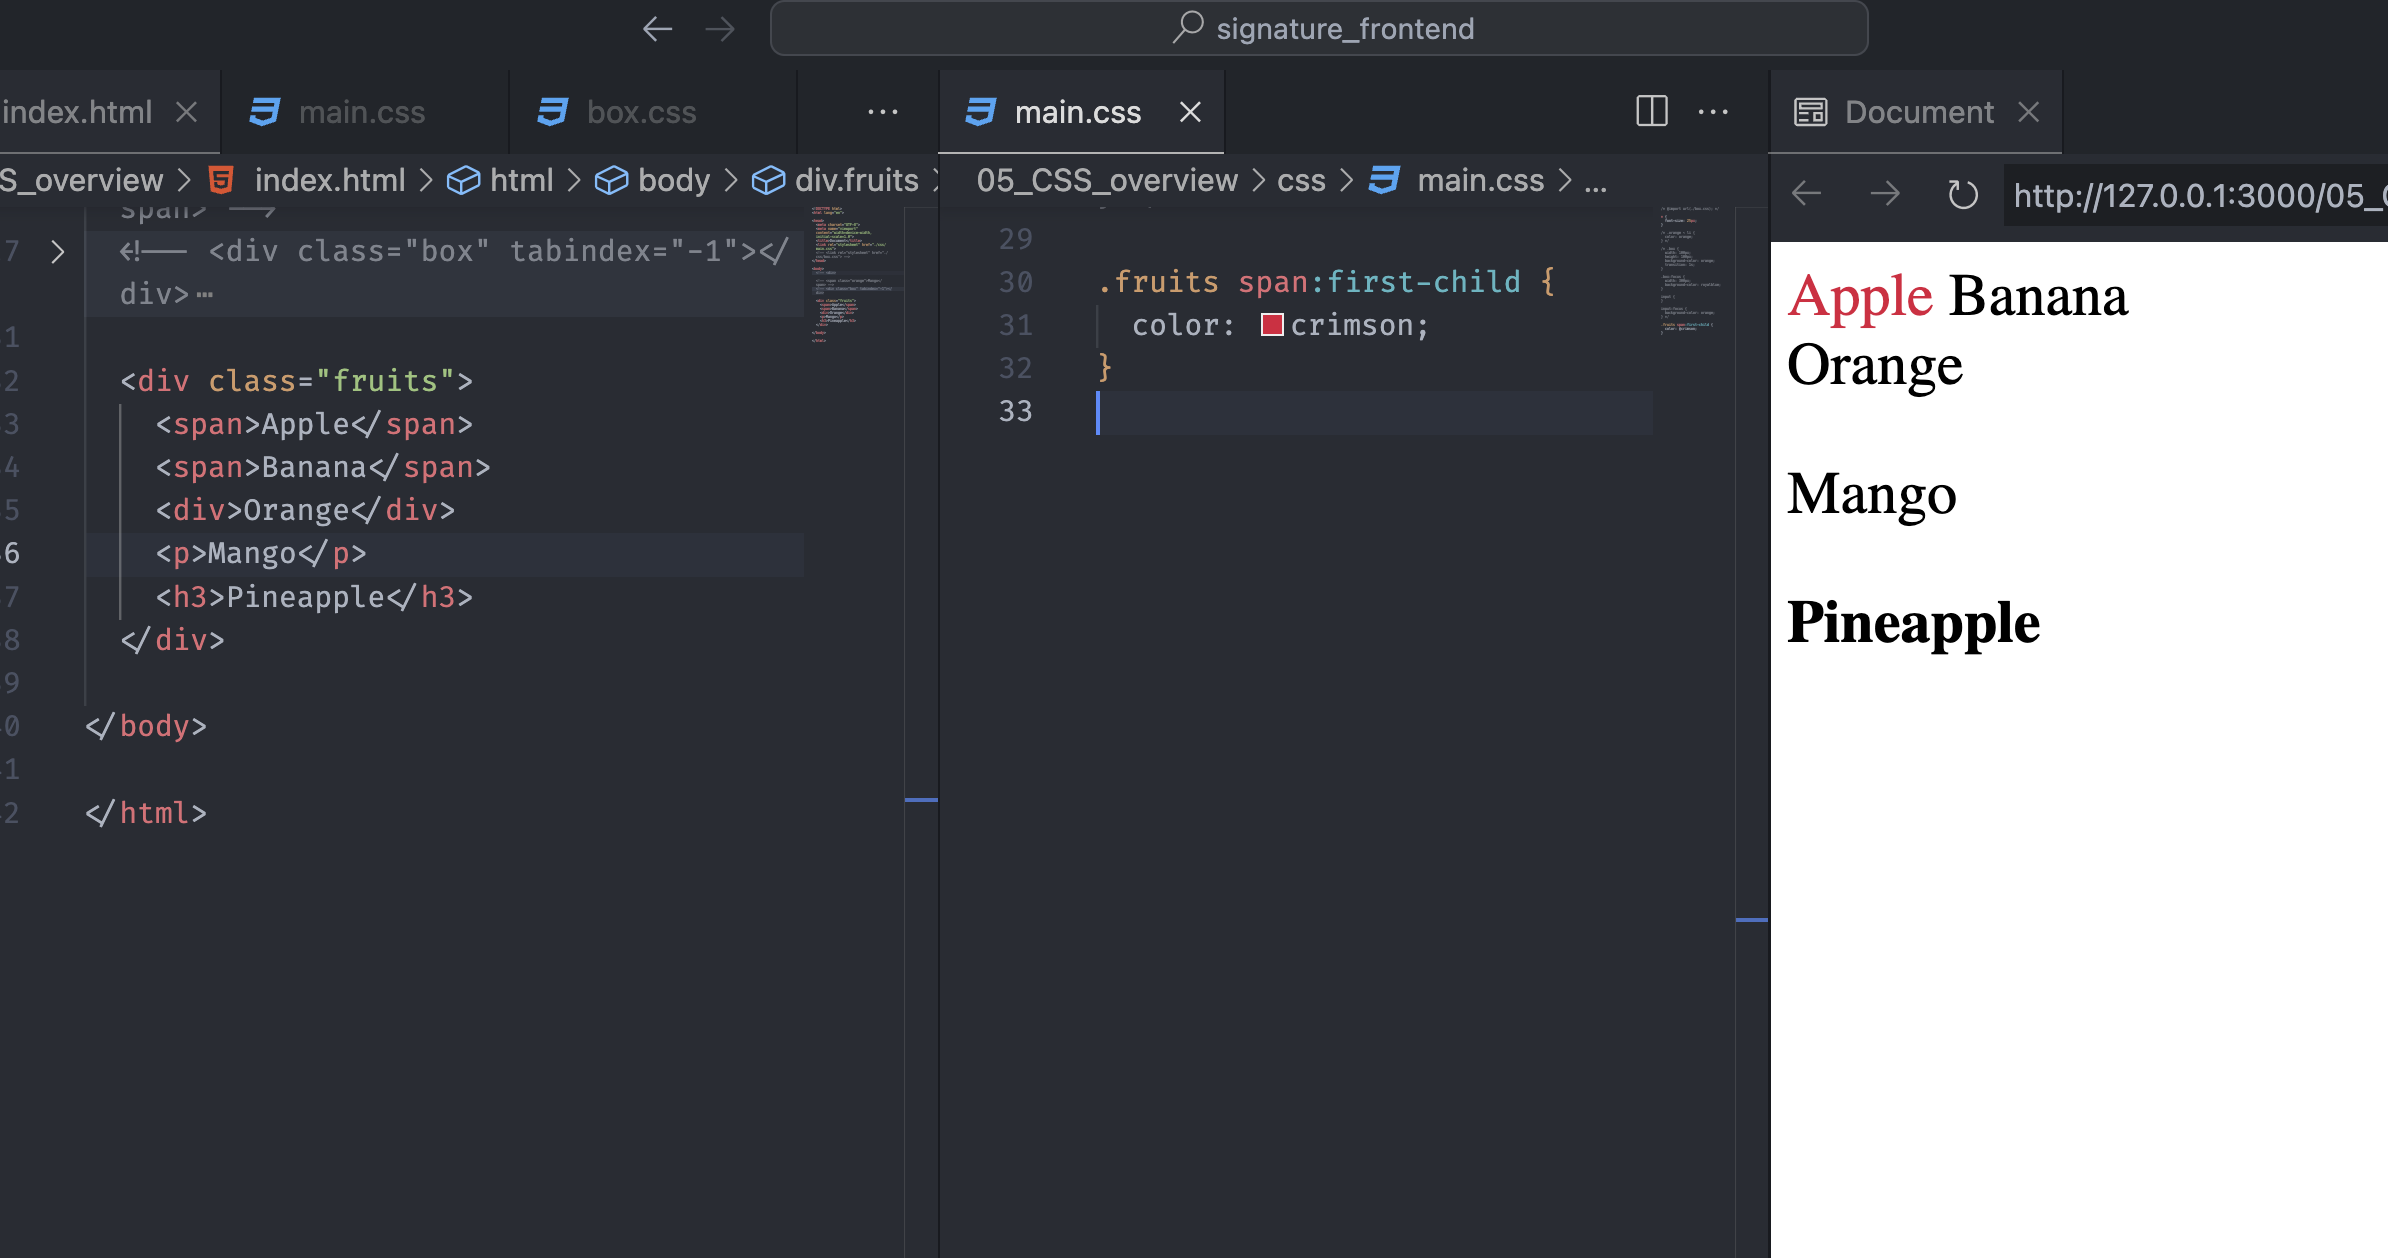
Notice in index.html that all the elements share one parent, the div, with the class name fruit, which are sibling elements. Also, in main.css, we use the class selector, descendant combinator, and type selector with the :first-child pseudo-class.
That means we want to find the element with the type span, in which two span tags are under the fruits class. Then, it finds the first element in those two span elements. Indeed, the first span tag has the content Apple. Hence, only the Apple text has a color on the web.
If we were to change the CSS class selector to div, the result should be like this:
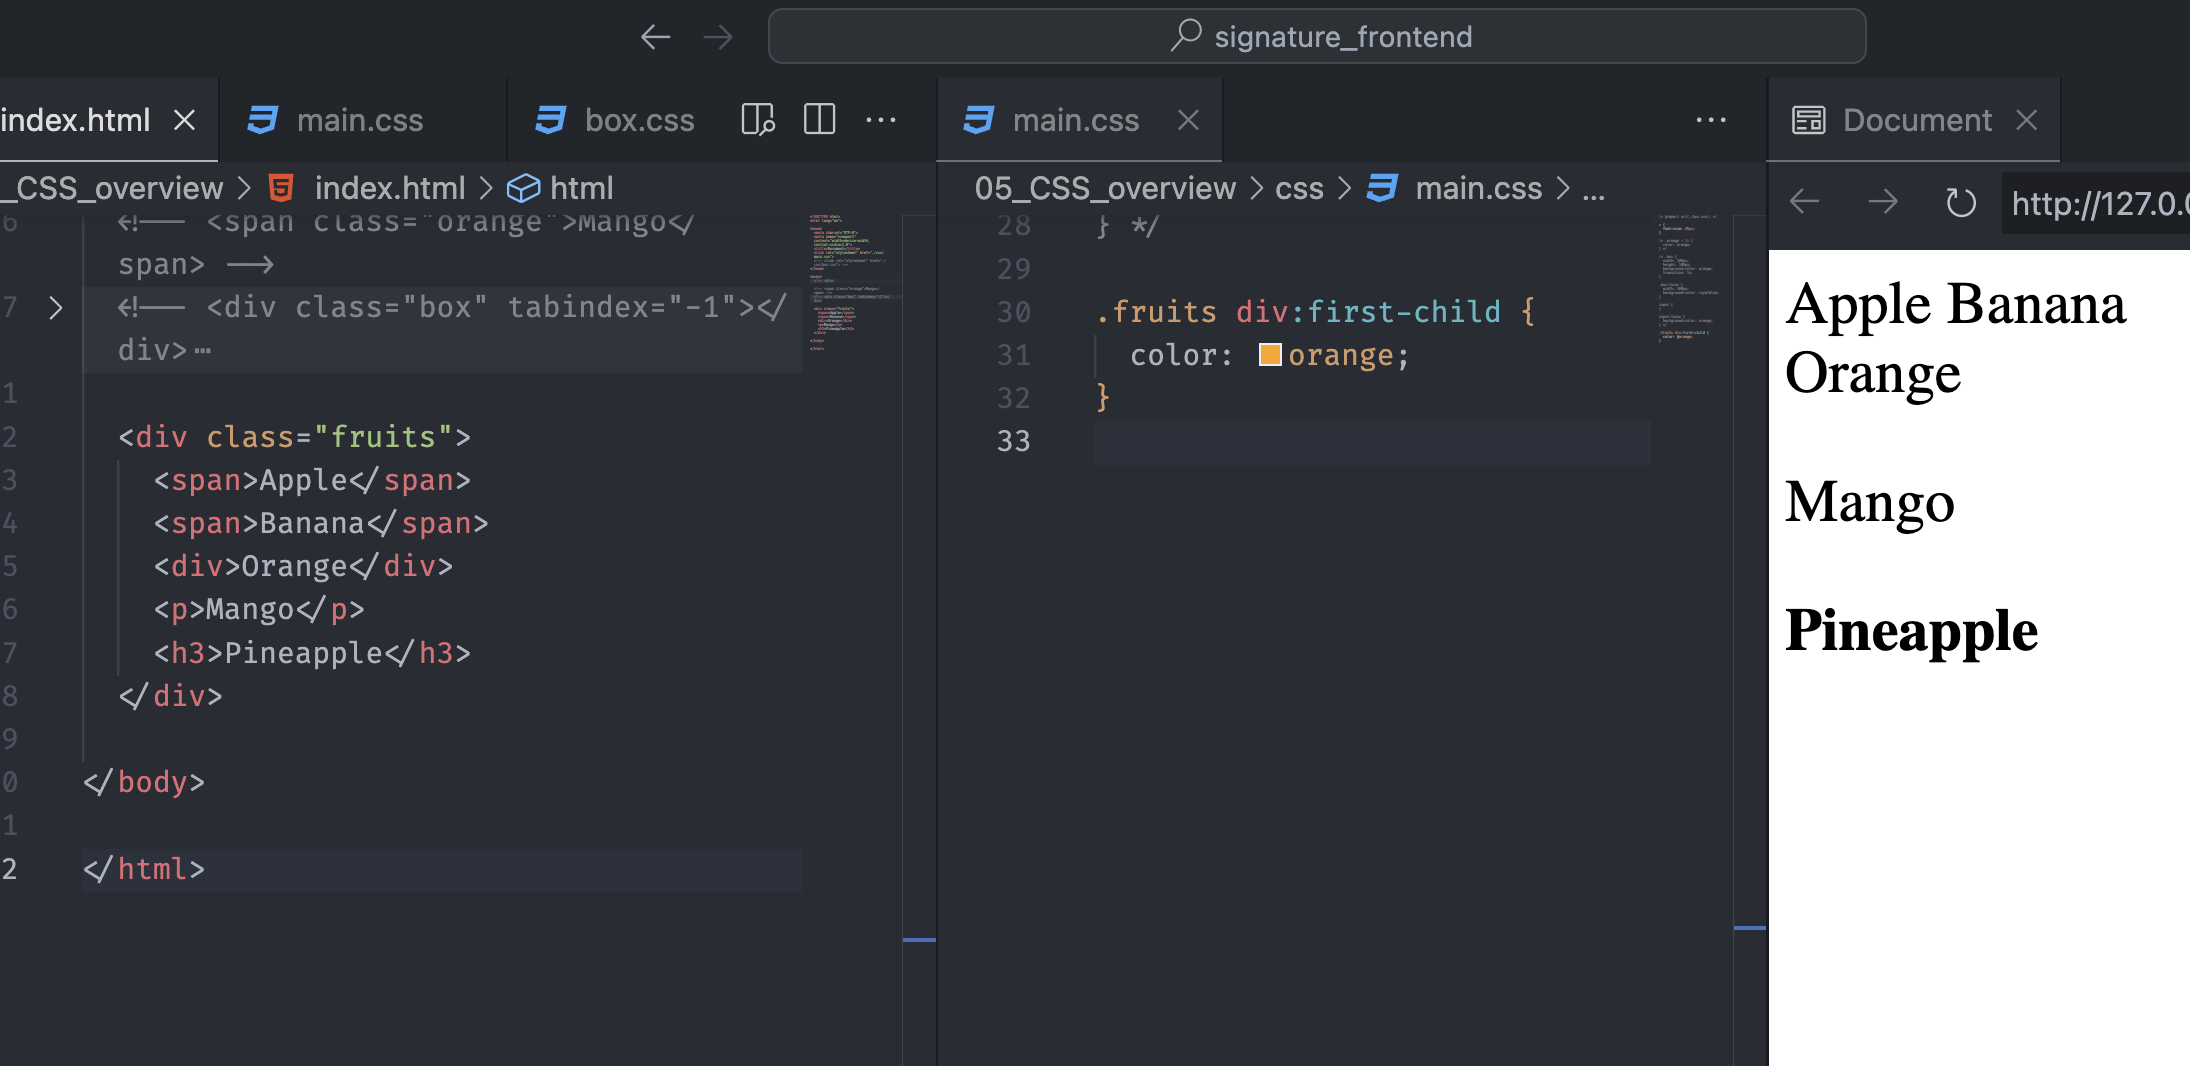
We might think the div element with the content Orange has to be colored in orange. However, among the sibling elements, the first element is span, not the div. Therefore, the CSS won’t work because of the wrong selector.
:last-child
On the other hand, the :last-child CSS pseudo-class represents the last element among a group of sibling elements.
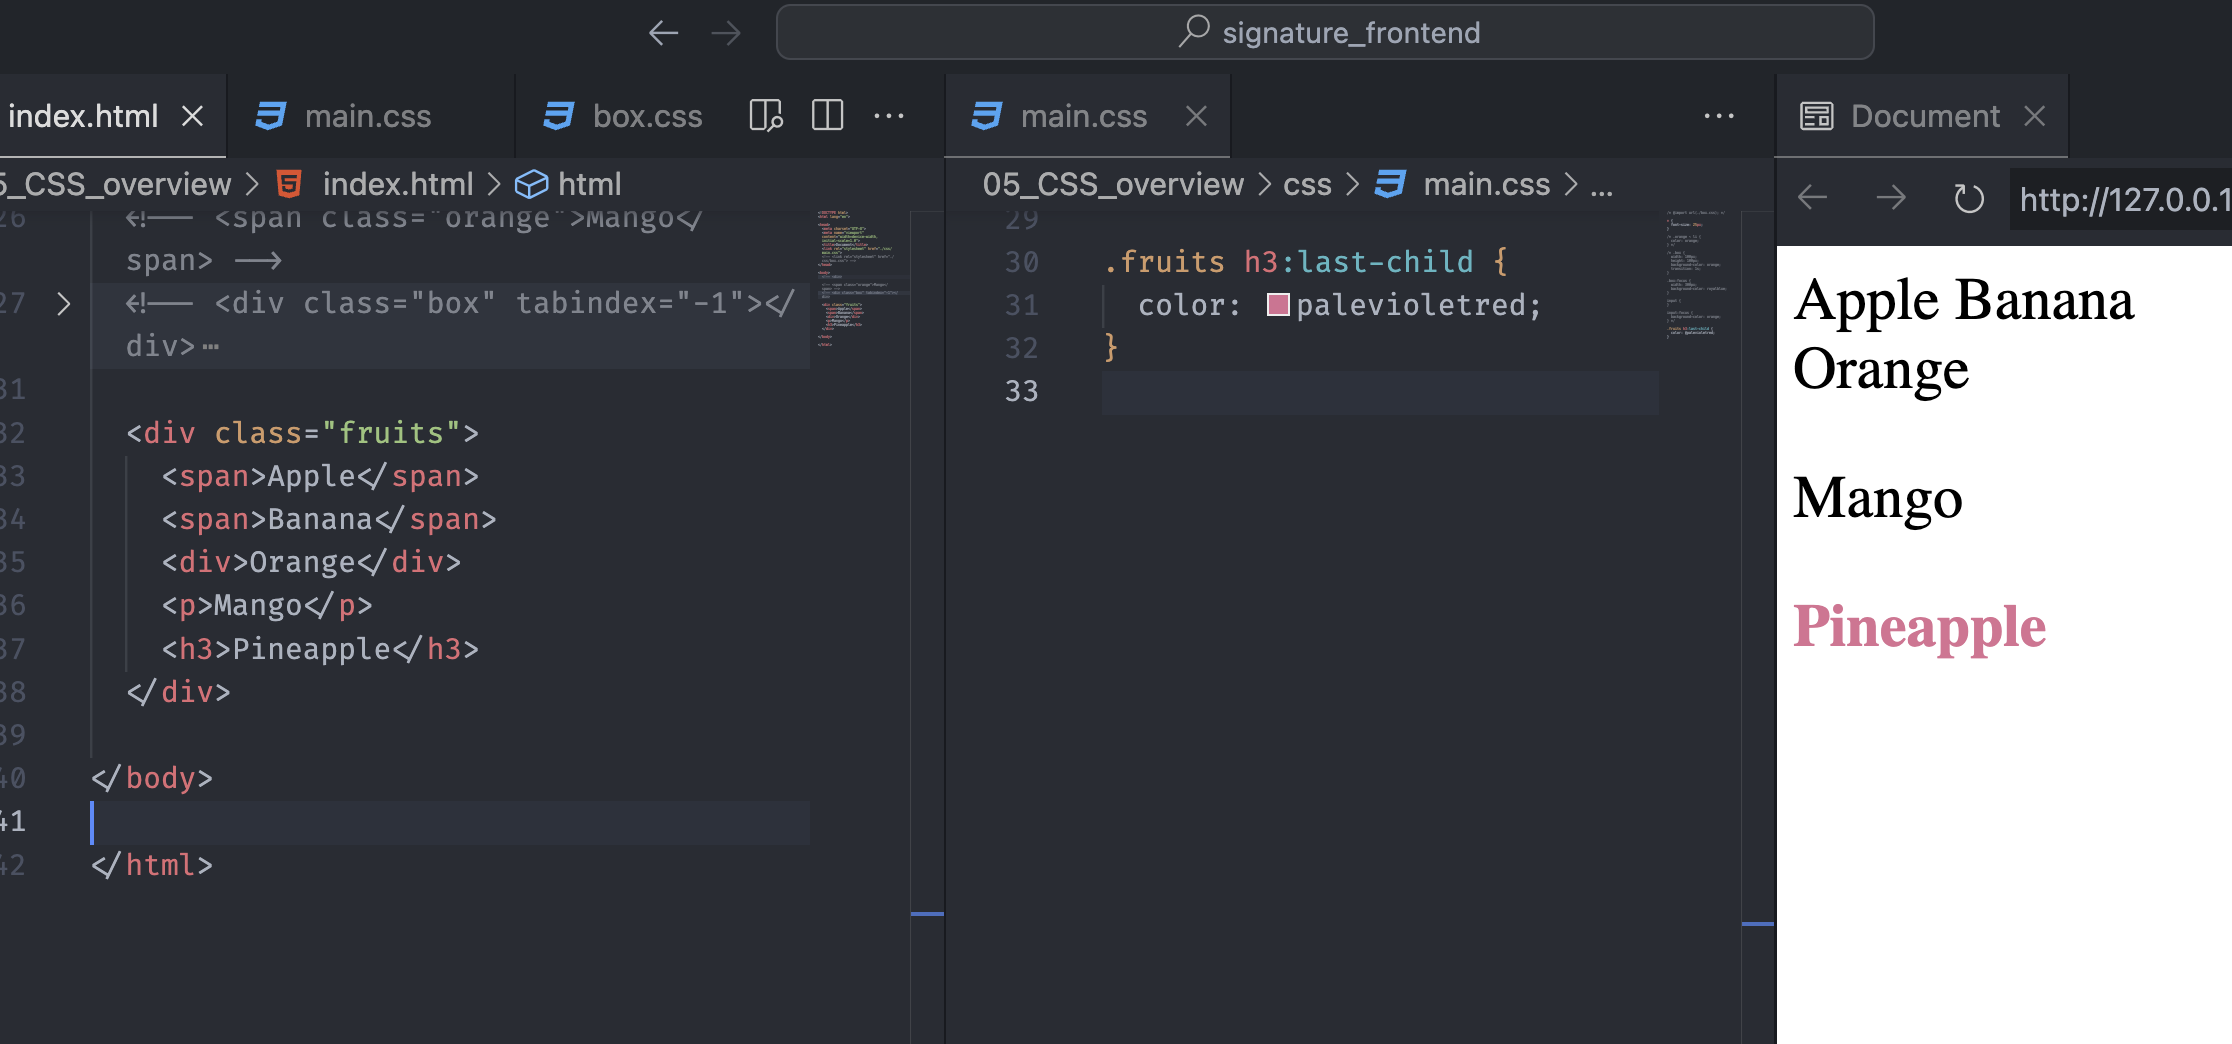
Similar to the previous pseudo-class, the :last-child is attached with h3. So, the CSS finds the class fruits and descendant h3 and checks if it is the last element among the siblings.
:nth-child()
The :nth-child() CSS pseudo-class matches elements based on the indexes of the elements in the child list of their parents.
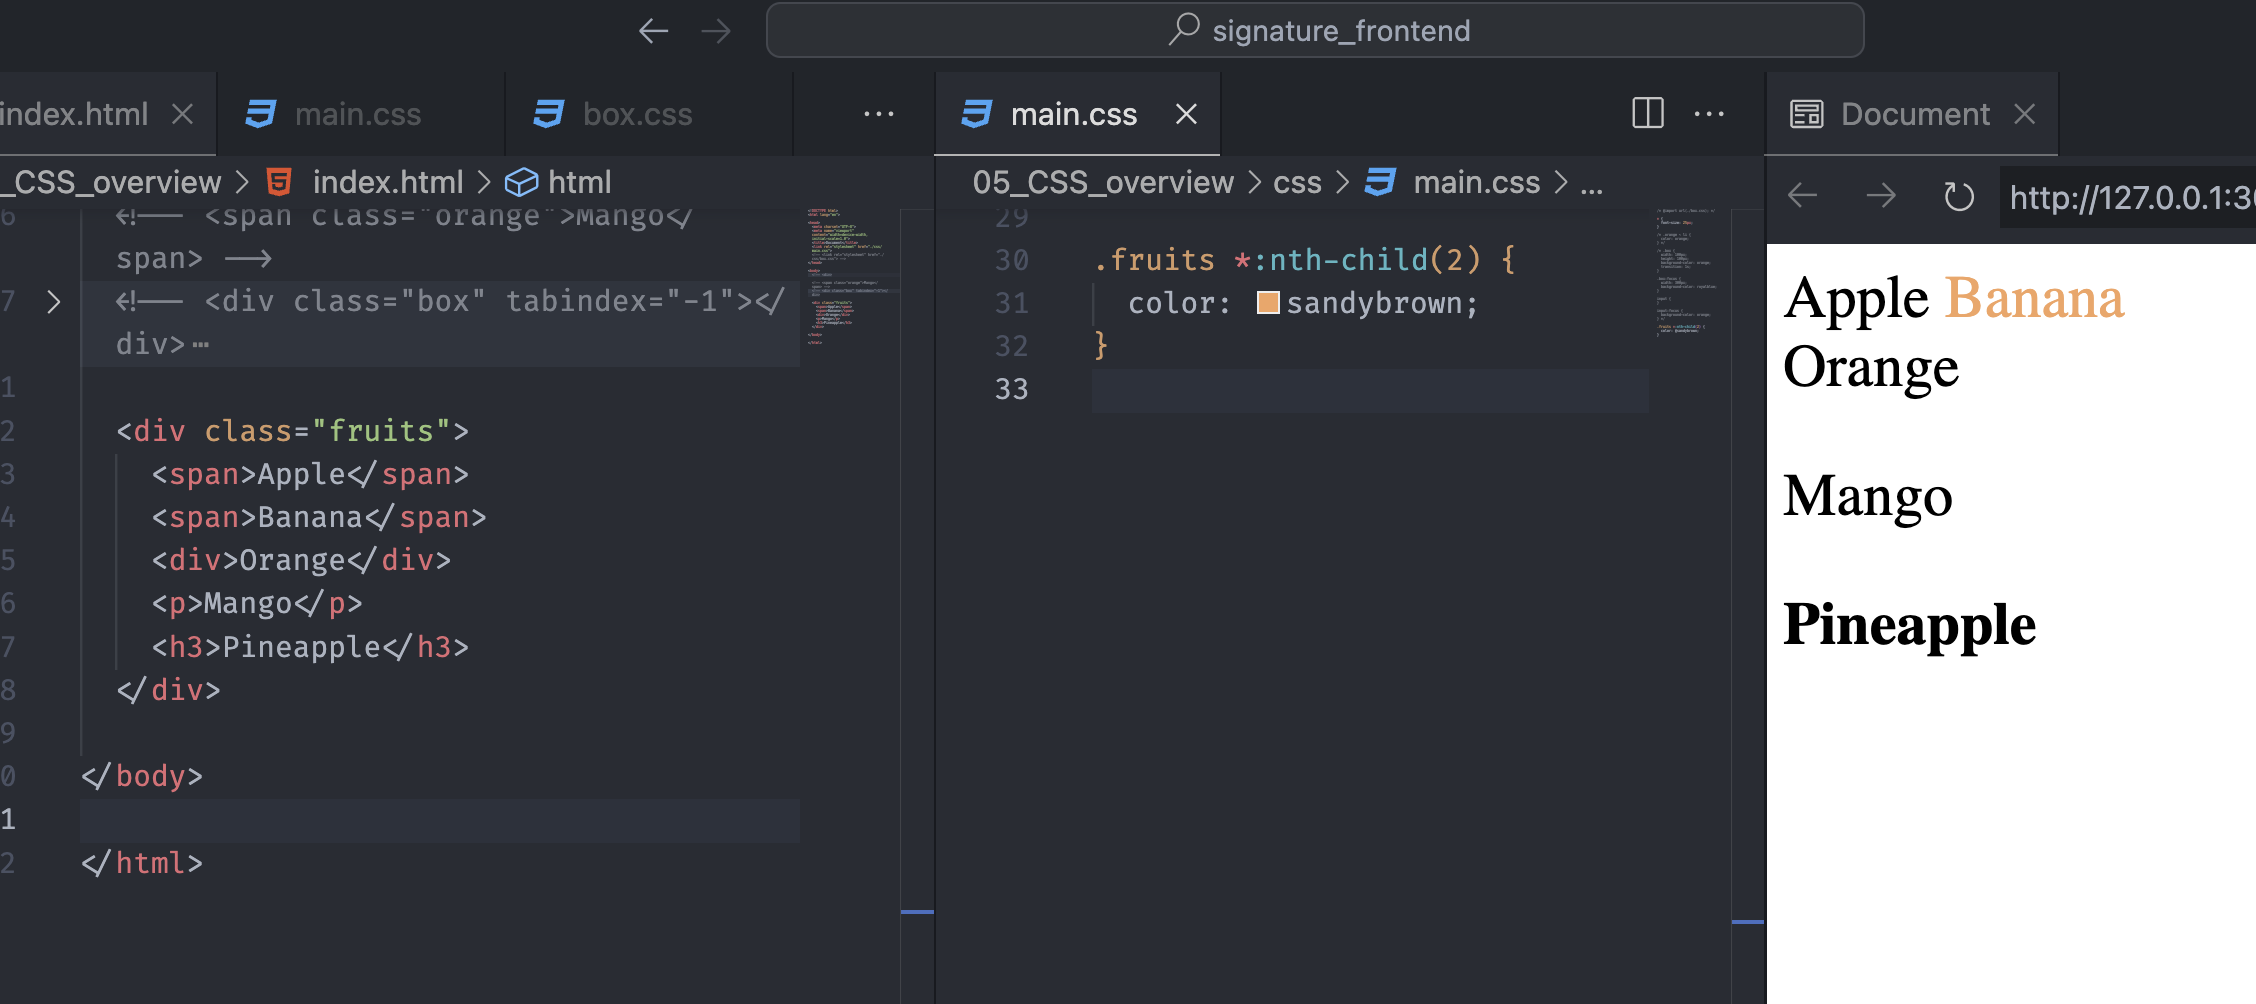
Notice that the :nth-child() pseudo-class is attached to the universal selector (*), which we can select any element under the fruits class.
The styling indicates that we want to find a second element, the descendant of the .fruits element.
Also, we can use the zero-based numbering in the parentheses and select the elements corresponding to the given number.
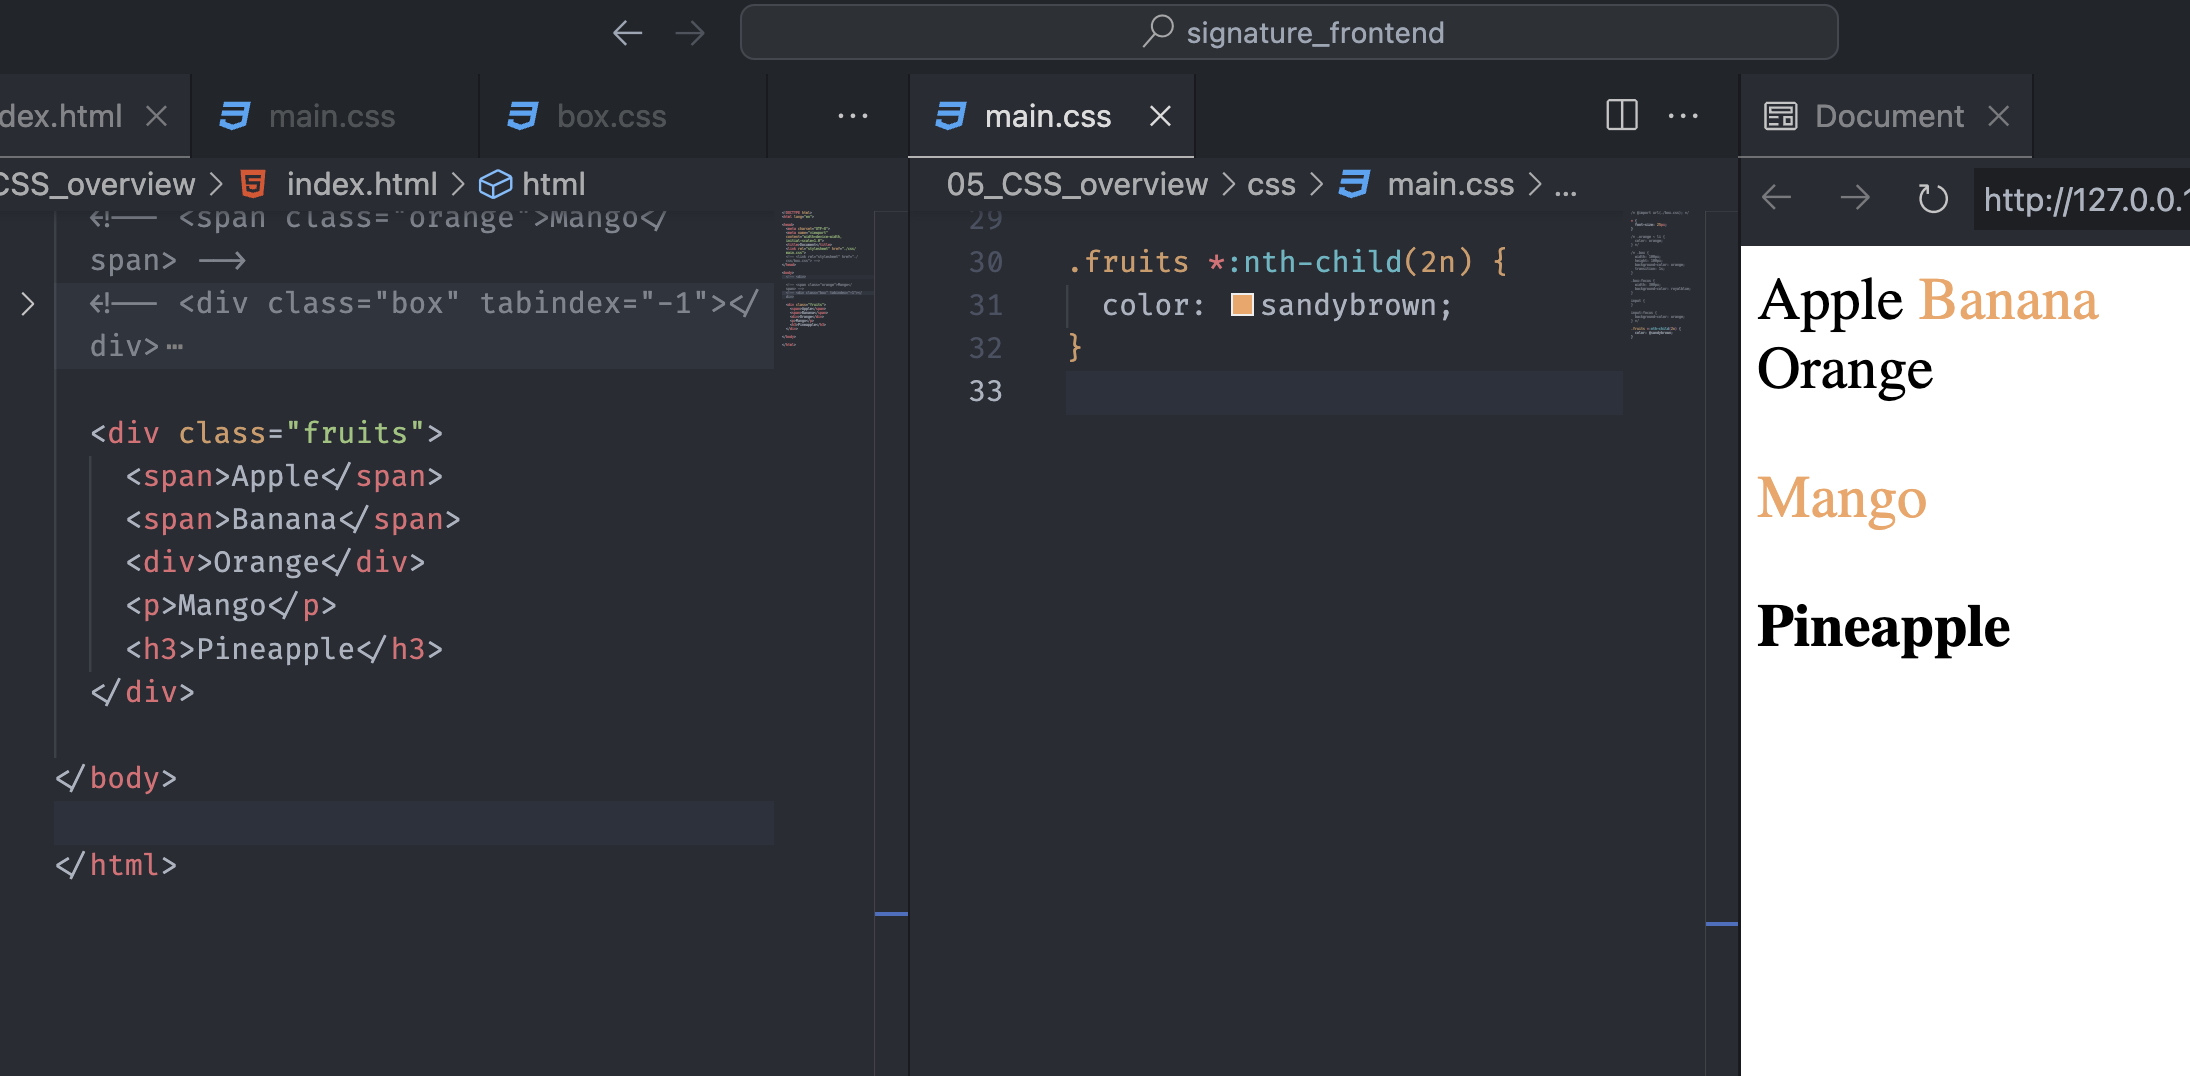
With the above example, we can select the even-numbered elements and with the :nth-child(2n+1), we can select the odd-numbered elements.
Another example will be the :nth-child(-n+3), which will indicate the first three elements because it will go negative after three elements.
There are various ways to select elements with the combination of n, and if you want to figure out it more, check the MDN website.
:not()
The :not() CSS pseudo-class represents elements that do not match a list of selectors. Since it prevents specific items from being selected, we call it negation pseudo-class.
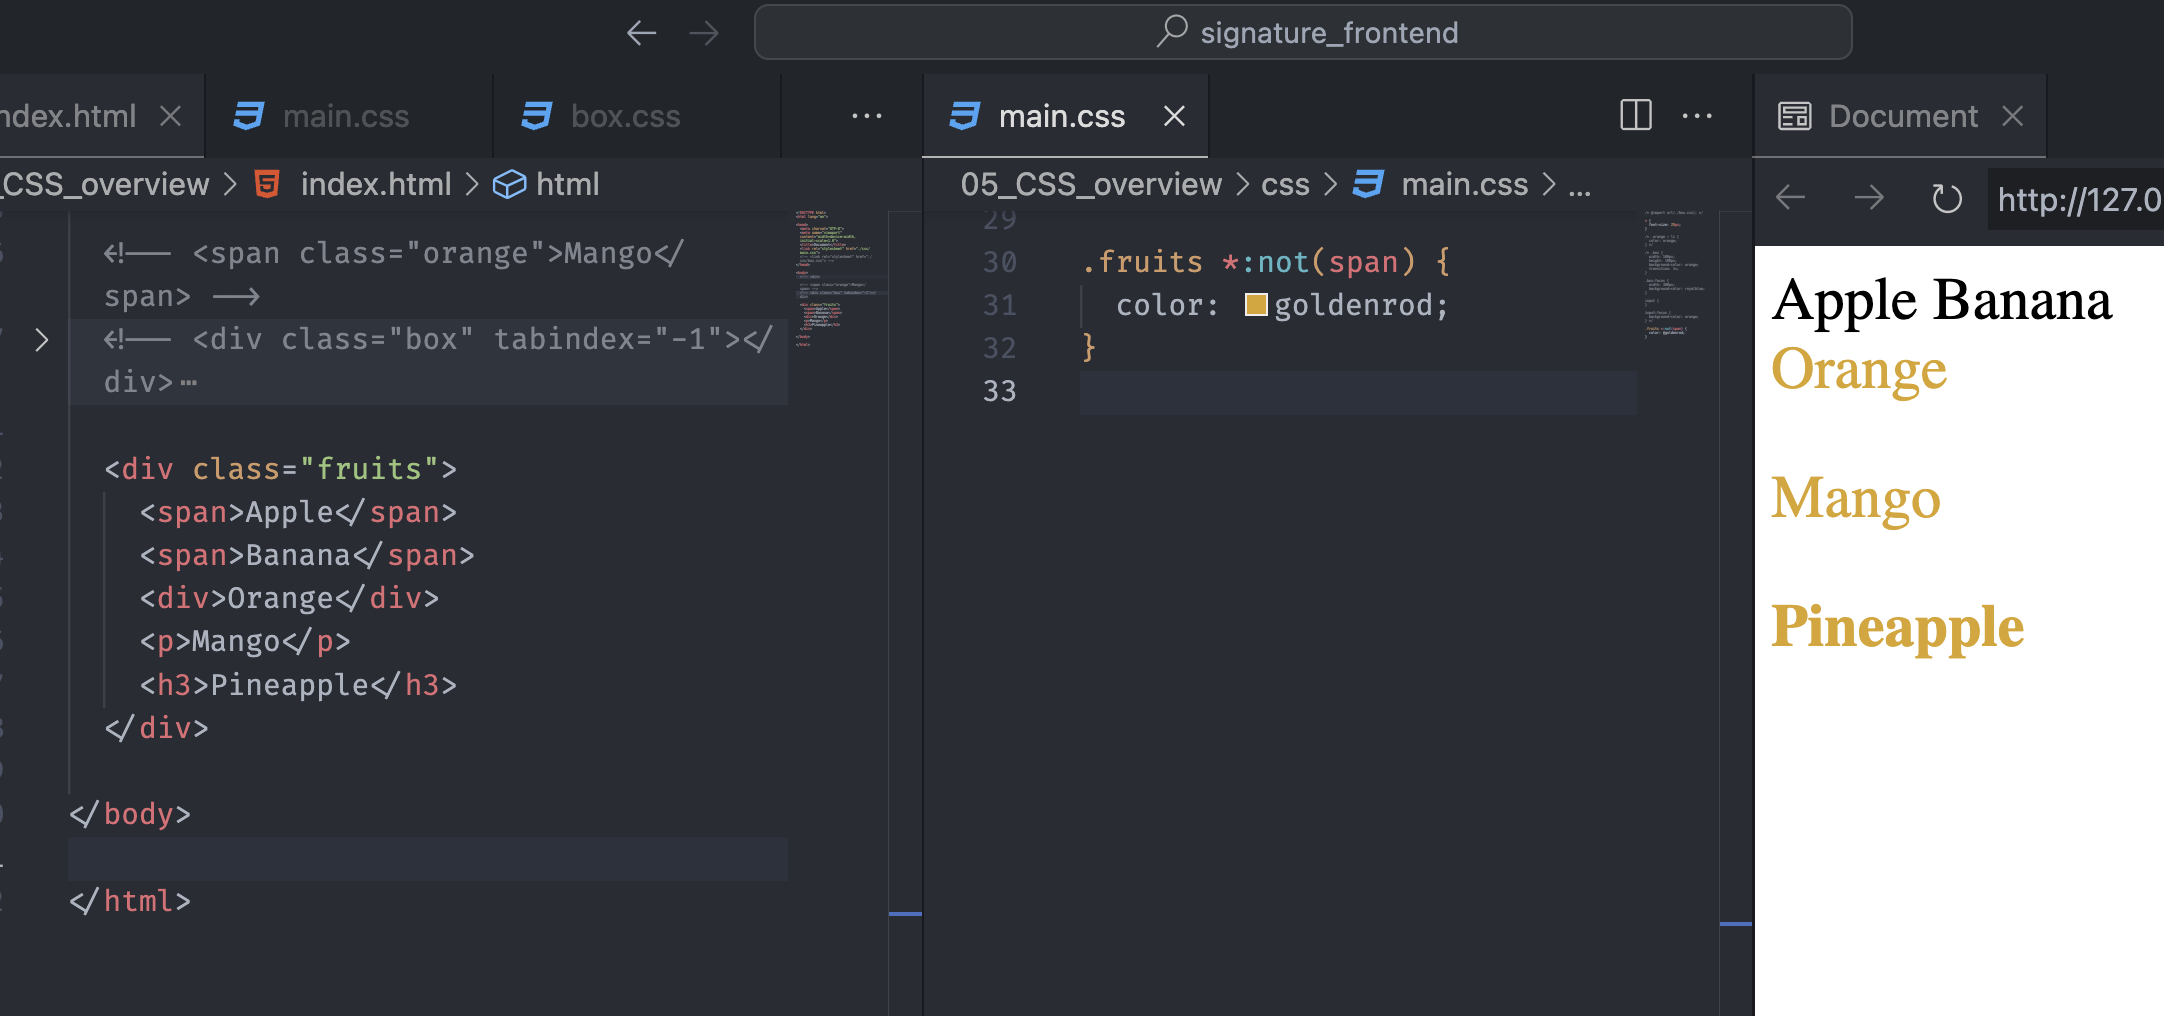
Notice the styling selects the class fruits, then finds any elements that are not the type span. Hence, the div, p, and h3 have colors.
CSS Pseudo-Element
::before
A CSS pseudo-element is a keyword added to a selector that lets us style a specific part of the selected element.
In CSS, ::before creates a pseudo-element that is the first child of the selected element.
It is an inline element by default and is often used to add cosmetic content to an element with the content property.
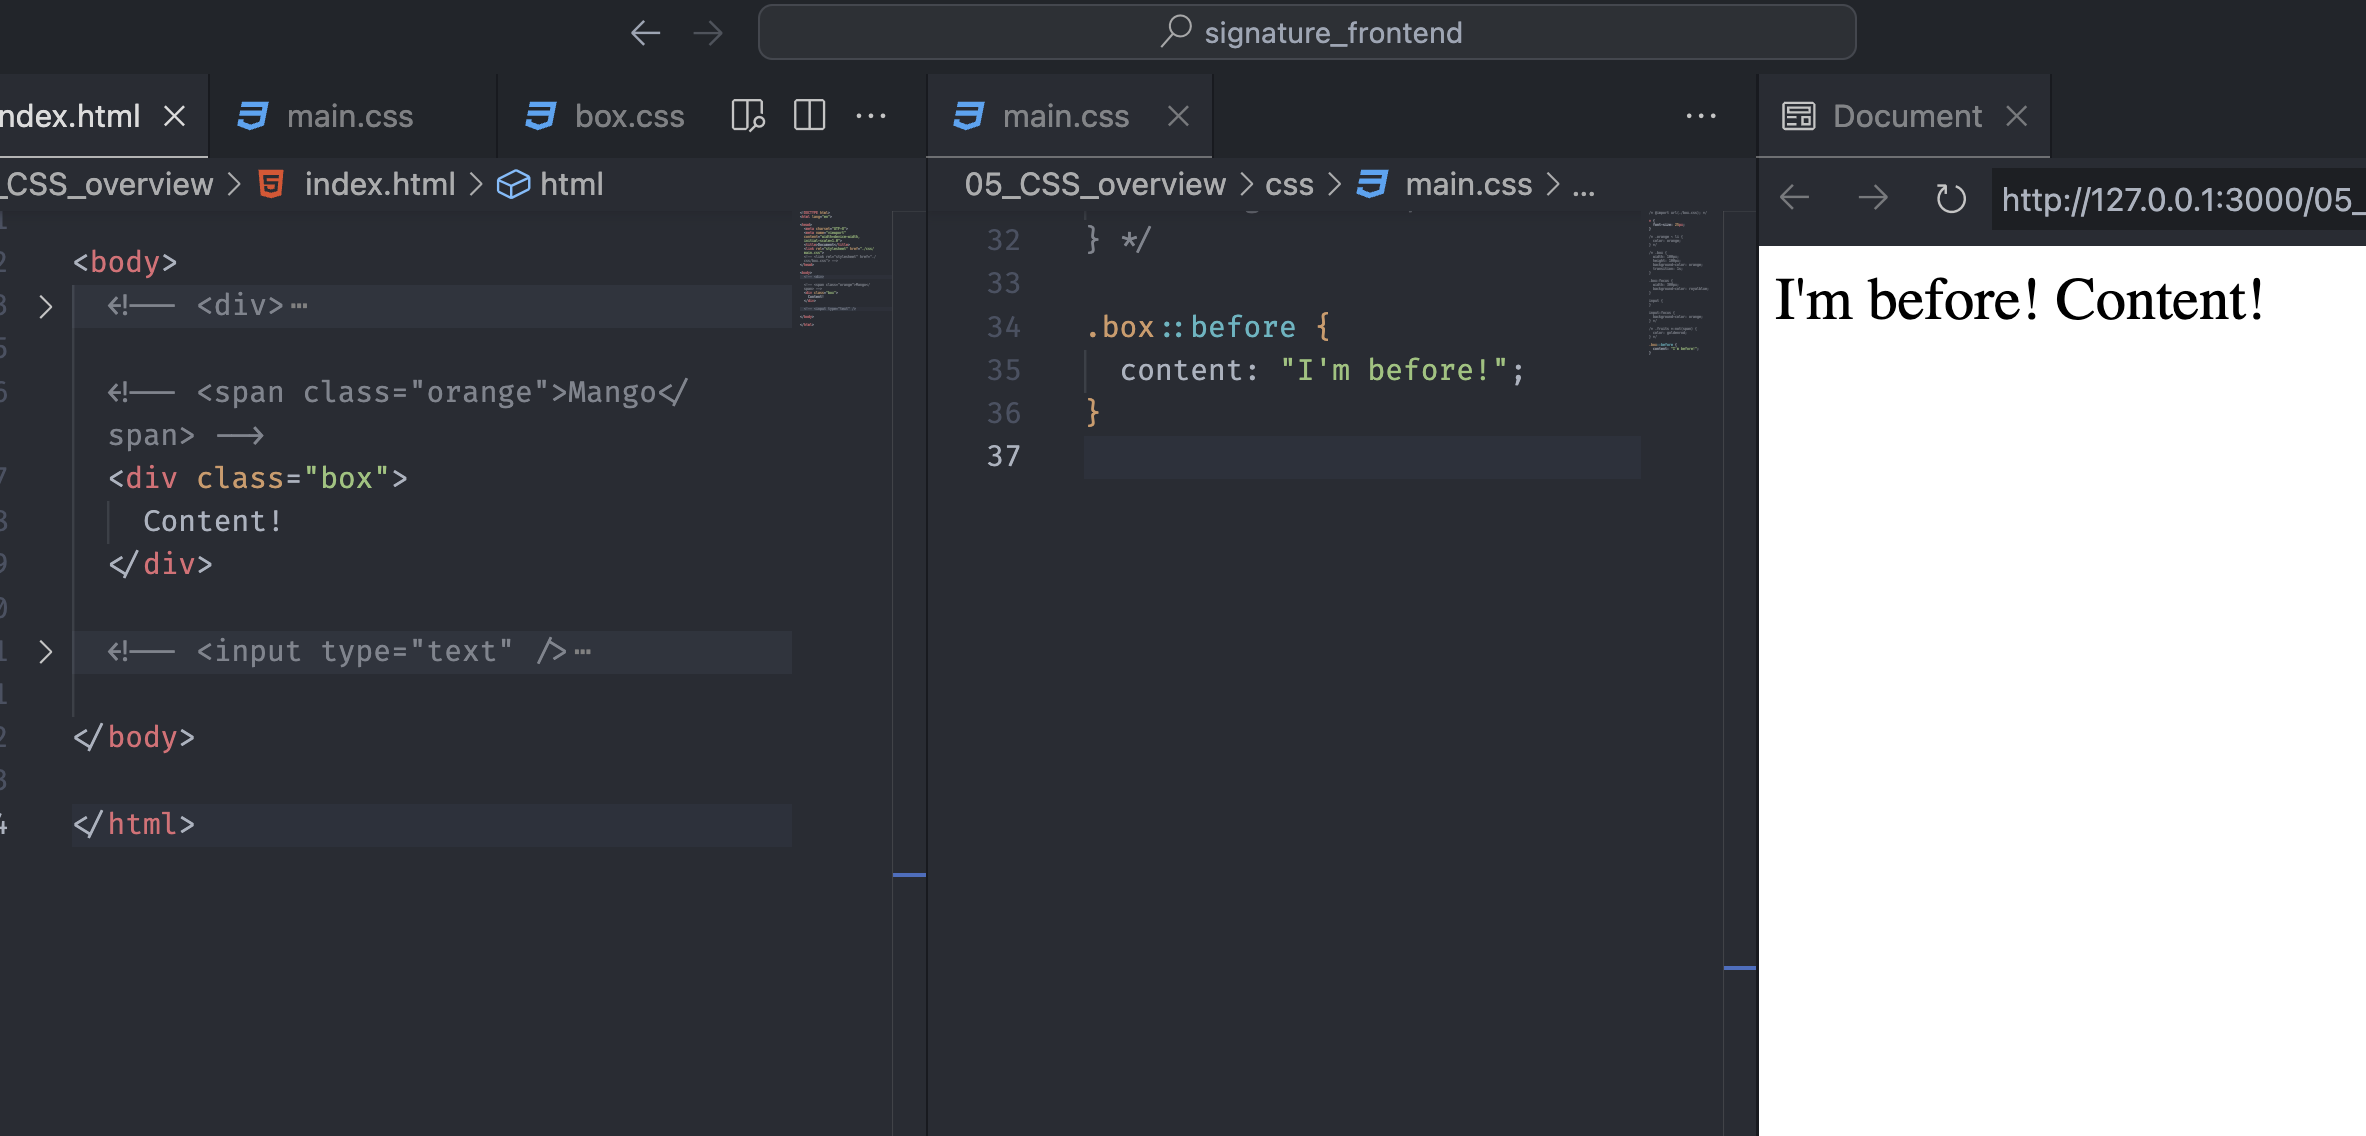
Notice that ::before creates a pseudo-element and inserts a certain content with a content property. The content created is placed in front of the div or at the same line because it is an inline element.
::after
Opposite to the ::before, we have another selector called ::after.
In CSS, ::after creates a pseudo-element that is the last child of the selected element.
If the content property is not specified, has an invalid value, or has normal or none as a value, then the ::after pseudo-element is not rendered and behaves as if display: none is set.
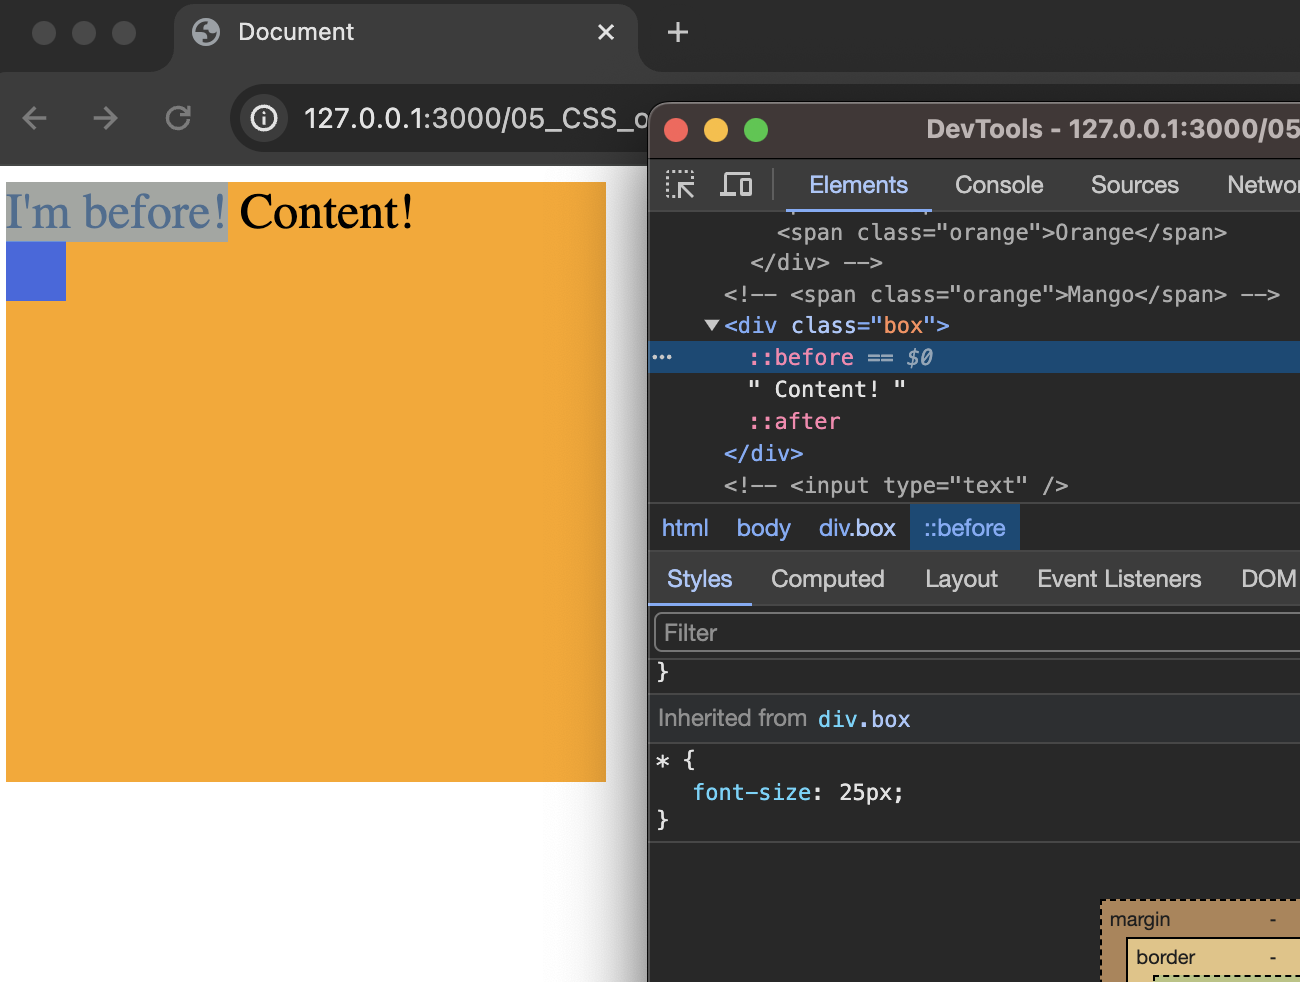
Notice the content of ::before printed in front of the main content - Content! - and the DevTool has a pseudo-element above the text from the main content.
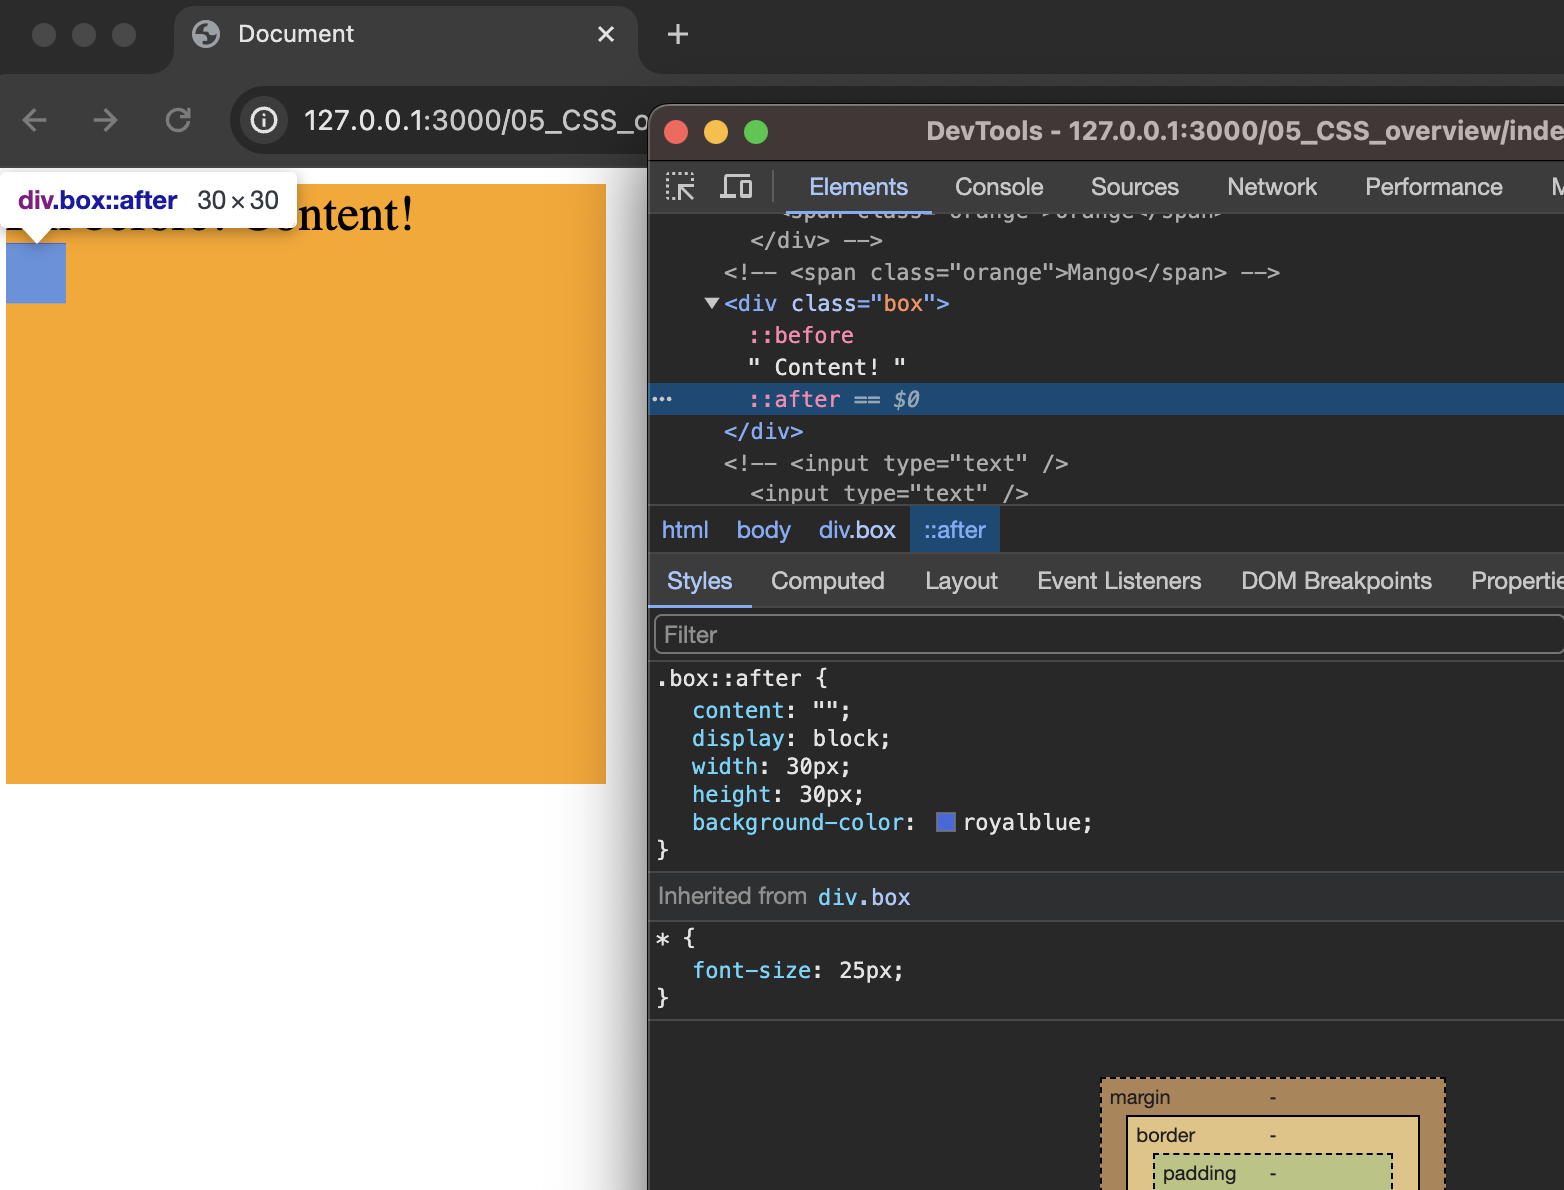
Meanwhile, if we look at the DevTool, there is no content in the ::after pseudo-element. The content is "", which means empty, but we have a property block.
An important note is that the ::before and ::after pseudo-elements are inline elements by default, so we had to change the content from an inline element to a block-level element.
By adding the block property, we can use the width and height properties, and the blue box is printed out in different lines because it is a block element.
Attribute Selector
[disabled]
The CSS attribute selector matches elements based on the element having a given attribute explicitly set, with options for defining an attribute value or substring value match.
If we want to select elements with unique attributes like disabled, we could use this selector.
[type]
In the case of the input element, the type attribute is required, and the selector [type] will select all of the input.
It is not commonly used because we can’t select the elements we want unless the attribute is unique, like the one above.
[type="password"]
This selector represents elements with an attribute name of type whose value is exactly password.
If we want to select a particular element among the same attribute name, we can use this selector.
Example of attribute selectors
Let’s see the actual result of the above selectors in the web server.
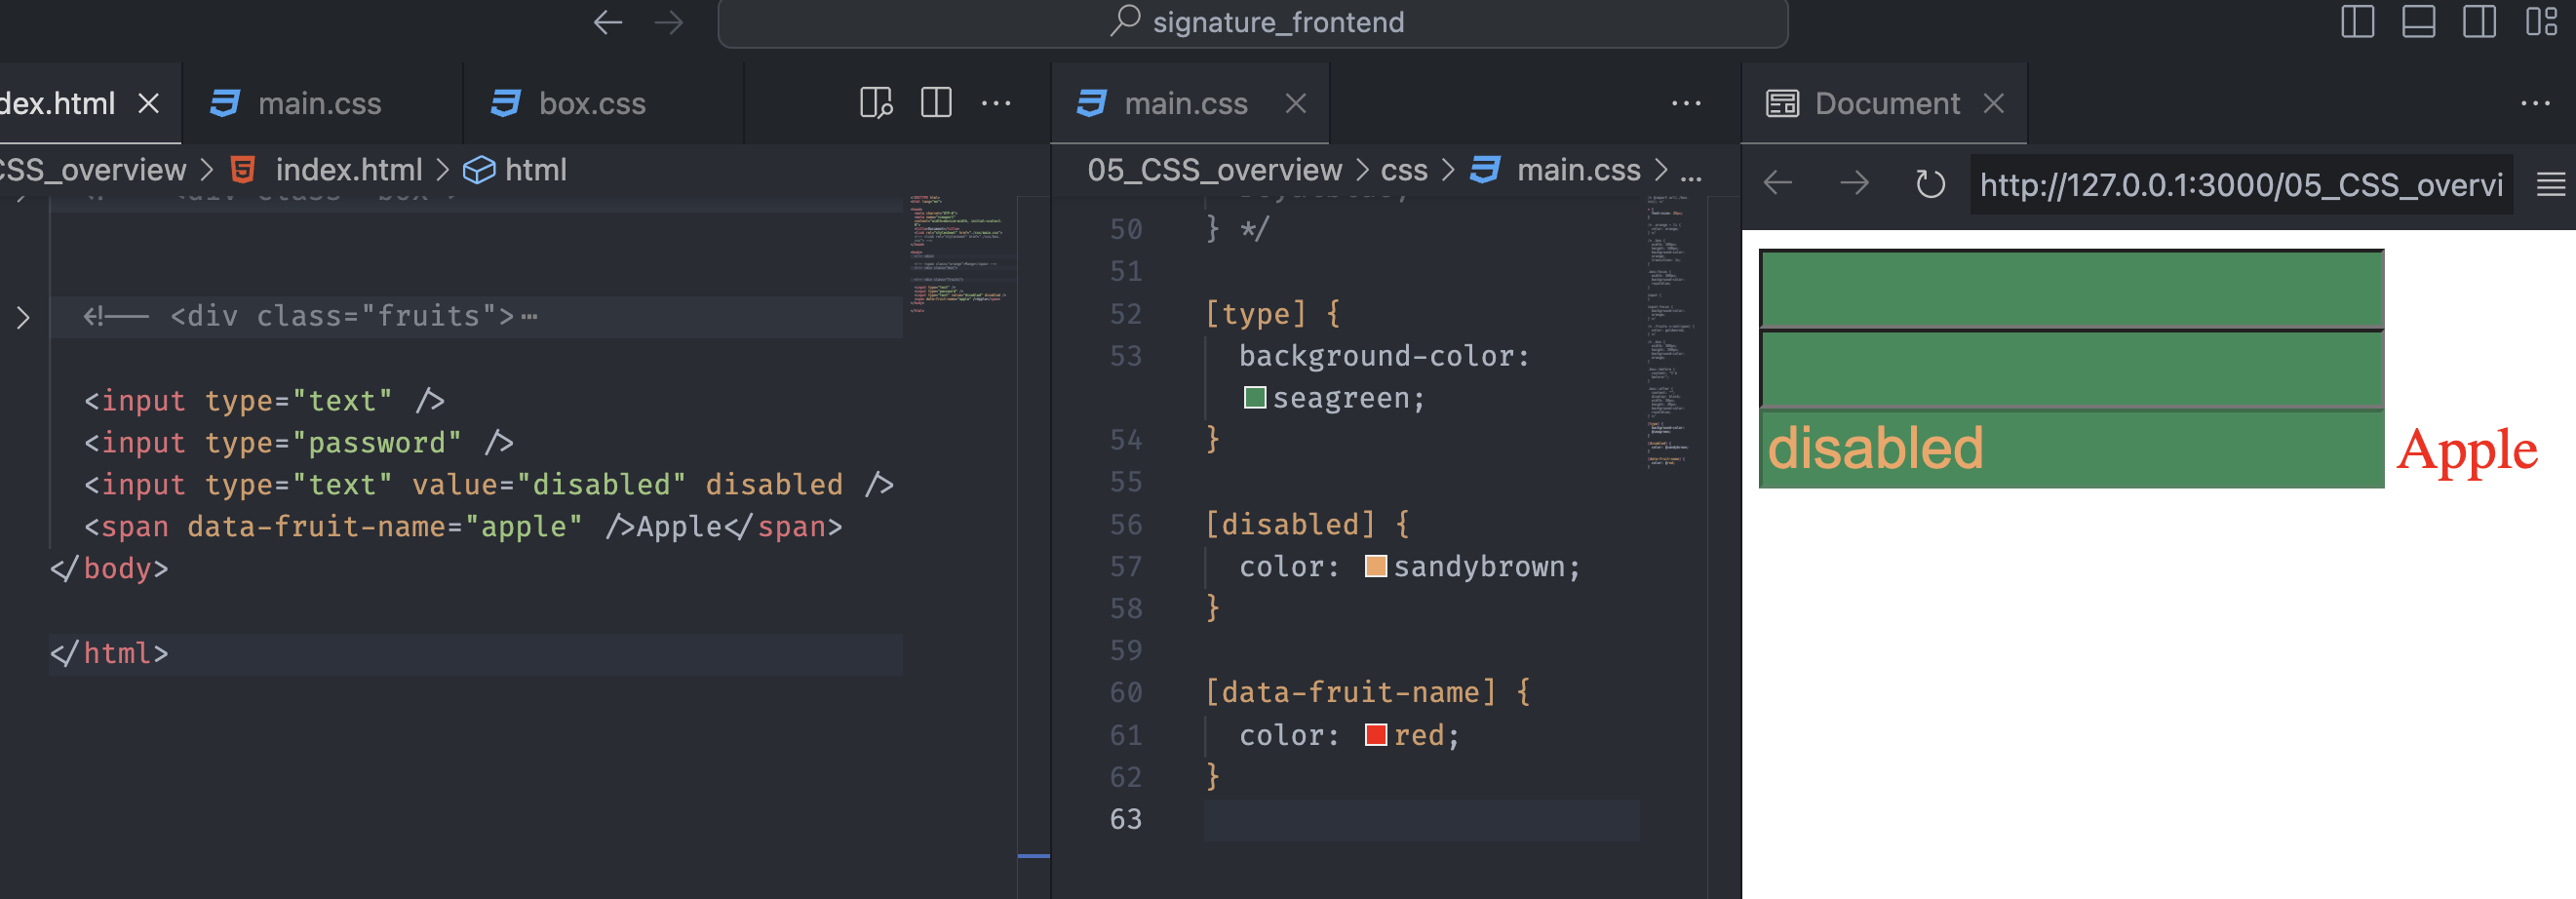
We have three input elements and one span element with the content of text Apple.
In CSS, the [type] selector selected and changed all the input elements’ background color to sea green because all the input elements have the type attribute.
The [disabled] selector changed the text color or the value text color to sandy brown from the default gray color.
The data-fruit-name selector represents another special attribute since it is unique. We can easily modify the content’s style by selecting a unique attribute.
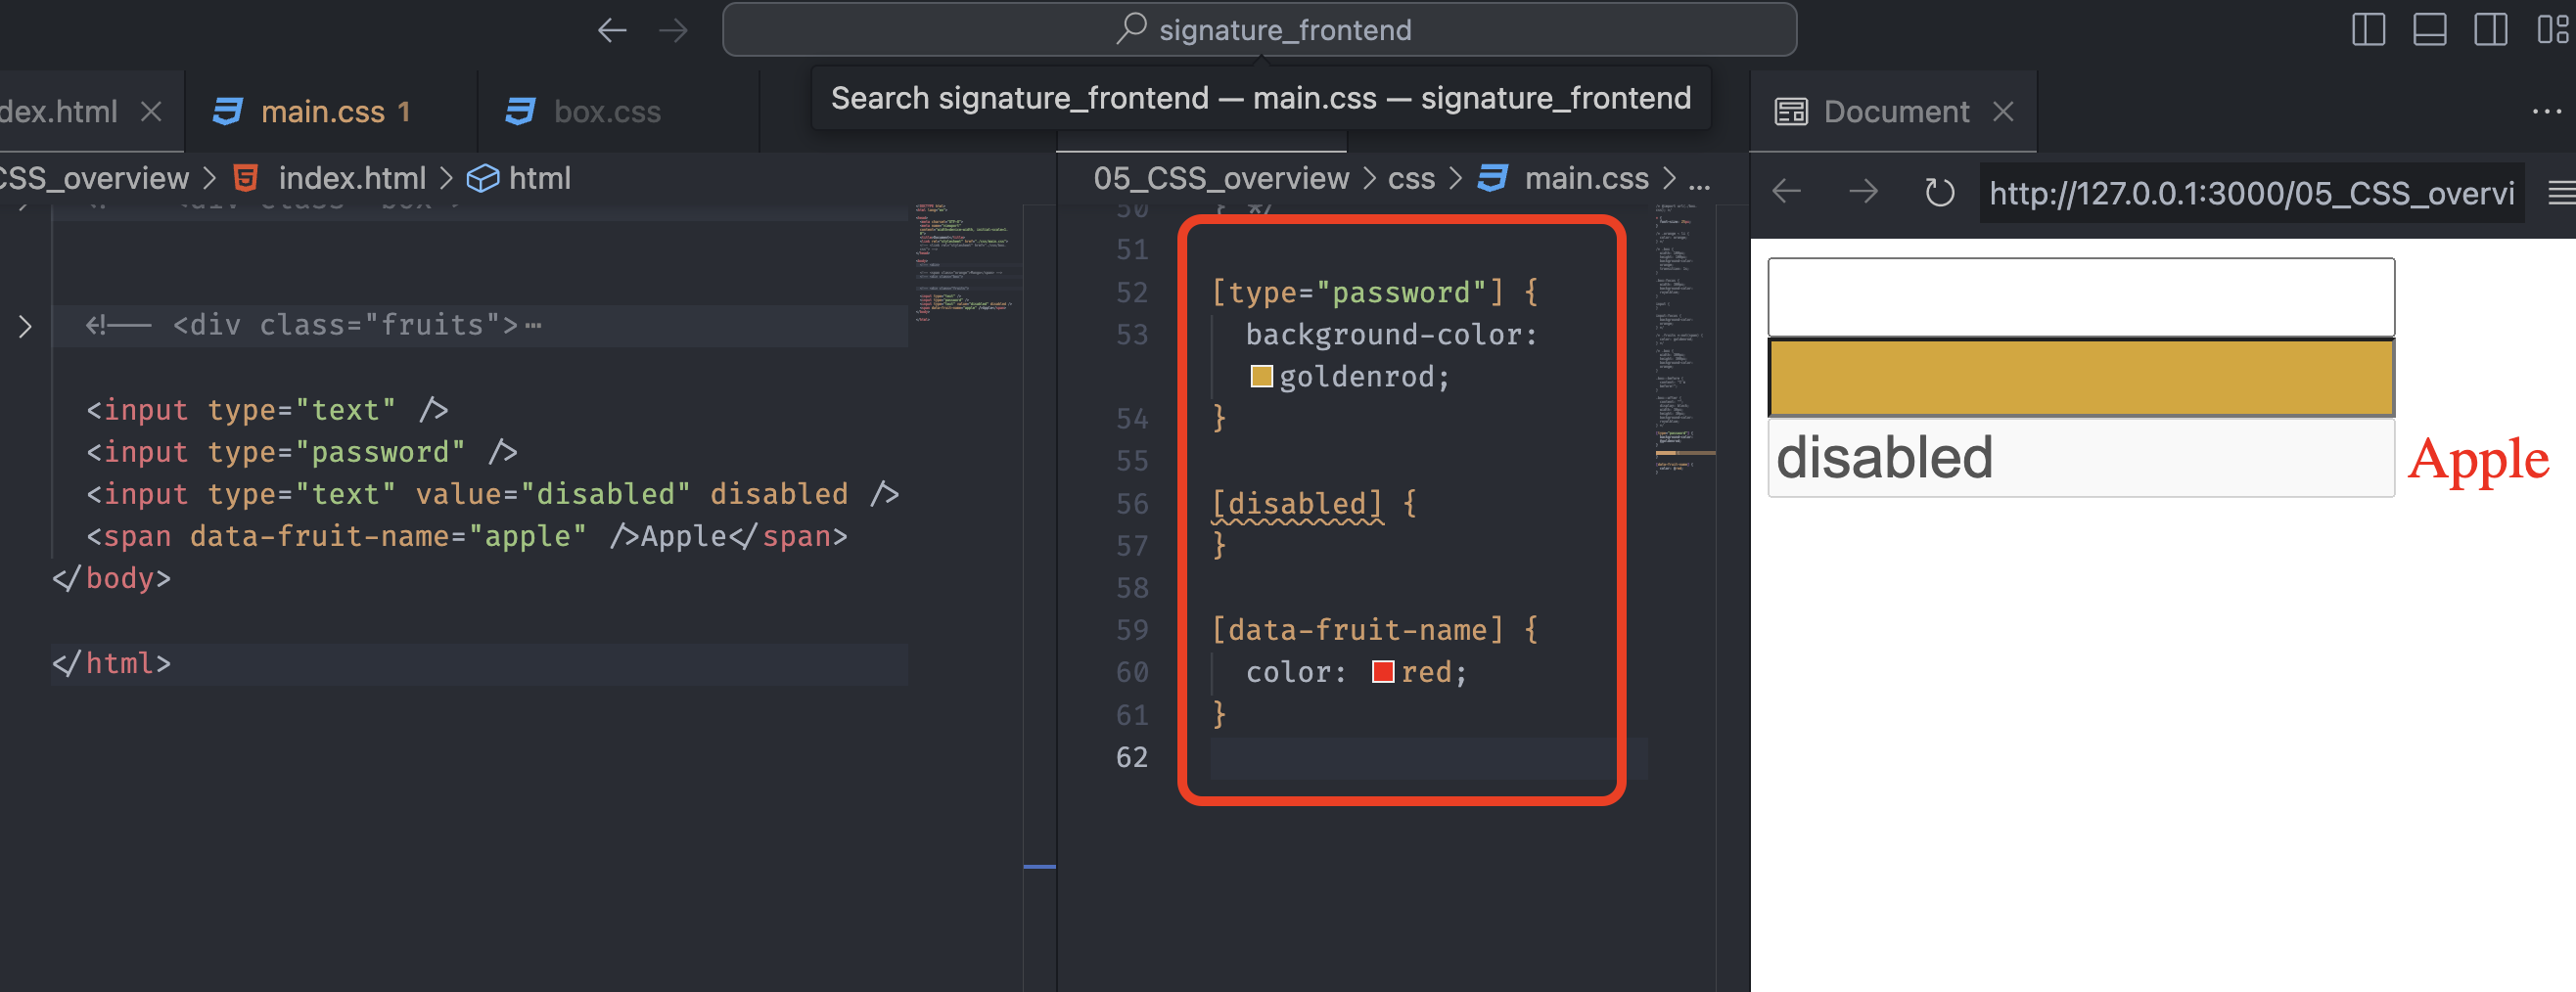
If we change the selectors like above, the [type="password"] selector only selects the input with the attribute name type and the value password. Also, the color of the content disabled went back to the default color, since it has no property.
Style Inheritance
Inheritance
In CSS, inheritance controls what happens when no values are specified for a property on an element.
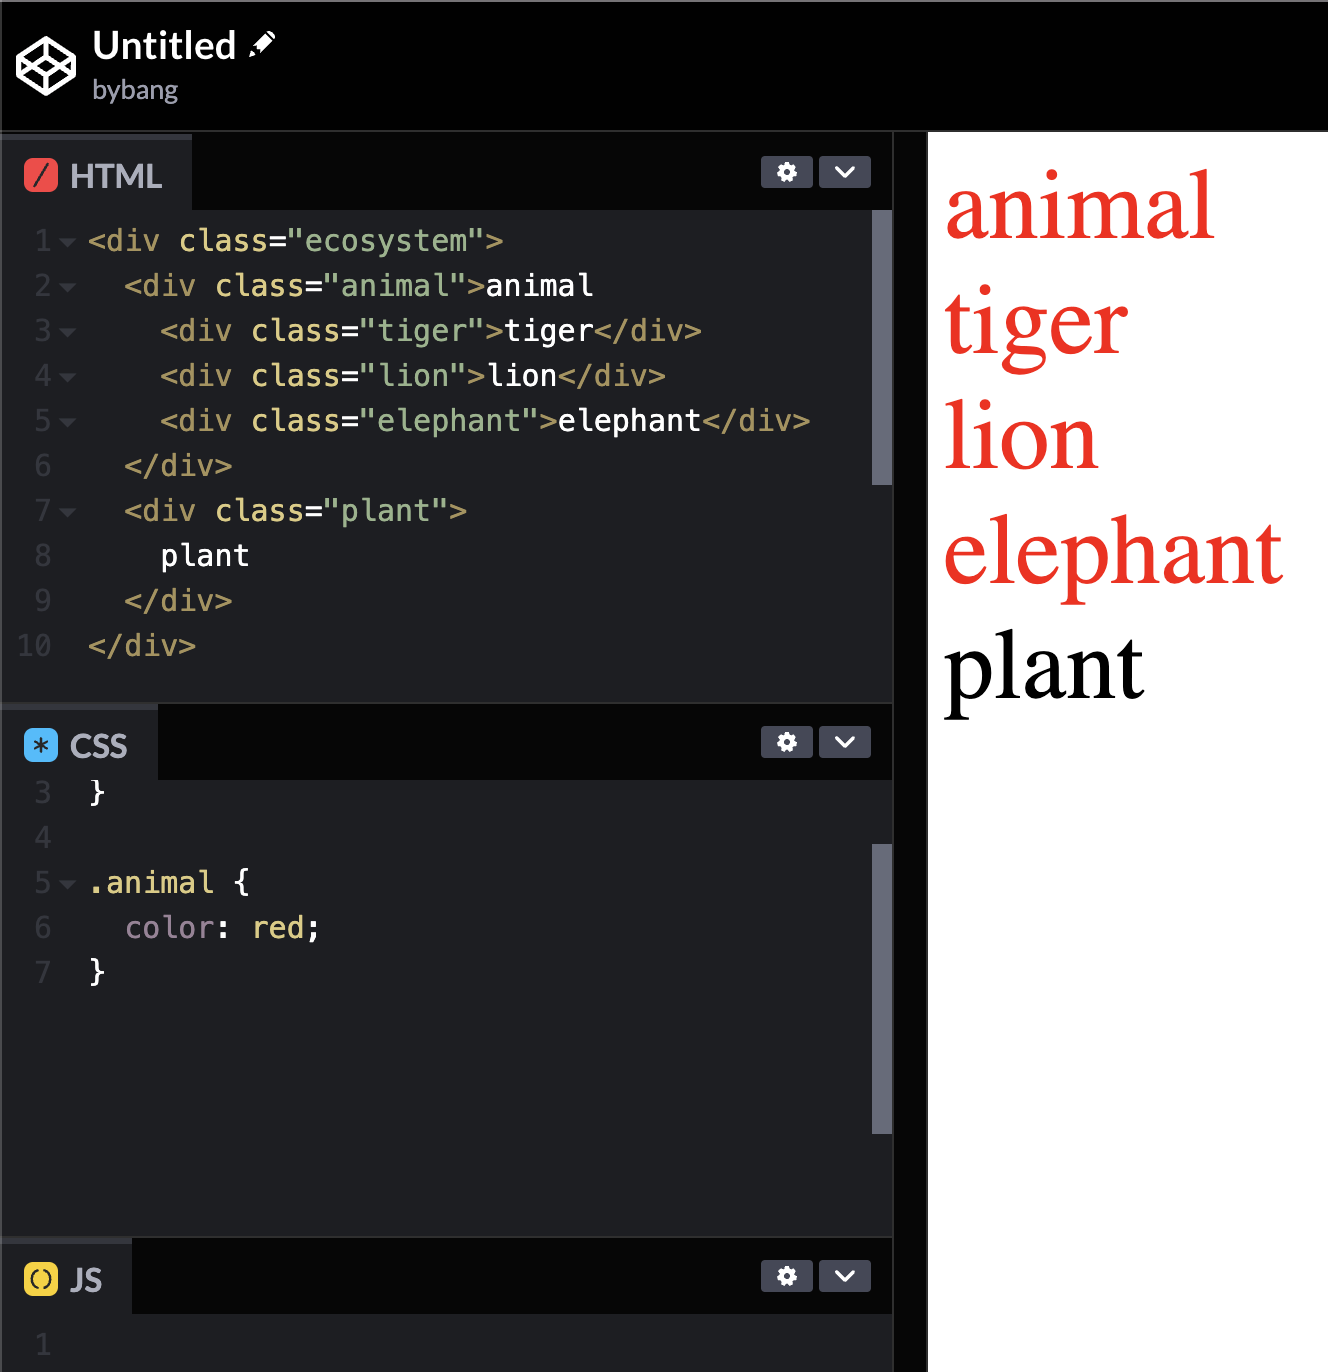
When we see the left side, the element name animal wraps all the animal elements, and only the element that has the name animal has the color property.
However, not only the text animal, but also all the child elements have the same color as the animal element.
This happens because the parent element’s style affects all the descendant elements, and we call it style inheritance.
Inherited properties
The CSS properties can be categorized into two types, which are inherited and non-inherited properties.
When no value for an inherited property has been specified on an element, the element gets the computed value of that property on its parent element.
In general, the inherited properties are related to the font or text. A typical example of an inherited property is the color, text-align, line-height or font-size properties.
Inherit
The inherit keyword allows us to specify inheritance explicitly. It works on both inherited and non-inherited properties.
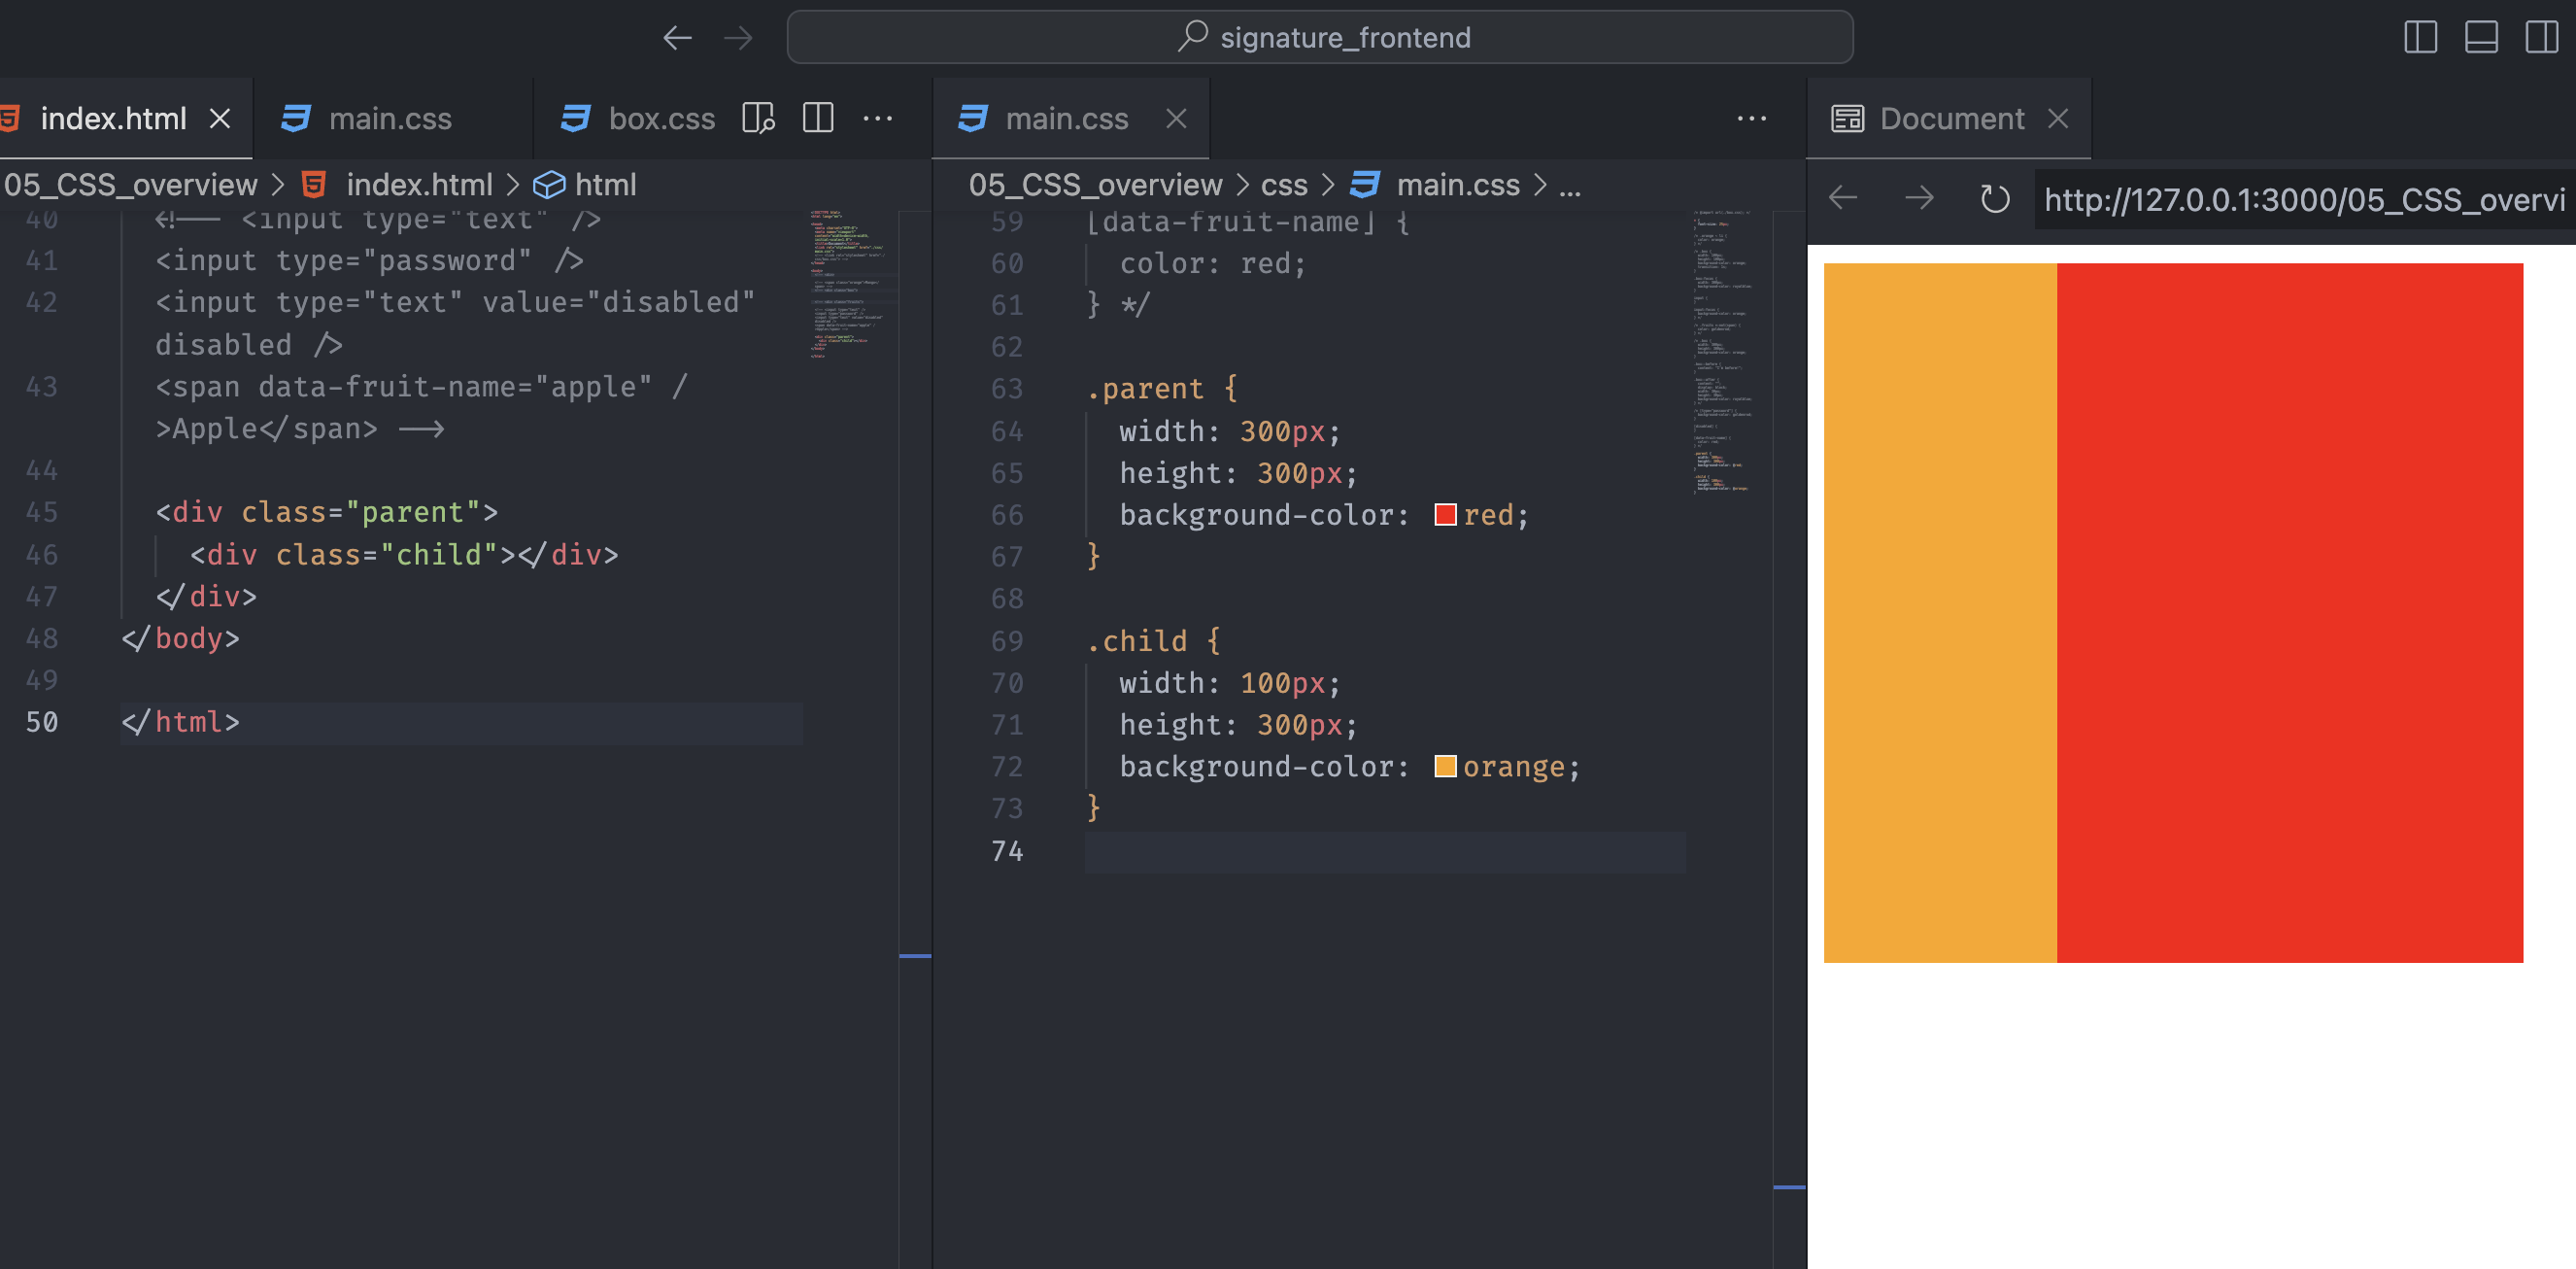
There are parent and child boxes with different color and widths. Suffice it to say we always want the box height the same, and we have to change it.
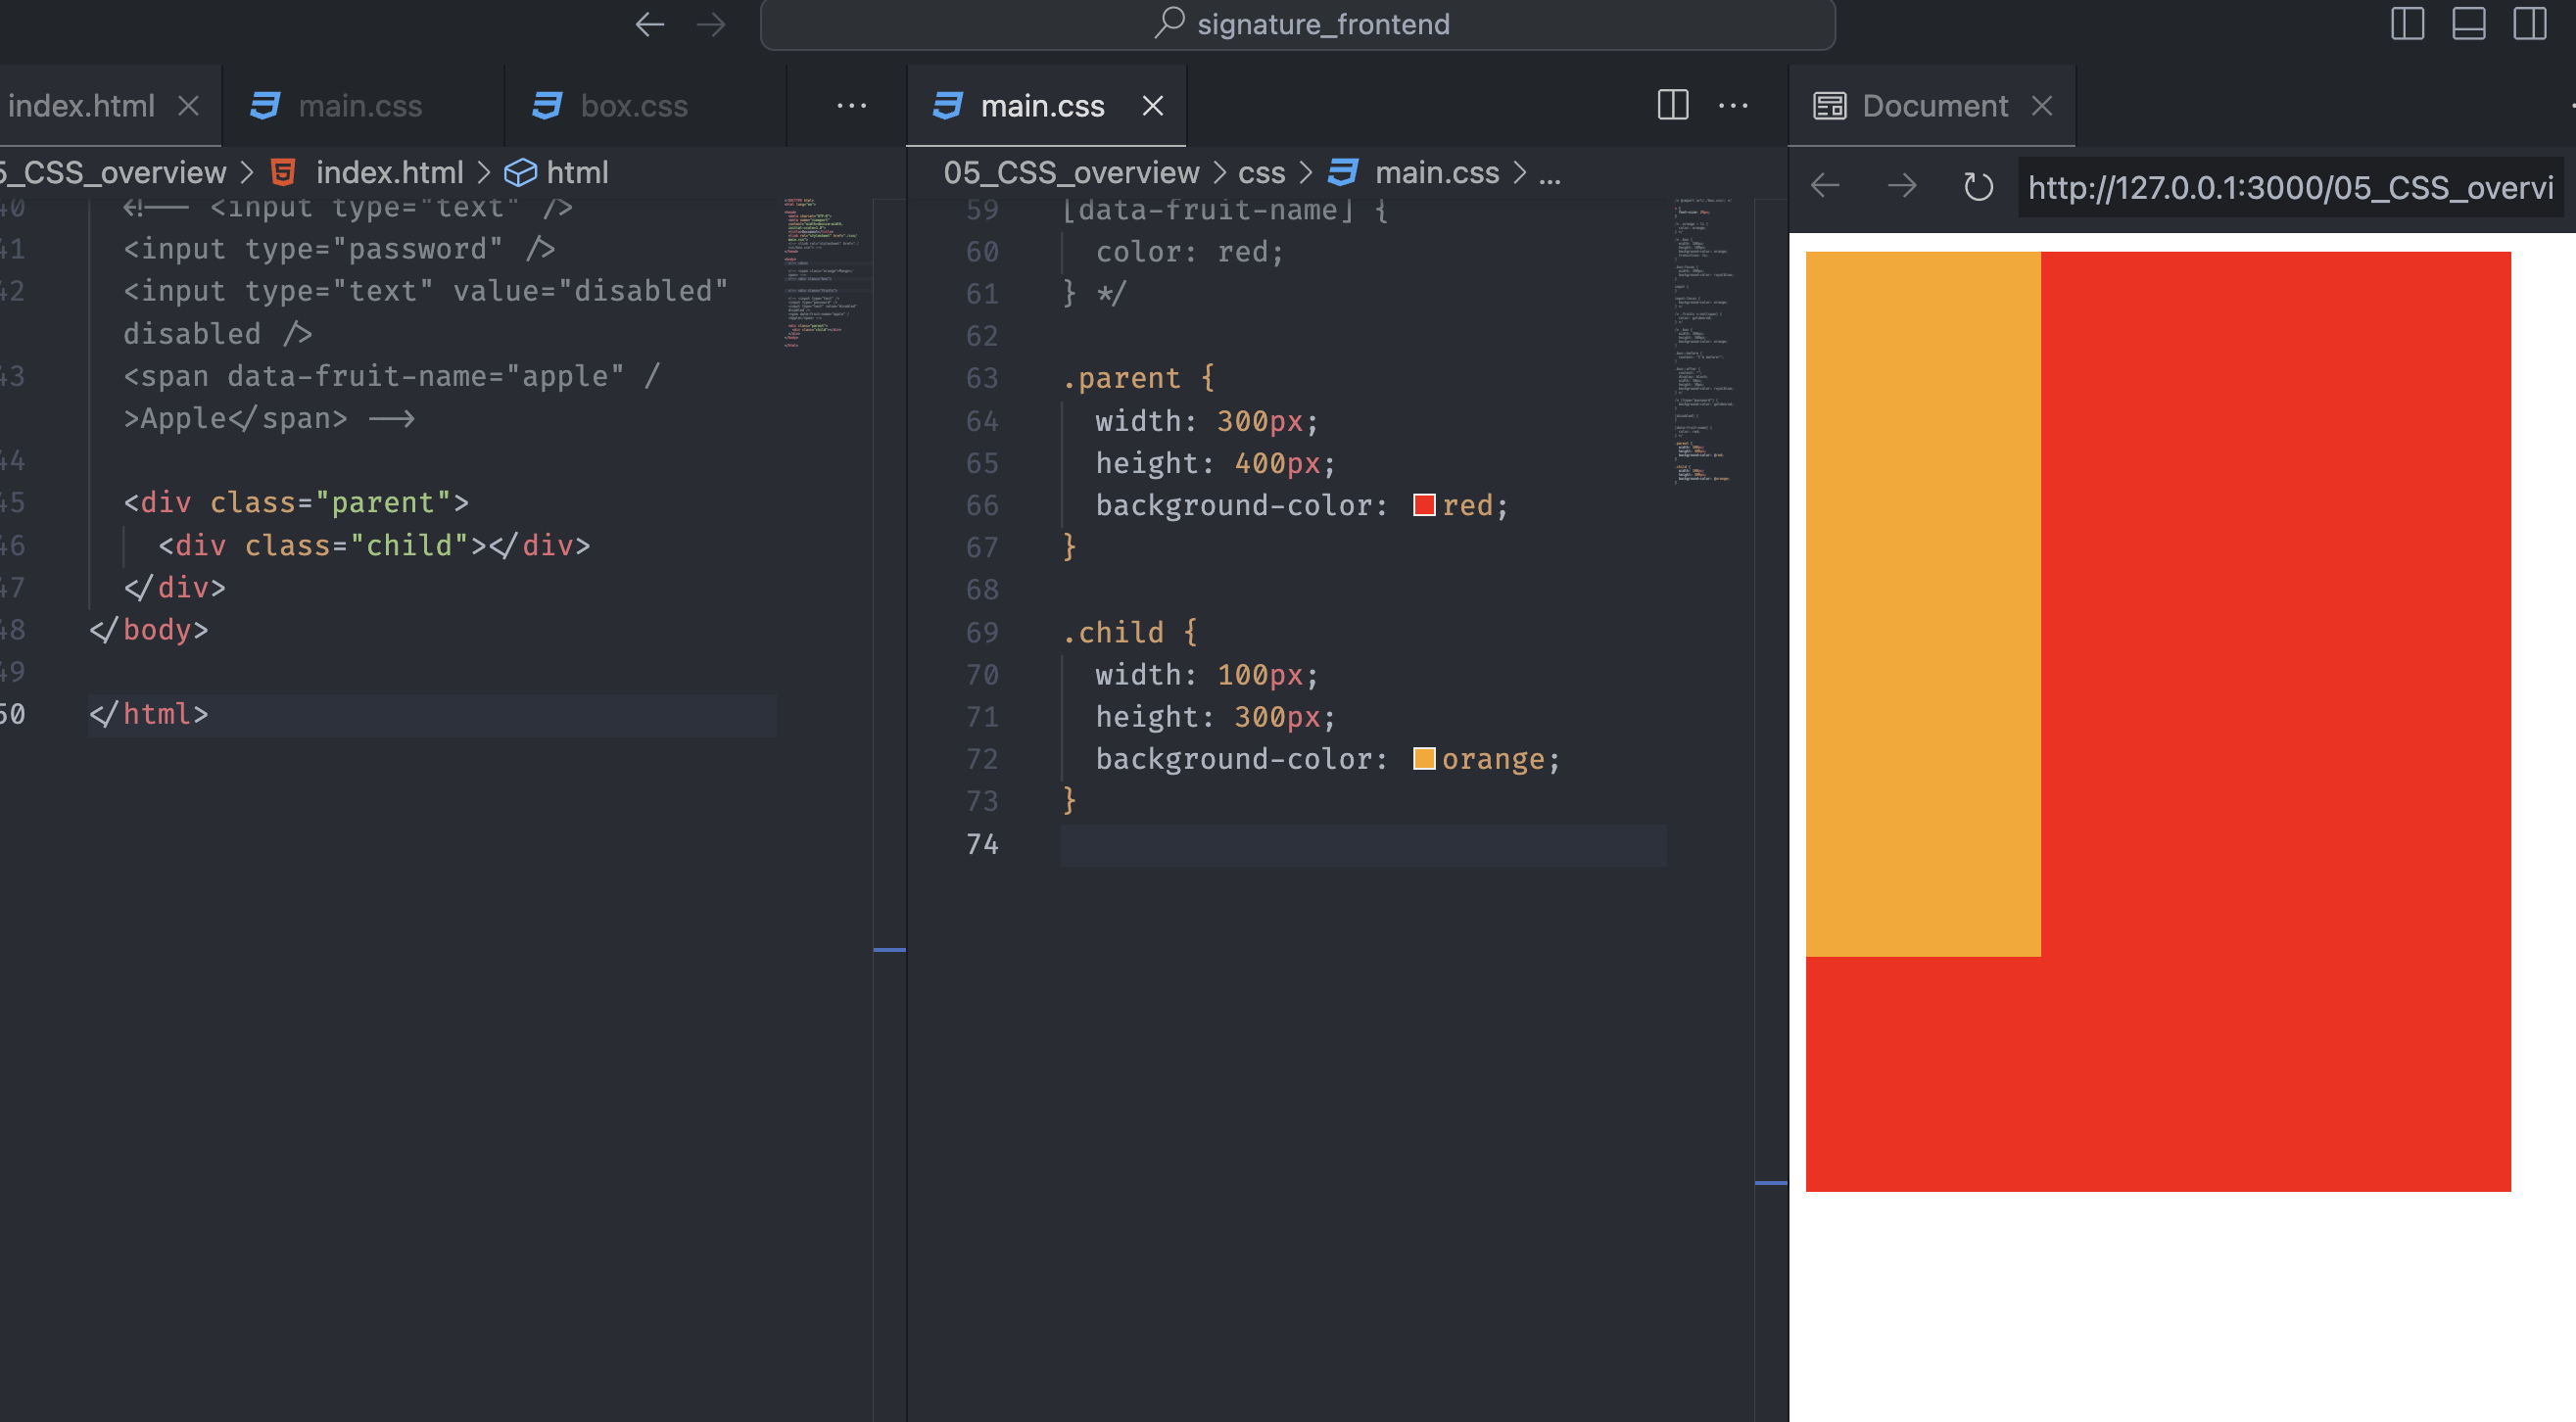
However, if the code gets complex, we might miss changing the child box’s value and end up getting a weird box shape.
To avoid the error, we can use the inherit keyword.
The inherit CSS keyword causes the element to take the property’s computed value from its parent element. - MDN
The inherit can be applied to any CSS property and used when we need to override inheritance.
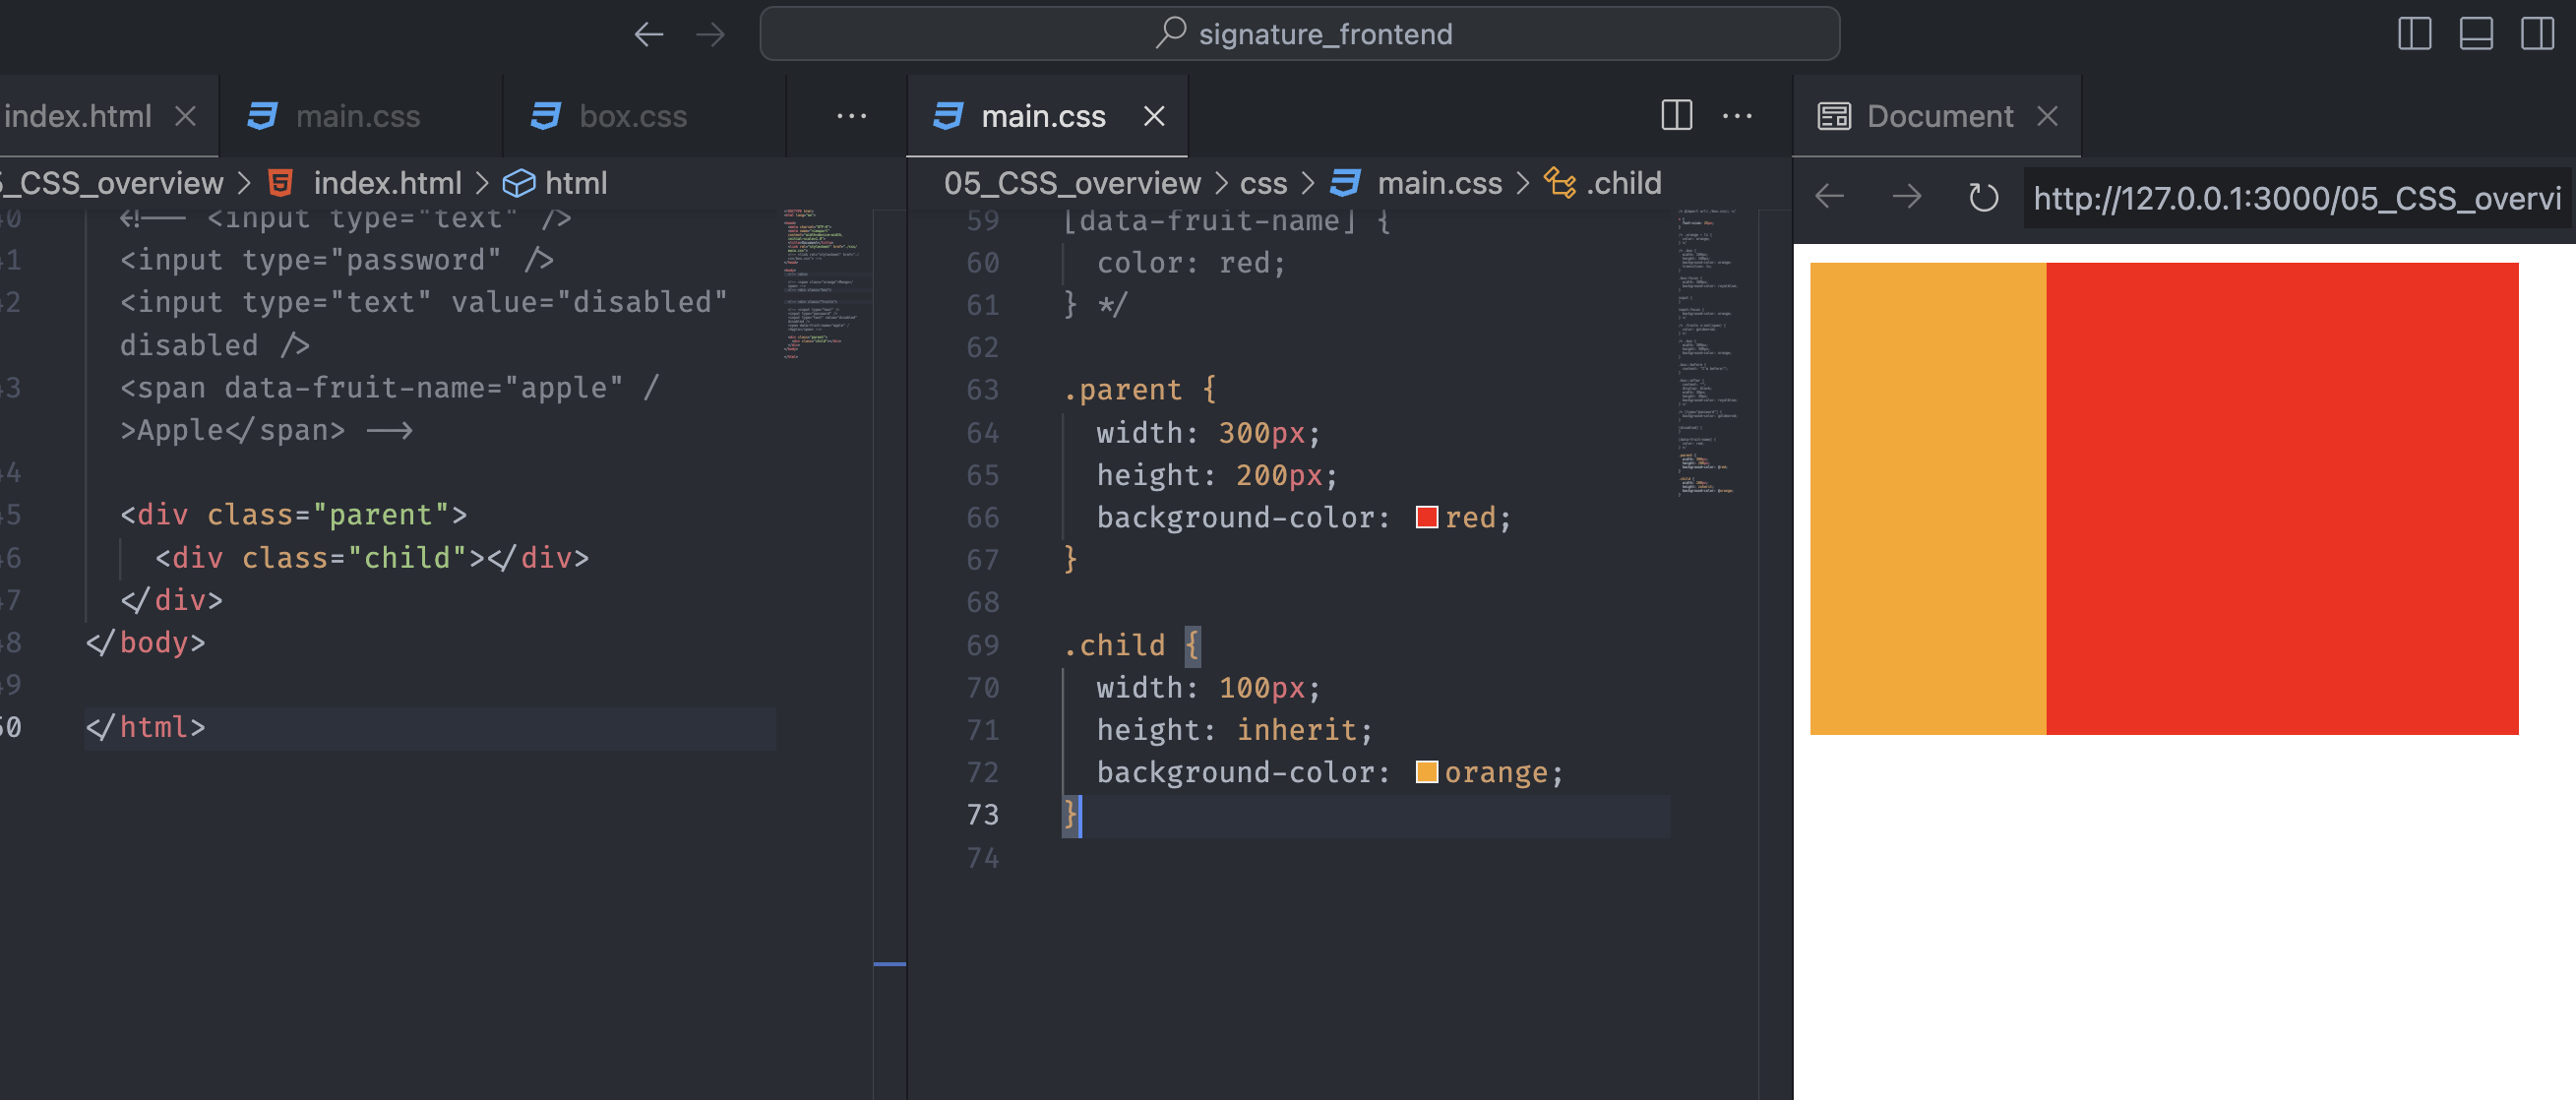
By adding the inherit keyword, we can see the child box shares the same height value with its parent element.
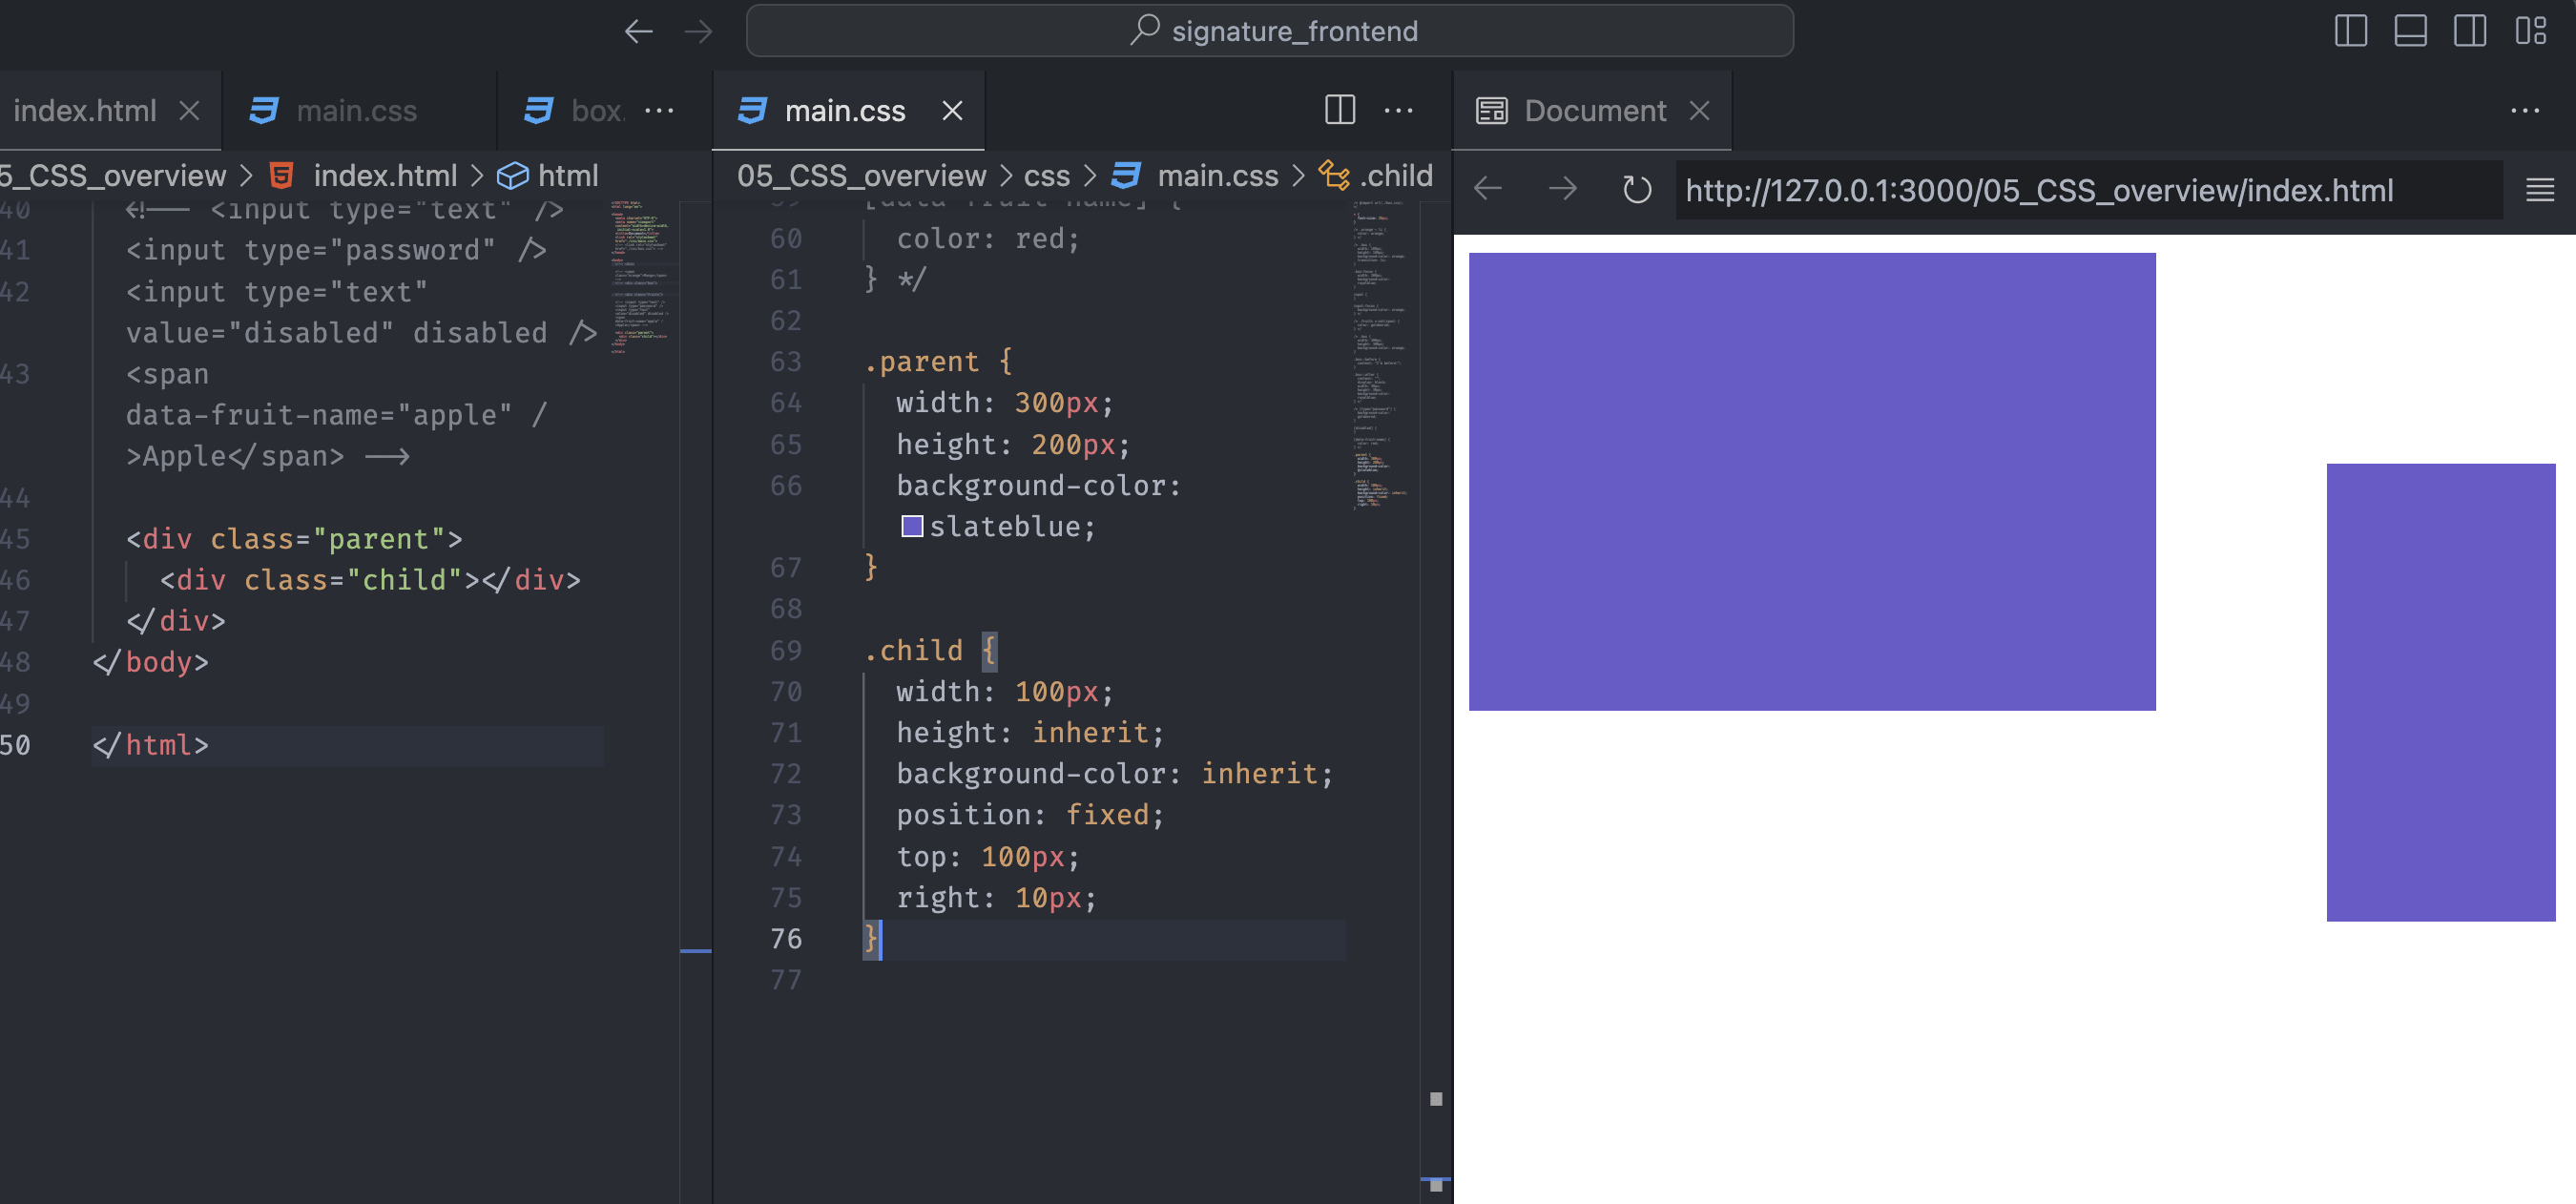
Also, we can use the non-inherited properties like the above picture. Notice that the height and the background-color properties are not related to the text(non-inherited), but we can use those values with the keyword inherit.
If you are interested in inheritance, more information will be on the above MDN page above or this page.
CSS Specificity
Specificity definition
Specificity is the algorithm used by browsers to determine the CSS declaration that is the most relevant to an element, which, in turn, determines the property value to apply to the element.
The specificity algorithm calculates the weight of a CSS selector to determine which rule from competing CSS declarations gets applied to an element.
Specificity calculation
The specificity algorithm is basically a three-column value of three categories or weights - ID, Class, and Type - corresponding to the three types of selectors.
-
ID column Includes only ID selectors, such as
#myID. Add1-0-0 (100)to the weight value for each ID in a matching selector. -
CLASS column Includes class selectors, such as
.myClass, attribute selectors like[type="radio"]and[lang|="fr"], and pseudo-classes such as:hover,:nth-child, and:required. For each class, attribute selector, or pseudo-class in a matching selector, add0-1-0 (10)to the weight value. -
TYPE column Includes type selectors, such as
p,h1,td, and pseudo-element like::before, and all other selectors with double-colon notation(::). Add0-0-1 (1)to the weight value for each type or pseudo-element in a matching selector. -
No value The universal selector (
*) and the pseudo-class:where()and its parameters aren’t counted when calculating the weight. Their value is0-0-0, but they do match elements. These selectors do not impact the specificity weight value.
Specificity exceptions
Inline styles
Inline styles added to an element always overwrite any normal styles in author stylesheets. Therefore, we can thought of as having the highest specificity.
The inline styles have a specificity weight of 1-0-0-0 (1000). The only way to override inline styles is by using the !important.
The !important exception
CSS declarations marked as important override any other declarations within the same cascade layer and origin.
Technically, the !important has nothing to do with specificity; it interacts directly with specificity and the cascade.
If declarations from the same origin, cascade layer conflict and one property value have the !important flag set, the important declaration is applied no matter the specificity.
For more detailed information about specificity, check out MDN document.
Specificity Examples
Let’s look at some specificity examples and see the actual result of the styles depending on the specificity.
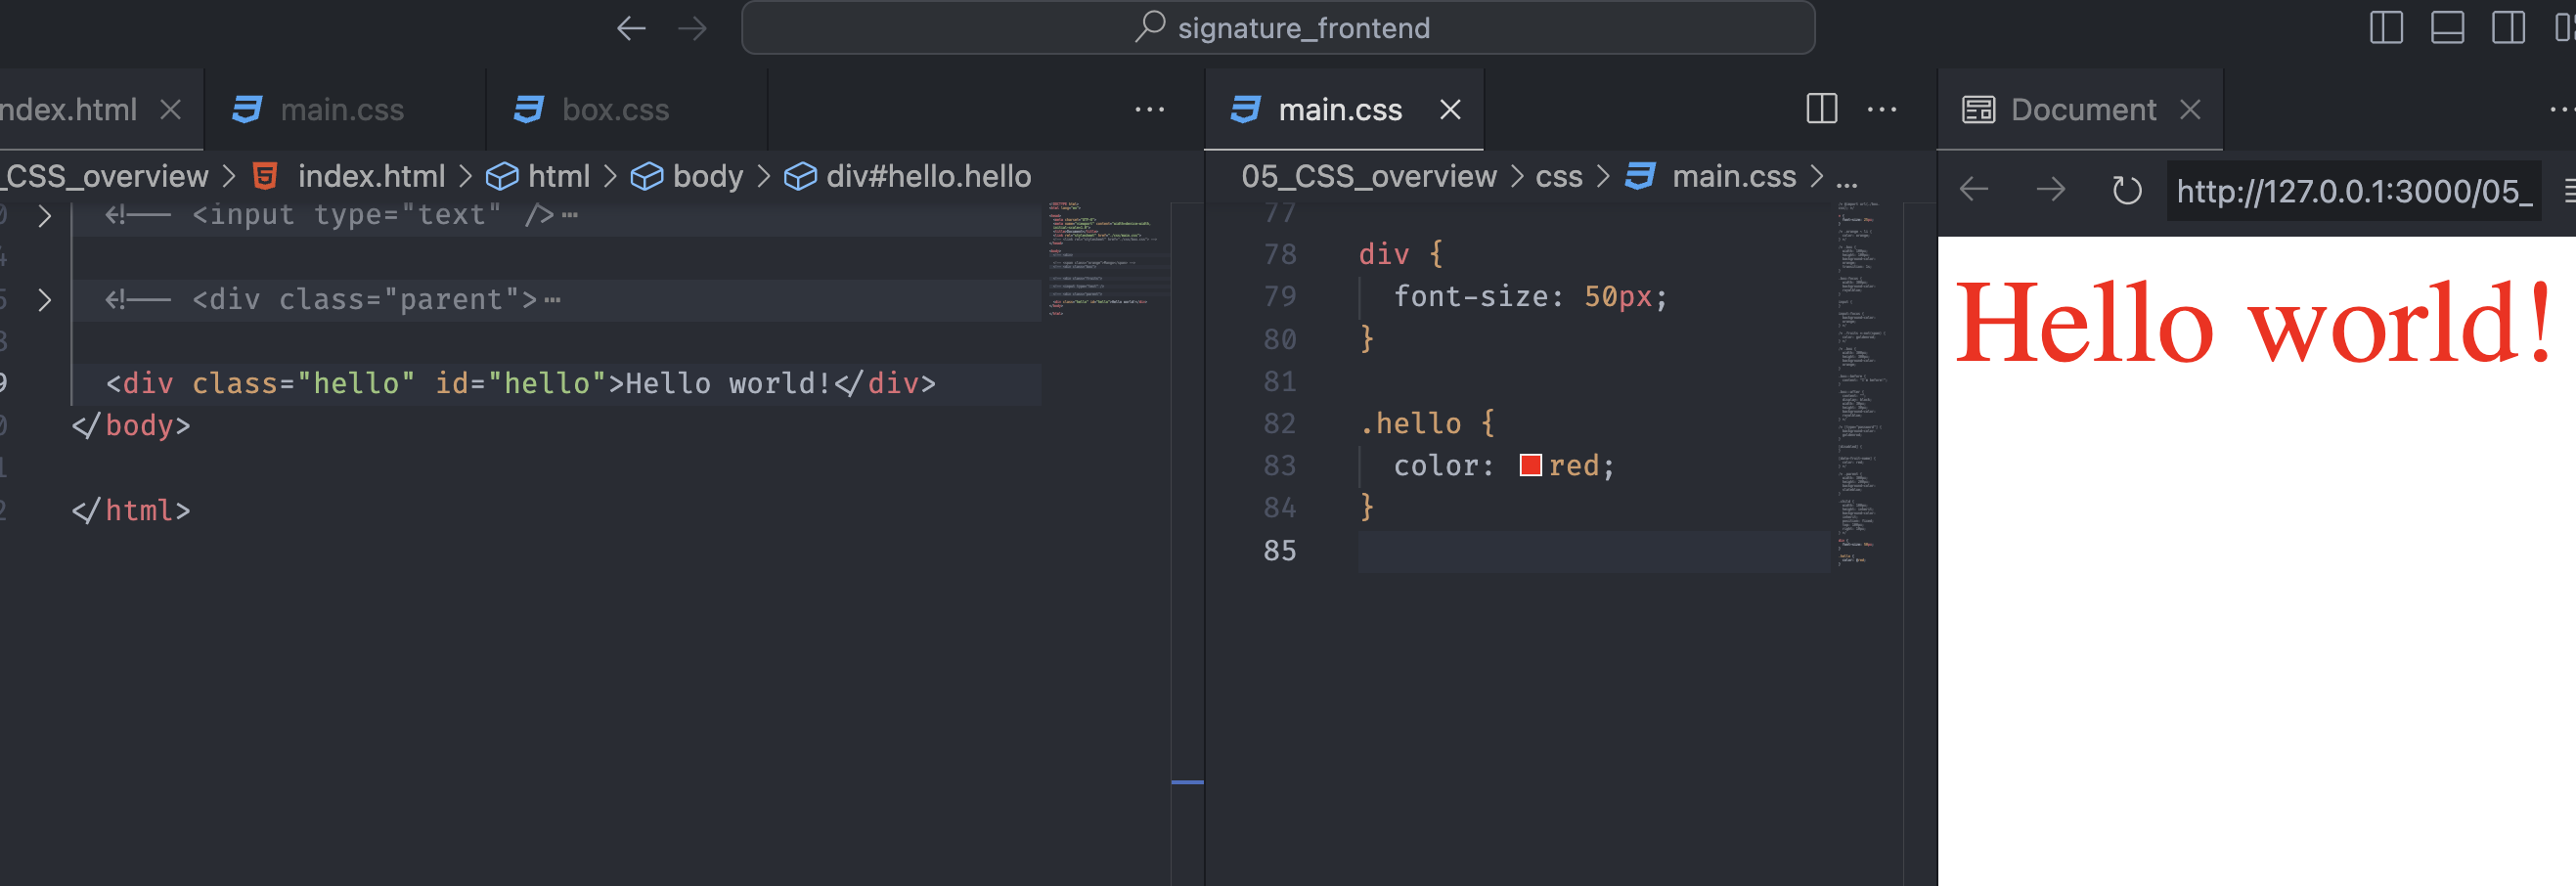
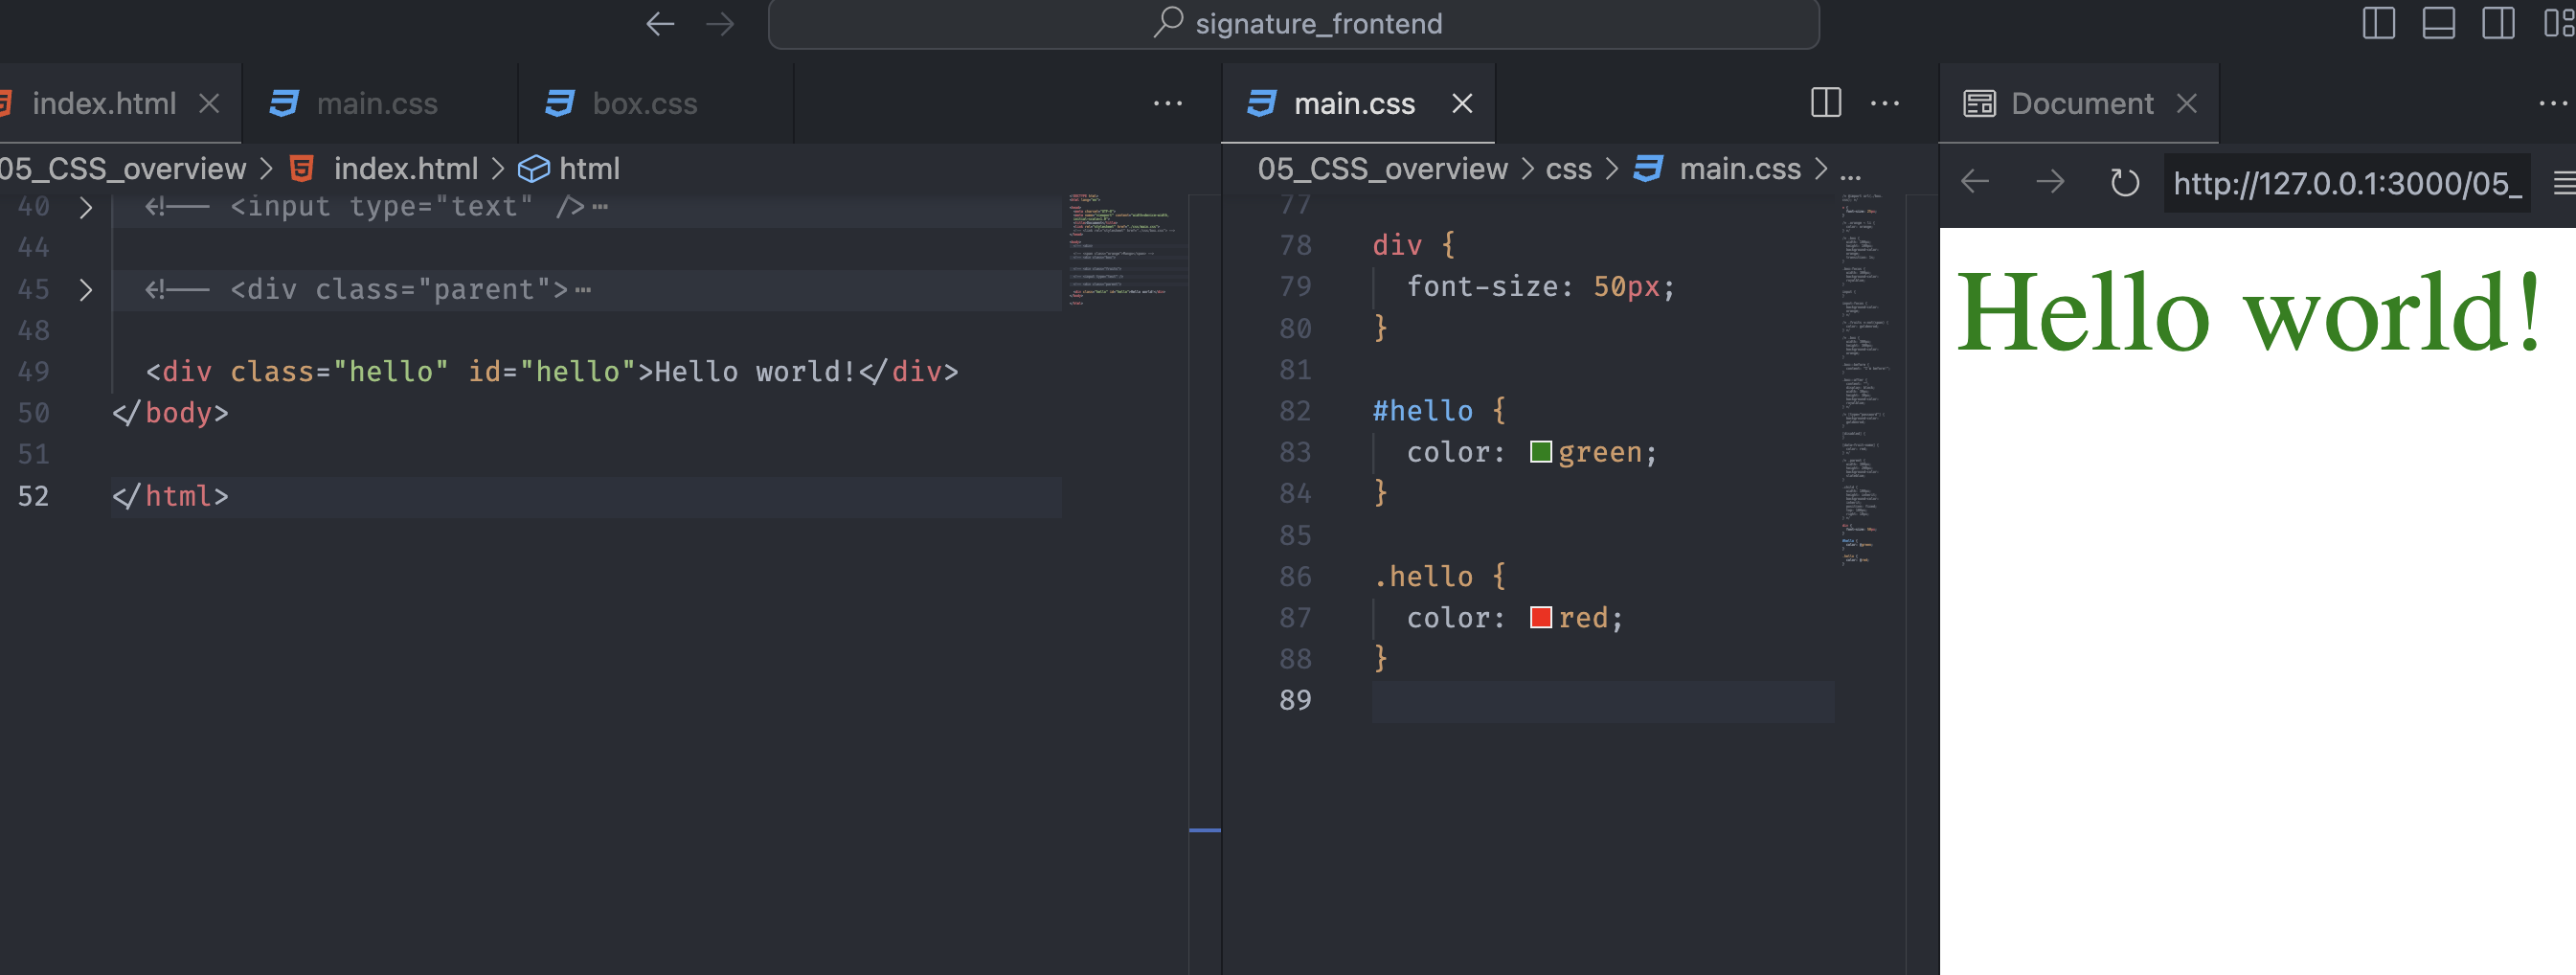
Notice we have a div element with the class and id name hello. The class .hello has the red color property. We will set this as a default state and see the changes.
The above picture has two different selectors. Each selector competes and is compared by weight. The selector with the greater value in the ID column wins regardless of the values in the other columns.
The ID column weight is 1-0-0, while the class column is 0-1-0. Therefore, the content is colored green.
The order of the style does not matter in this case because the ID column has a high priority.
The bottom-most style takes precedence if multiple CSS styles are applied to the same element.
When we reverse the order of the two selectors, we can see the style has changed to a red color.
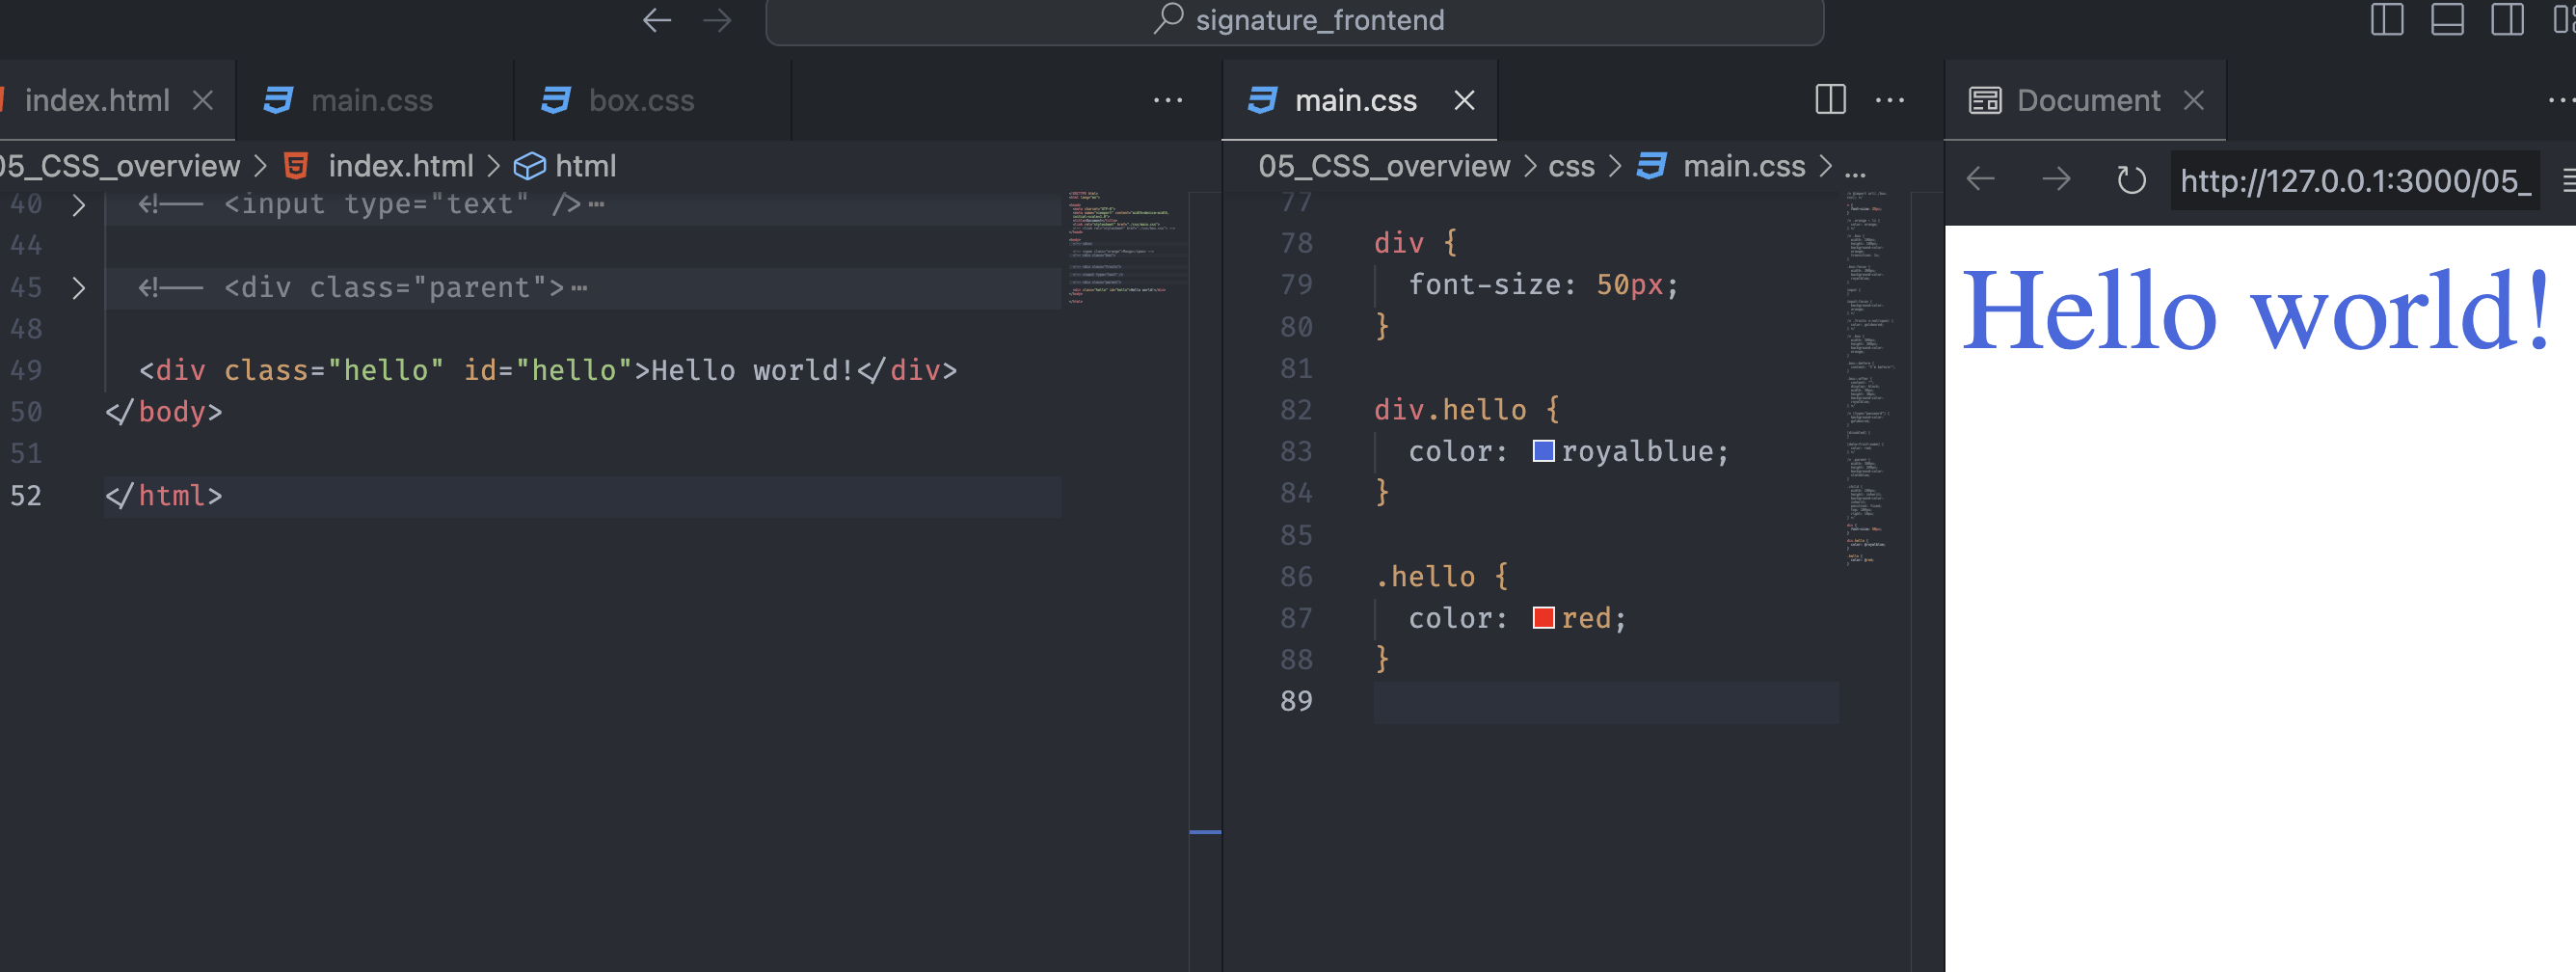
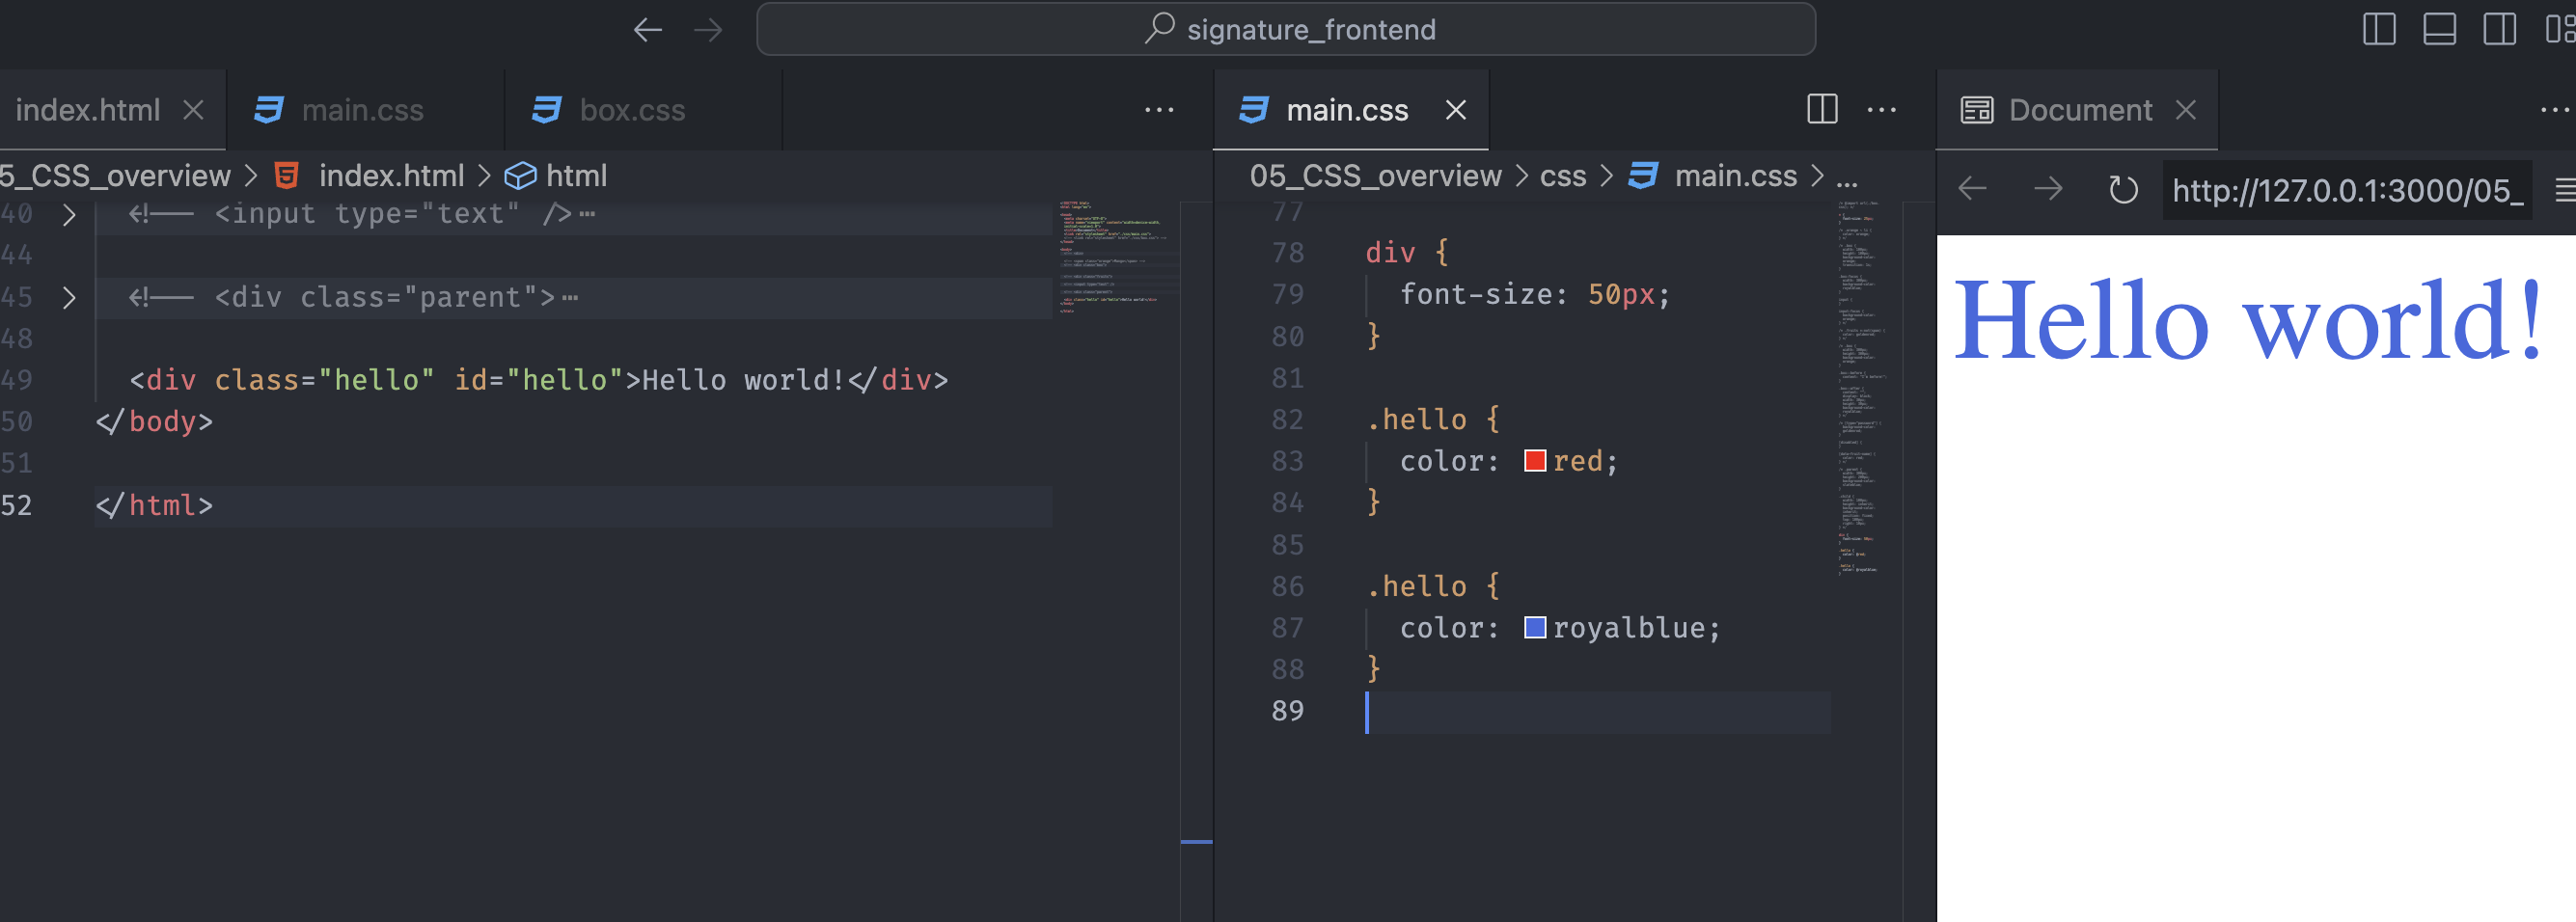
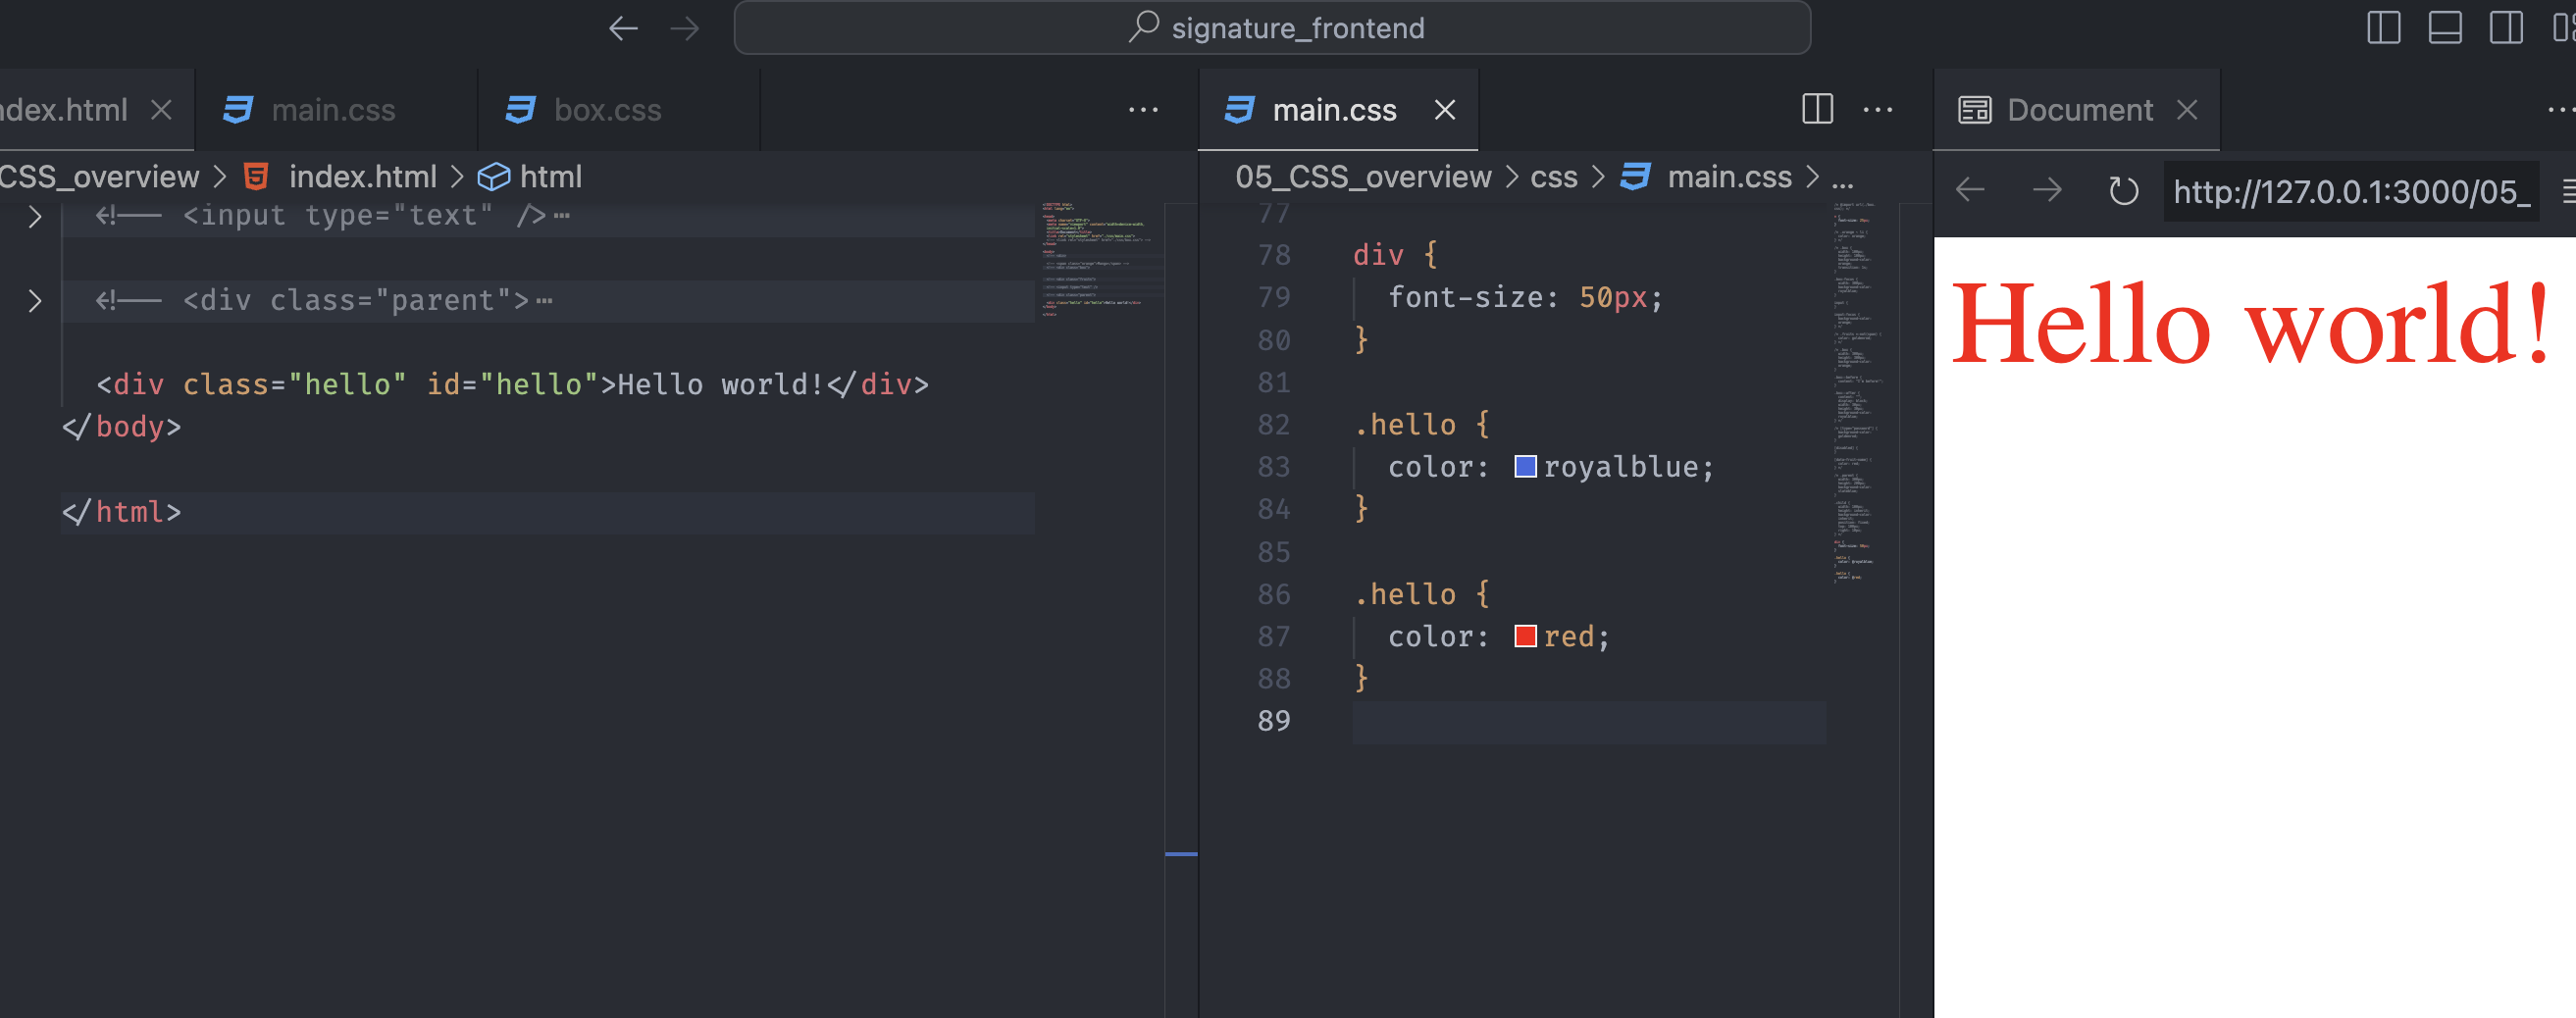
Notice that we added a type selector div in front of the class selector .hello. As we calculate the weight of two selectors, the div.hello selector weights 0-1-1 (11) and the .hello selector weights 0-1-0 (10).
As a result, the content is colored with the royal blue.
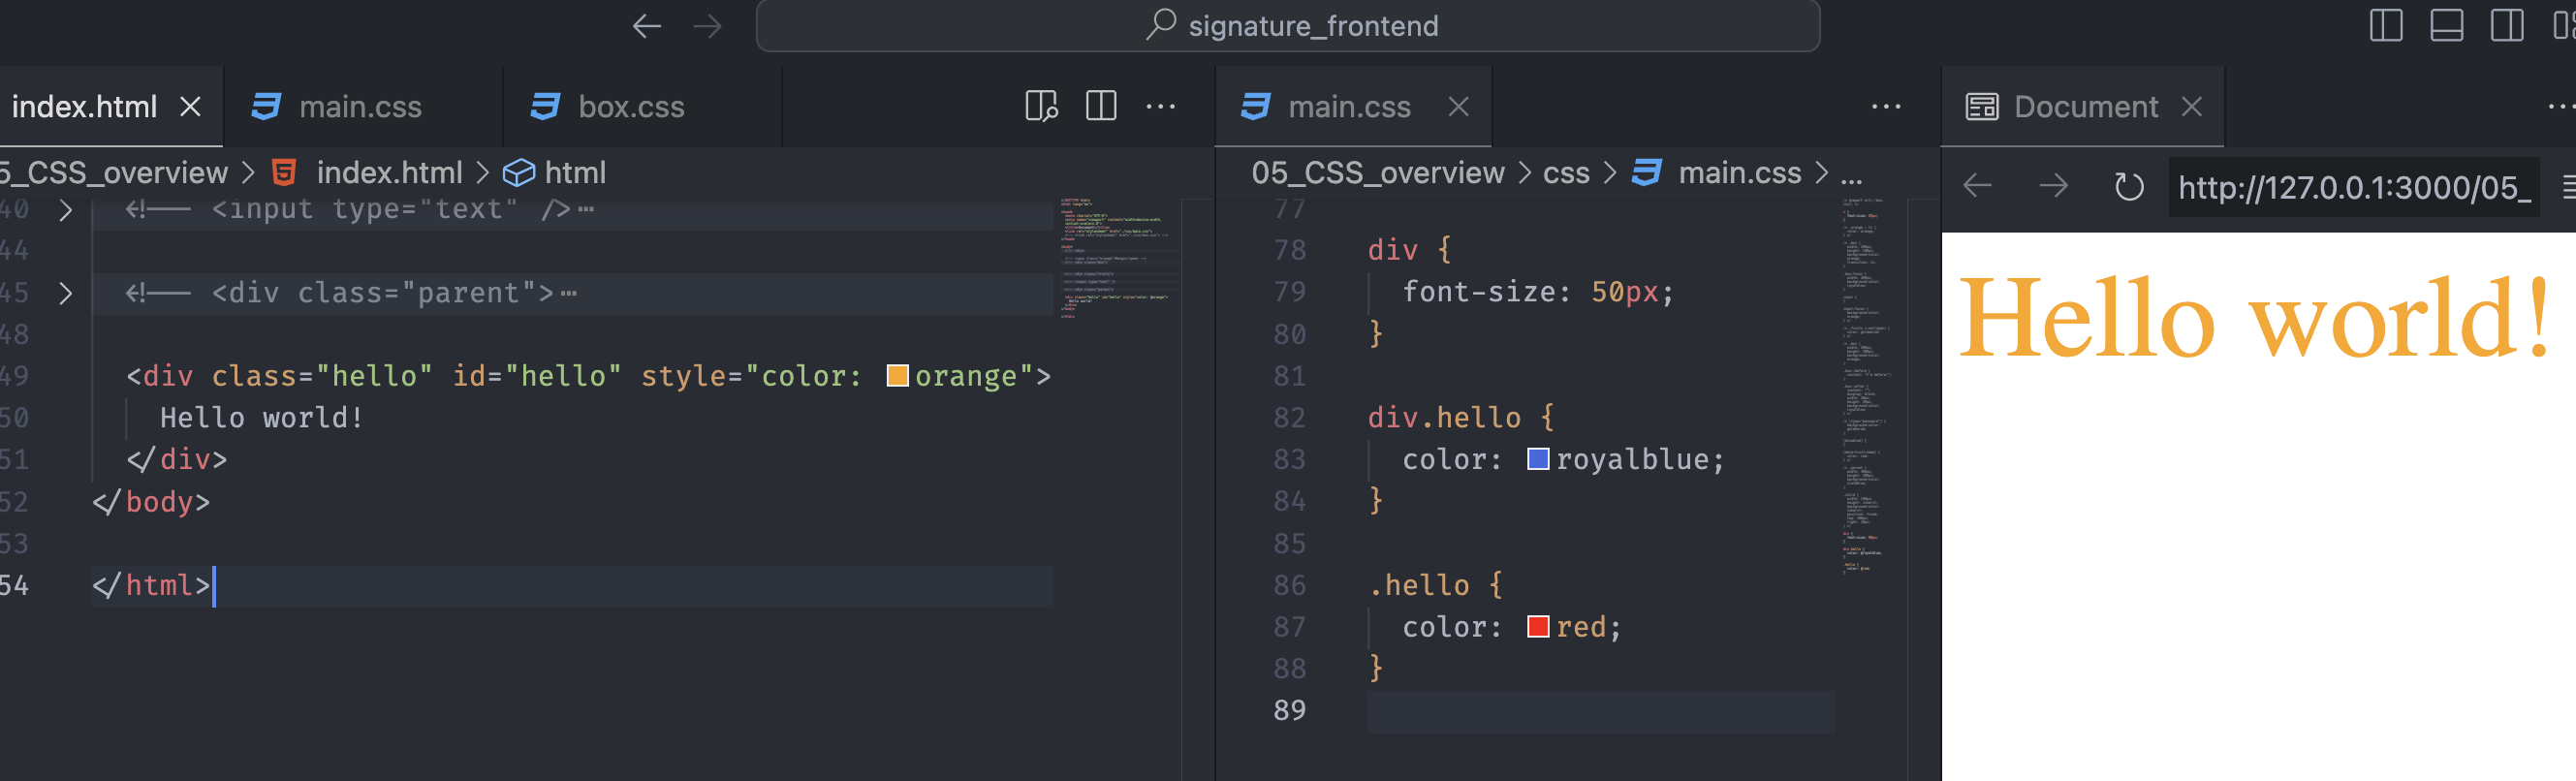
If we add the inline style to the div element in the HTML document (style="color: orange), the orange color is applied to the content. The weight of the inline style is 1-0-0-0 (1000), which is the highest value.
We should avoid using inline styles because they have such high weight and will always overwrite any normal styles in stylesheets.
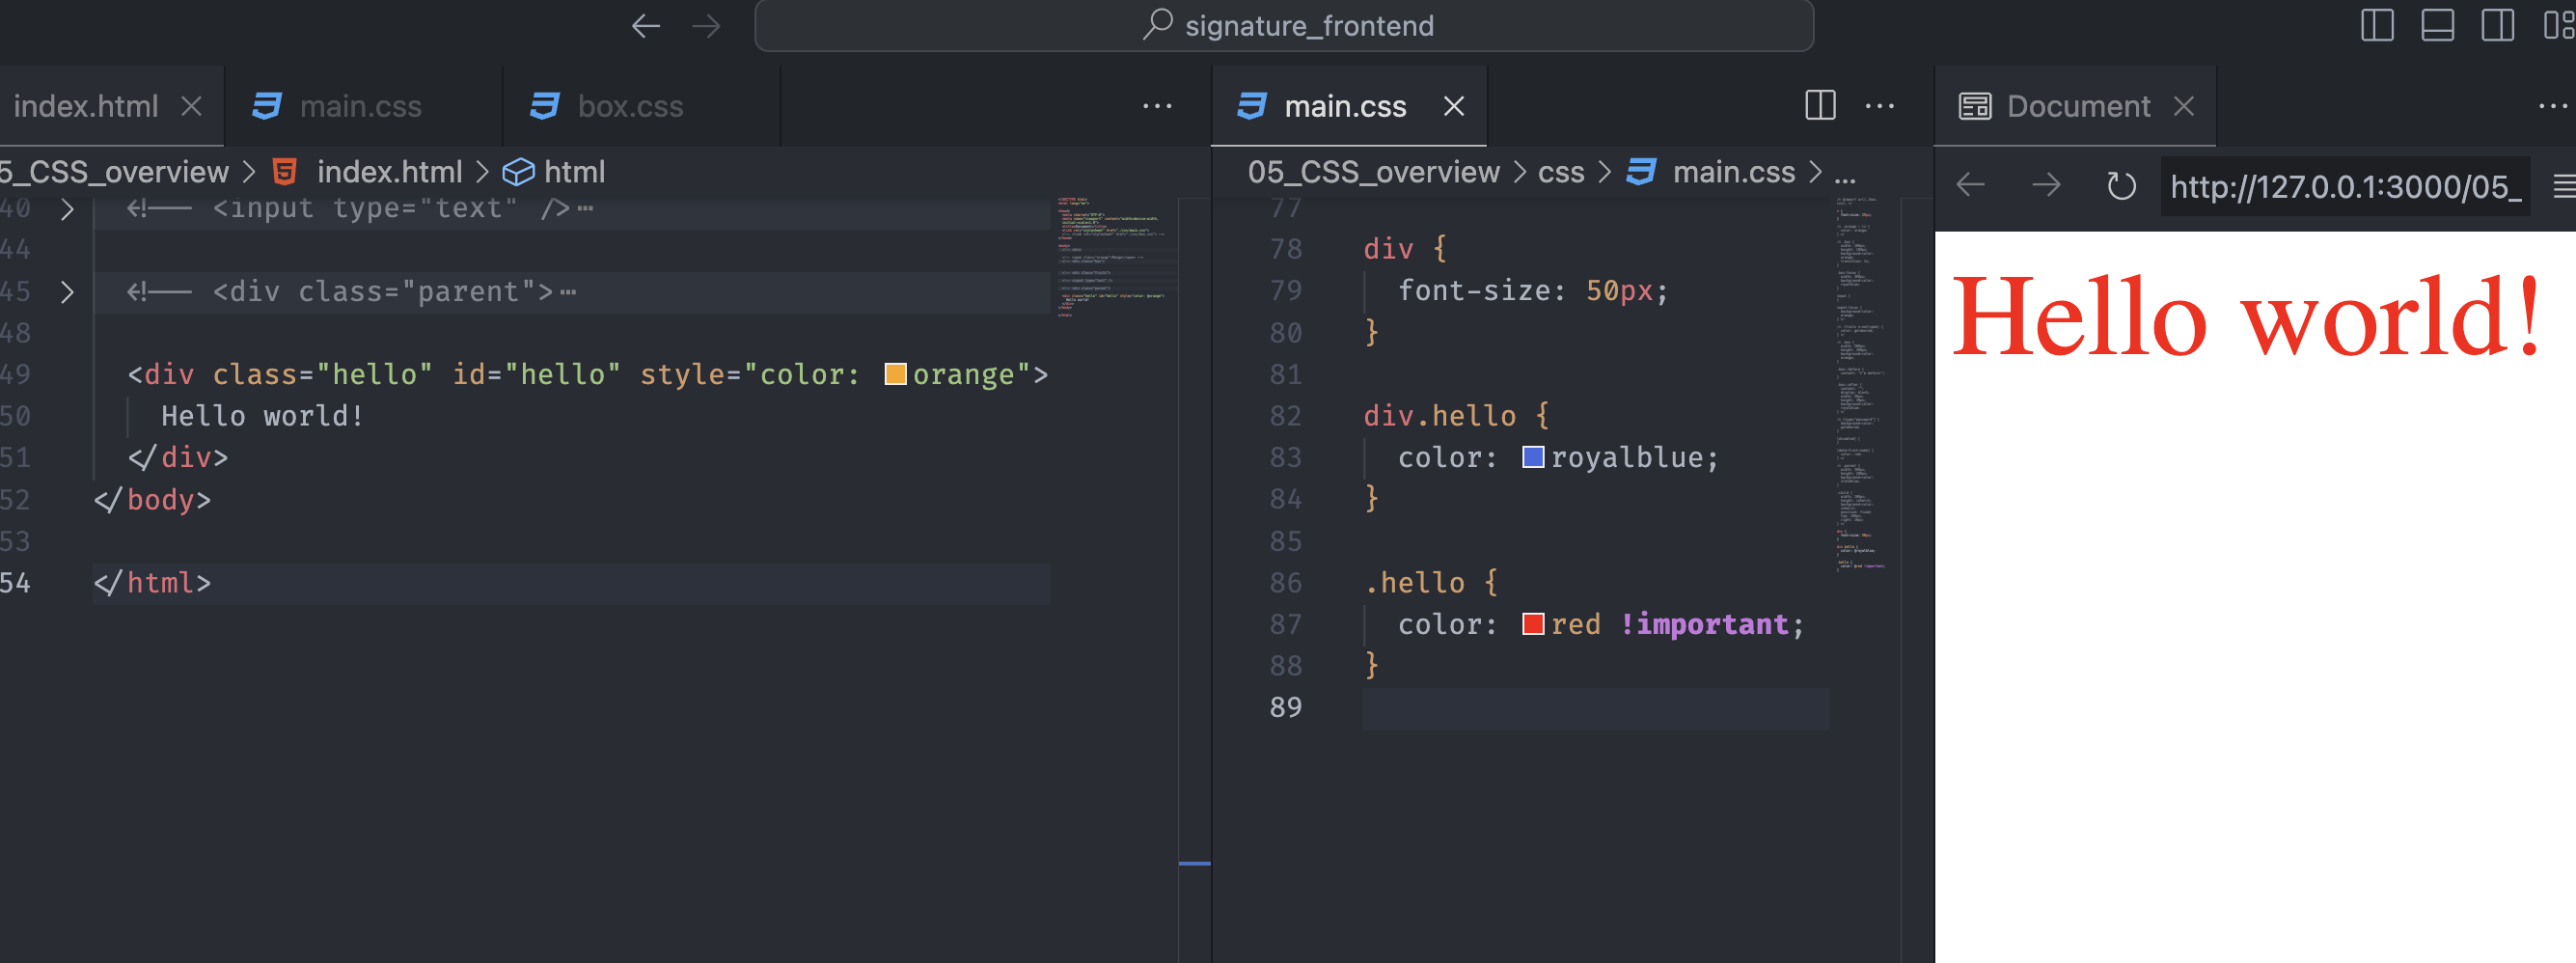
Finally, as we learned, we can override the inline style only with the !important. The last class column, .hello, has the keyword !important, and the red color is applied to the content.
Using !important to override specificity is considered a bad practice and should be avoided for this purpose.
If the !important rule must be used in CSS, it should be commented on to explain its usage. That will help future code maintainers understand why the declaration was marked as important and discourage them from overriding it.
Understanding and effectively using specificity and the cascade can remove any need for the !important flag.
📌 Takeaway
- The
:nth-child()CSS pseudo-class matches elements based on the indexes of the elements in the child list of their parents. - The
:nth-child(-n+3)will always select first three elements. - The
:not()CSS pseudo-class represents elements that don’t match a list of selectors and is called negation pseudo-class. - A CSS pseudo-element is a keyword added to a selector that lets us style a specific part of the selected element.
- The
::beforecreates a pseudo-element that is the first child of the selected element. - The
::aftercreates a pseudo-element that is the last child of the selected element. - If the
contentproperty is not specified, is an invalid value, or hasnormalornoneas a value, the::beforeand::afterpseudo-element is not rendered and behaves as ifdisplay: noneis set. - The
::beforeand::afterpseudo-elements are inline elements by default. - Adding the
display: blockproperty can change the inline pseudo-elements above to the block-level elements. - The CSS attribute selector matches elements based on an element having a given attribute explicitly set, with options for defining an attribute value or substring value match.
- The CSS inheritance determines what happens to a property when no value is specified for an element.
- When an element does not have a specified value for an inherited property, it takes on the computed value of that property from its parent element.
- The
inheritkeyword allows for explicit inheritance specification for inherited and non-inherited properties. - CSS specificity is an algorithm web browsers employ to ascertain the most relevant CSS declaration for an element, which determines the property value to be applied to the element.
- The specificity algorithm calculates the weight of a CSS selector to determine which rule from competing CSS declarations is to be applied to an element.
- ID selector adds
1-0-0 (100), the class selector adds0-1-0 (10), and the type selector adds0-0-1 (1)to the weight value. - The class column includes the pseudo-classes, and the type column includes the pseudo-elements.
- The universal selector (
*) and the pseudo-class:where()and its parameter add0or are not counted, if you will, to the weight value. - The inline styles have a specificity weight of
1-0-0-0 (1000). - The CSS declarations marked as
!importantoverride any other declarations within the same cascade layer and origin. - We should avoid using inline styles as they have a higher specificity and can override any normal styles in stylesheets.
- If the
!importantrule is necessary, it should be commented to explain its usage. That helps future maintainers understand why the declaration was marked as important and prevents them from overriding it.
💻 Solution
- None
🔖 Review
- The
:first-childCSS pseudo-class represents the first element among sibling elements. - The
:last-childCSS pseudo-class represents the last element among sibling elements. - The
:nth-child()uses a zero-based numbering in the parentheses and selects the elements corresponding to the given number. - The attribute selector uses square brackets (
[]) and uses type or type and a value or a unique attribute likedisabledordata-*. - When the parent element’s style affects all the descendant elements, we call it style inheritance.
- The inherited properties are usually related to the font or text.
- We can use non-inherited properties like
heightorbackground-colorby adding theinheritkeyword. - Using
!importantto override specificity is considered a bad practice.
Comments