
[Frontend] TIL Frontend project - Core HTML Concepts

FASTCAMPUS Frontend Project
Core HTML Concepts
패스트캠퍼스 - 프론트엔드 웹 개발의 모든 것 초격차 패키지 Online 과정
🧩 What I Should Learn?
- Core Elements
- Output of Core Elements
- Comments
- Global Attributes
🎯 What I learned today
Core HTML Elements
div
Let’s review the div HTML element, which is the content division element. The div element is a generic container for flow content(block element) and has no effect on the content or layout until styled in some way with CSS.
Often, we use the div element when we want to group different tags and set the area of those tags. The above code has different tags inside of the div element, which we can use the div because it has no such meaning.
Headings
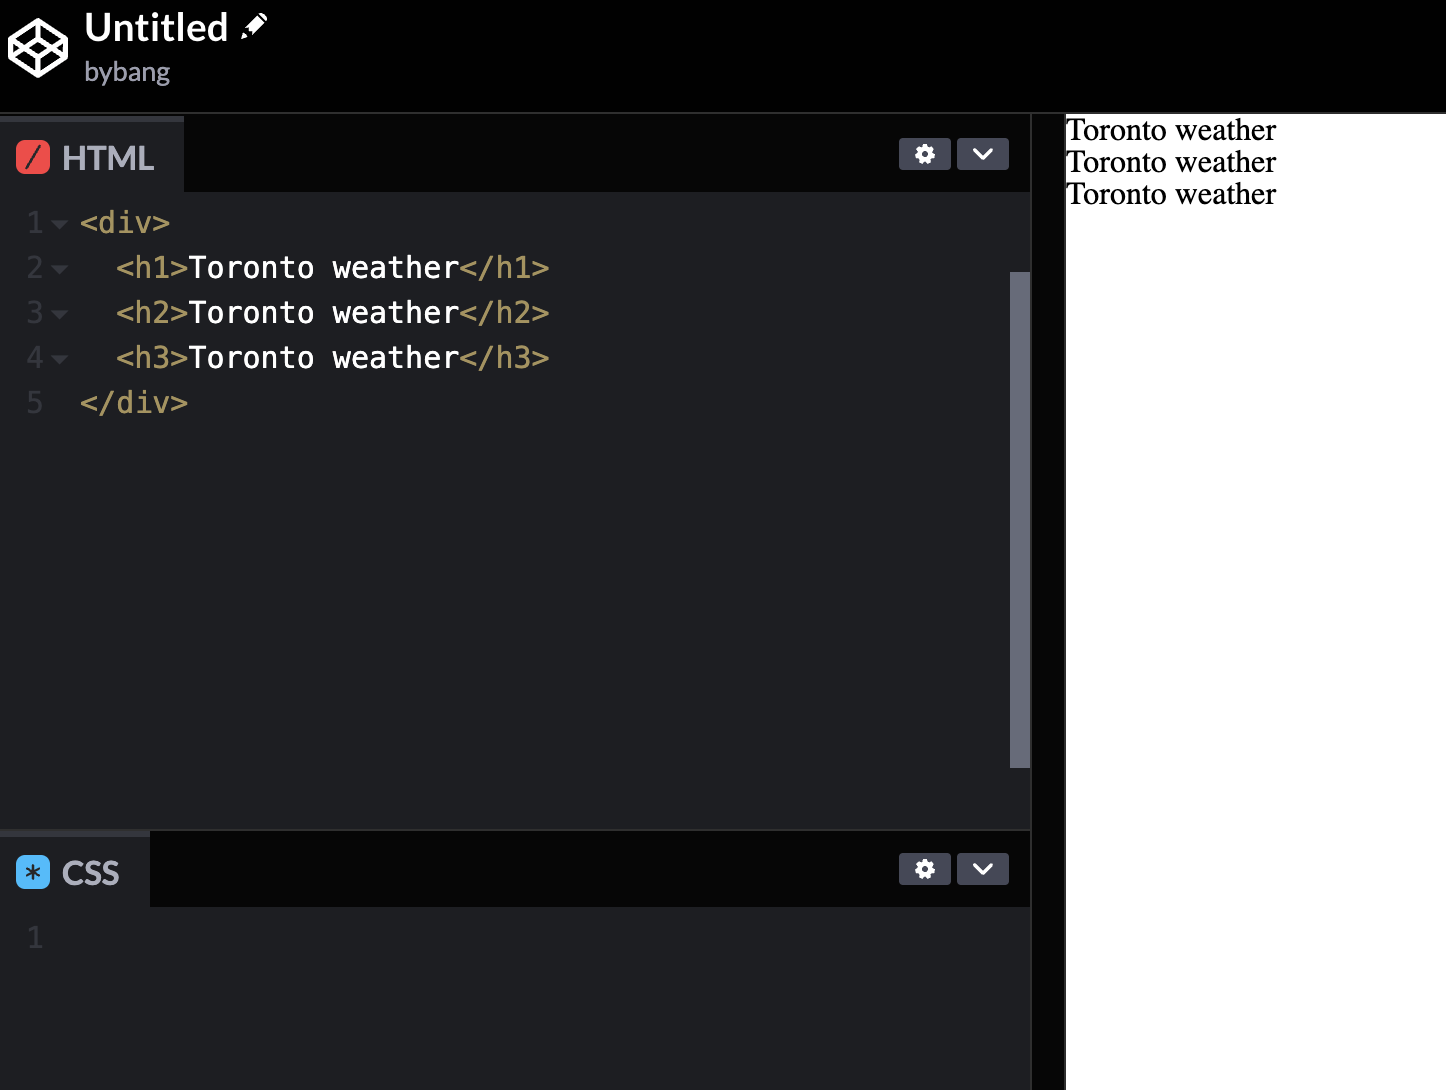
The <h1> to <h6> HTML elements represent six levels of section headings. By default, all heading elements create a block-level box in the layout.
<h1>Heading1</h1>
<h2>Heading2</h2>
<h3>Heading3</h3>
<h4>Heading4</h4>
<h5>Heading5</h5>
<h6>Heading6</h6>
The headings have different sizes; generally, a smaller number heading is more important. Hence, we should avoid using <h1> many times in the same document.
MDN specifies the usage. For example, we shouldn’t skip the heading levels and the like. We can check it from here.
Paragraph
The <p> HTML element represents a paragraph. Paragraphs are usually represented in visual media as blocks of text.
If it is uncertain whether the text needs a <p> element, we can use the div element instead.
Paragraphs are block-level elements, like the heading tags. They are dealing with text because they are not words but usually sentences - more information on MDN.
Image Tag
The <img> HTML element embeds an image into the document, and it is an inline element. There are some generalizations about inline elements that do not apply to the <img> element. Check here for more information.
The <img> element has two essential attributes:
The src attribute is required, which contains the path to the image.
The alt attribute is mandatory and incredibly useful for accessibility, which holds a textual replacement for the image.
If we don’t include these attributes, we can say the website is not following the web standard.
Unordered List
The <ul> HTML element represents an unordered list of items, typically rendered as a bulleted list.
<ul>
  <li>apple</li>
  <li>banana</li>
  <li>orange</li>
  <li>strawberry</li>
</ul>
As we can see, the <ul> element is for grouping a collection of items that don’t need a numerical ordering, and their order in the list is meaningless. If the order of the items has a meaning, we can use <ol>, but we don’t use it often.
Think of <ul> and <li> as one set because, without the list item, the list doesn’t exist. Also, the <li> element must be contained in a parent element.
The <ul> and <li> tags are also block-level content.
Anchor
The <a> HTML element creates a hyperlink to webpages, files, etc.
Suppose we are surfing the web’s ocean and throw an anchor to a particular island or webpage. That’s how we create a link to that webpage to certain text in our case.
If the metaphor is hard to understand, we can simply think the content within each <a> element should indicate the link’s destination.
<a href="https://www.google.ca/" target="_blank">Google</a>
<a href="https://developer.mozilla.org/en-US/">MDN</a>
Notice that the two anchor tags above are slightly different. When we use the internet, some web pages might open a new tab, and others might open on the current tab where we clicked the link.
The target attribute makes the difference. Where the target has the _blank value, it means we want to open the webpage in a new tab.
The <a> element is an inline element and more details about attributes and examples on MDN.
Span
A quick review for a span element is that the <span> HTML element is a generic inline container, which doesn’t have a meaning like a div.
Suffice it to say we want to color only Canada in red among the text. We can add CSS to the style tag and see that only the Canada part is colored red.
Break
The <br> HTML element produces a line break in text.
Notice that line one has no <br/> tag, although we hit enter between the sentences.
We will go over the details in the next chapter when we practice the outputs.
Input
The <input> HTML element is used to create interactive controls for web-based forms in order to accept data from the user.
The <input> element is inline-block by default, which means it is inline-level content, but it can use some attributes that can be only used for block-level content.
Recall that the inline element stacks horizontally from left to right. The <input> element is the same; however, the <input> element can also set the width and height and margins and paddings.
Input type Text
The picture below indicates three different types we can represent with the text input type.
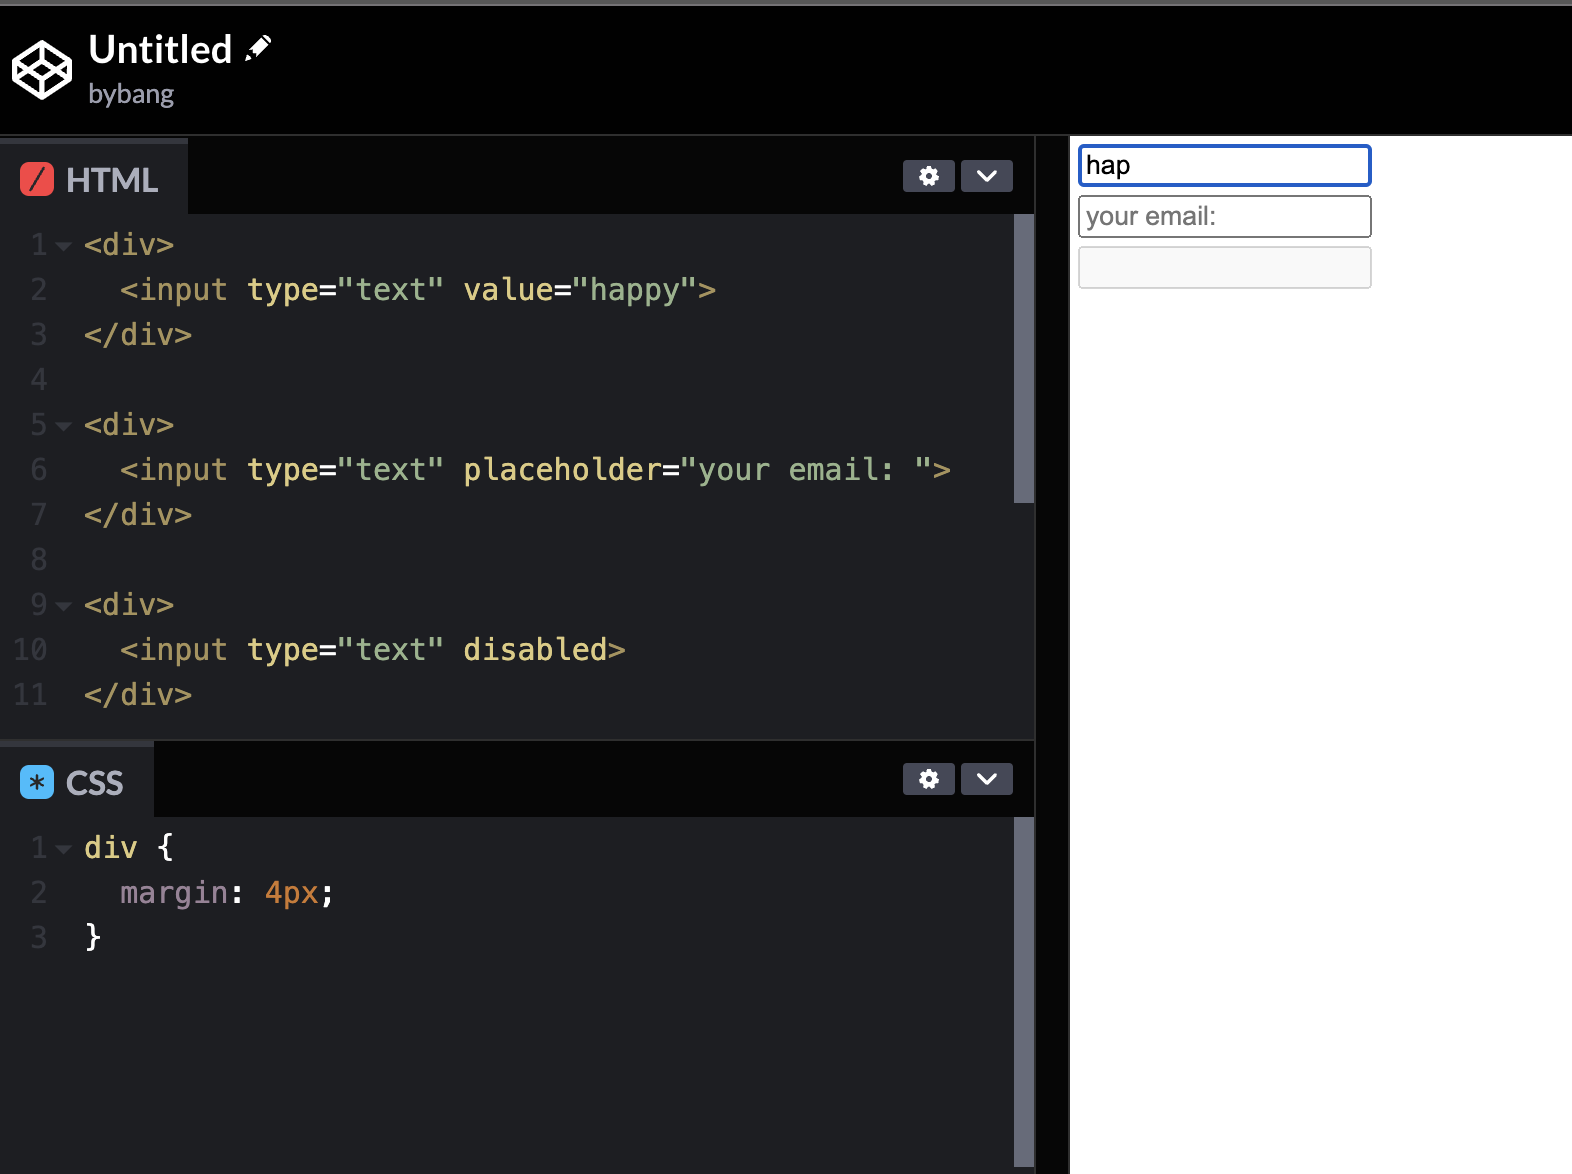
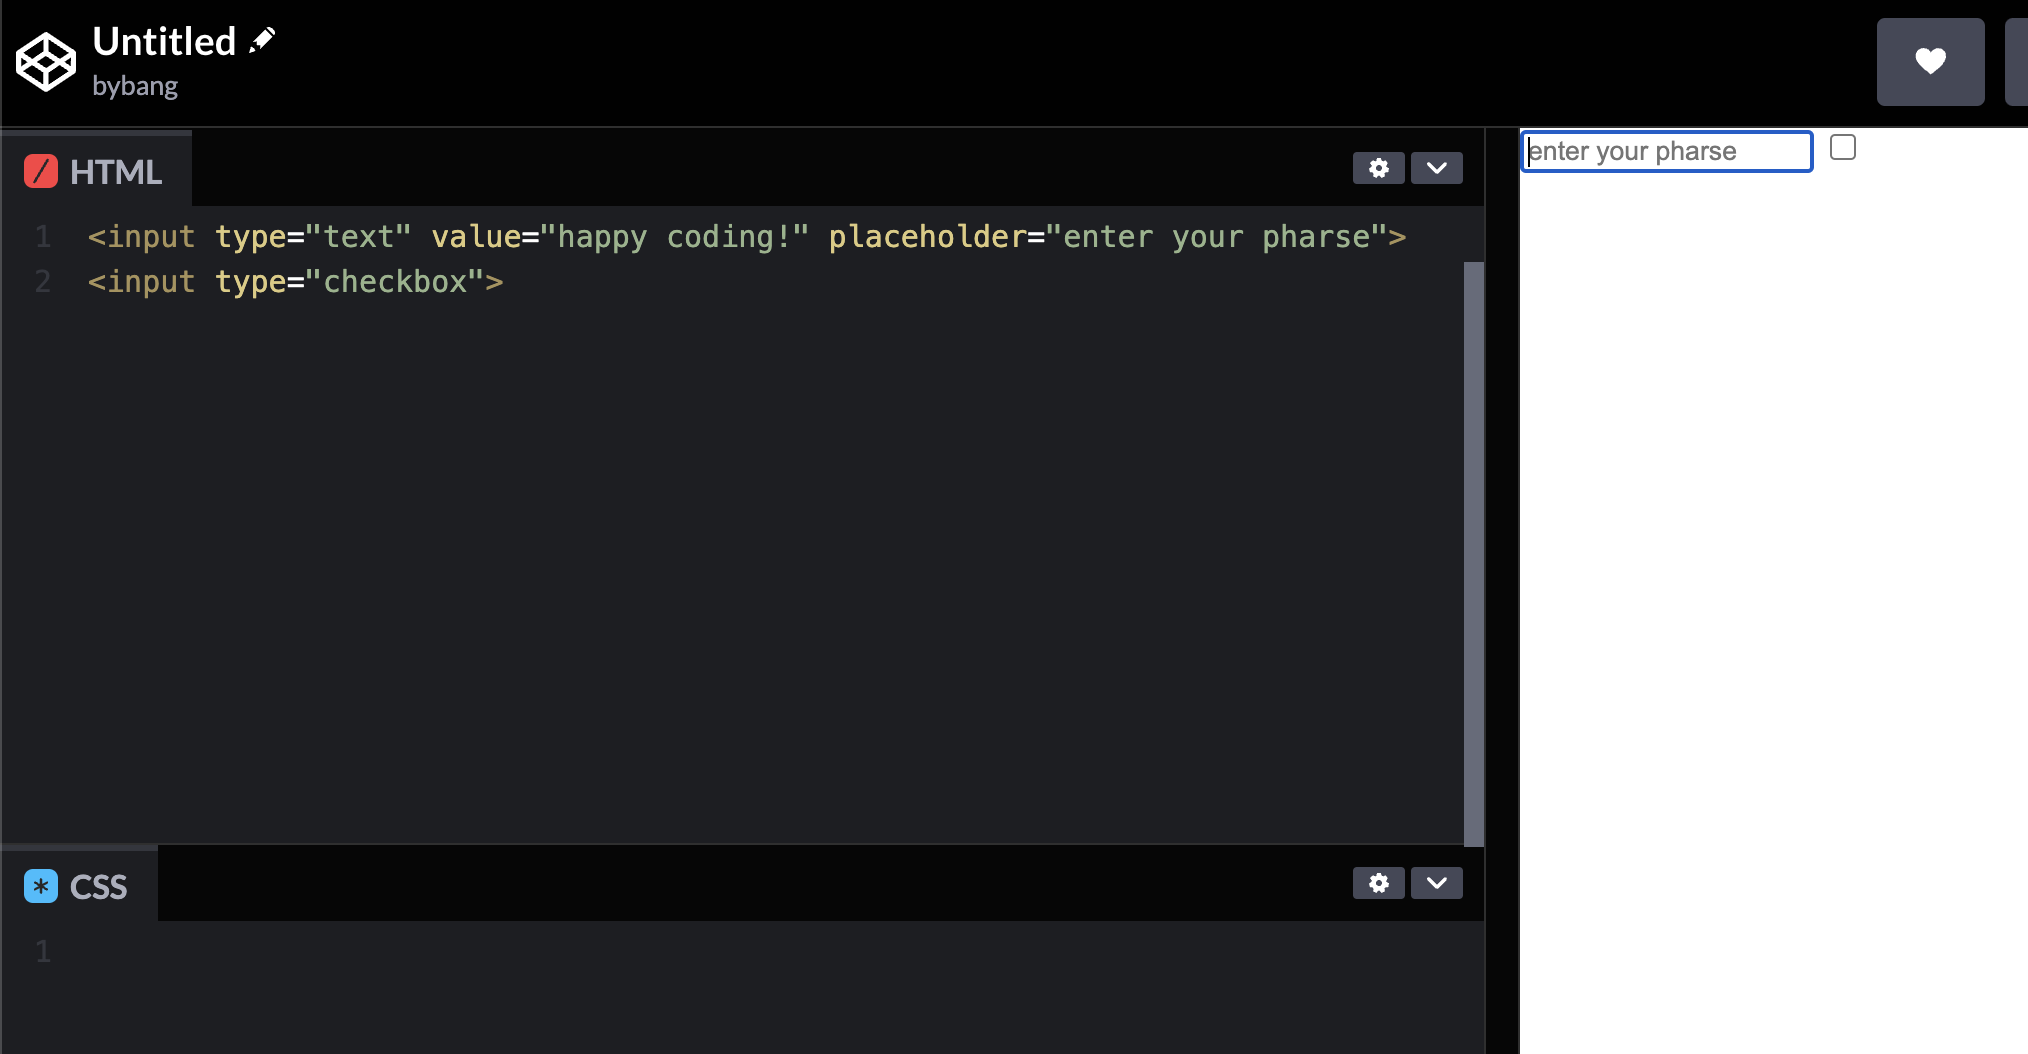
Value
The value attribute is the initial value of the control, which means pre-inserted text from the developer. As we can see from the picture, the value can be deleted or added, and it started from the value happy.
Placeholder
The placeholder attribute is the text that appears in the form control when it has no value set. Notice that the placeholder is hinting at the value that the user should put in. When the user starts to type some value, it will disappear.
Disabled
The disabled attribute literally means the form control is disabled. We can use the disabled attribute when we no longer want the user to use the form.
Notice that the disabled attribute doesn’t have a value, like an empty tag. Some attributes work individually without attached value.
Input type Checkbox and Radio
Other input types that are commonly used are checkboxes and radio buttons.
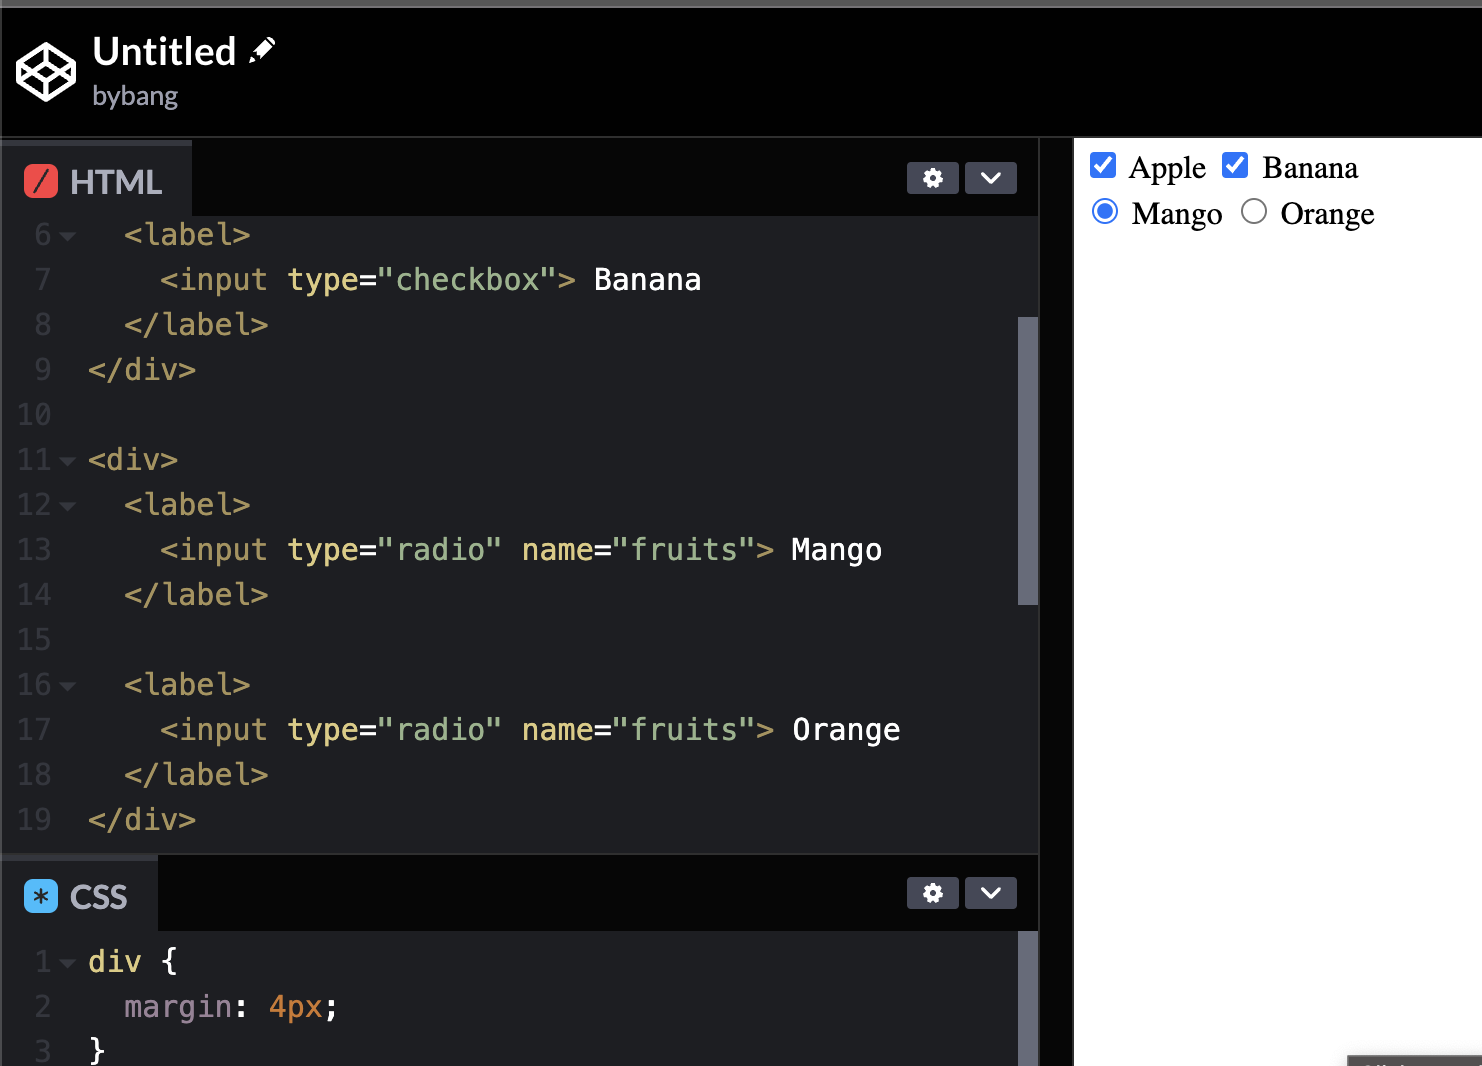
Checkbox
A check box allowing single values to be selected/deselected. Notice that the checkbox is wrapped with the label tag because, with a single checkbox, the user doesn’t understand the usage of the checkbox.
Hence, we use the label tag to label the checkbox with the adequate name beside it. Also, because we wrapped the input tag, the user can click the text or the checkbox to mark the box.
Another attribute is checked, where the checkbox starts empty, but if we want the checkbox to be marked from the start, we can use the checked attribute. The user can deselect the checkbox, so the checkbox still depends on the user’s choice.
Radio
A radio button allows a single value to be selected from multiple choices with the same name value.
If we make the radio buttons and try to check all of them, we can only check one of the multiple choices.
The important thing is that the radio buttons have to be grouped together, and if the name value is different, they can’t be grouped and can be checked together or result in weird behavior for our program.
There are many more types and attributes for the input, so feel free to check out from here.
Table
The <table> HTML element represents tabular data. The tabular data is information represented in a two-dimensional table comprised of rows and columns of cells containing data.
The <table> element is considered as table-level content but also in the block element category, so we can think of it as block-level content.
The <table> tag always starts with a row. The row is the <tr> element, and the <tr> stands for the table row.
Whether the <td> stands for the table data, which decides the table column, and we call it the table data cell element.
Output of Core Elements
Headings
Recall that HTML is the structure of the website, not a styler. Hence, we should not try to style with only HTML. We will use a bit of CSS to see the outputs of the core HTML elements we previously learned.
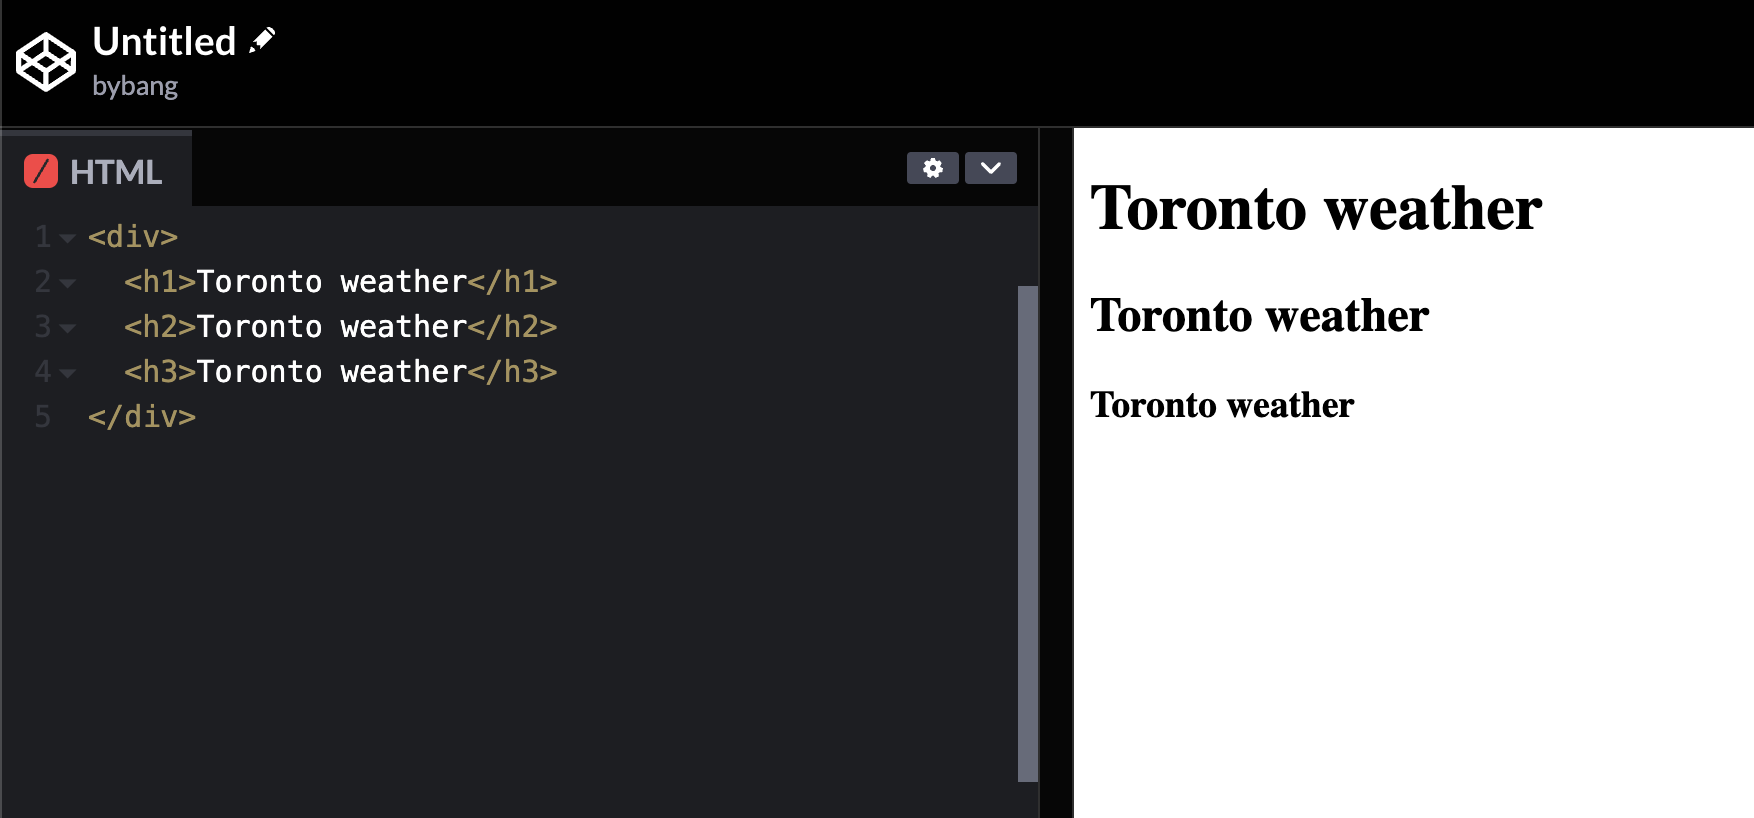
Notice that we have headings from <h1> to <h3>, with different font sizes. In fact, the text size is not important as we reset the default browser settings.
Every browser has a different heading size, and a developer or the company will choose the size of different headings according to their preference.
After resetting the default browser settings, we can see the headings have no styling or font size.
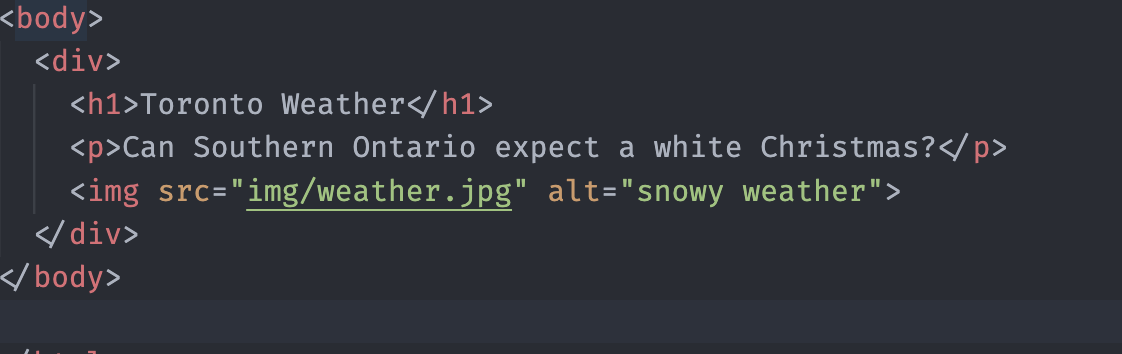
Images
Now, we would like to display an image of the weather. We can use an img tag like this:
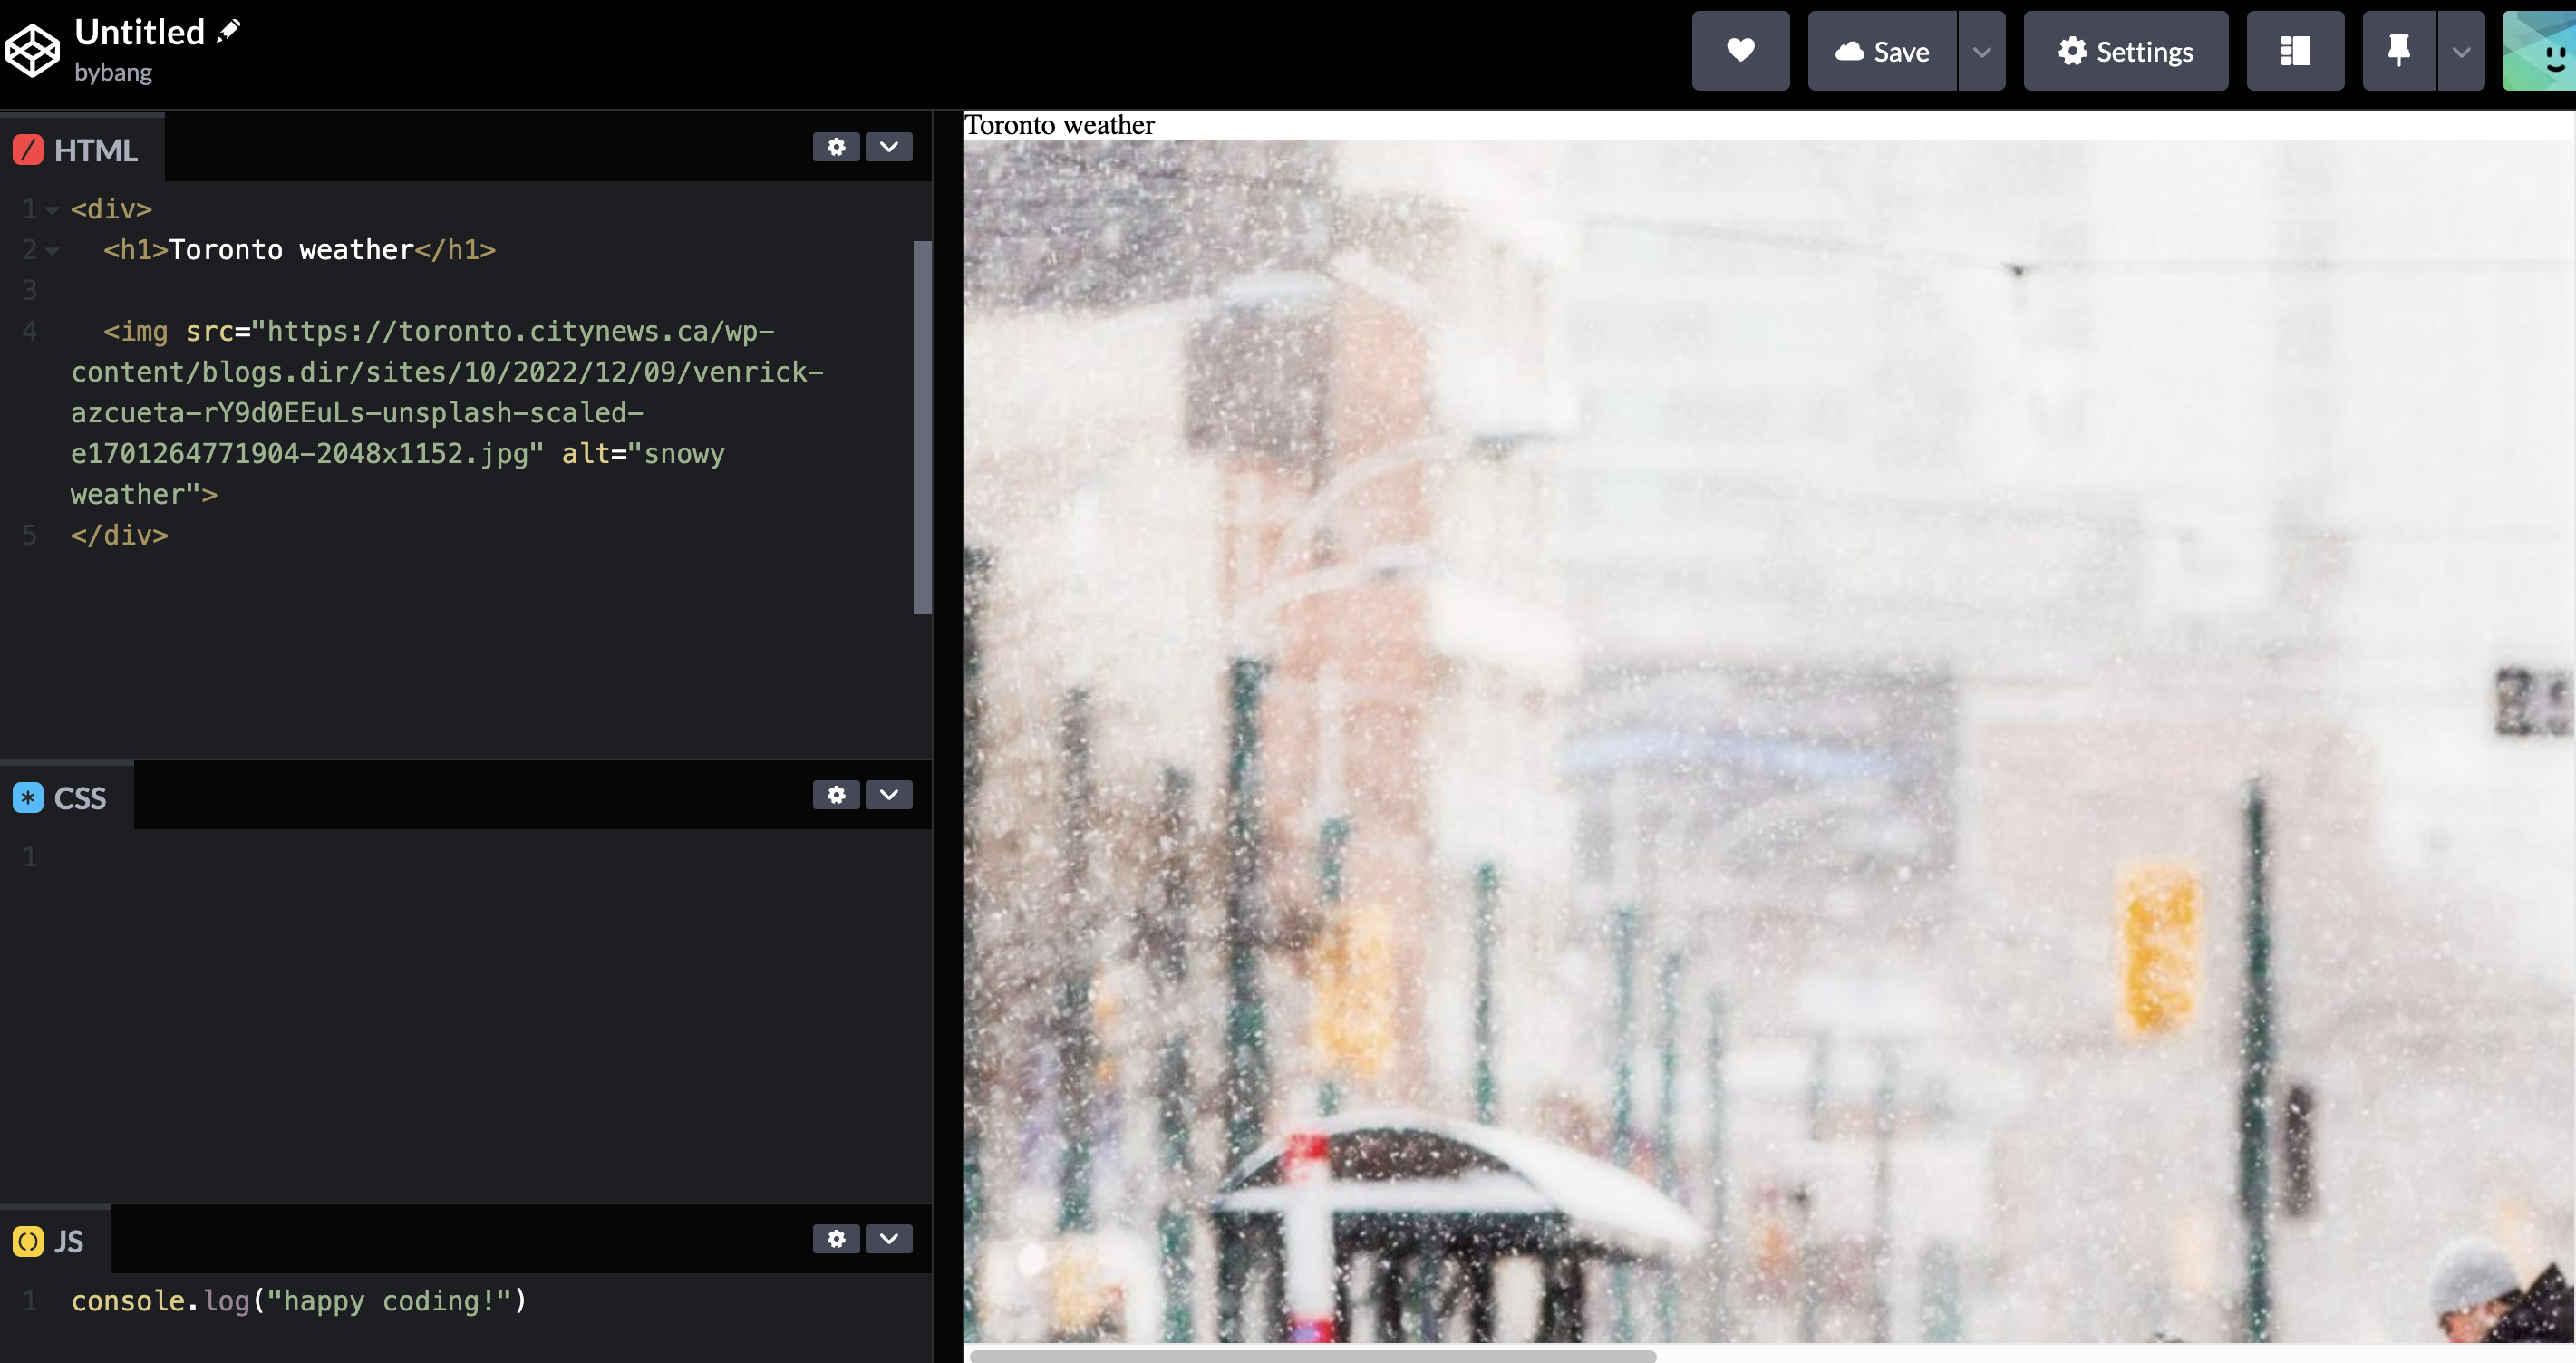
Notice that the image is from the CityNews, and we copied the absolute path for the image and pasted in src and set alt or alternate text to snowy weather.
Suppose we accidentally delete one letter from the src value.
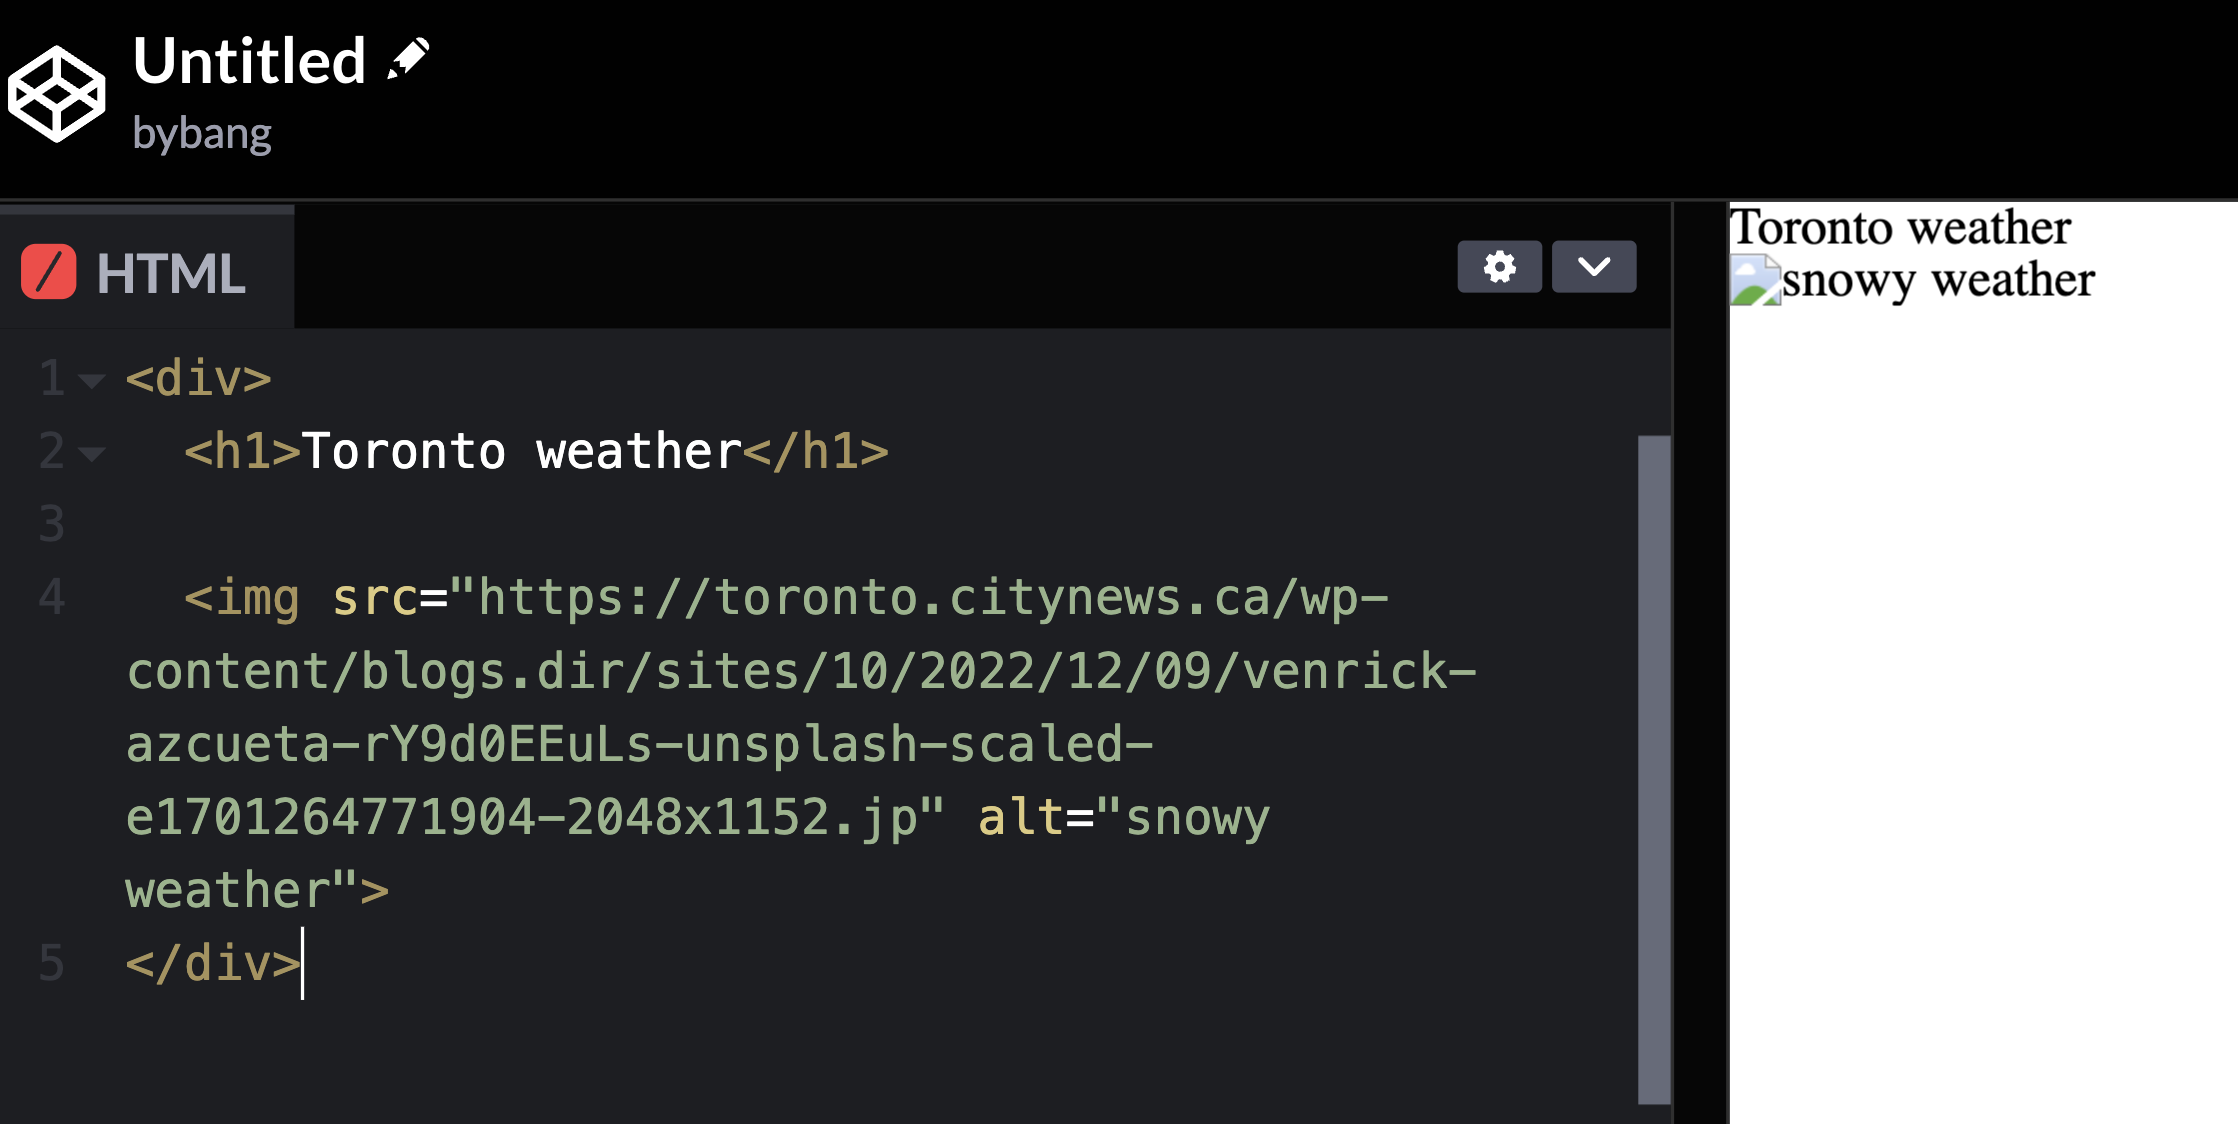
That is the power of the alt attribute and why it is the mandatory attribute. There are many situations in which the browser cannot properly load an image. Hence, we should correctly name the alt attribute to explain the image.
Unordered List
The next output is the <ul> element, and by far, we reset the browser style. Hence, our content will be like this:
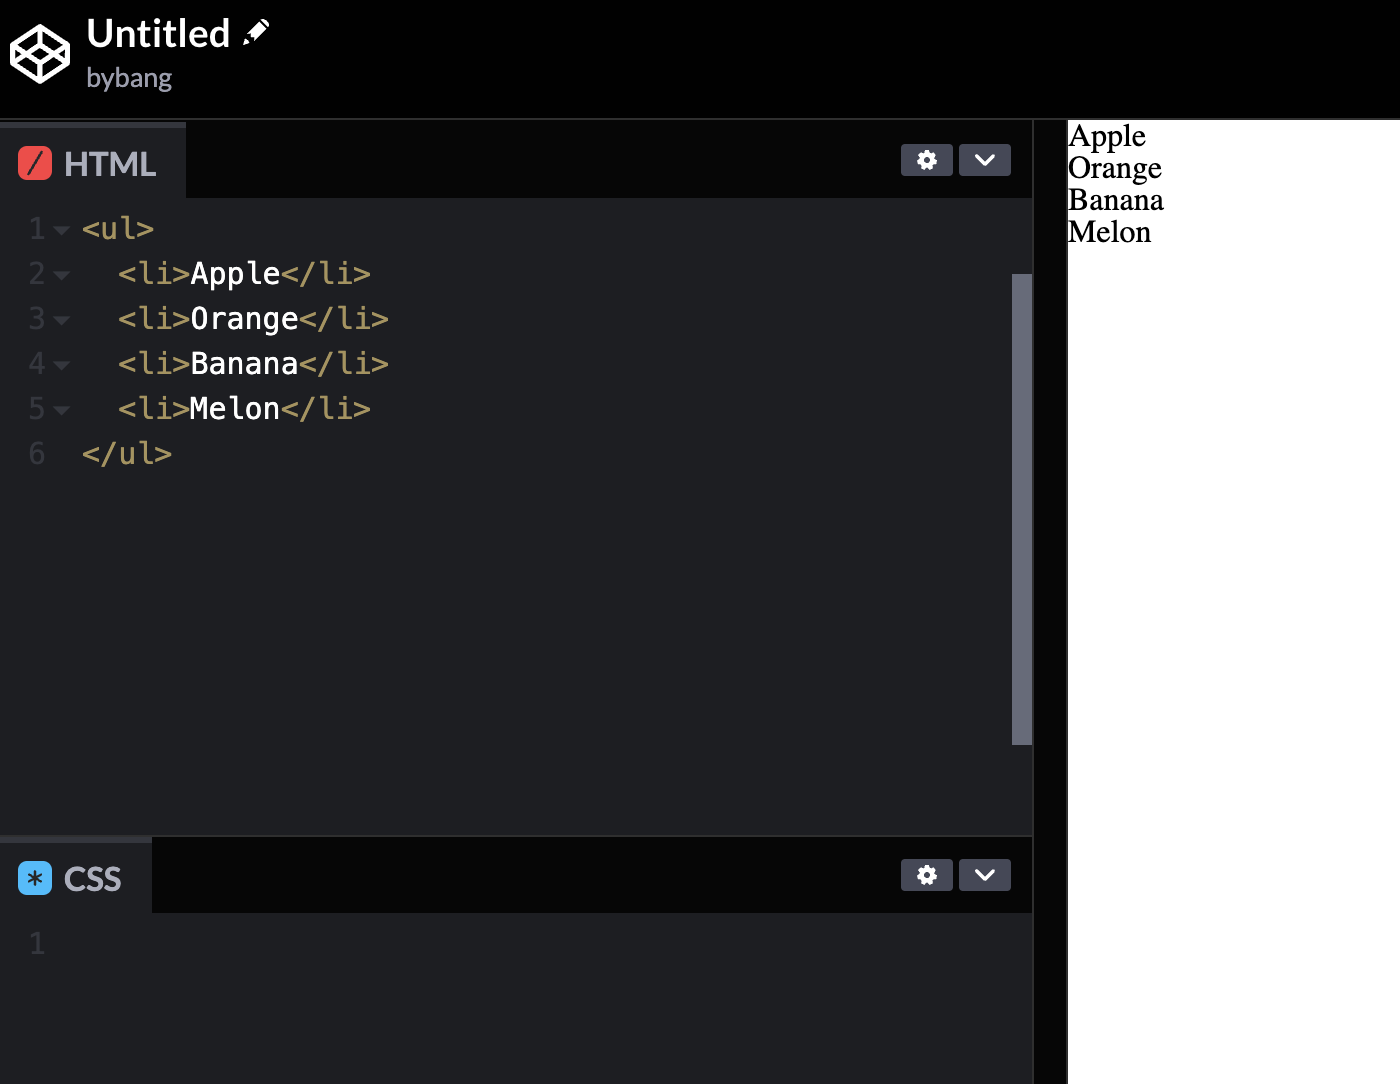
Notice that the unordered list doesn’t have the style since we reset the browser CSS style.
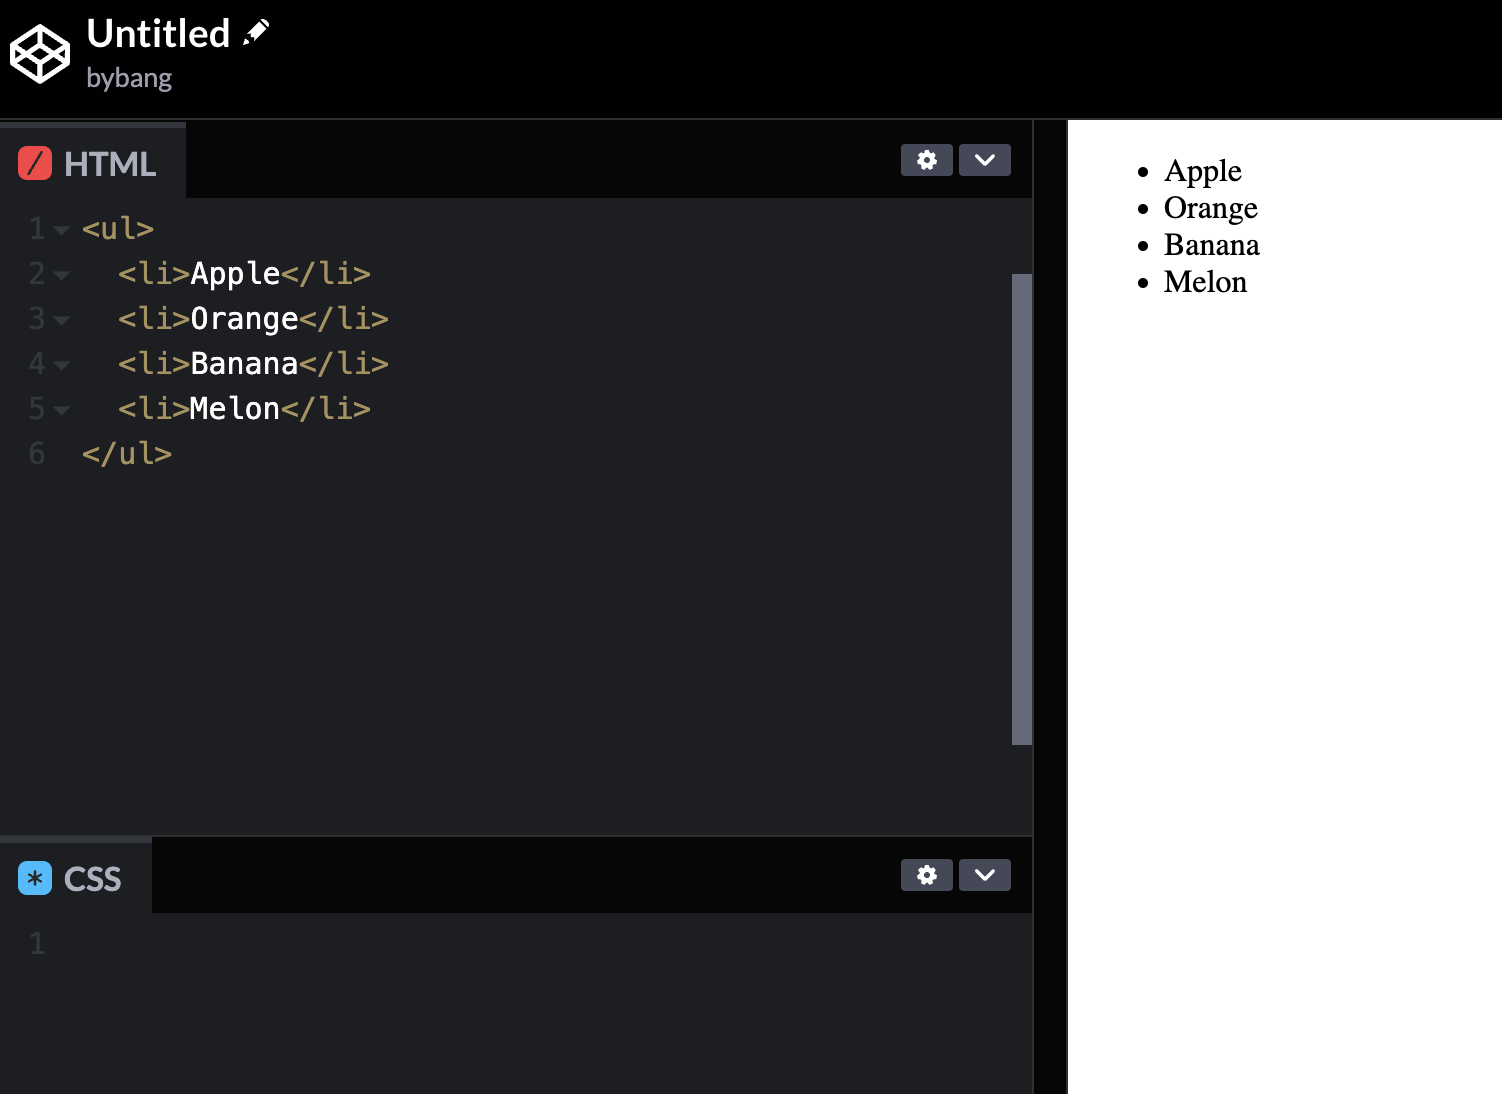
If we go back to the default browser setting, it appears with the bullet points.
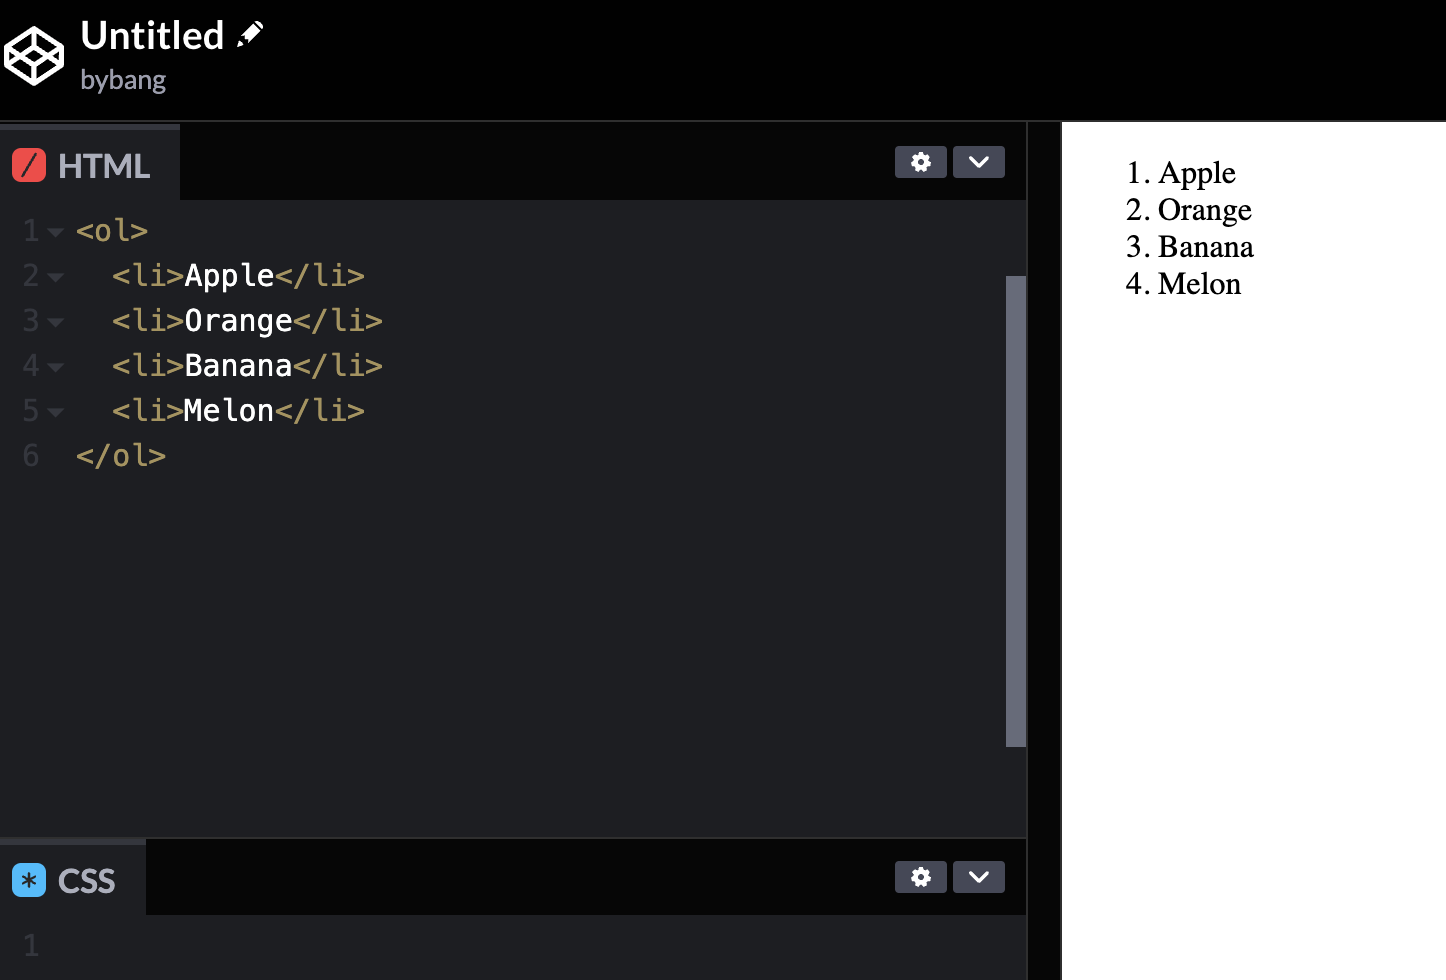
And we can see the <ol> tags are ordered lists of items and rendered as a numbered list.
Anchor
The output of the <a> element can’t be checked with the Codepen website, so we need to write the code in our HTML file and open the live server.
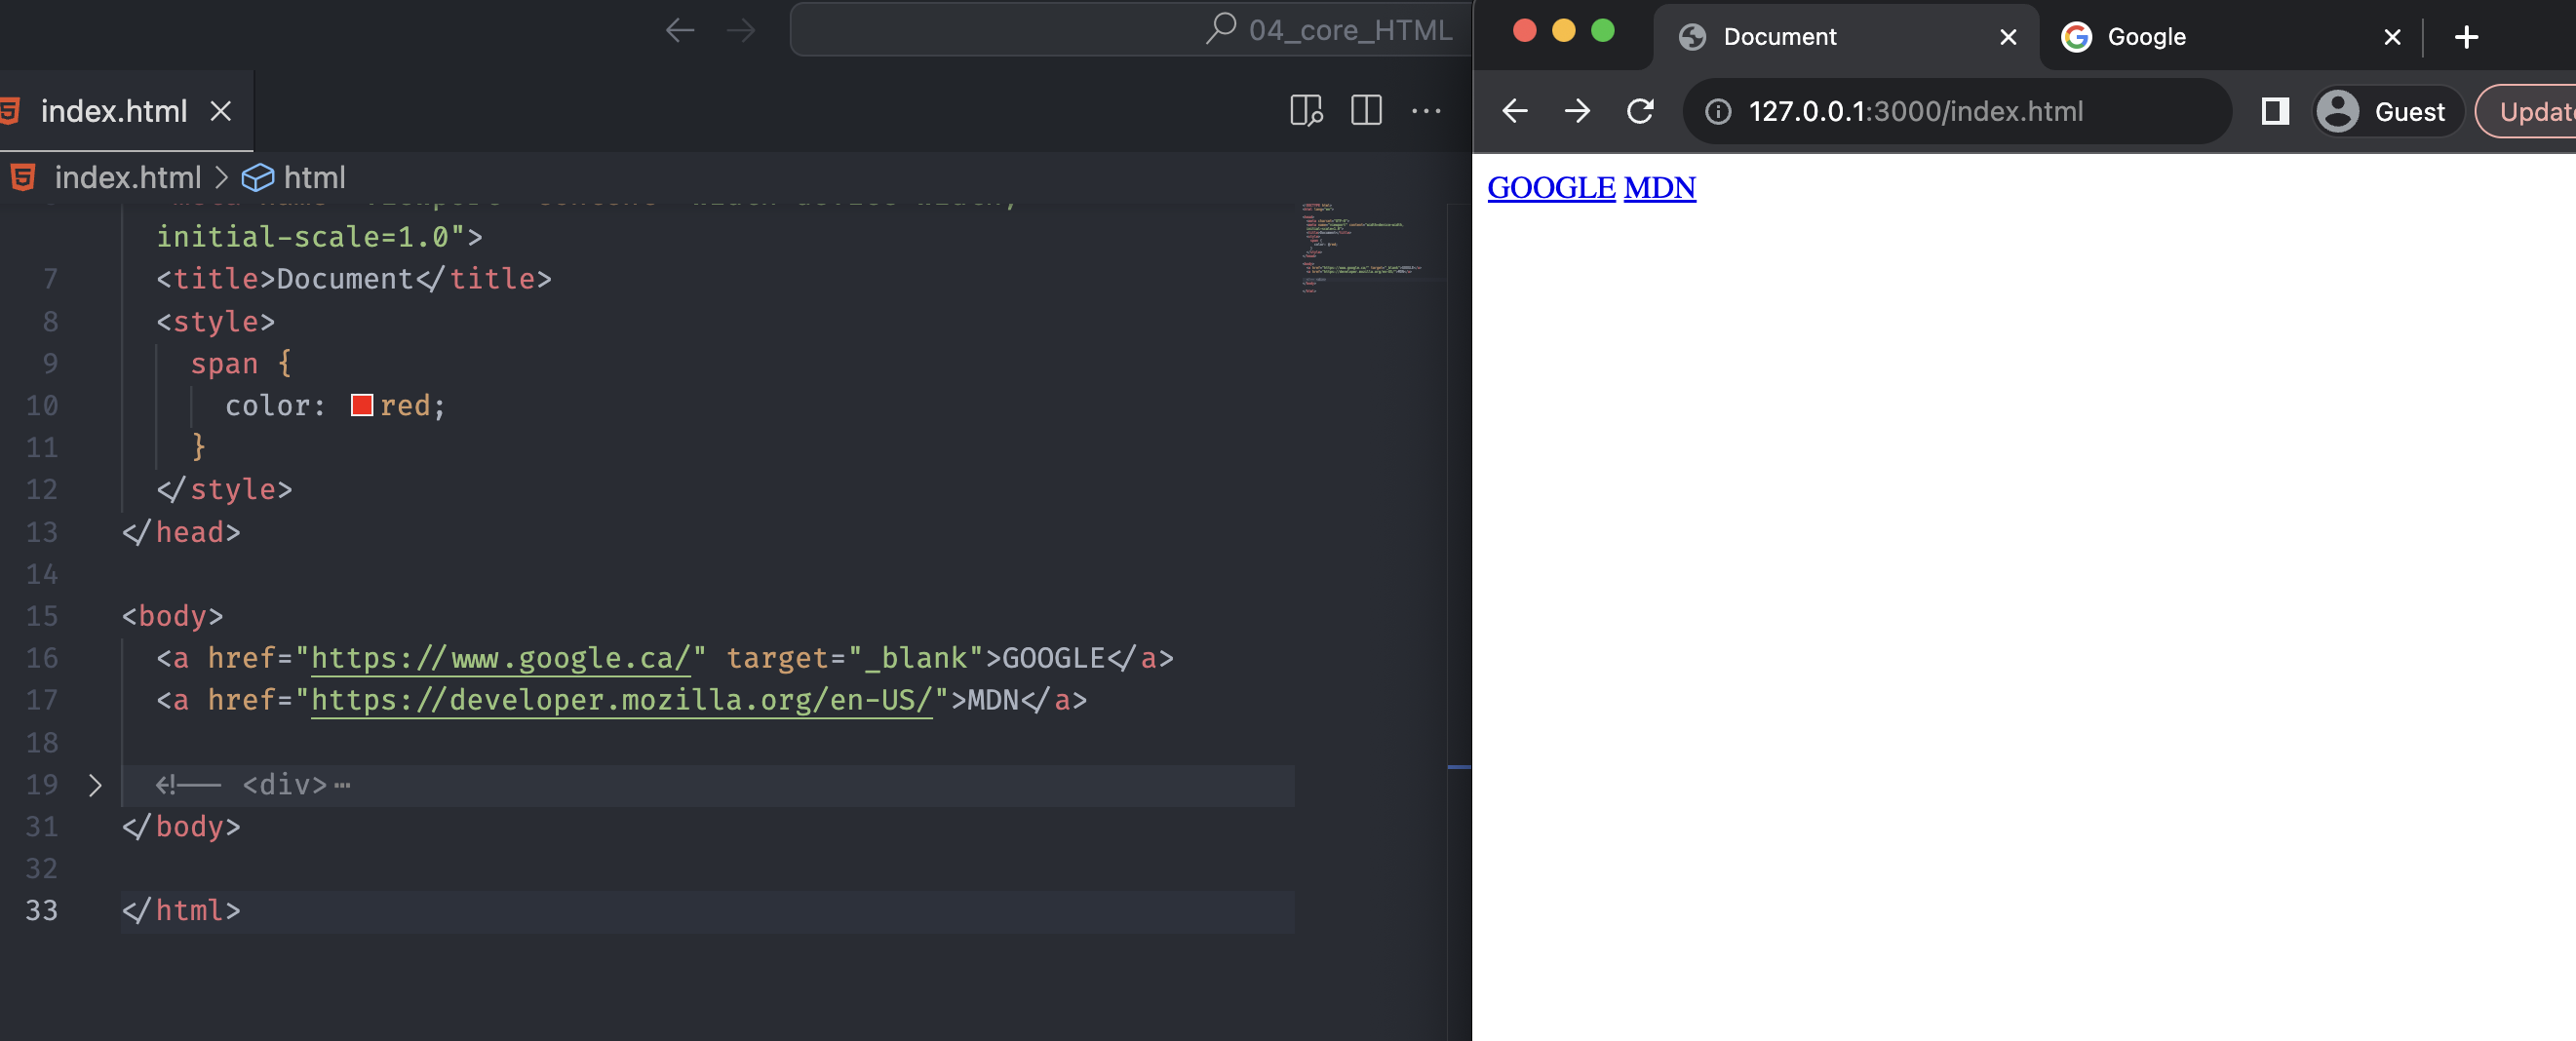
Check out how the two tags are different by clicking the text. Google link has a target attribute and a _blank value. It will open a new tab, but the MDN link will open the page in the current tab.
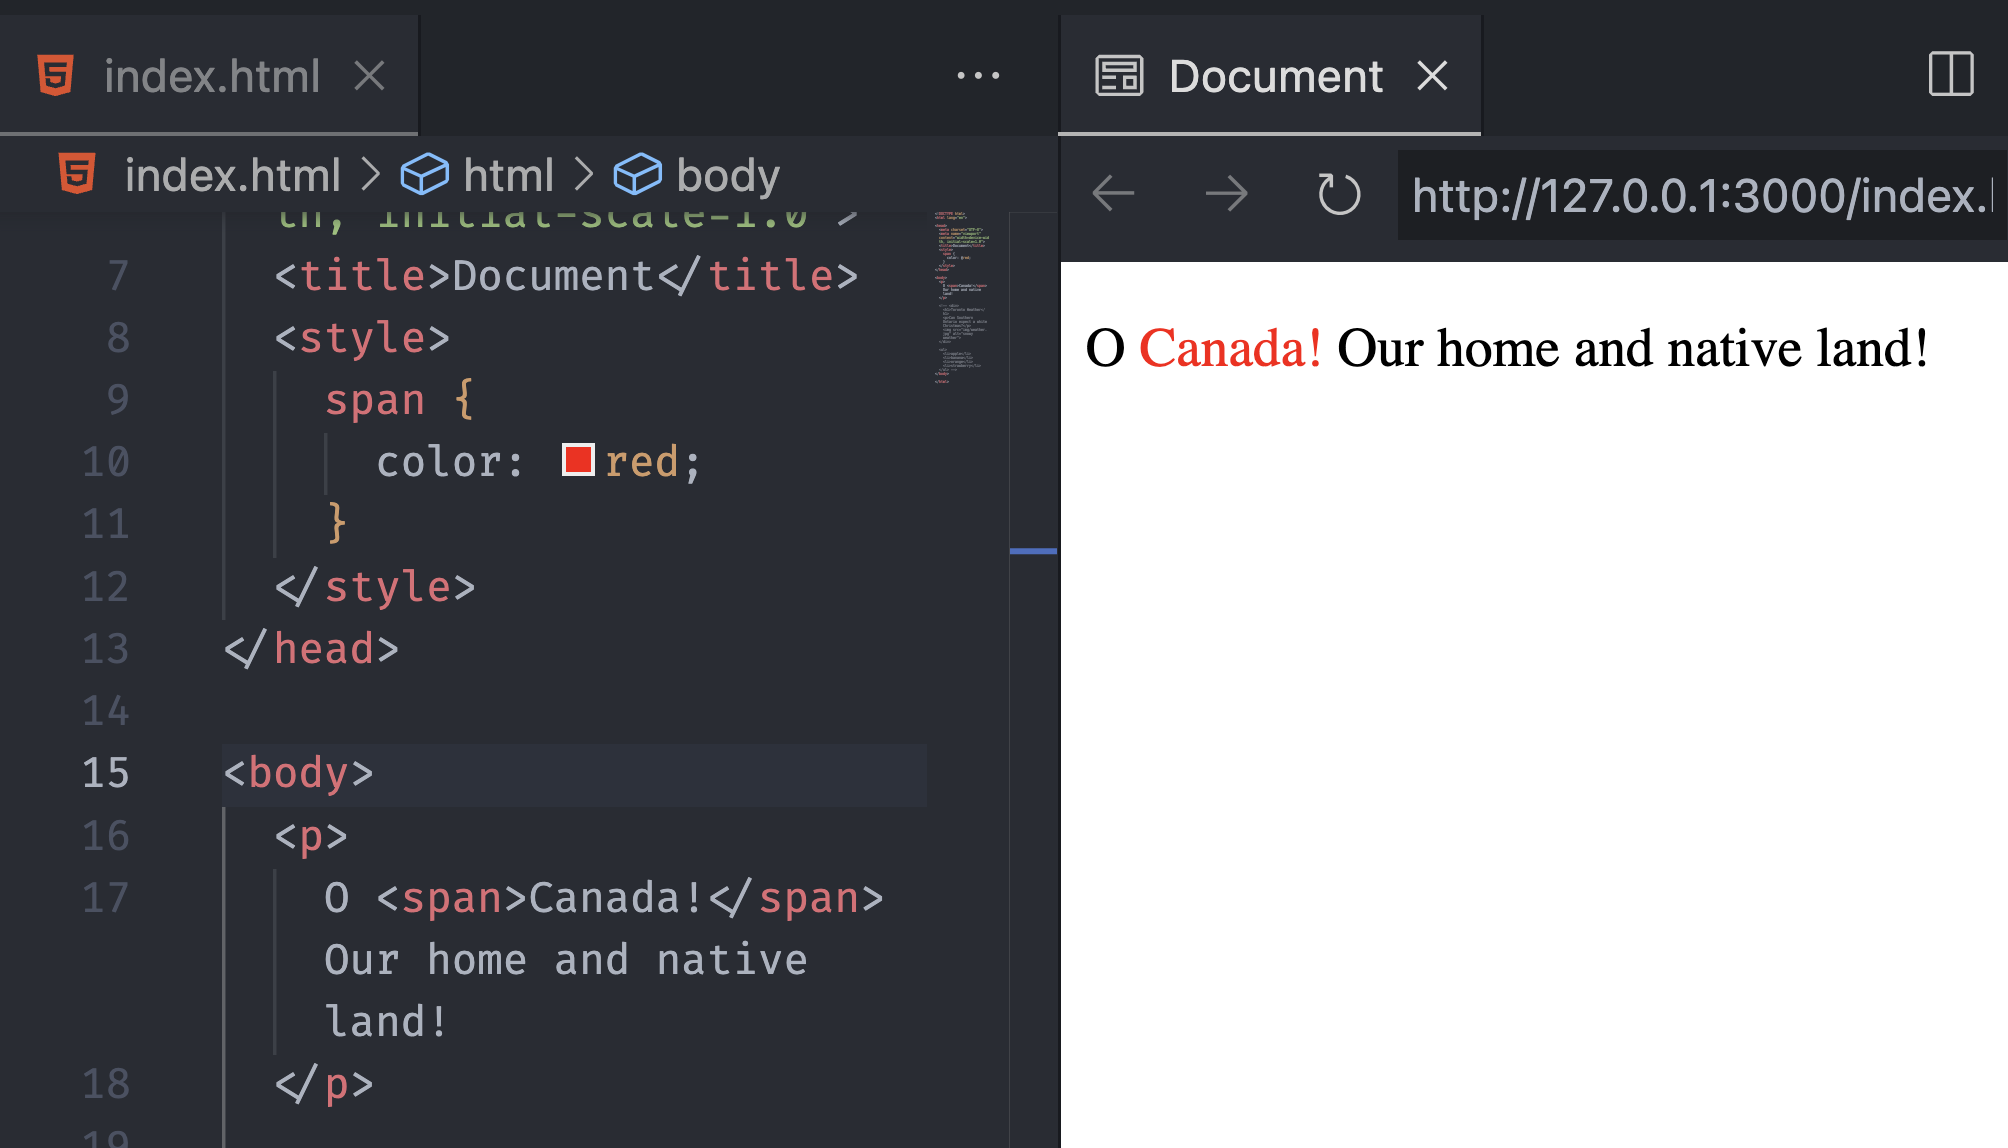
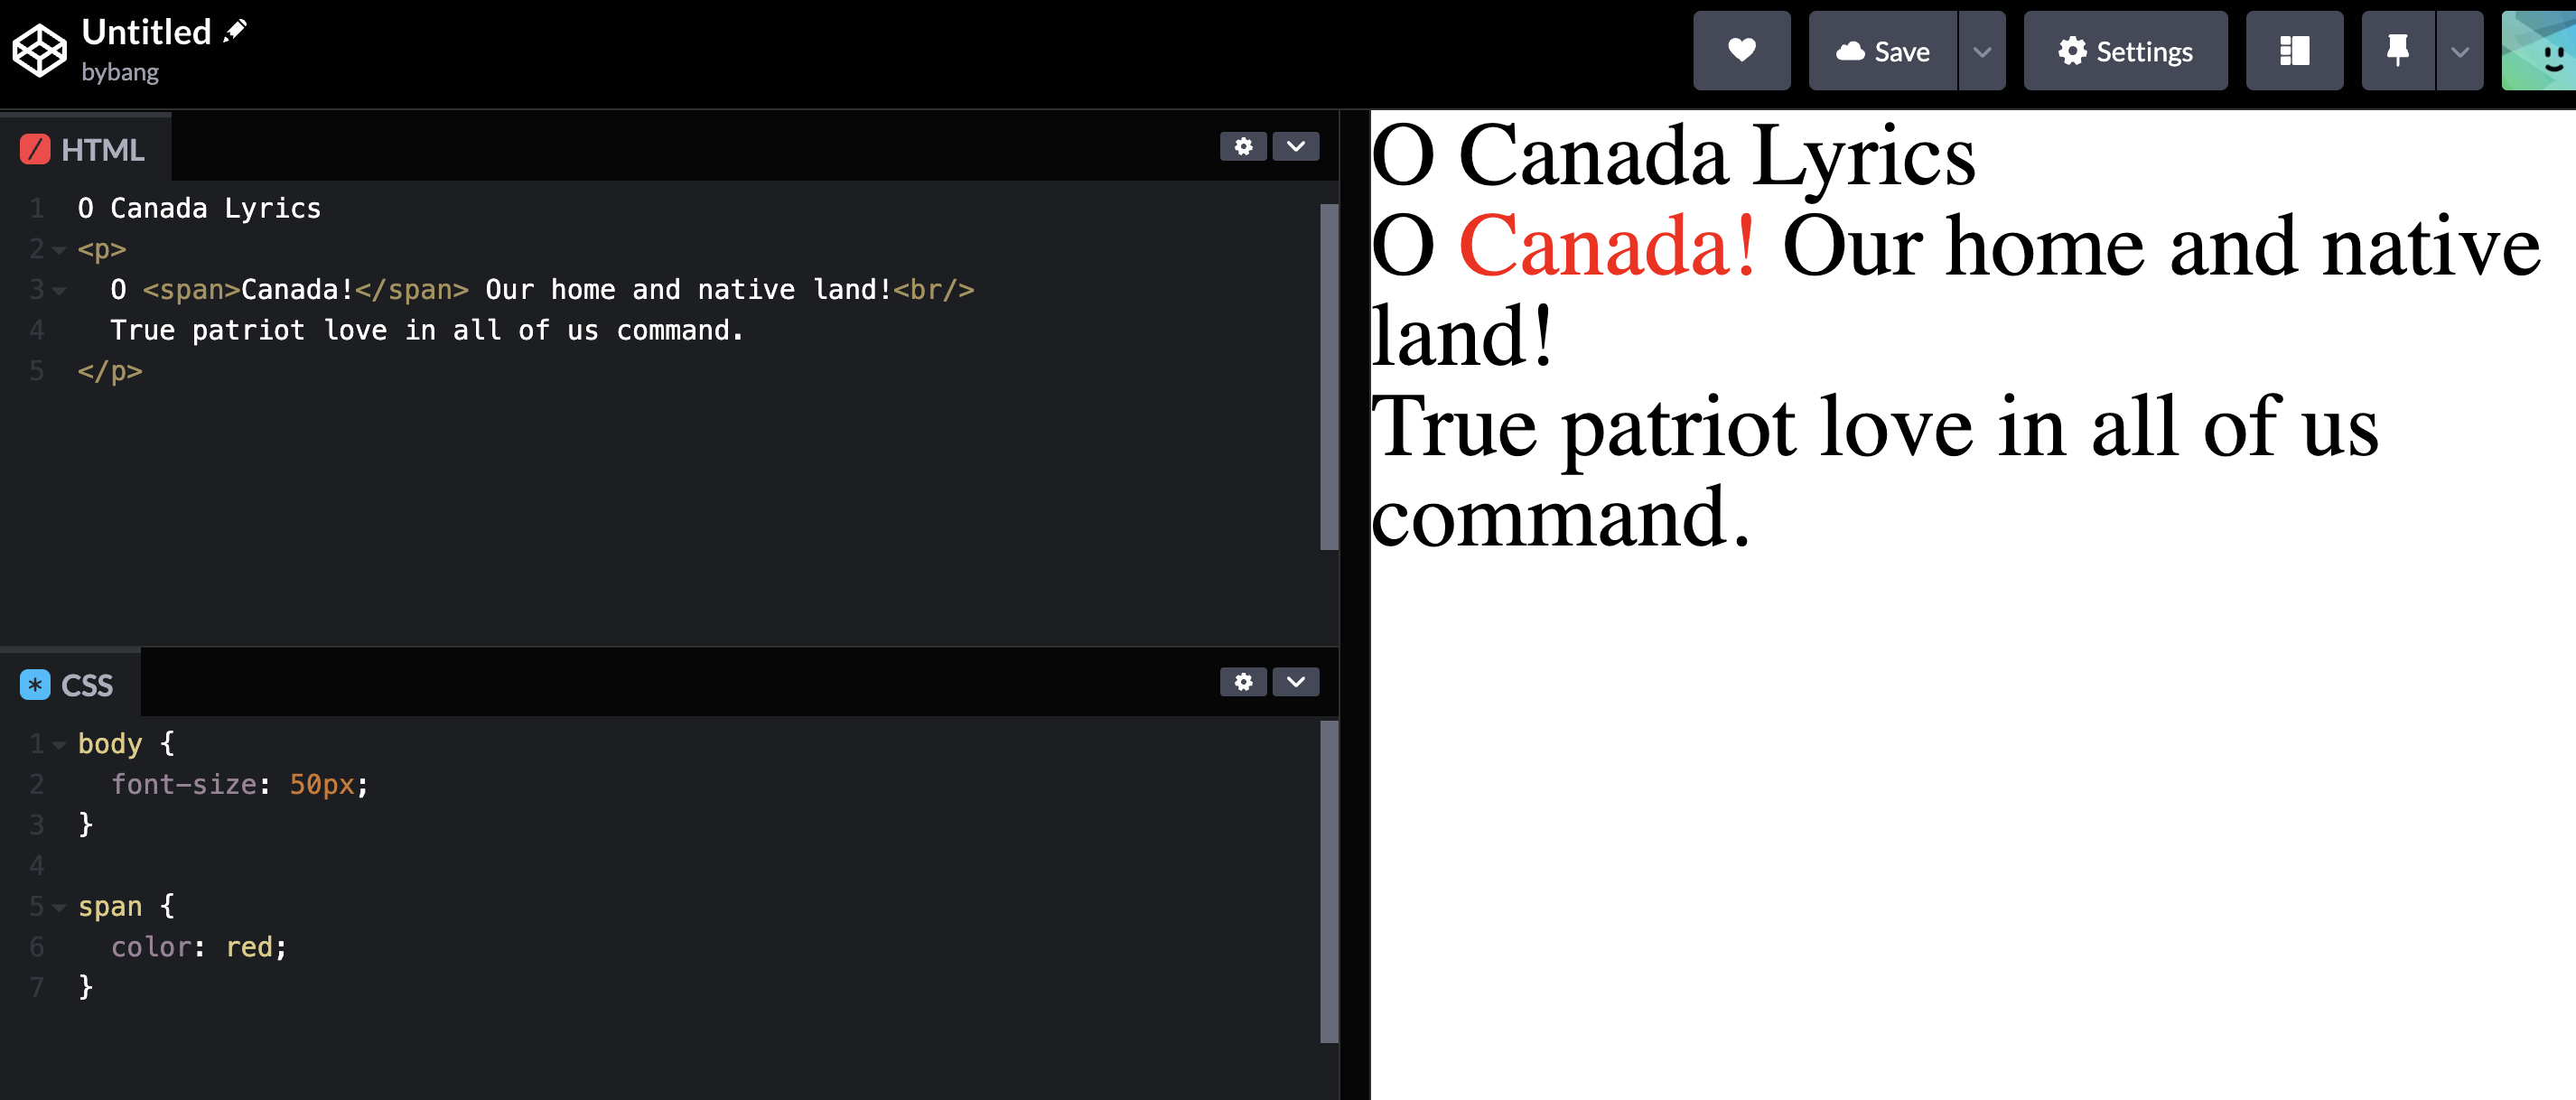
Span
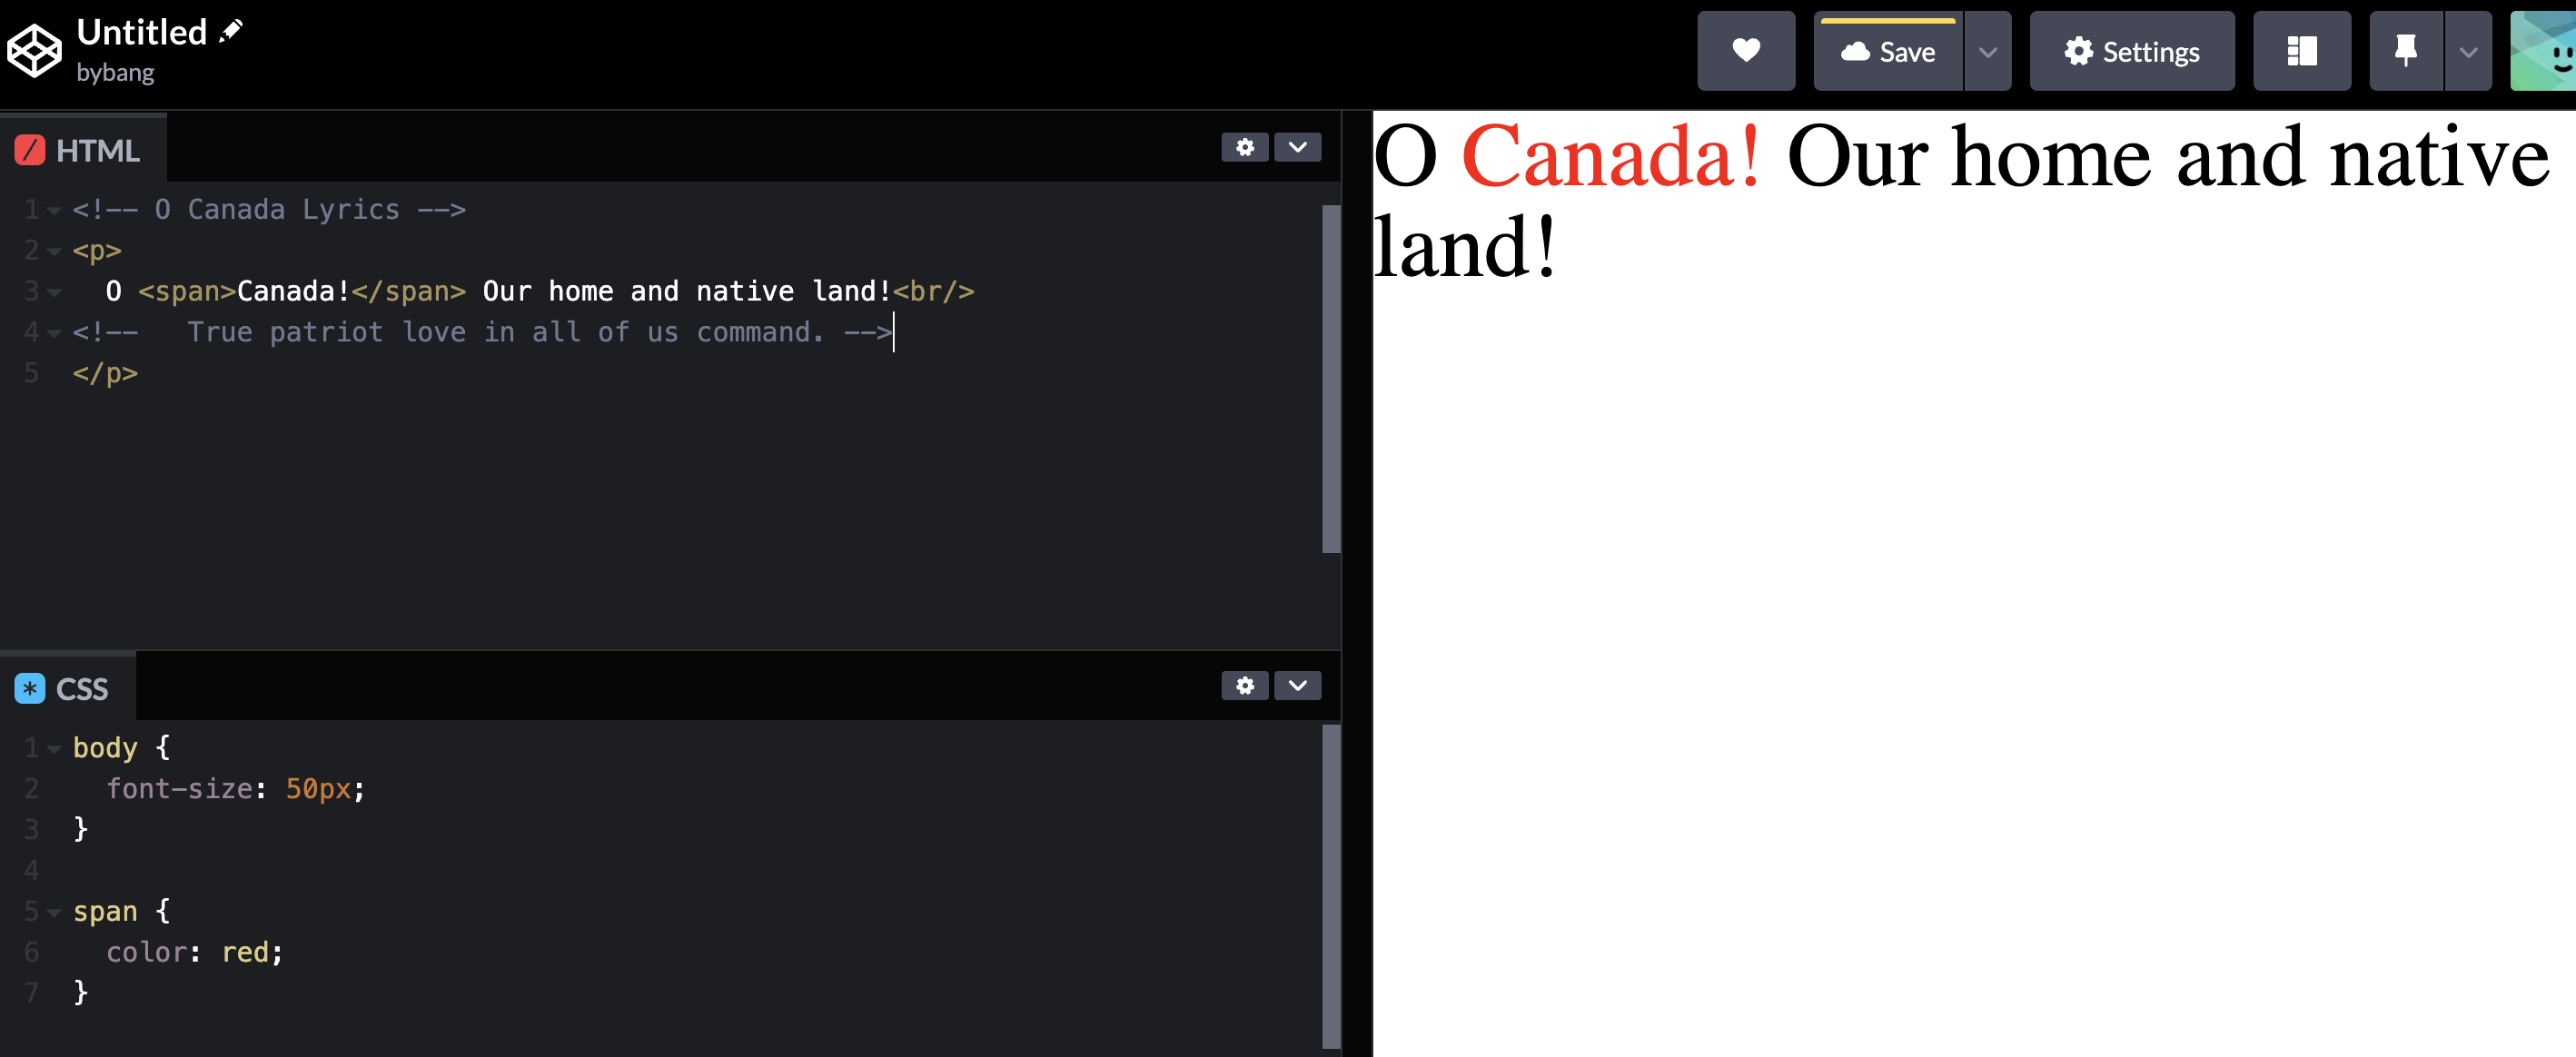
Let’s bring the lyrics of O Canada, and suppose we want to color the Canada part in red.
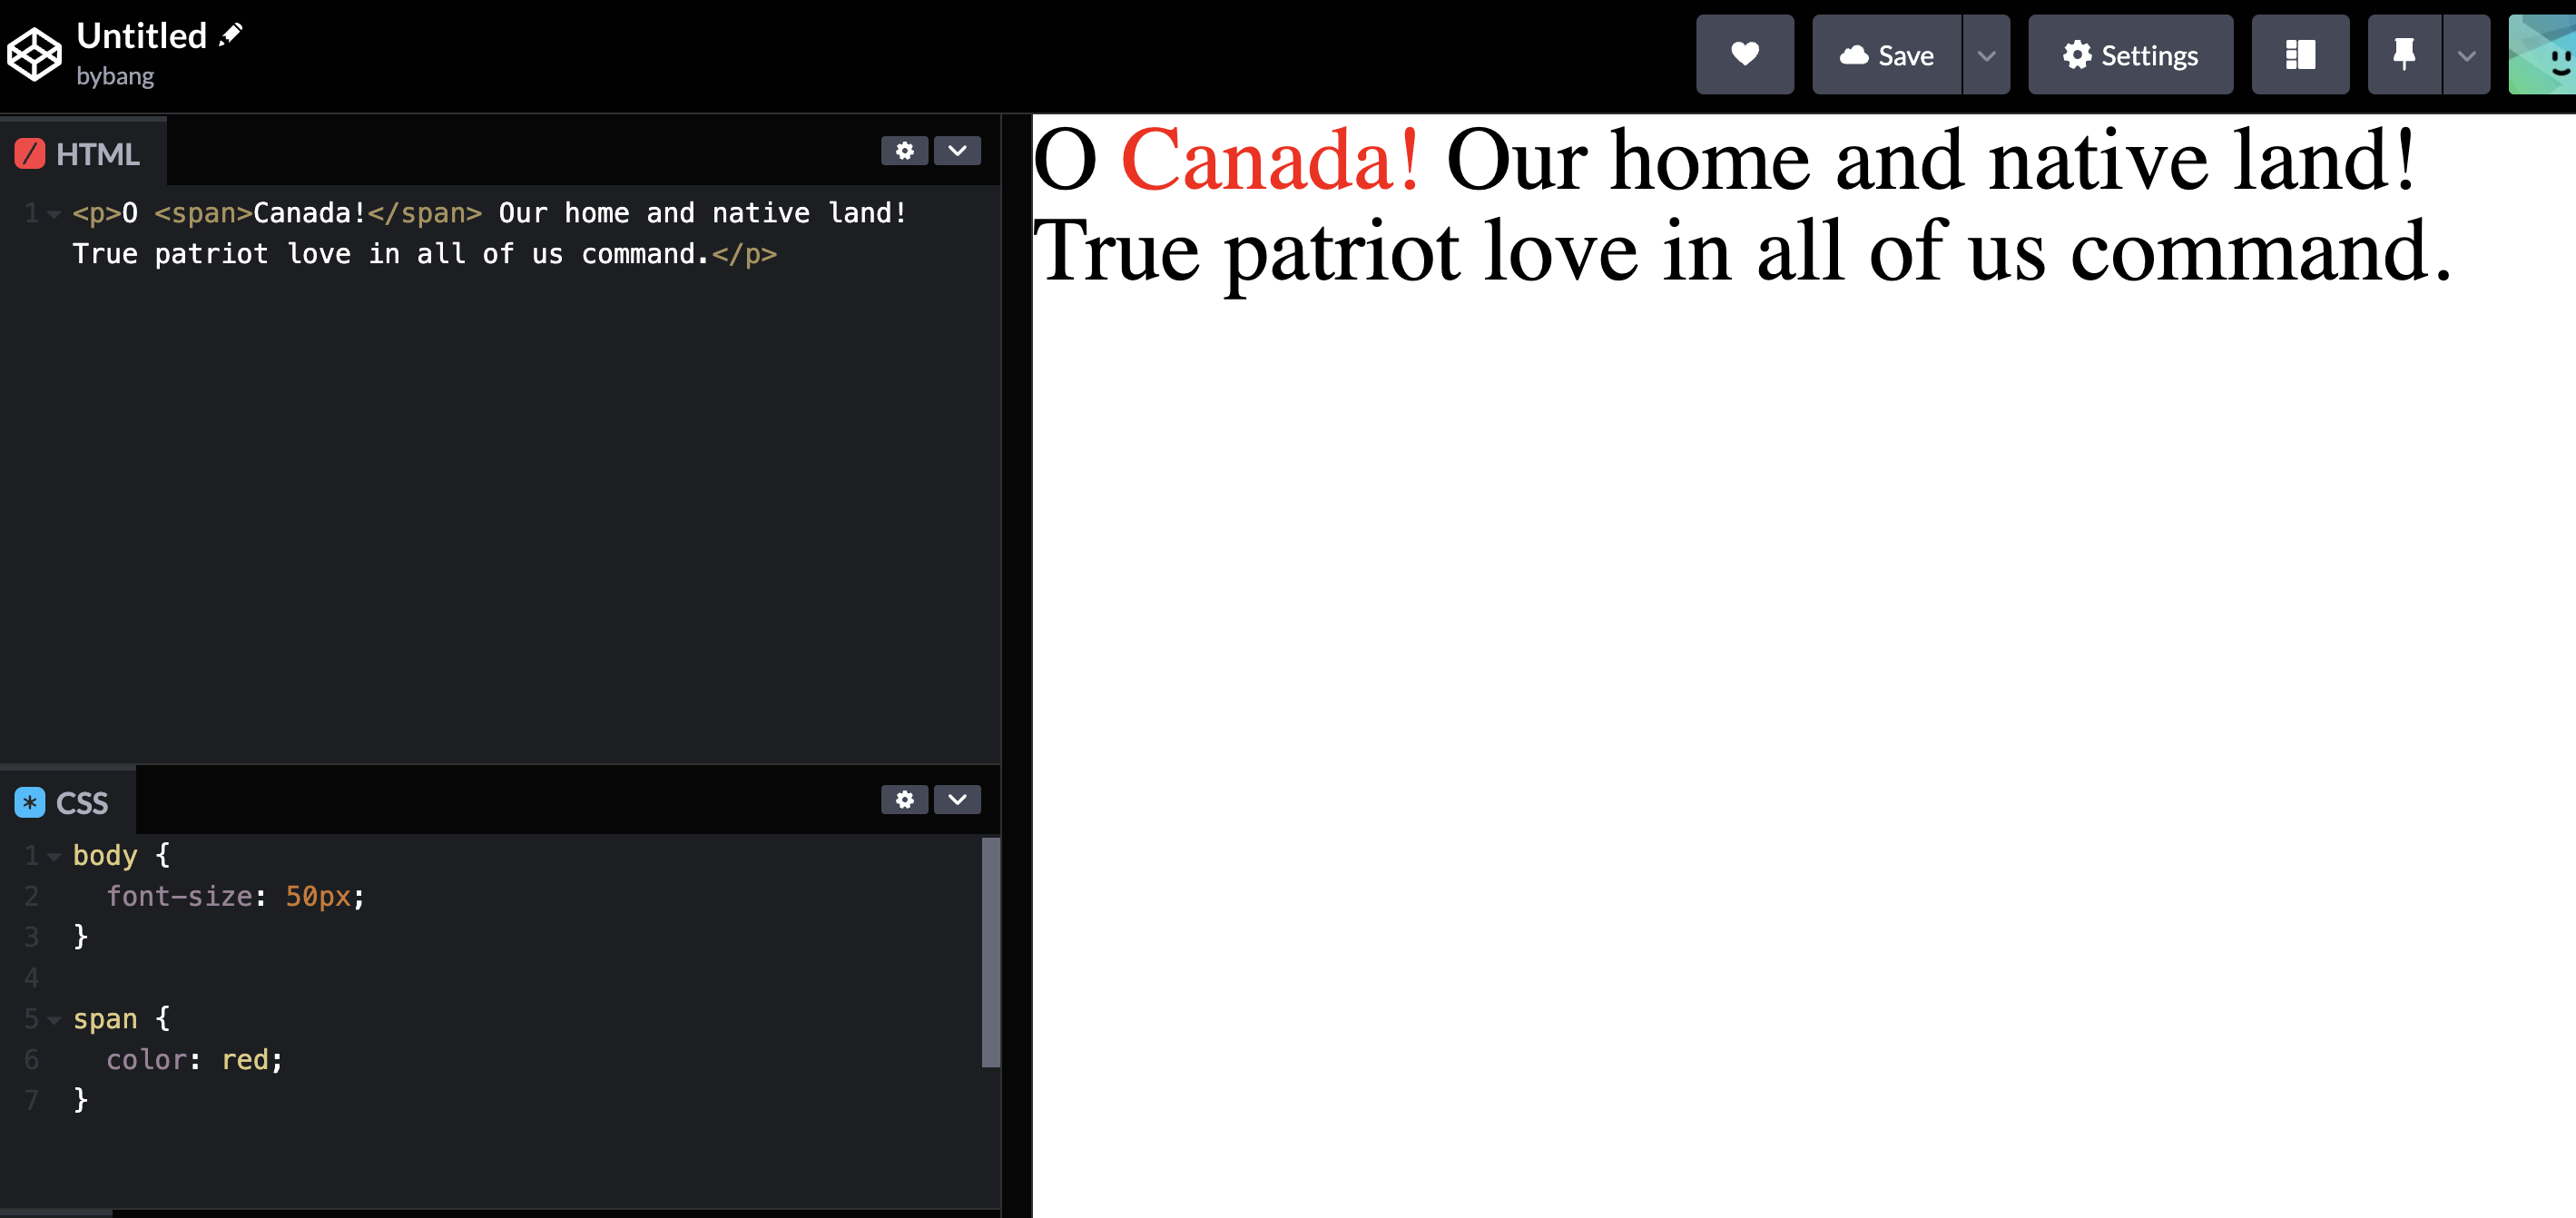
Notice we wrapped only the Canada! part in the span tag inside of the <p> tag. If we apply the same logic but with a div tag, it will look like this:
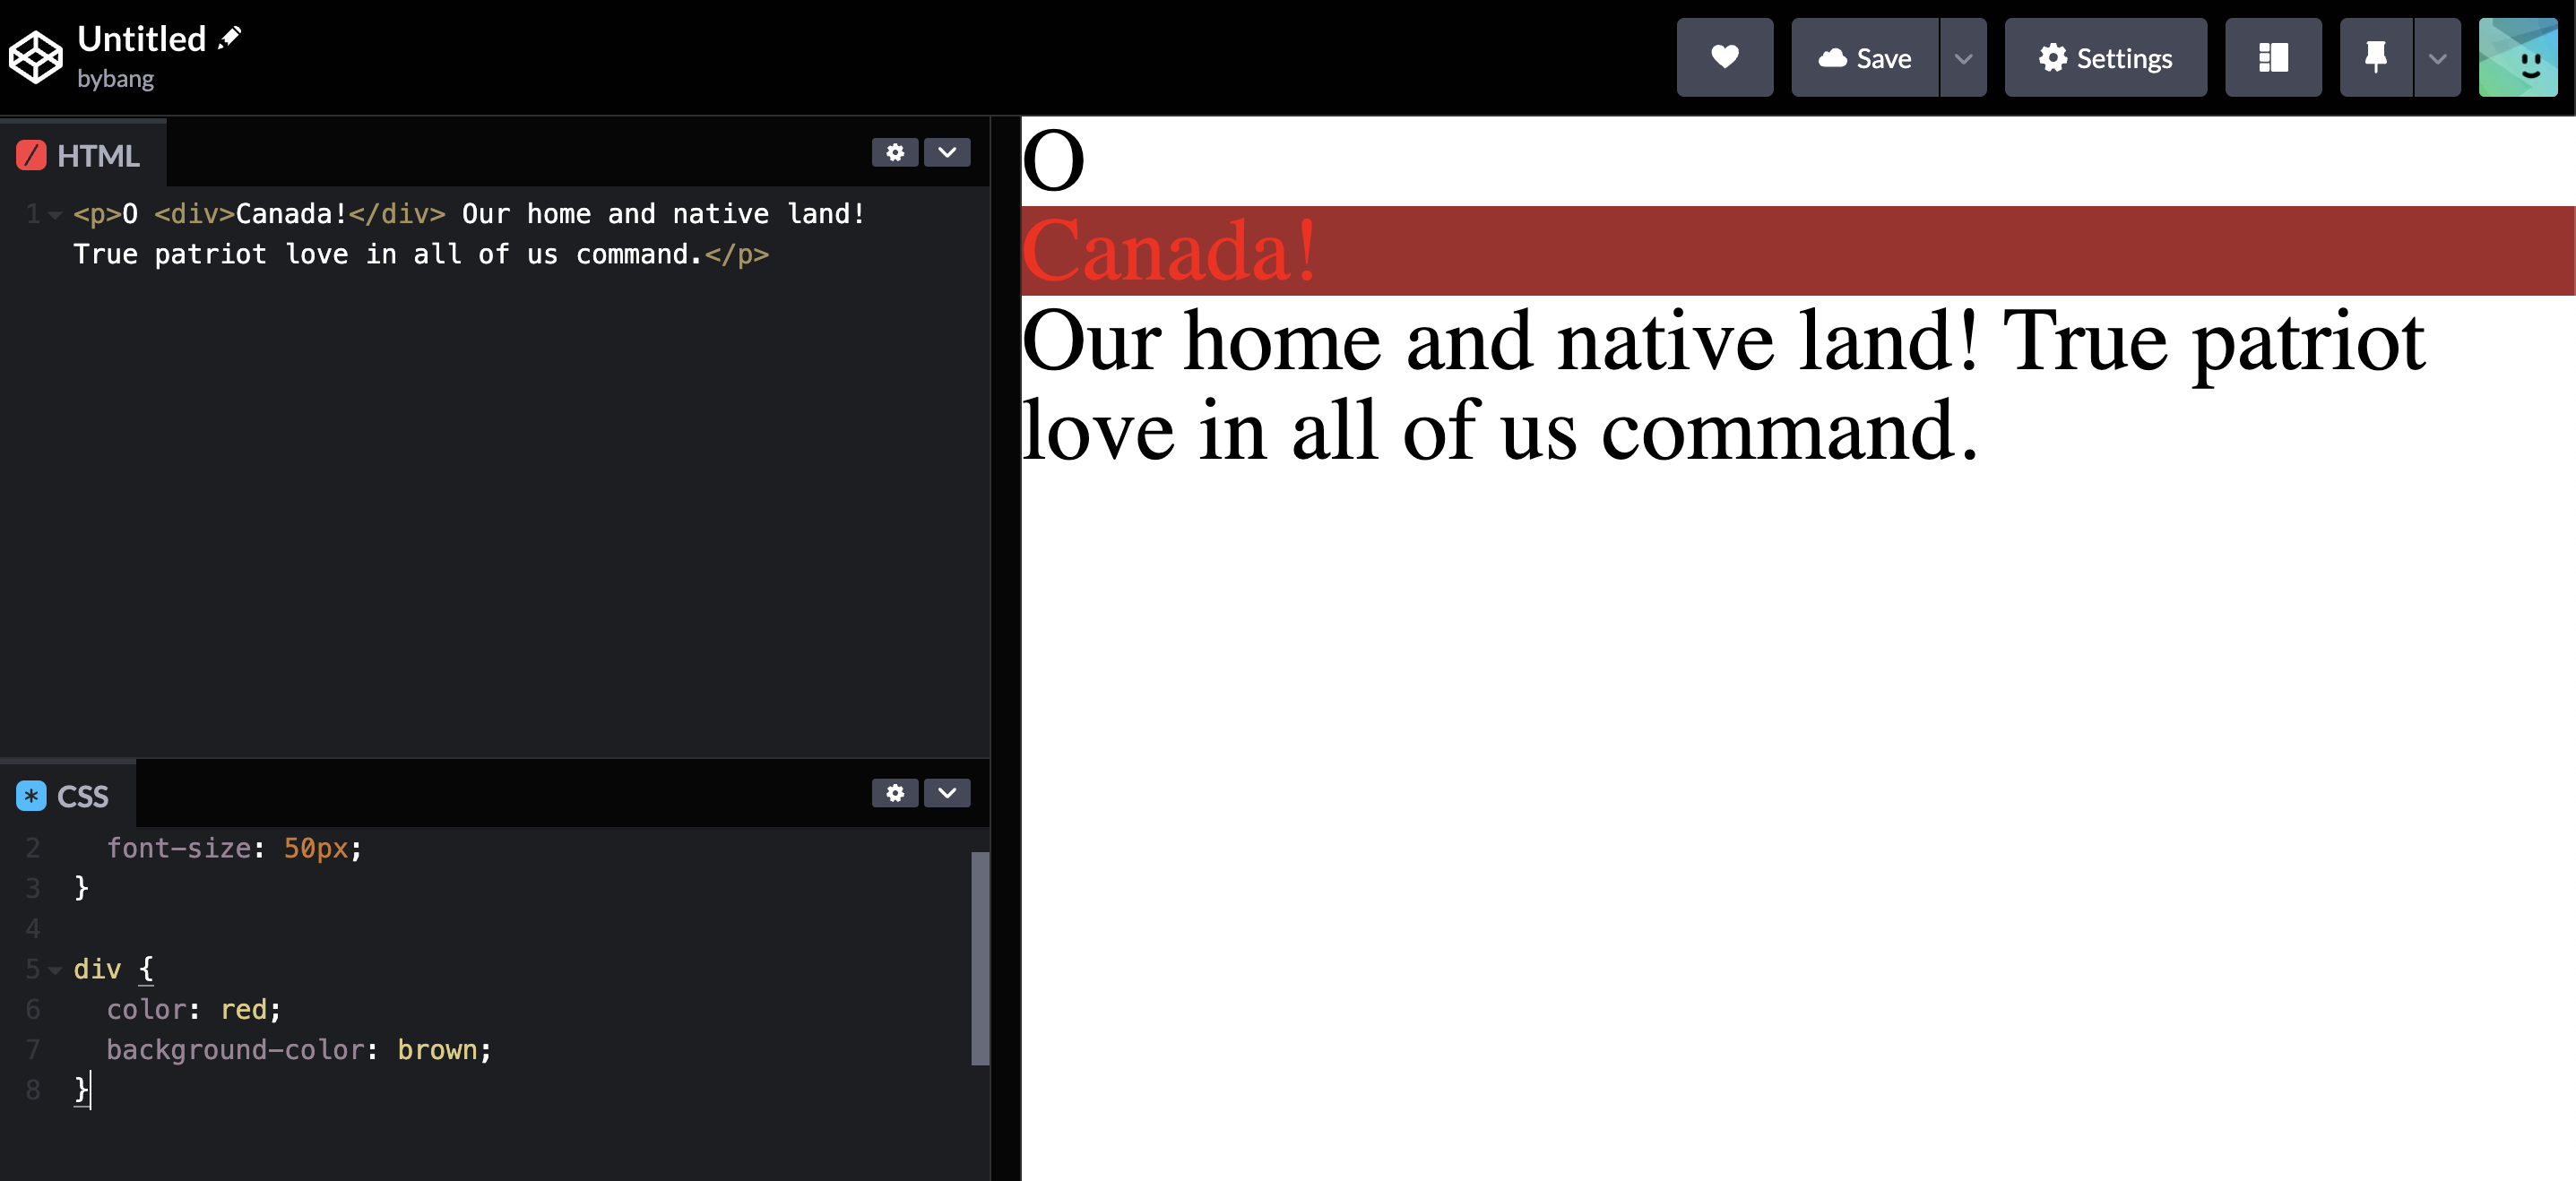
The div tag is the block element, and we can see the div tag created some weird space and broke the paragraph. The background-color CSS indicates that the block element tends to expand to its parent element size, which occupies the whole line.
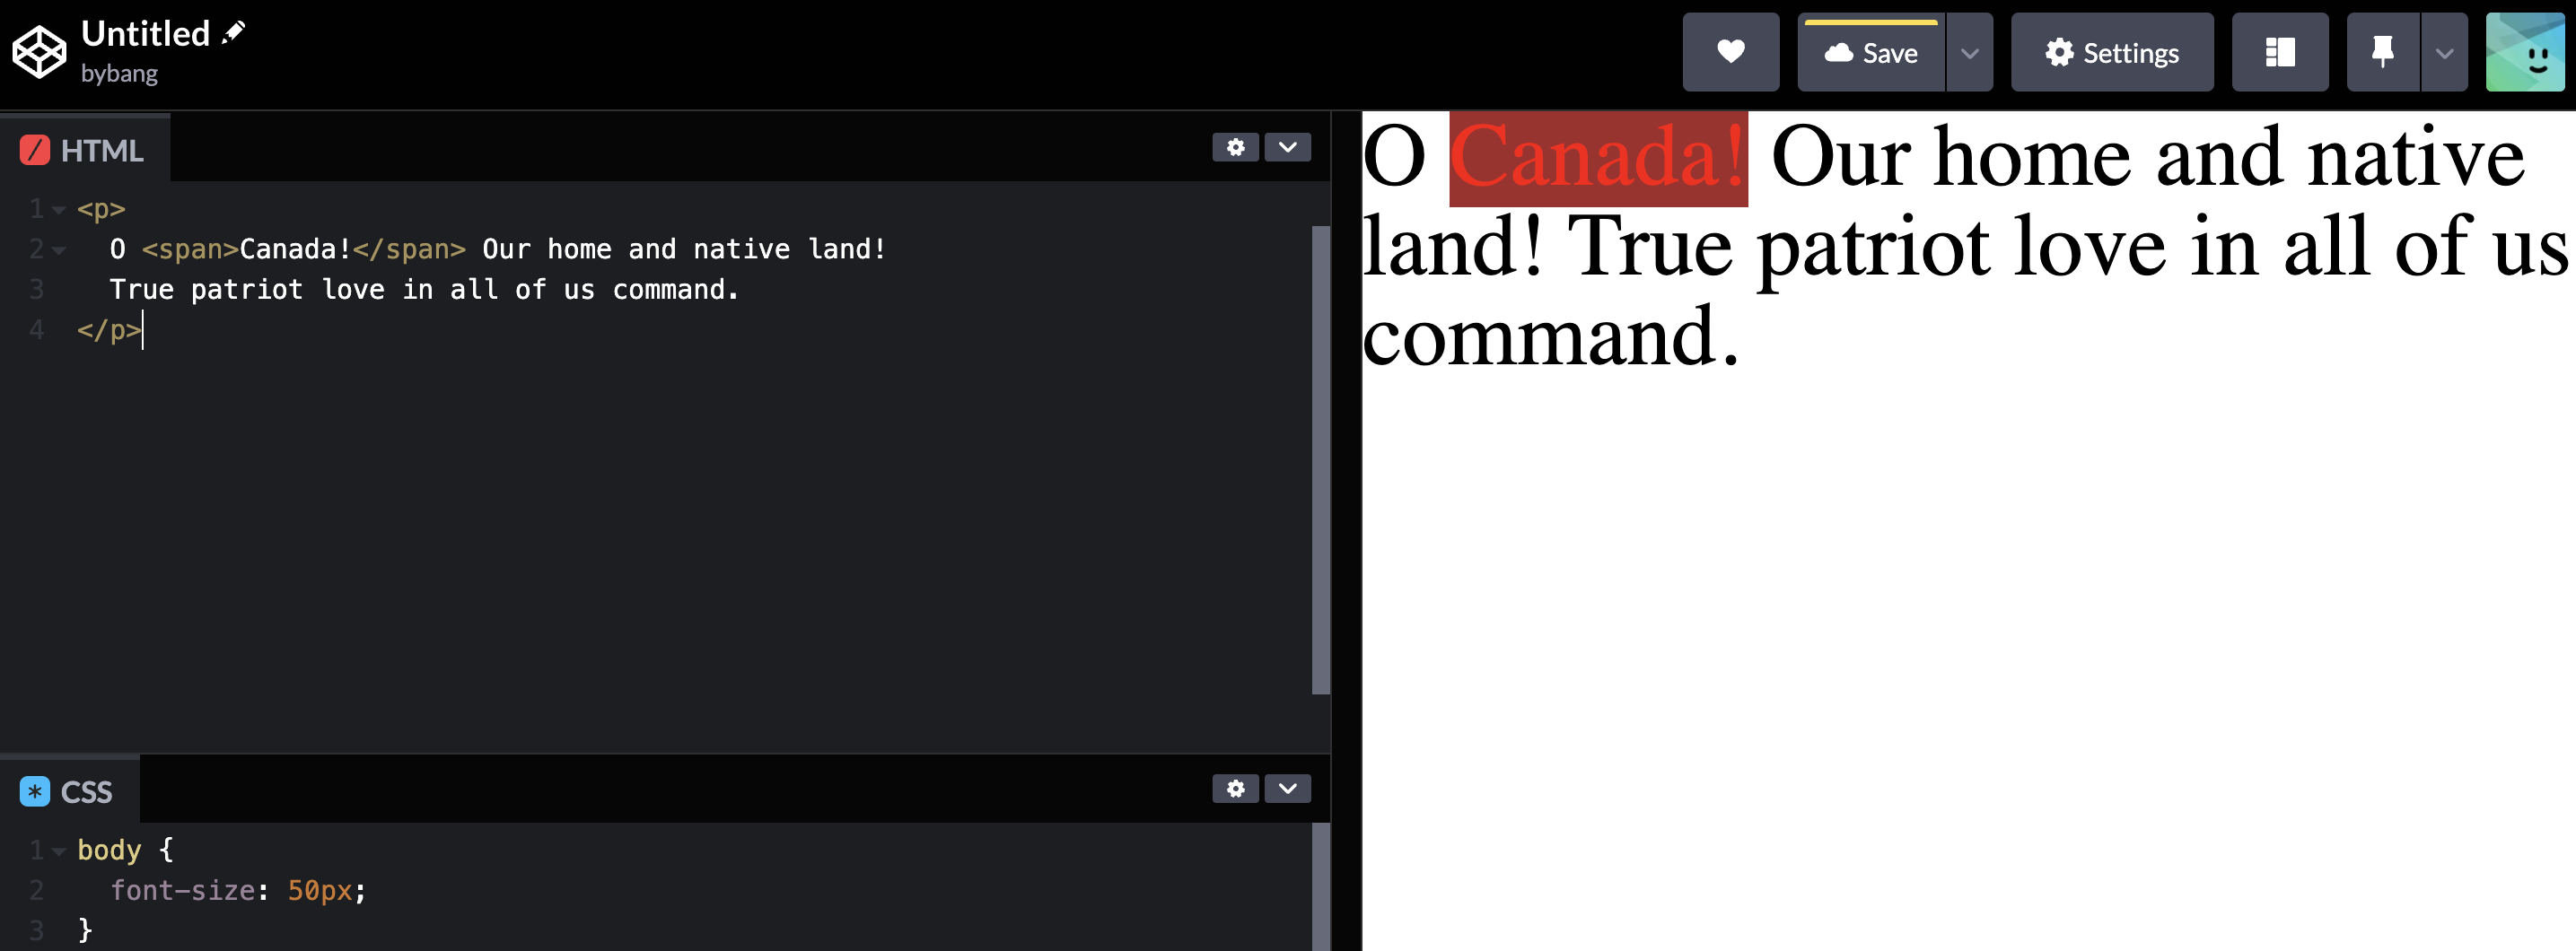
If we go back to the span tag, it doesn’t create additional space because the span tag is the inline element and is treated as text. The inline element tends to shrink to the size of the content. Hence, we can use the span tag when dealing with the text.
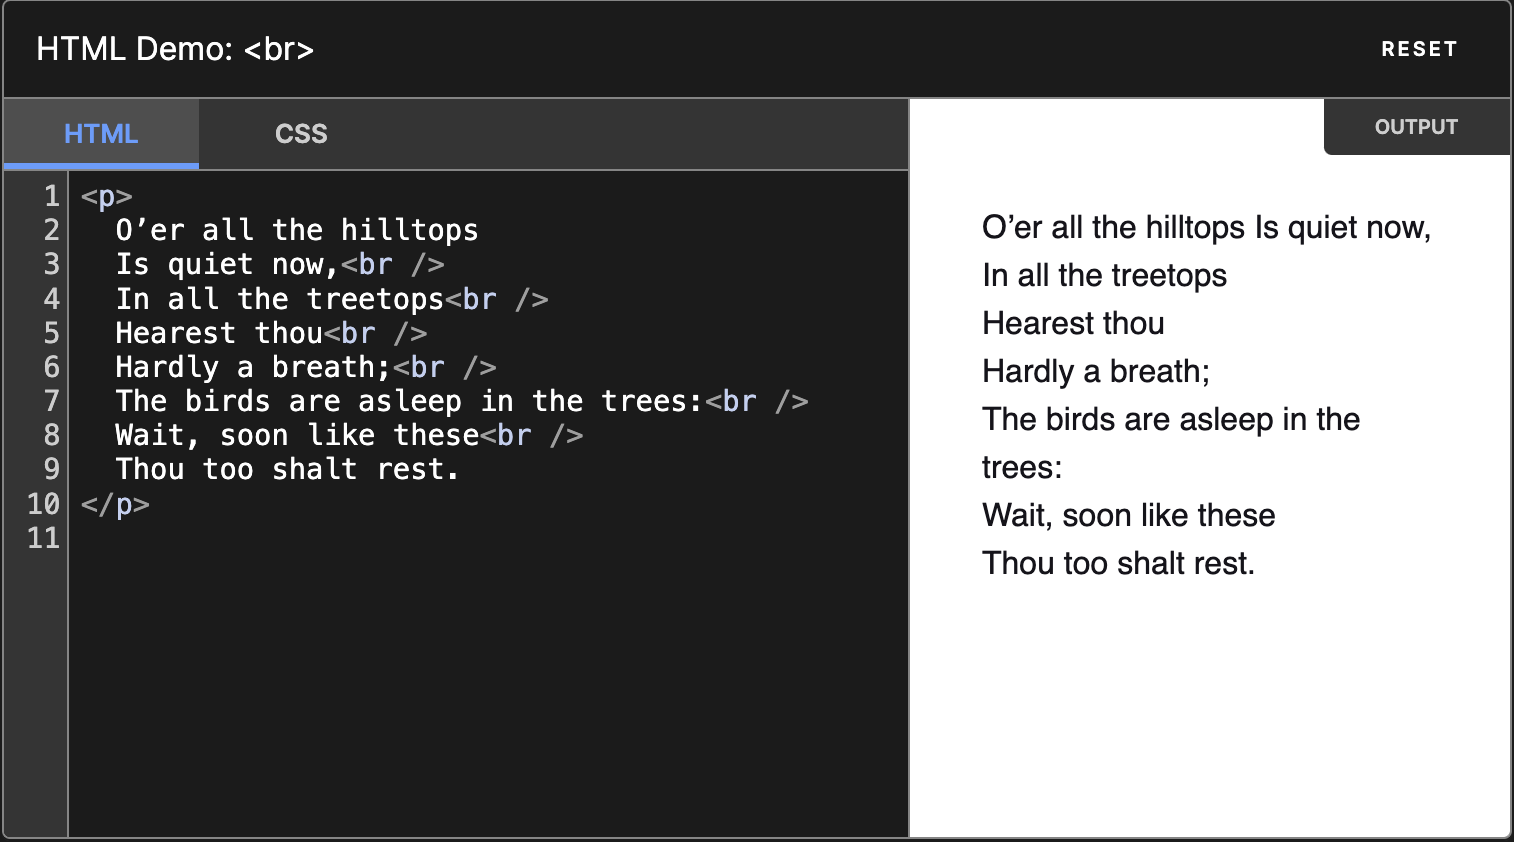
Break
What else might be weird from the above? It turns out we added a new line next to the land!, but it didn’t apply to the output.
<p>
  O <span>Canada!</span> Our home and native land! True patriot love in all of
  us command.
</p>
We might think something is wrong, and we can try adding a few more lines between the code snippet above, but the result should be the same.
If we want a new line in HTML, we must use a <br/> tag.
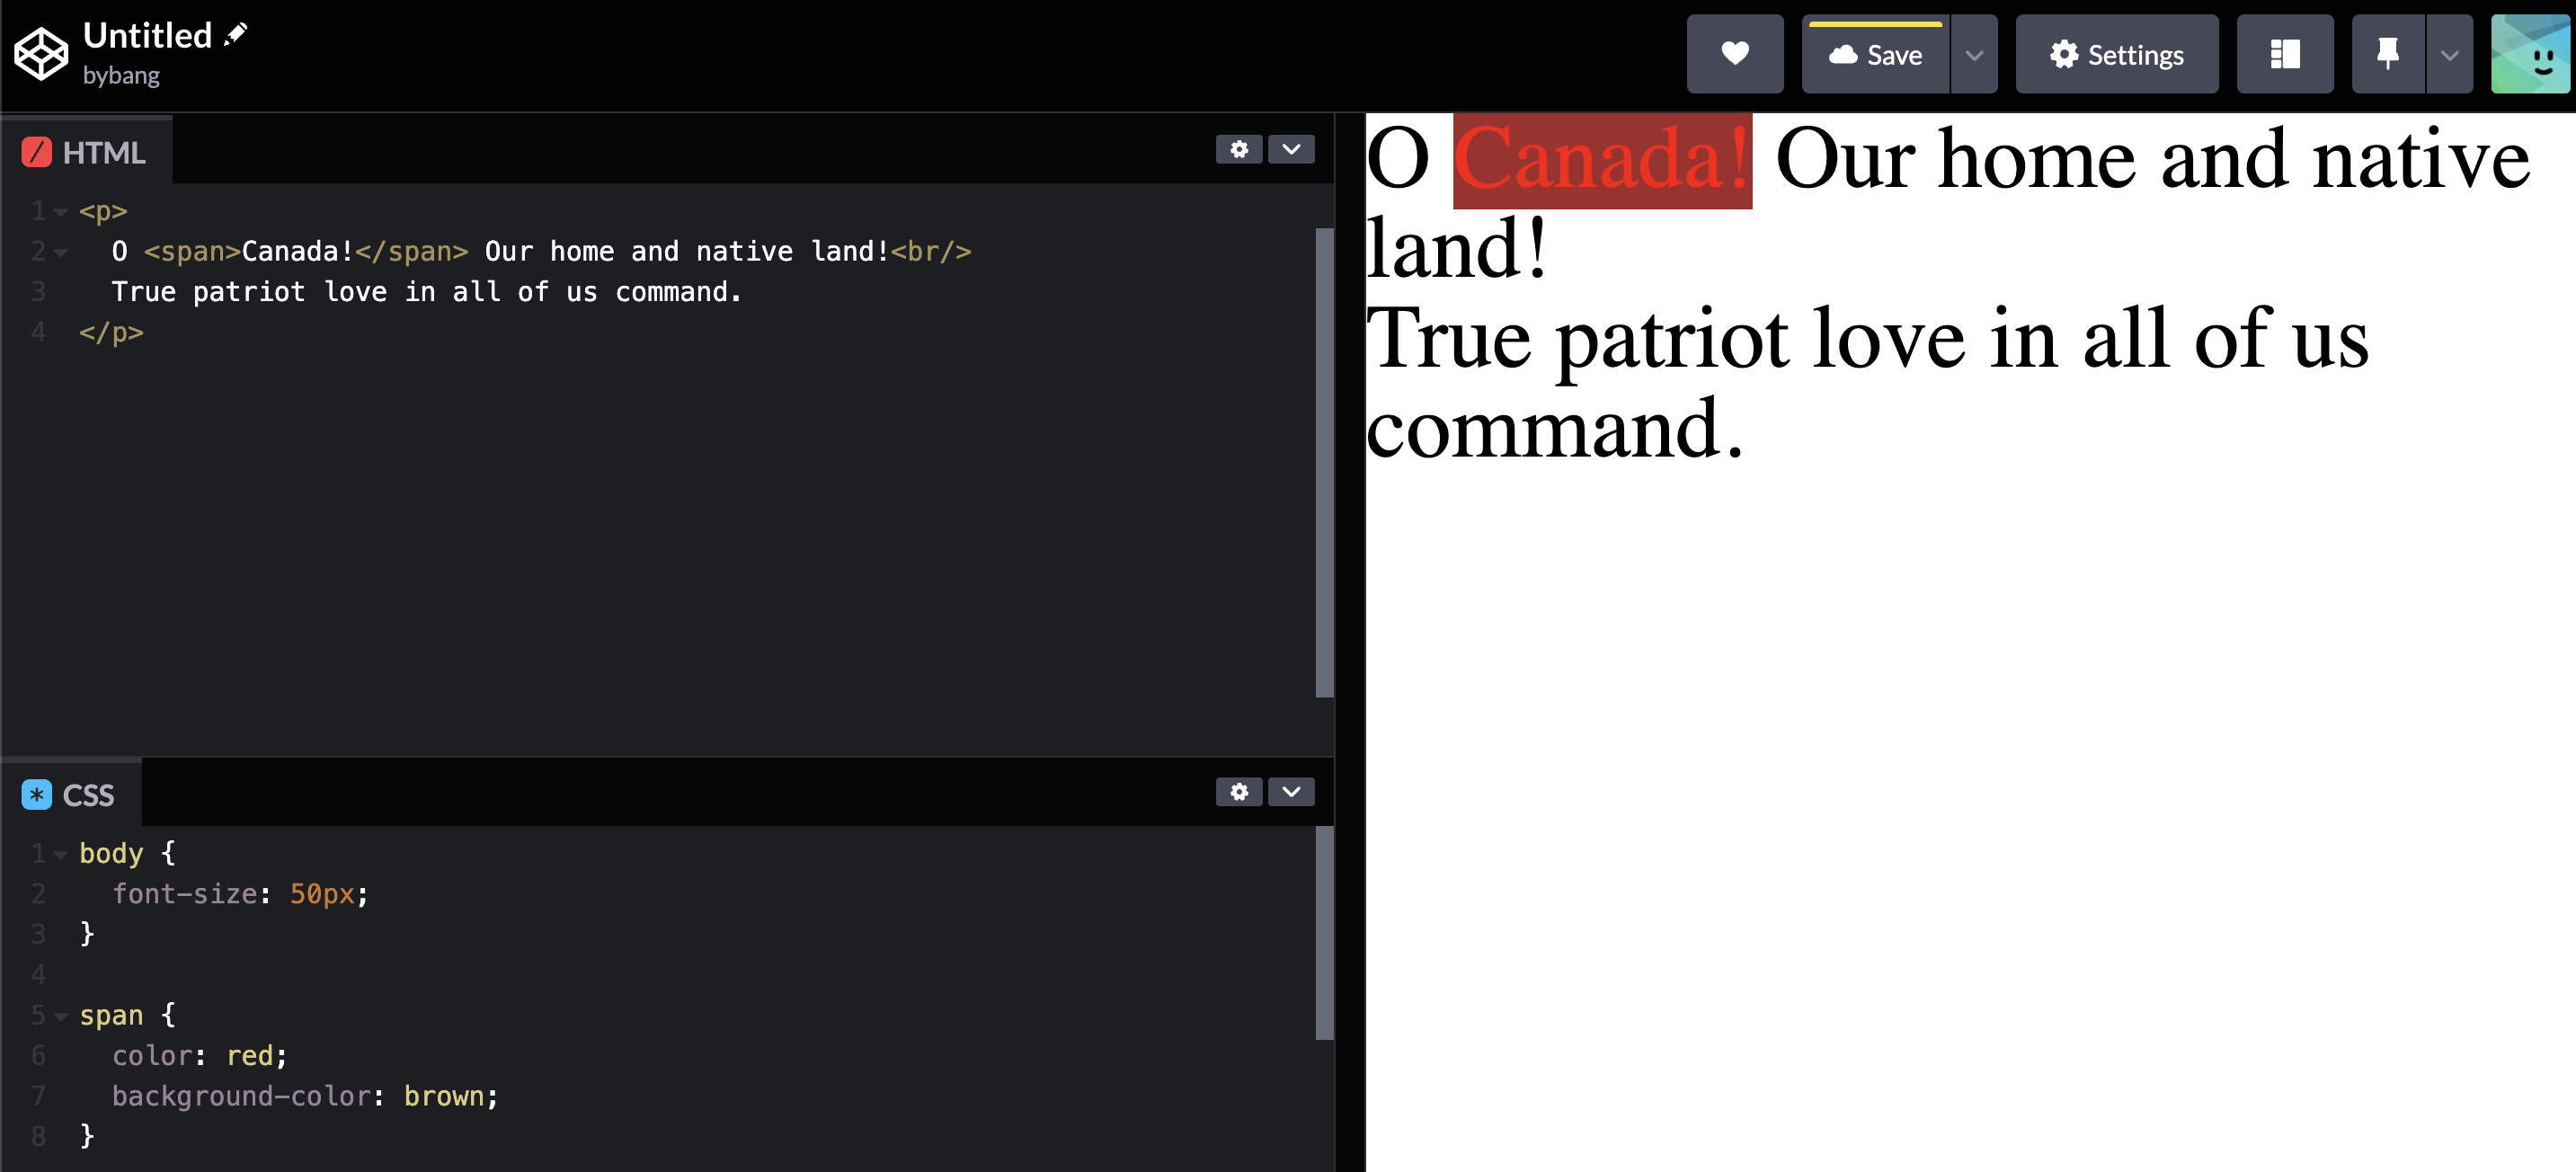
Then, we can see the desired input with a new line.
Input
To understand the output of the <input> element, we need to make and play with the tag.
What happened here is that we set the value and the placeholder to the input box. The value should be printed, and suppose we deleted all the written text happy coding!. Then, the placeholder should come up, and we can see the cursor is in the first place. We can assume what happened there, but the best way to understand it is by making it ourselves.
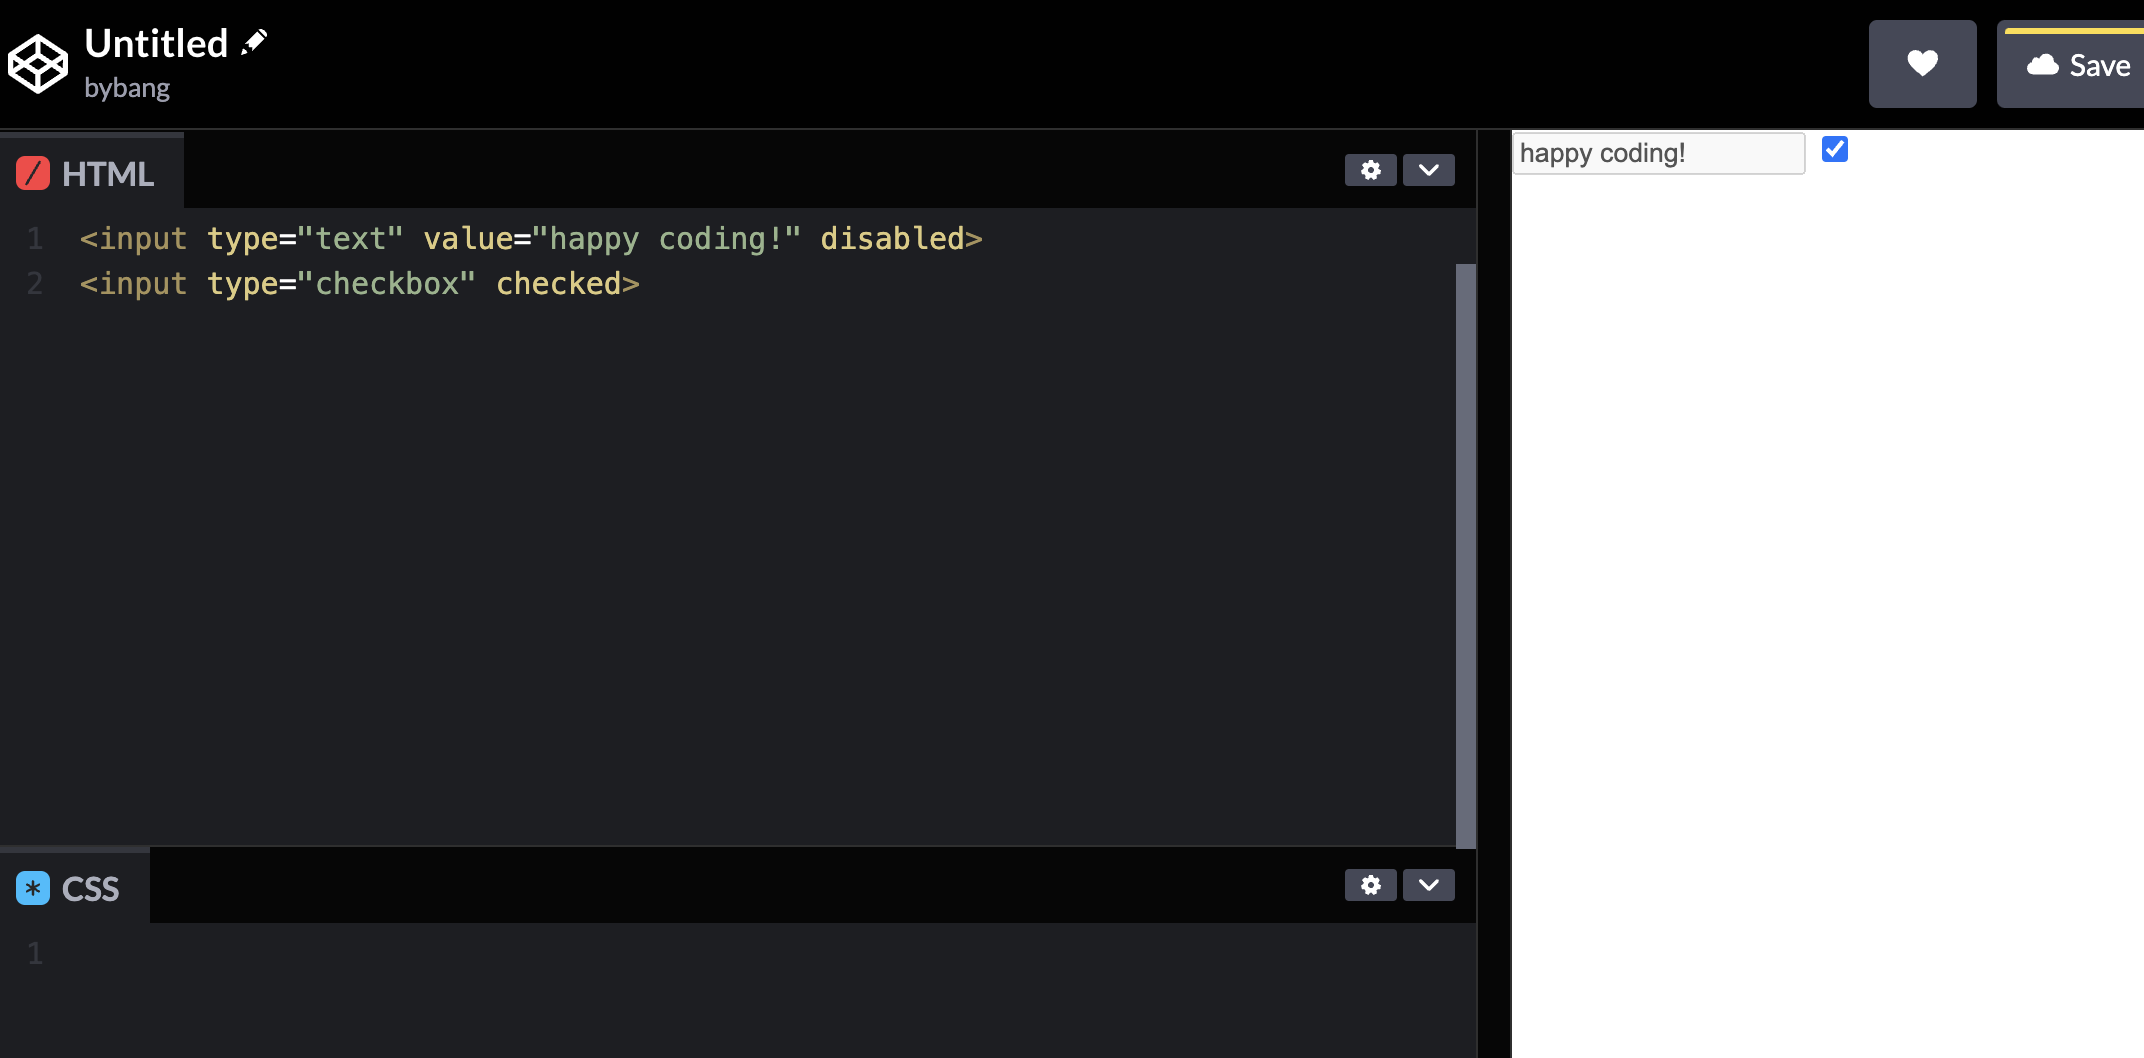
Additionally, by adding a disabled attribute, we can make the text box to be not modified. Also, by adding the checked attribute, we can make the checkbox always start with the check mark, but the user can deselect it.
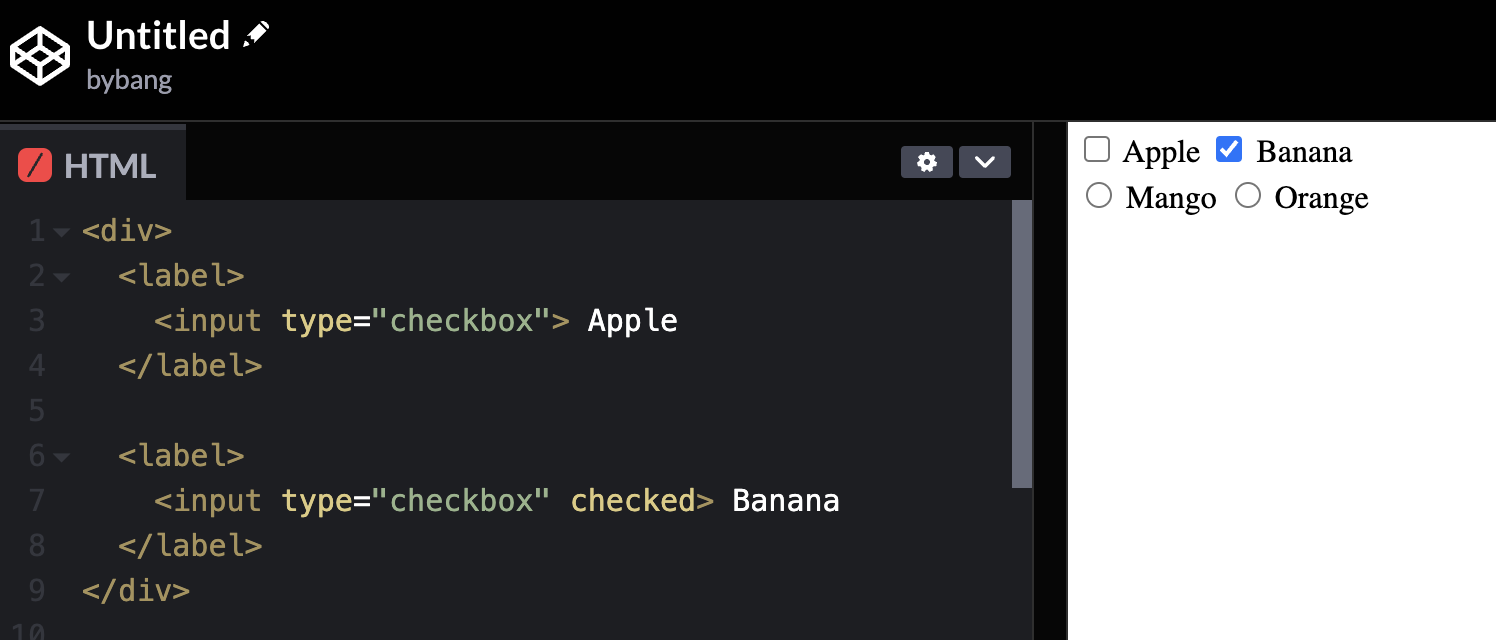
Label
Let’s create another checkbox to practice the label tag output.
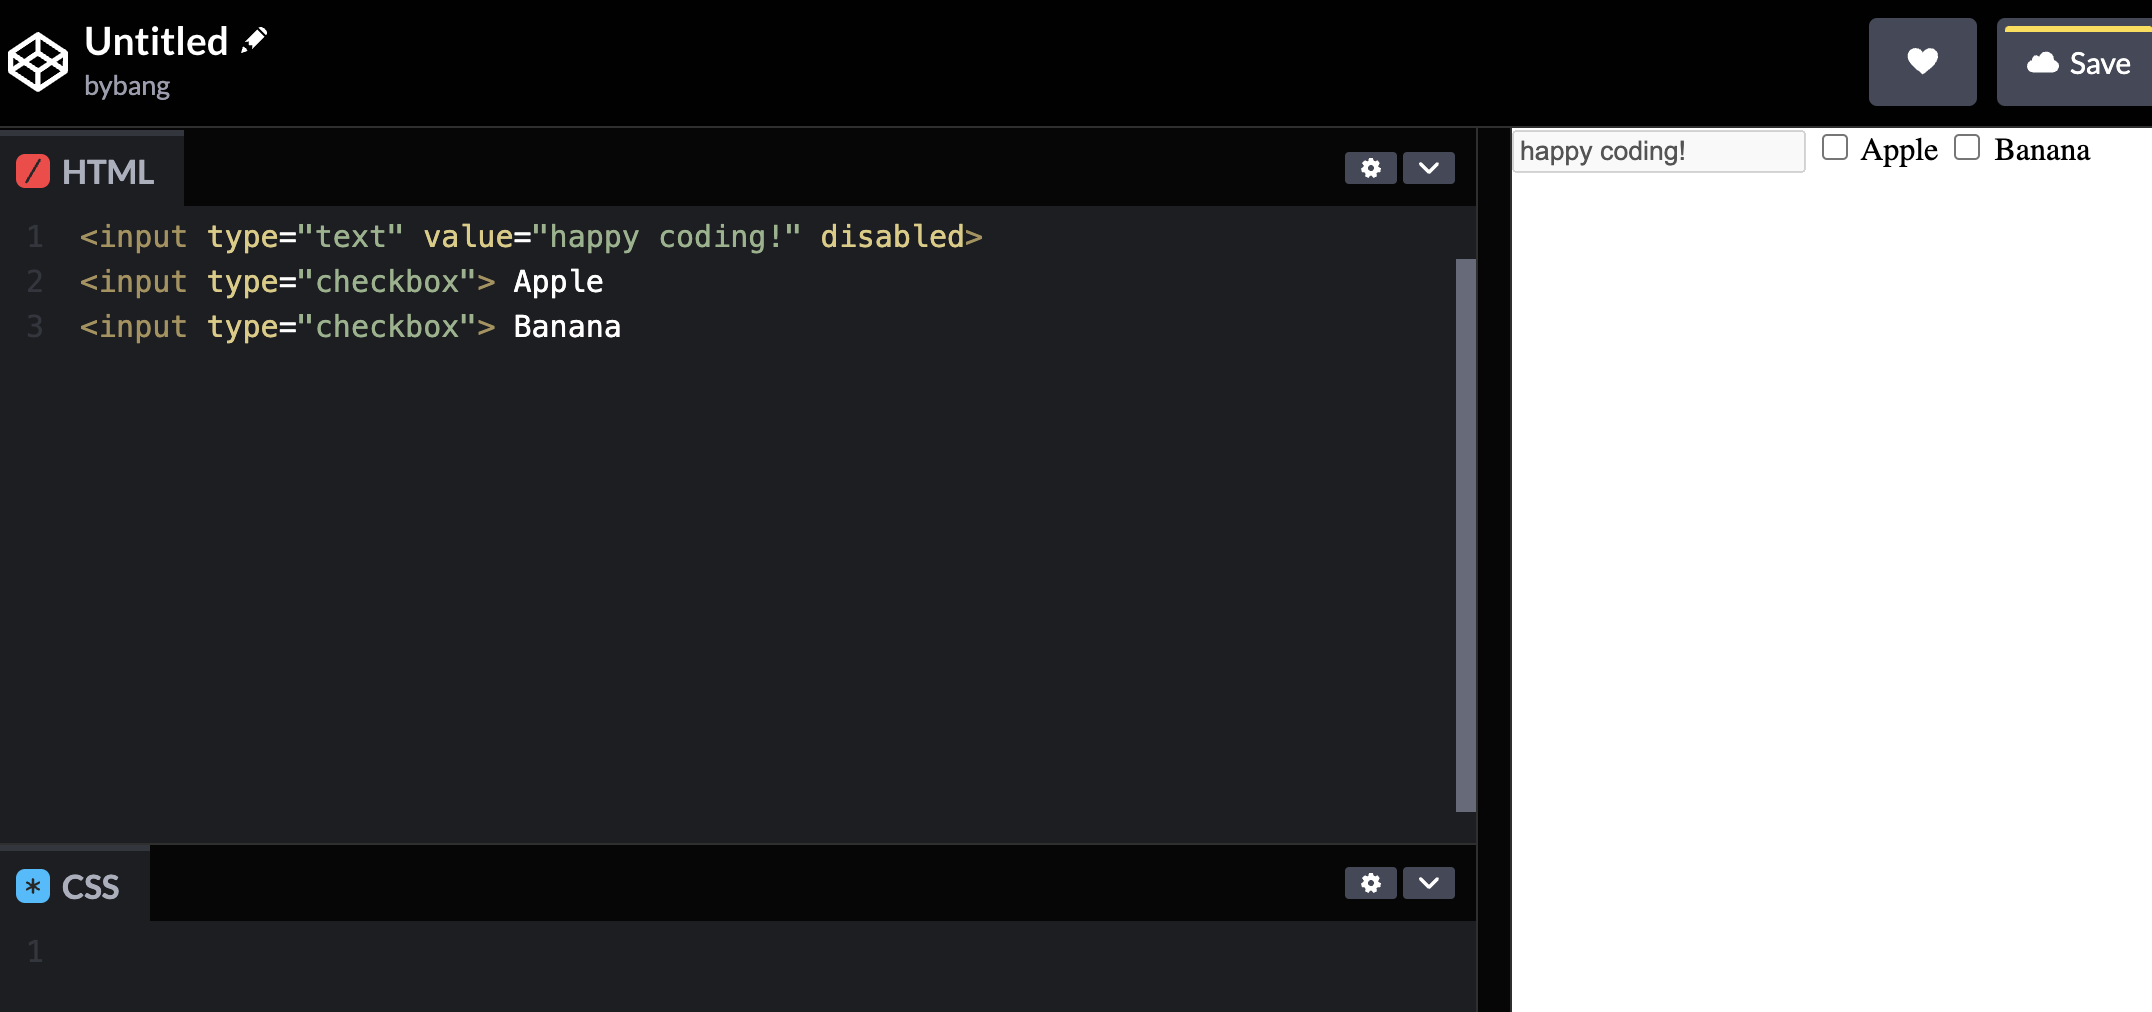
When we click the Apple or Banana text, the checkbox does not respond because it is not the same element.
We can wrap the two elements with a label tag, and now it works as expected.
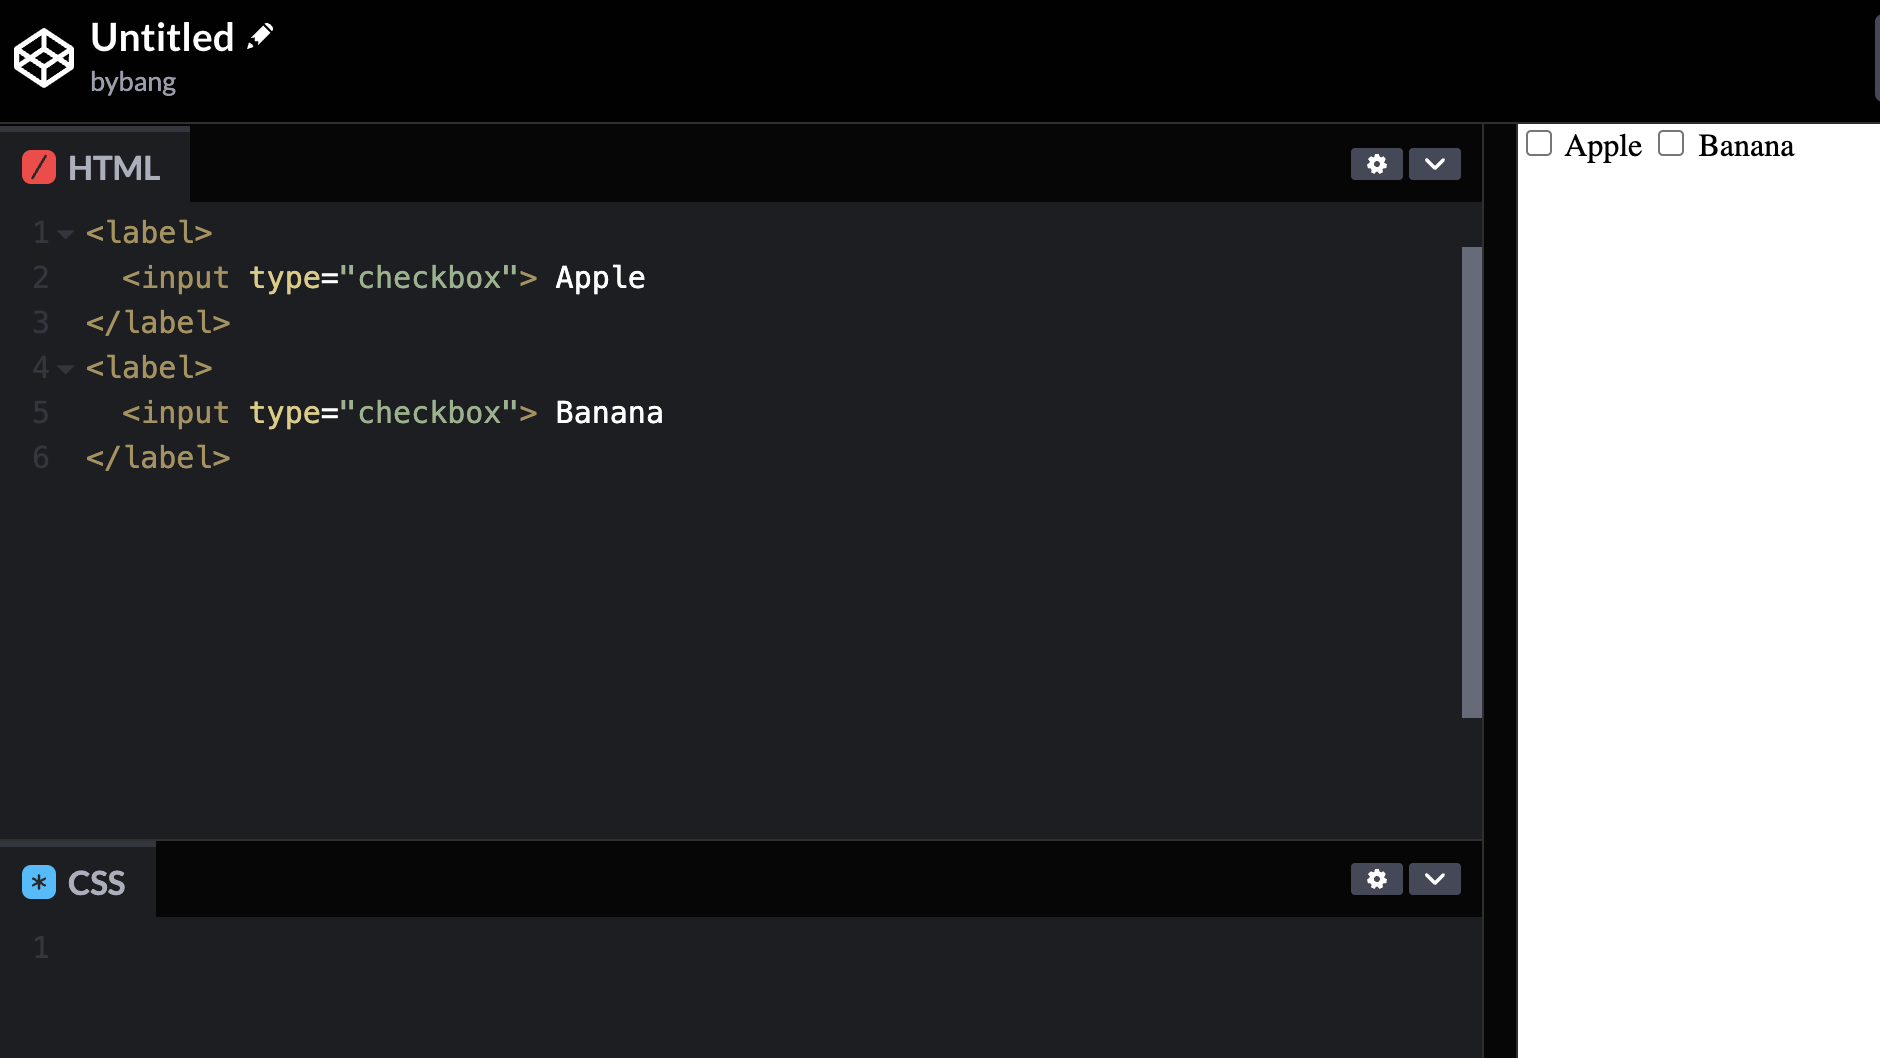
Notice when we hover over the text, the text selector disappears. Or we can simply click the text, and the checkbox will be checked because now they are the same element under the label tag.
Radio
We have been playing with the checkboxes and might realize the checkboxes are independent and not related to other checkboxes.
We can use the radio input type if we want related buttons to select only one item from the collection.

Now, we made radio buttons, but they do not work as expected. That’s because the radio buttons must be grouped if they are in the same category.
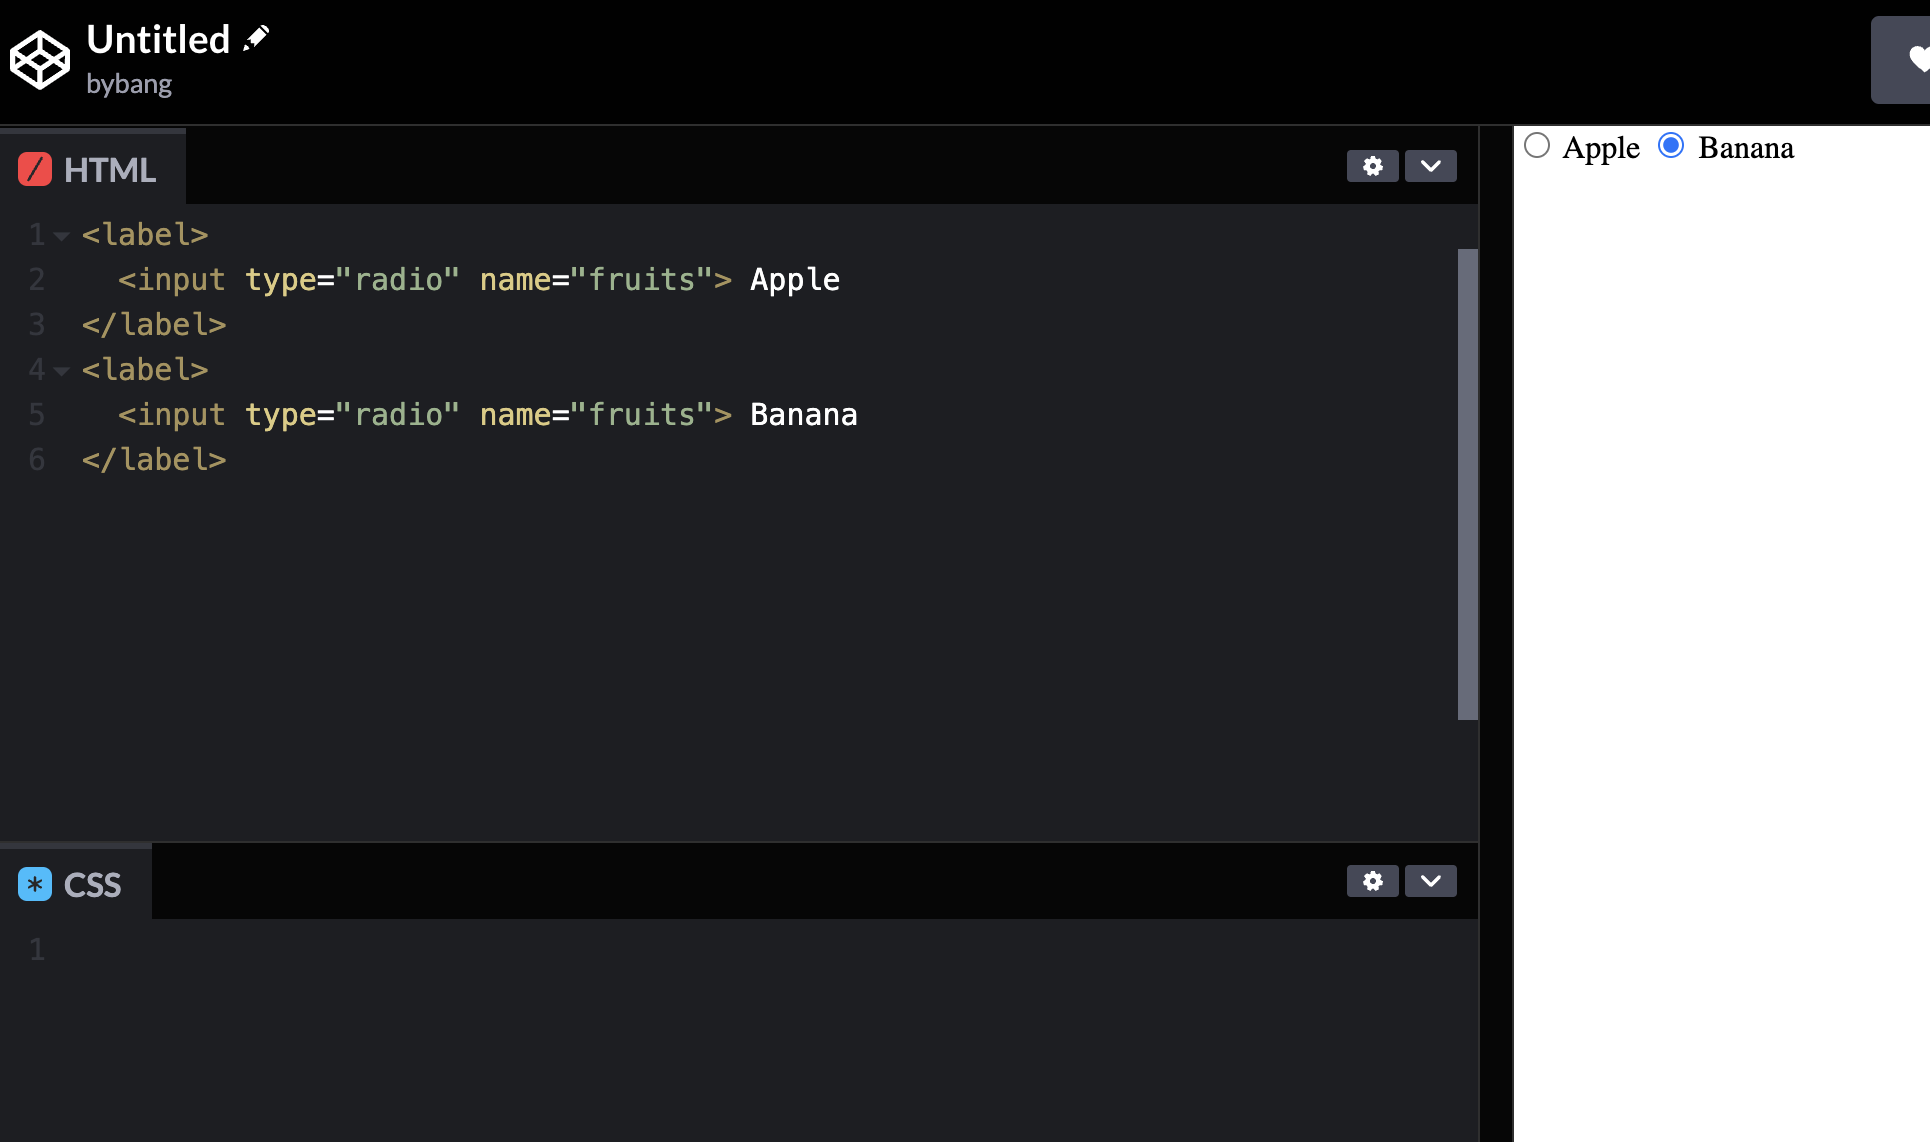
After we group them into the same name, we can select one or the other buttons. If interested in the input type radio, check out MDN
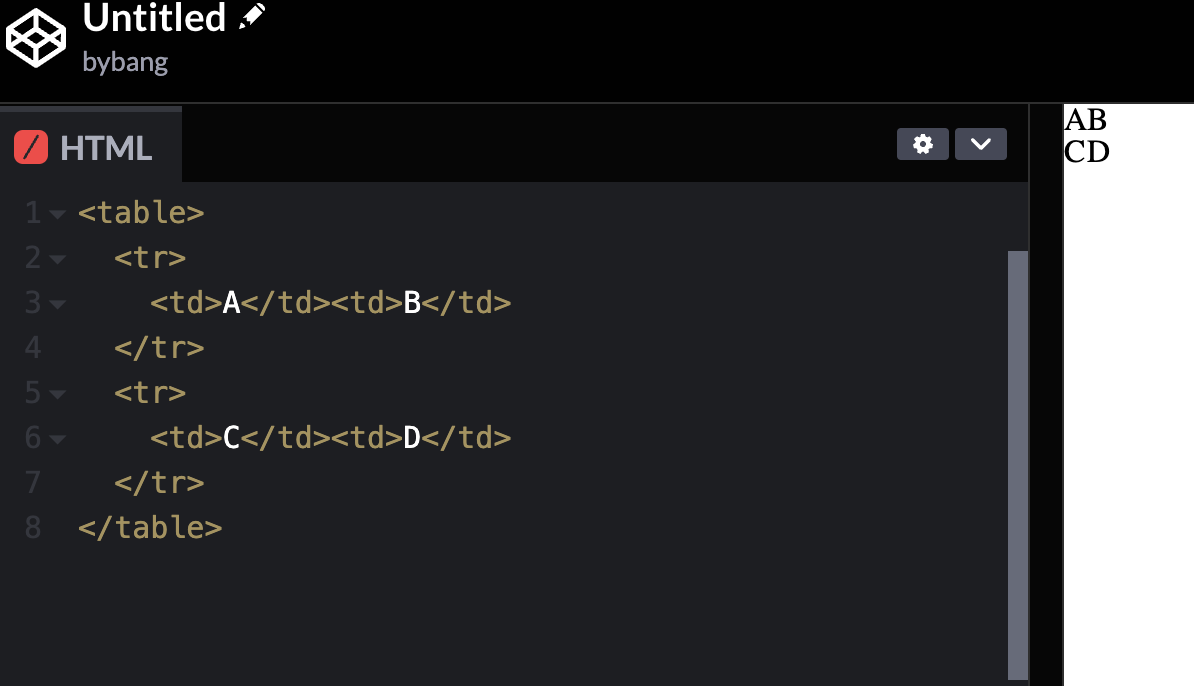
Table
We didn’t learn the CSS, so we just typed the CSS without understanding for now. The picture below CSS creates the border of each cell data and padding or inner space of each cell data.
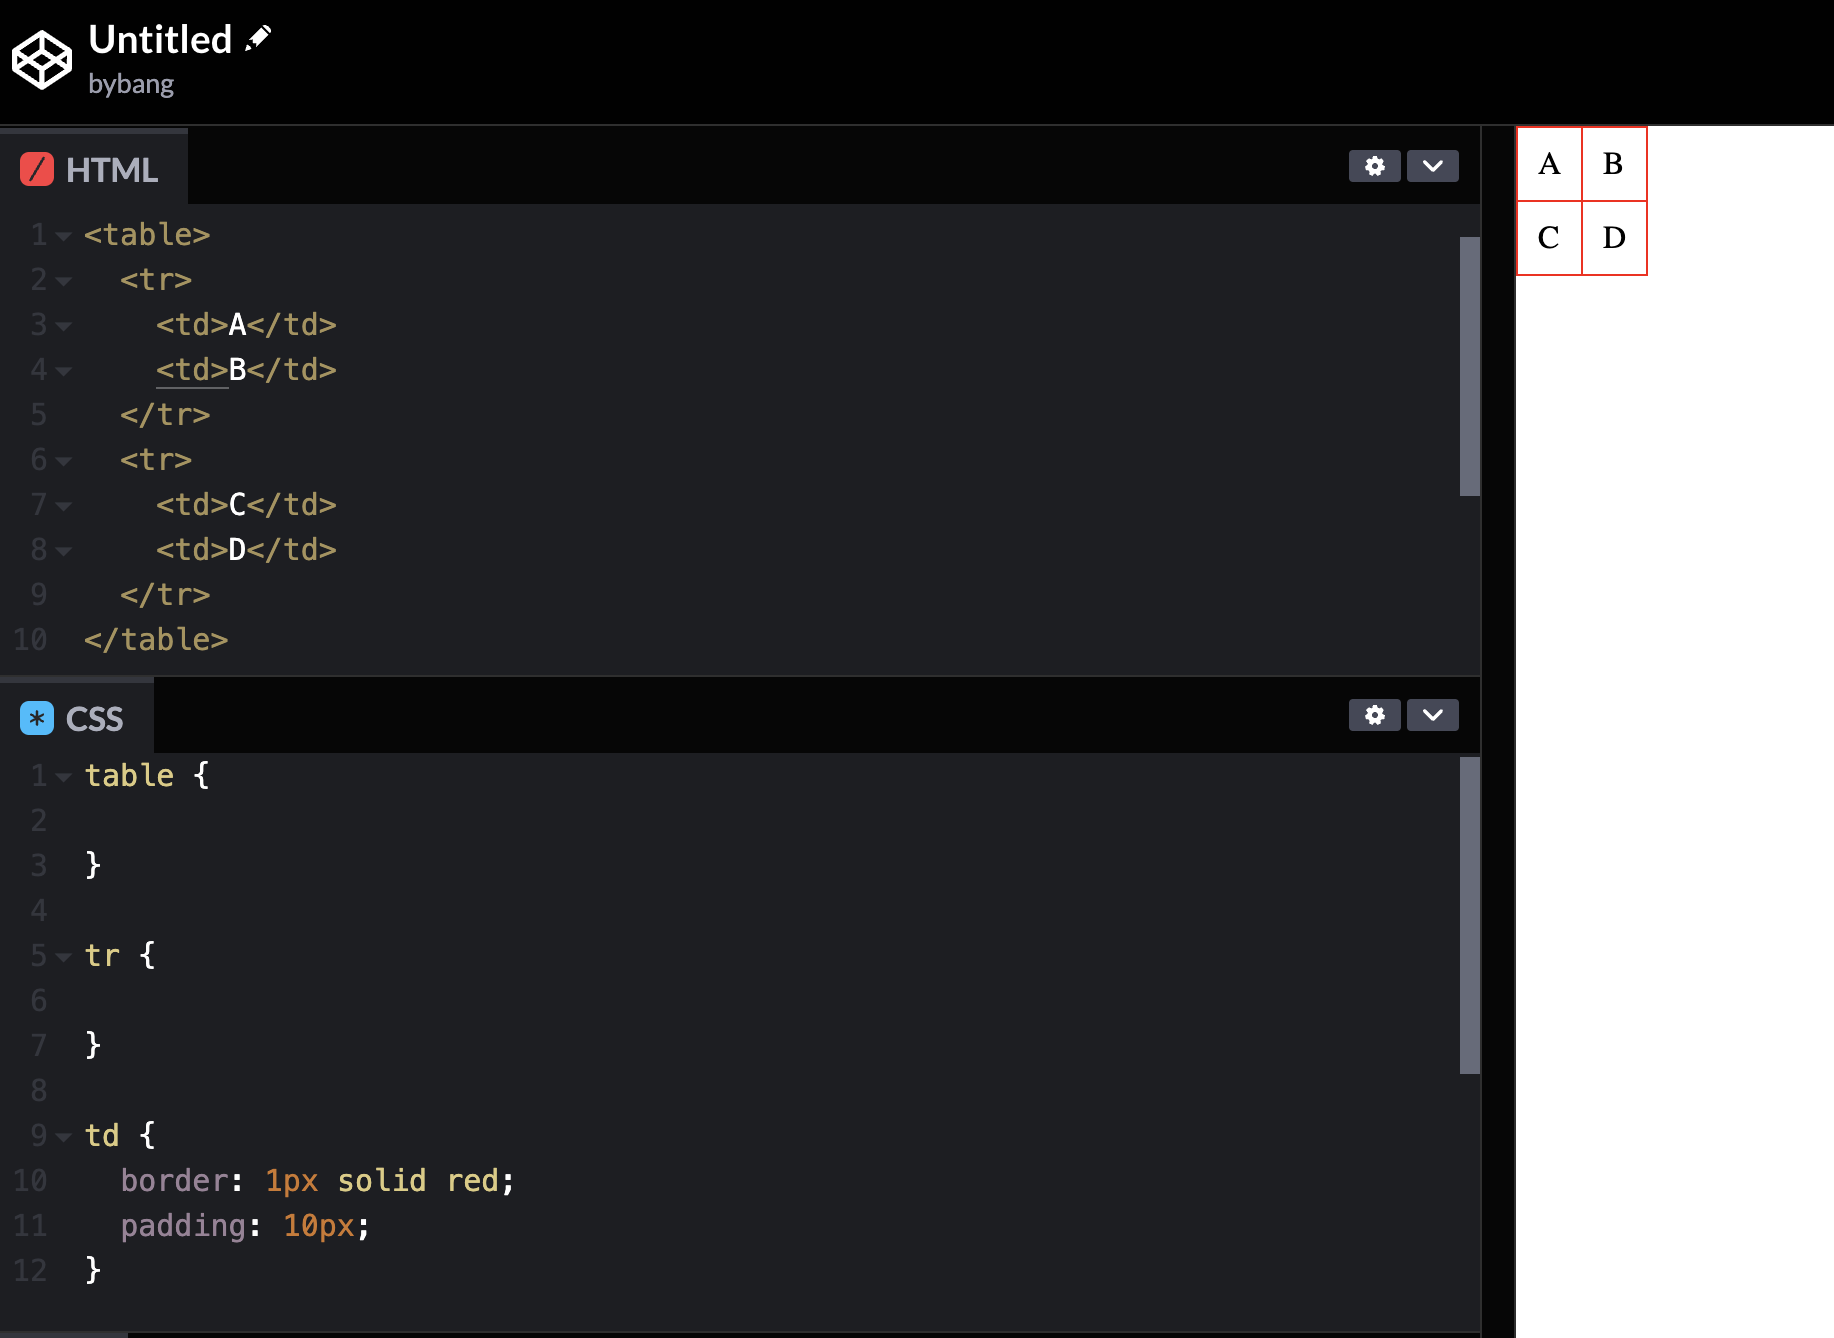
If we want to add more data in the first row, we can add an additional td tag in there. But what about the second row?
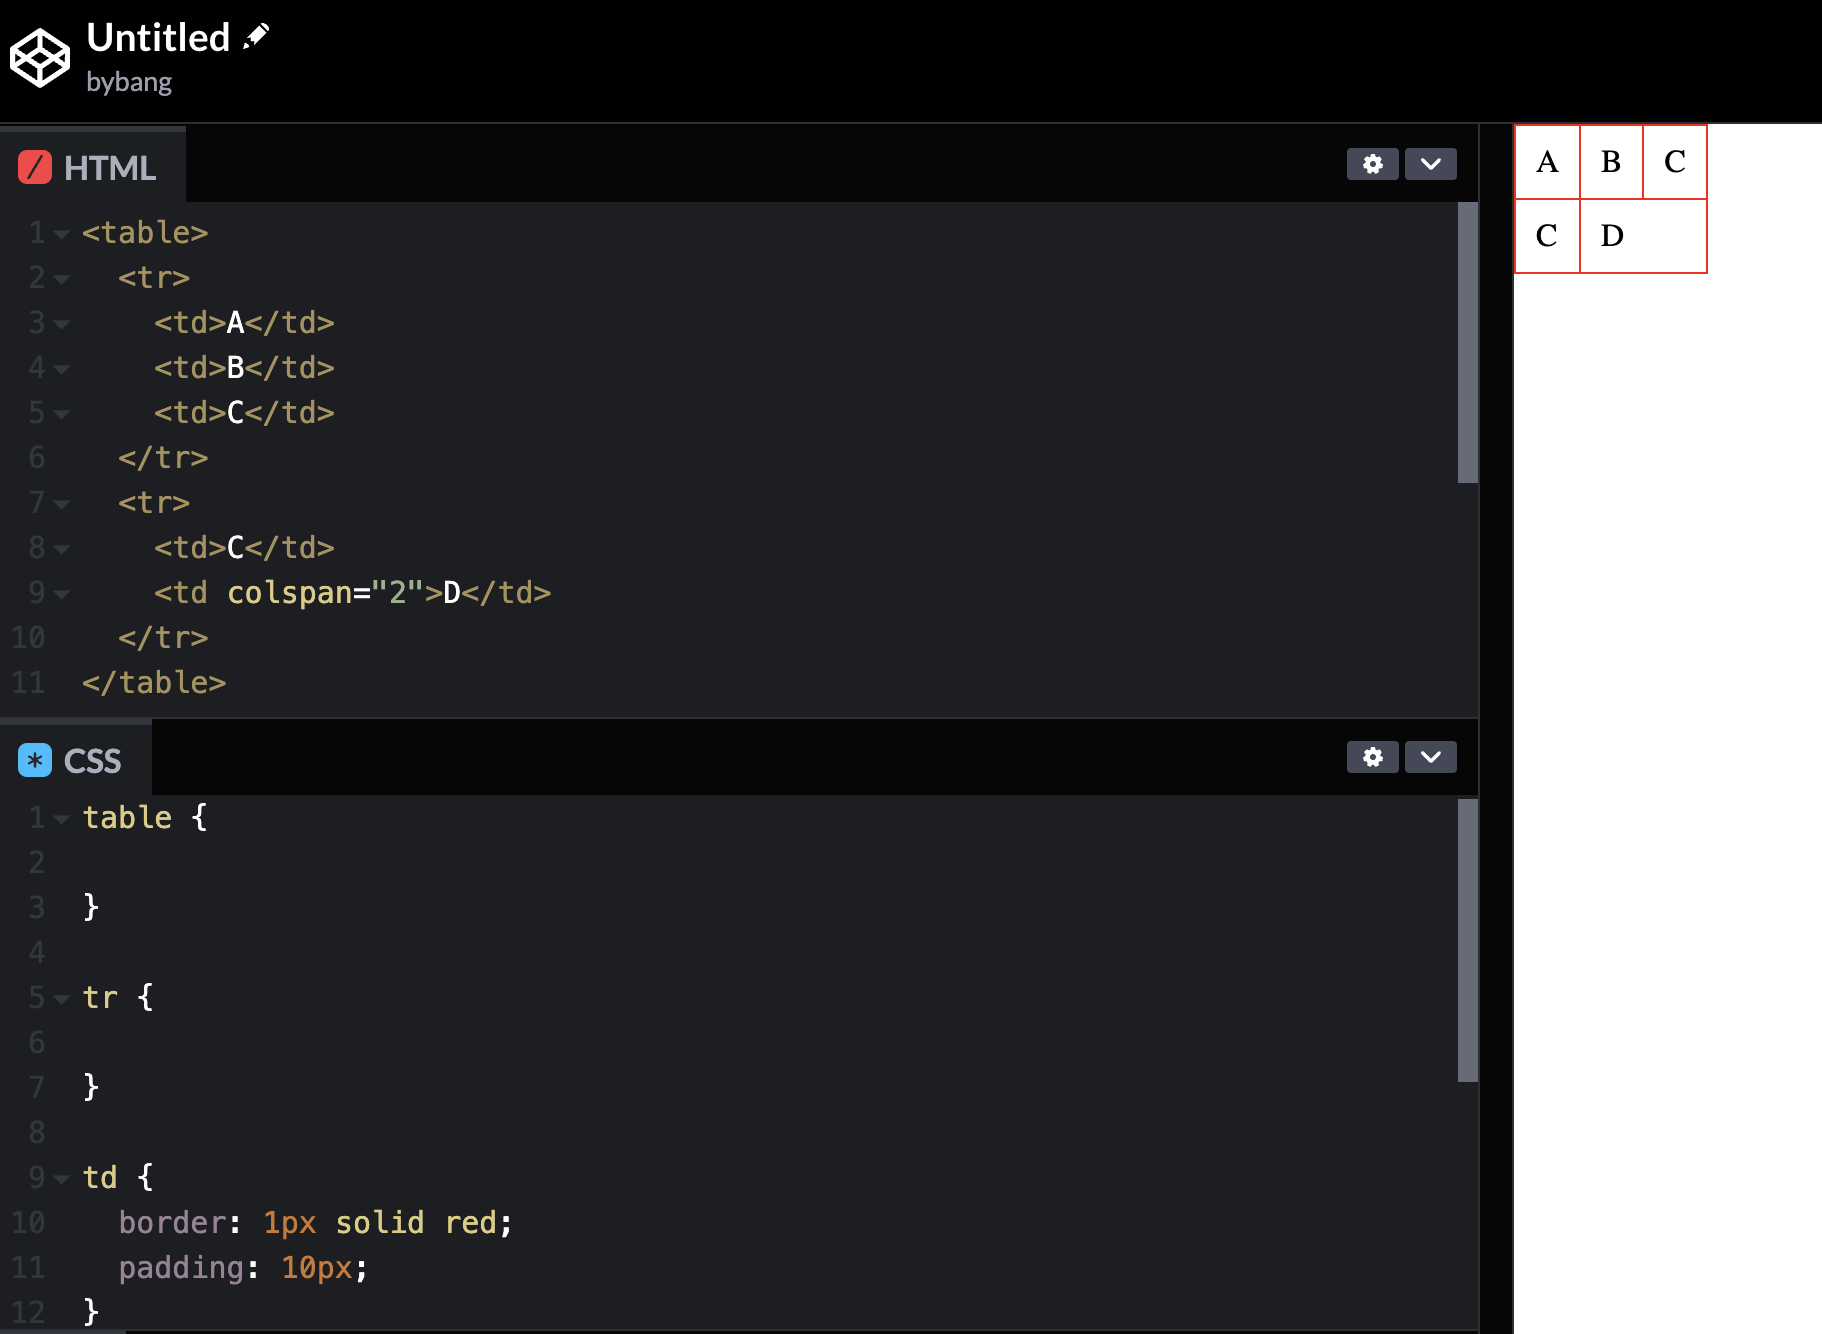
We can use colspan to merge two tables of data, but this is not a best practice. Avoid using colspan. Instead, match the table row and column data to make the complete table.
Comments
HTML Comments
Suffice it to say we want to leave some memo to reference or check the code later. Let’s look back at our p tag with O Canada.
We left a memo, but it shouldn’t be displayed on the screen because it is for ourselves, not for the user.
We can do so by adding a special mark in our memo like this:
<!-- Memo goes here -->
<p>Lyrics go here</p>
The <!-- --> symbol indicates that inside of this symbol will commented out, which means it does not display on the screen because it is for developers.
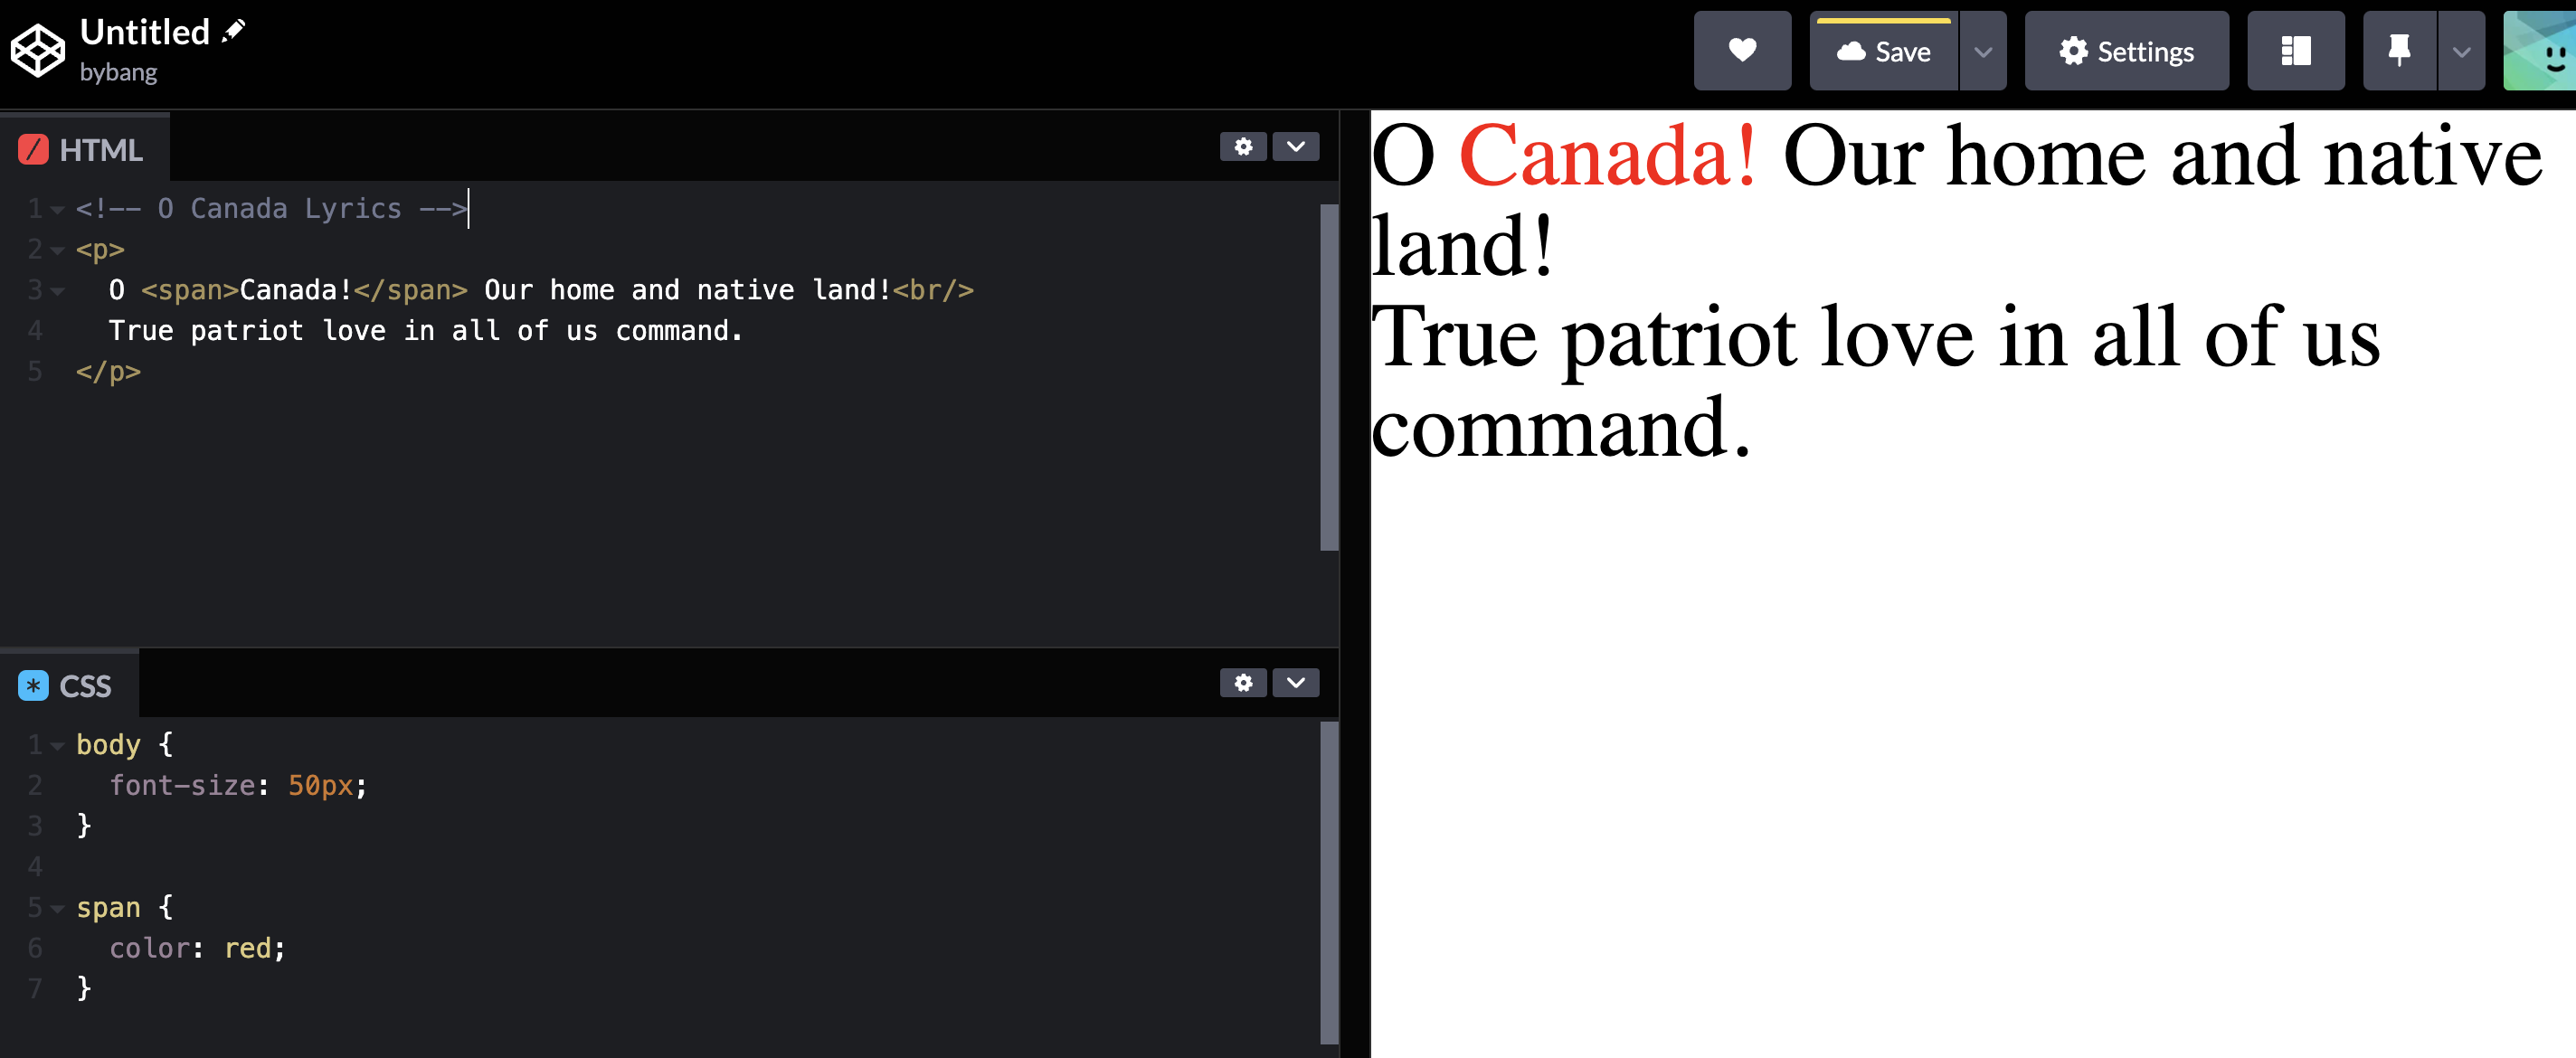
We can check the result from the Codepen. Indeed, the memo disappeared from the screen. In fact, the comment symbols are different, and they follow each programming language’s rules.
Thankfully, all the programming tools, including IDE like Codepen, allow us to use the same command: ‘ cmd + /orctrl + /. Most development environments allow the comment-out function with the same command, so we only need to memorize the cmd + /` command.
Another use case is that if we don’t want to delete the code, we can see the result without the code like this:
Now, the second line is not displayed in the result screen, but we have a code in our editor.
Global Attributes
Definition of Global attributes
To remind you, the HTML attributes are the special words used inside the opening tag to control the element’s behavior.
Let’s look at the code snippets below, which we previously used to see the output of each element.
<body>
  <a href="https://www.google.ca/" target="_blank">GOOGLE</a>
  <a href="https://developer.mozilla.org/en-US/">MDN</a>

  <img
    src="https://toronto.citynews.ca/wp-content/blogs.dir/sites/10/2022/12/09/venrick-azcueta-rY9d0EEuLs-unsplash-scaled-e1701264771904-2048x1152.jpg"
    alt="snowy weather"
  />

  ...
</body>
We might realize that both the a tag and the img tag use the paths. How about we use the href attribute in the img tag since it also indicates the path?
Obviously, we can’t use the href attribute in the img tag because the HTML elements have their own attributes they can use.
However, the global attributes are different from the normal attributes.
Global attributes are attributes common to all HTML elements that can be used on all elements.
Title
There are many global attributes, and we will learn the most common attributes.
The first attribute is the title attribute, which we can use like the picture below:
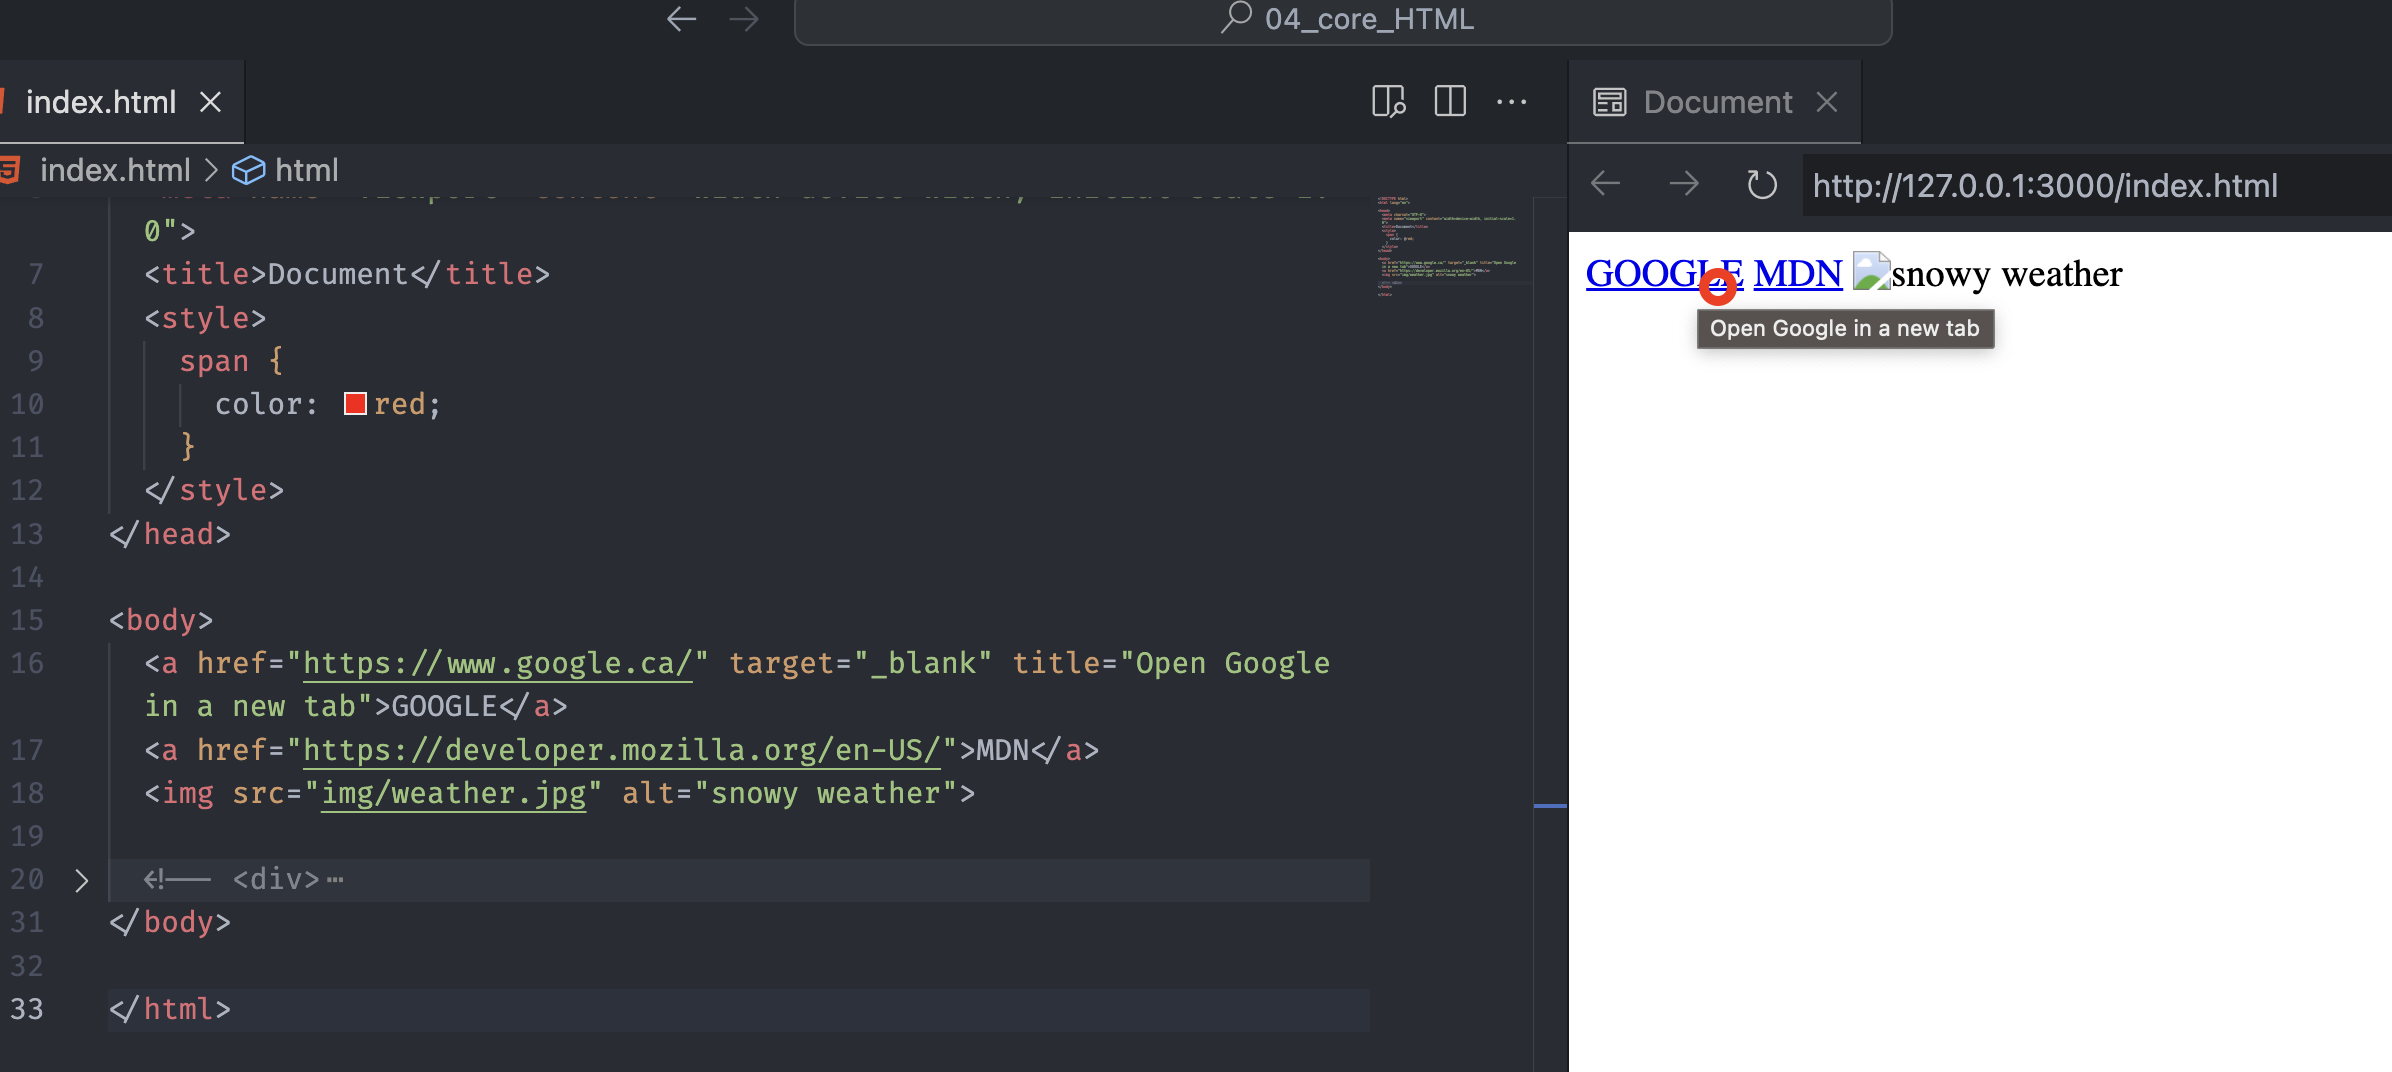
Notice that our a tag has a new title attribute, and the value seems to be an explanation. On the right side, think of the red circle as a mouse pointer.
When we use the internet and hover over some item on the web and wait for a few seconds, we might see a little message box like the picture above.
The title tag contains a text representing advisory information related to the element to which it belongs.
Style
When we use CSS, there are four different types to declare the CSS. For instance, we learned to bring external CSS files into HTML. Also, we can add a <style> element in the head element, or we can say the document metadata(header) element.
<tag style=""></tag>
The style global attribute contains CSS styling declarations to be applied to the element. Note that this attribute and the <style> element mainly allow for quick styling like the testing purpose.
Class
The class global attribute allows CSS and JavaScript to select and access specific elements via the class selectors or functions like the DOM method.
<tag class="name"></tag>
The class attribute is a versatile attribute commonly used for styling and scripting purposes across different elements in a document.
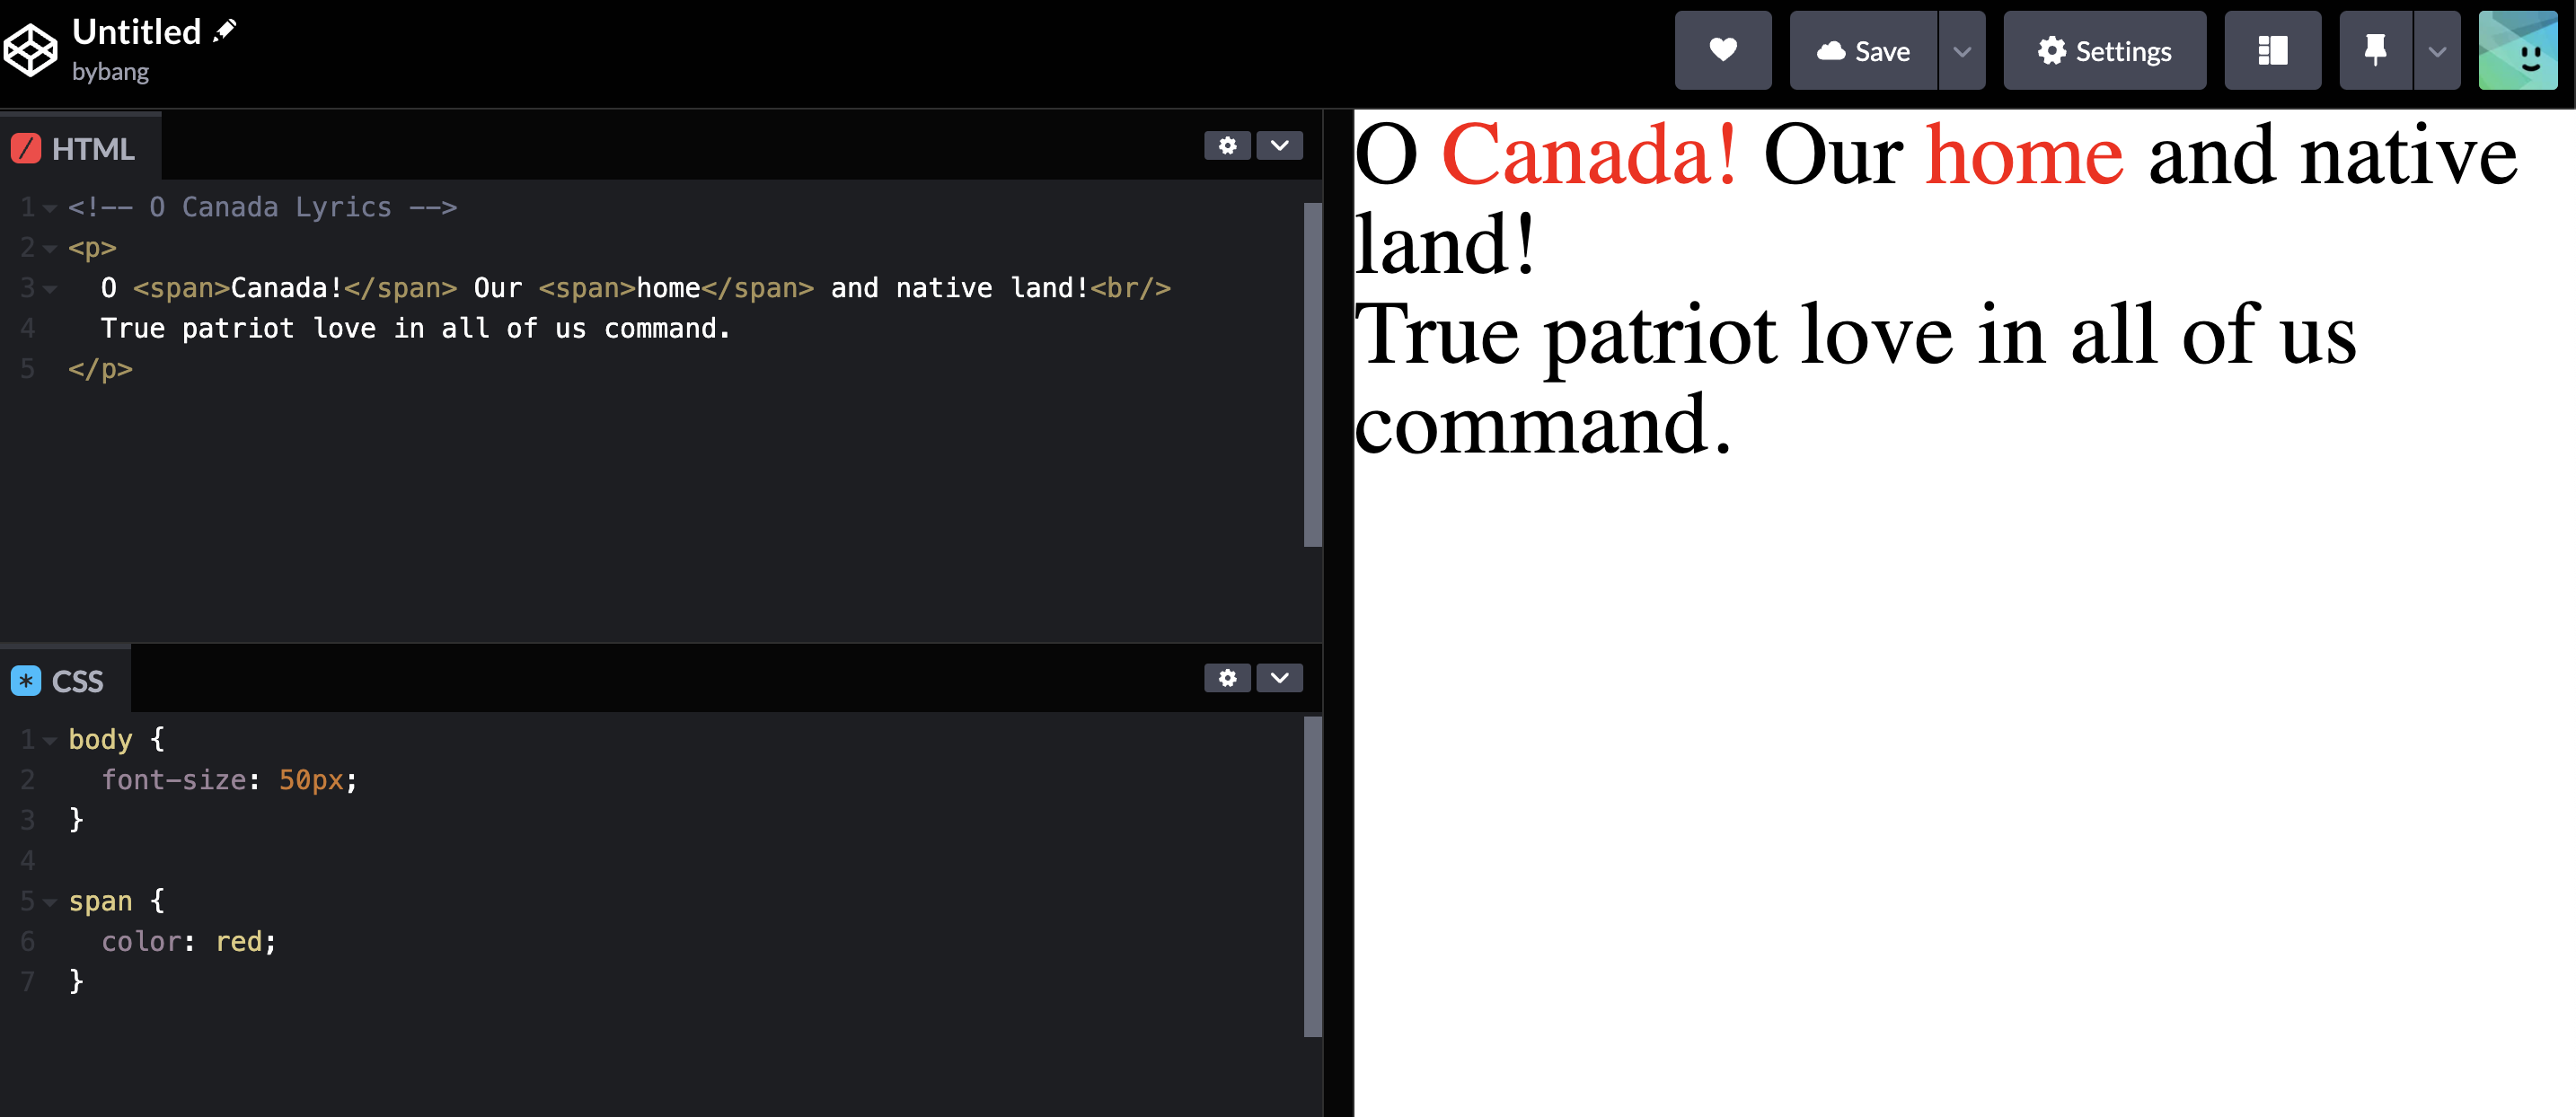
Suppose we want to color a word home to a different color. We learned that we should use the span tag to target inline elements or text, so we set the two span tags like the .picture above.
However, the problem is if we change the color of the span tag in CSS, every span color will change.
To avoid this issue, we can use the class attribute like this:
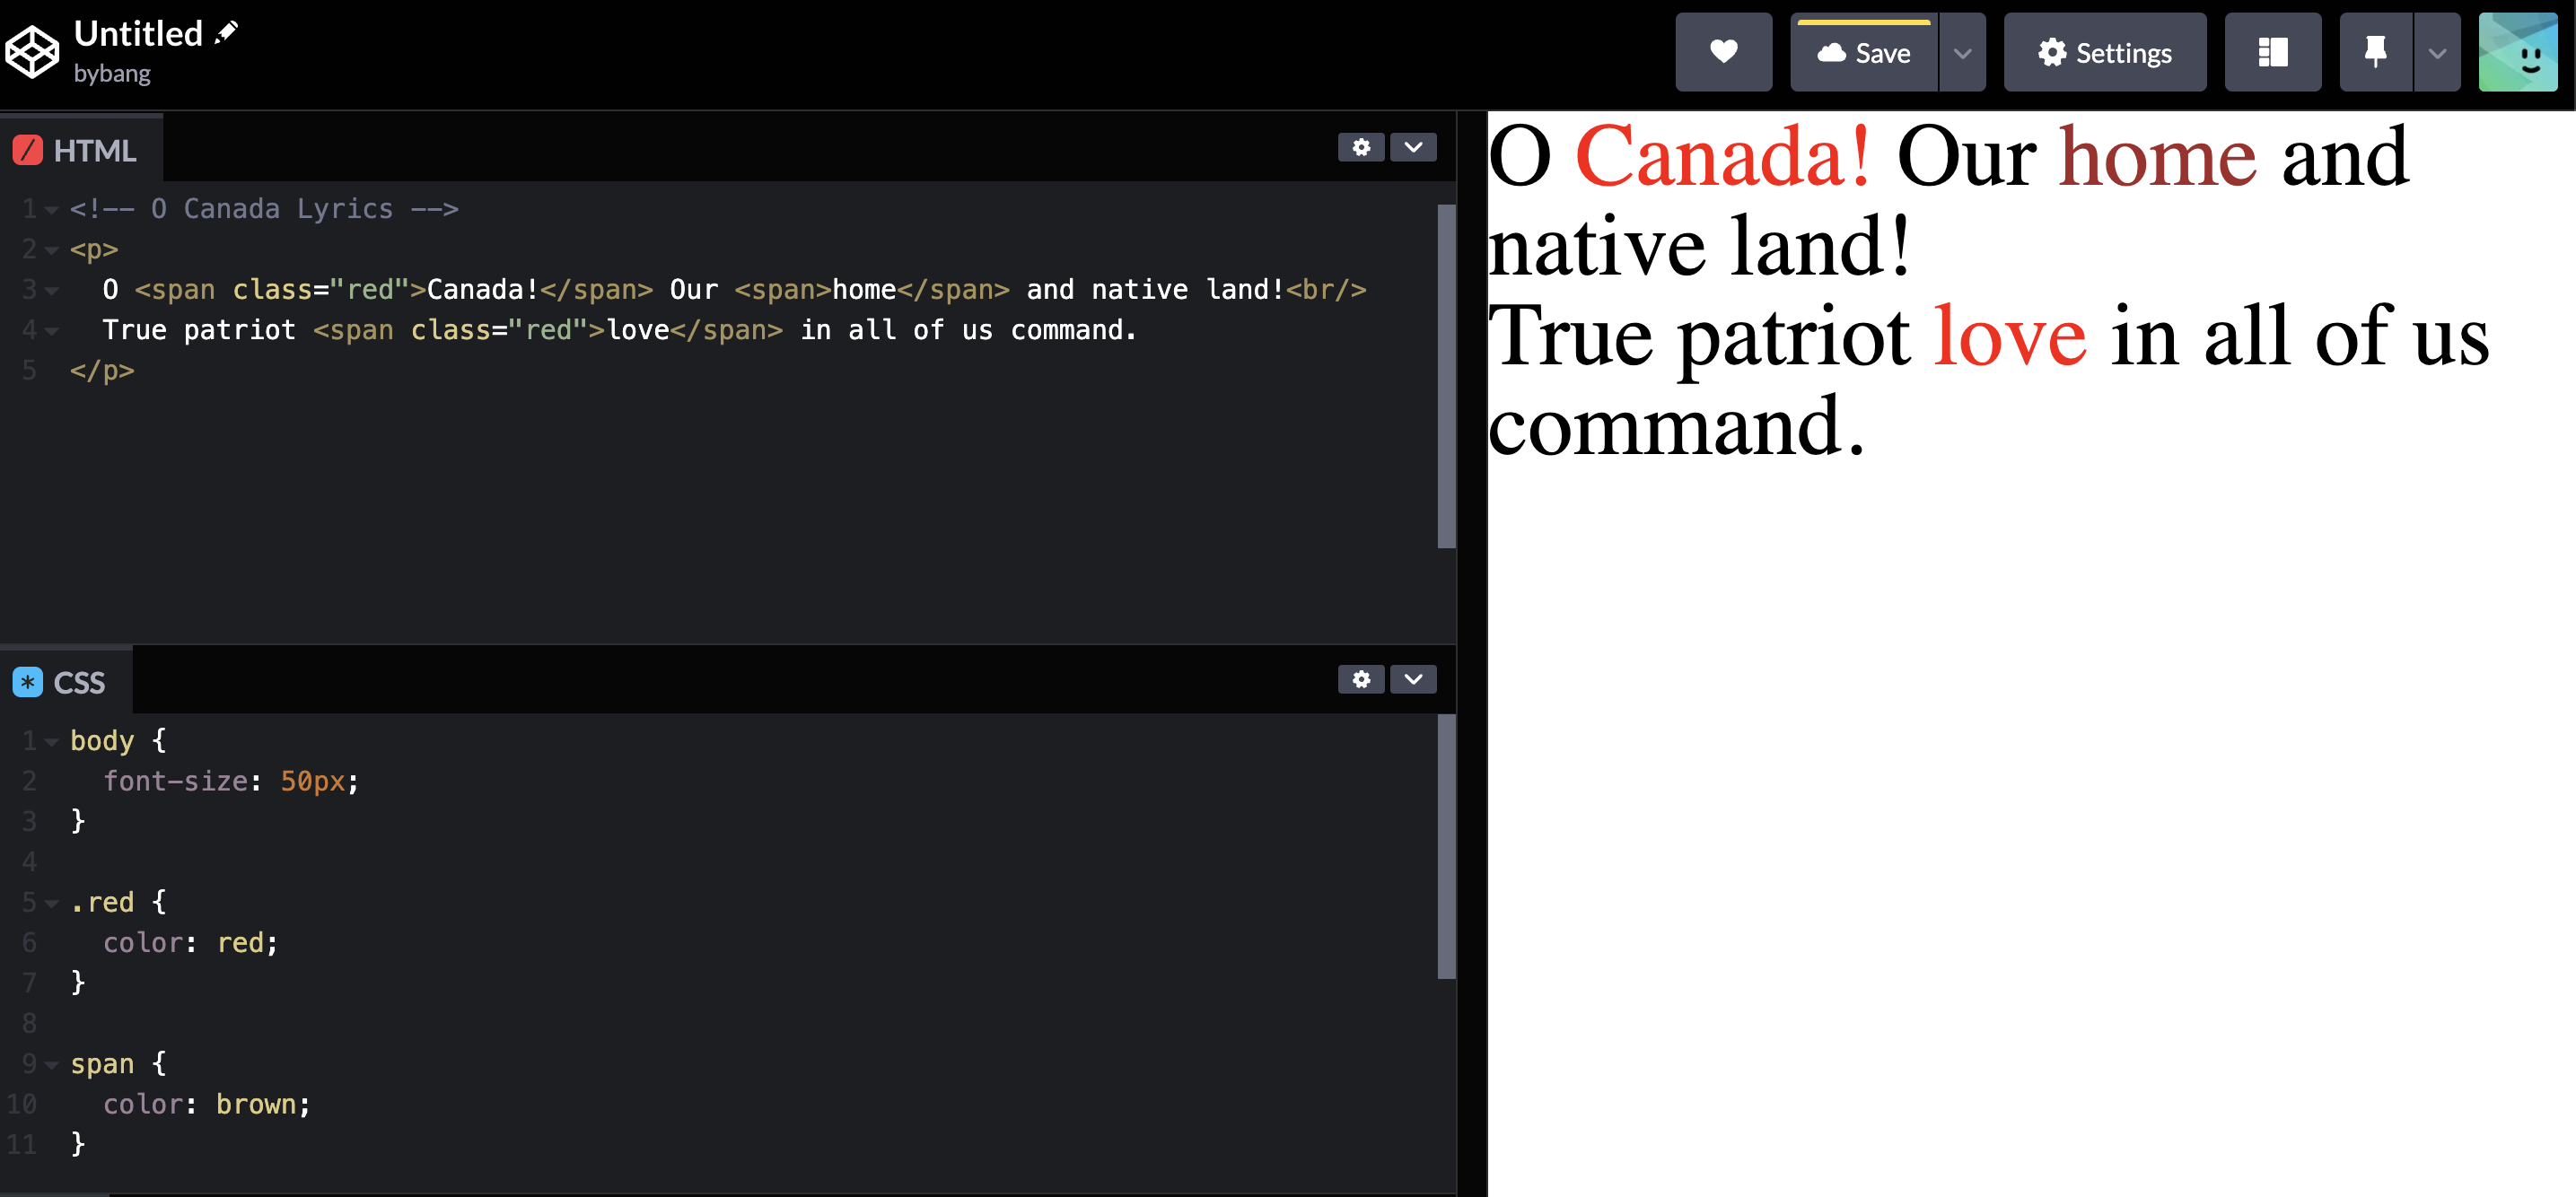
We added a class with the name red and used it in two different places to style the same way. The original span tag still has the CSS color of brown, so the word home is brown because it doesn’t have the class attribute.
Id
The id global attribute defines an identifier(ID), which must be unique in the document. The purpose of ID is to identify the element when linking, scripting, or styling.
In contrast with the class attribute, the id attribute can be used only once, which means if we declare id="something", we can’t use the value something in other elements.
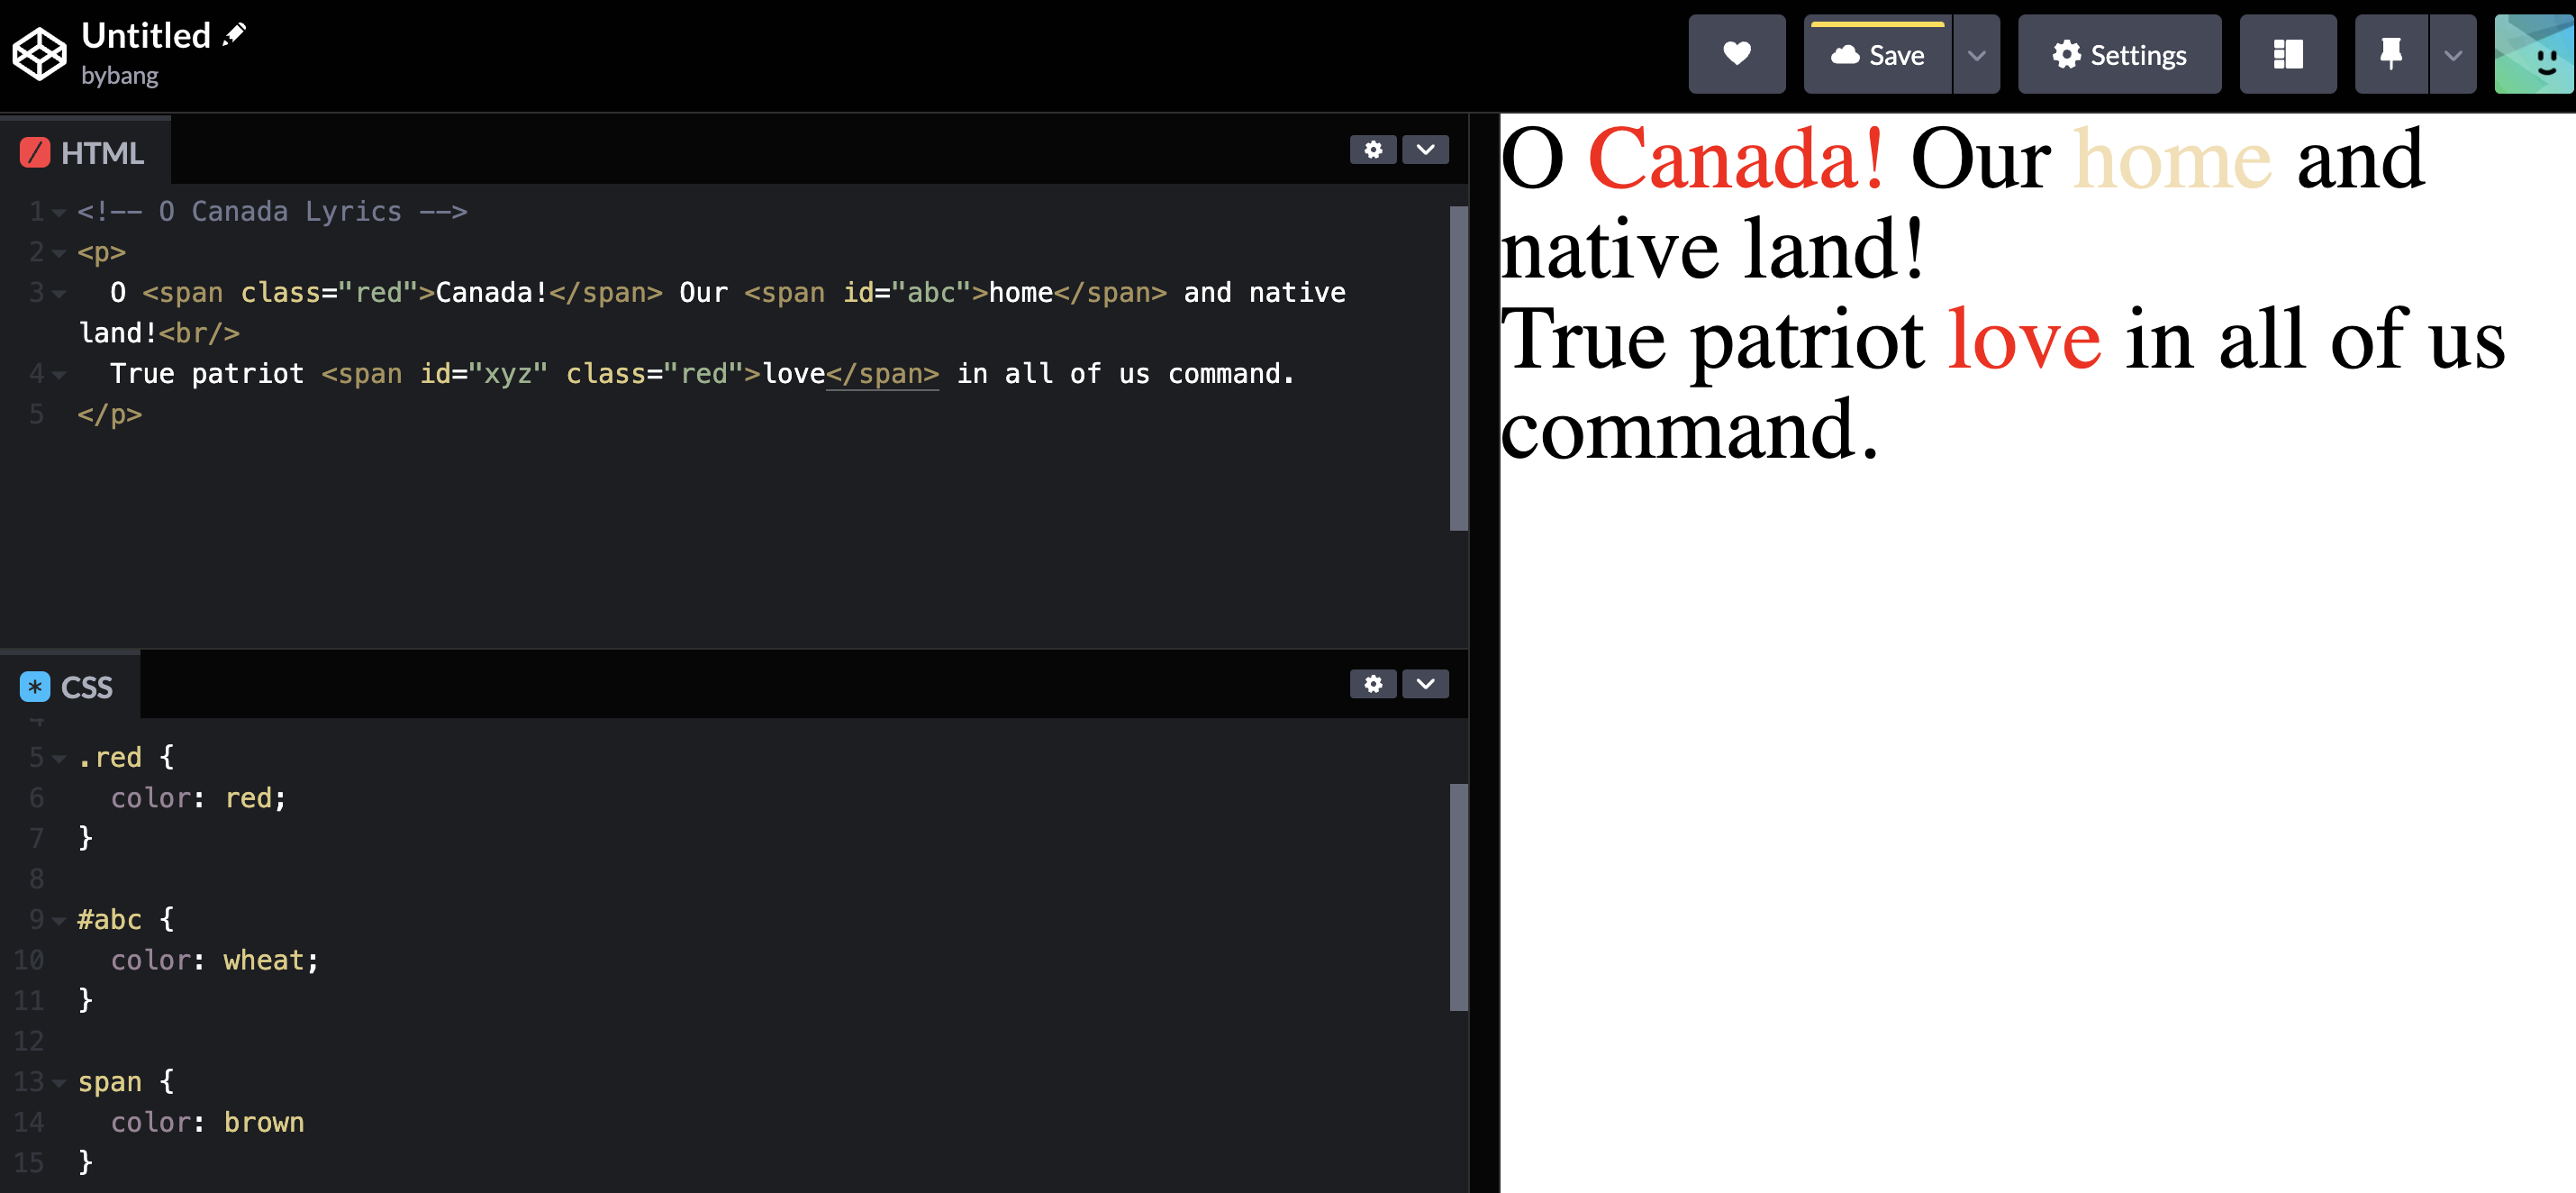
Notice we set the id="abc" to the second span element, and in the CSS file, we defined id with the #, which is a little different from class syntax ..
Use the id name with the pound, #abc, and curly braces as normal CSS. Another point is we used a different id="xyz" to the second element. The id and class attributes can be used in the same element, but the id has to be unique.
If we use the same id attribute in different elements, the browser will not detect an error, but we have to follow the web standards. Hence, the id attribute and value pair should be unique and belong to only one element.
Data-*
The data-* global attributes are from a class of attributes called custom data attributes, allowing proprietary information to be exchanged between the HTML and its DOM representation by scripts.
This attribute could be difficult for now, so let’s briefly learn the basic use cases in this chapter.
<tag data-name="data"></tag>
The basic structure of this tag is the line above, where the name part can be replaced with any name we want. The value data part is the text data we want to assign.
We can use the data-* attribute to store some value temporarily, and we can use that stored value in the script with JavaScript codes.
There are many layers we have to understand, but we haven’t learned JavaScript yet, so we will just understand what the JavaScript code does and skip the syntax and the like.
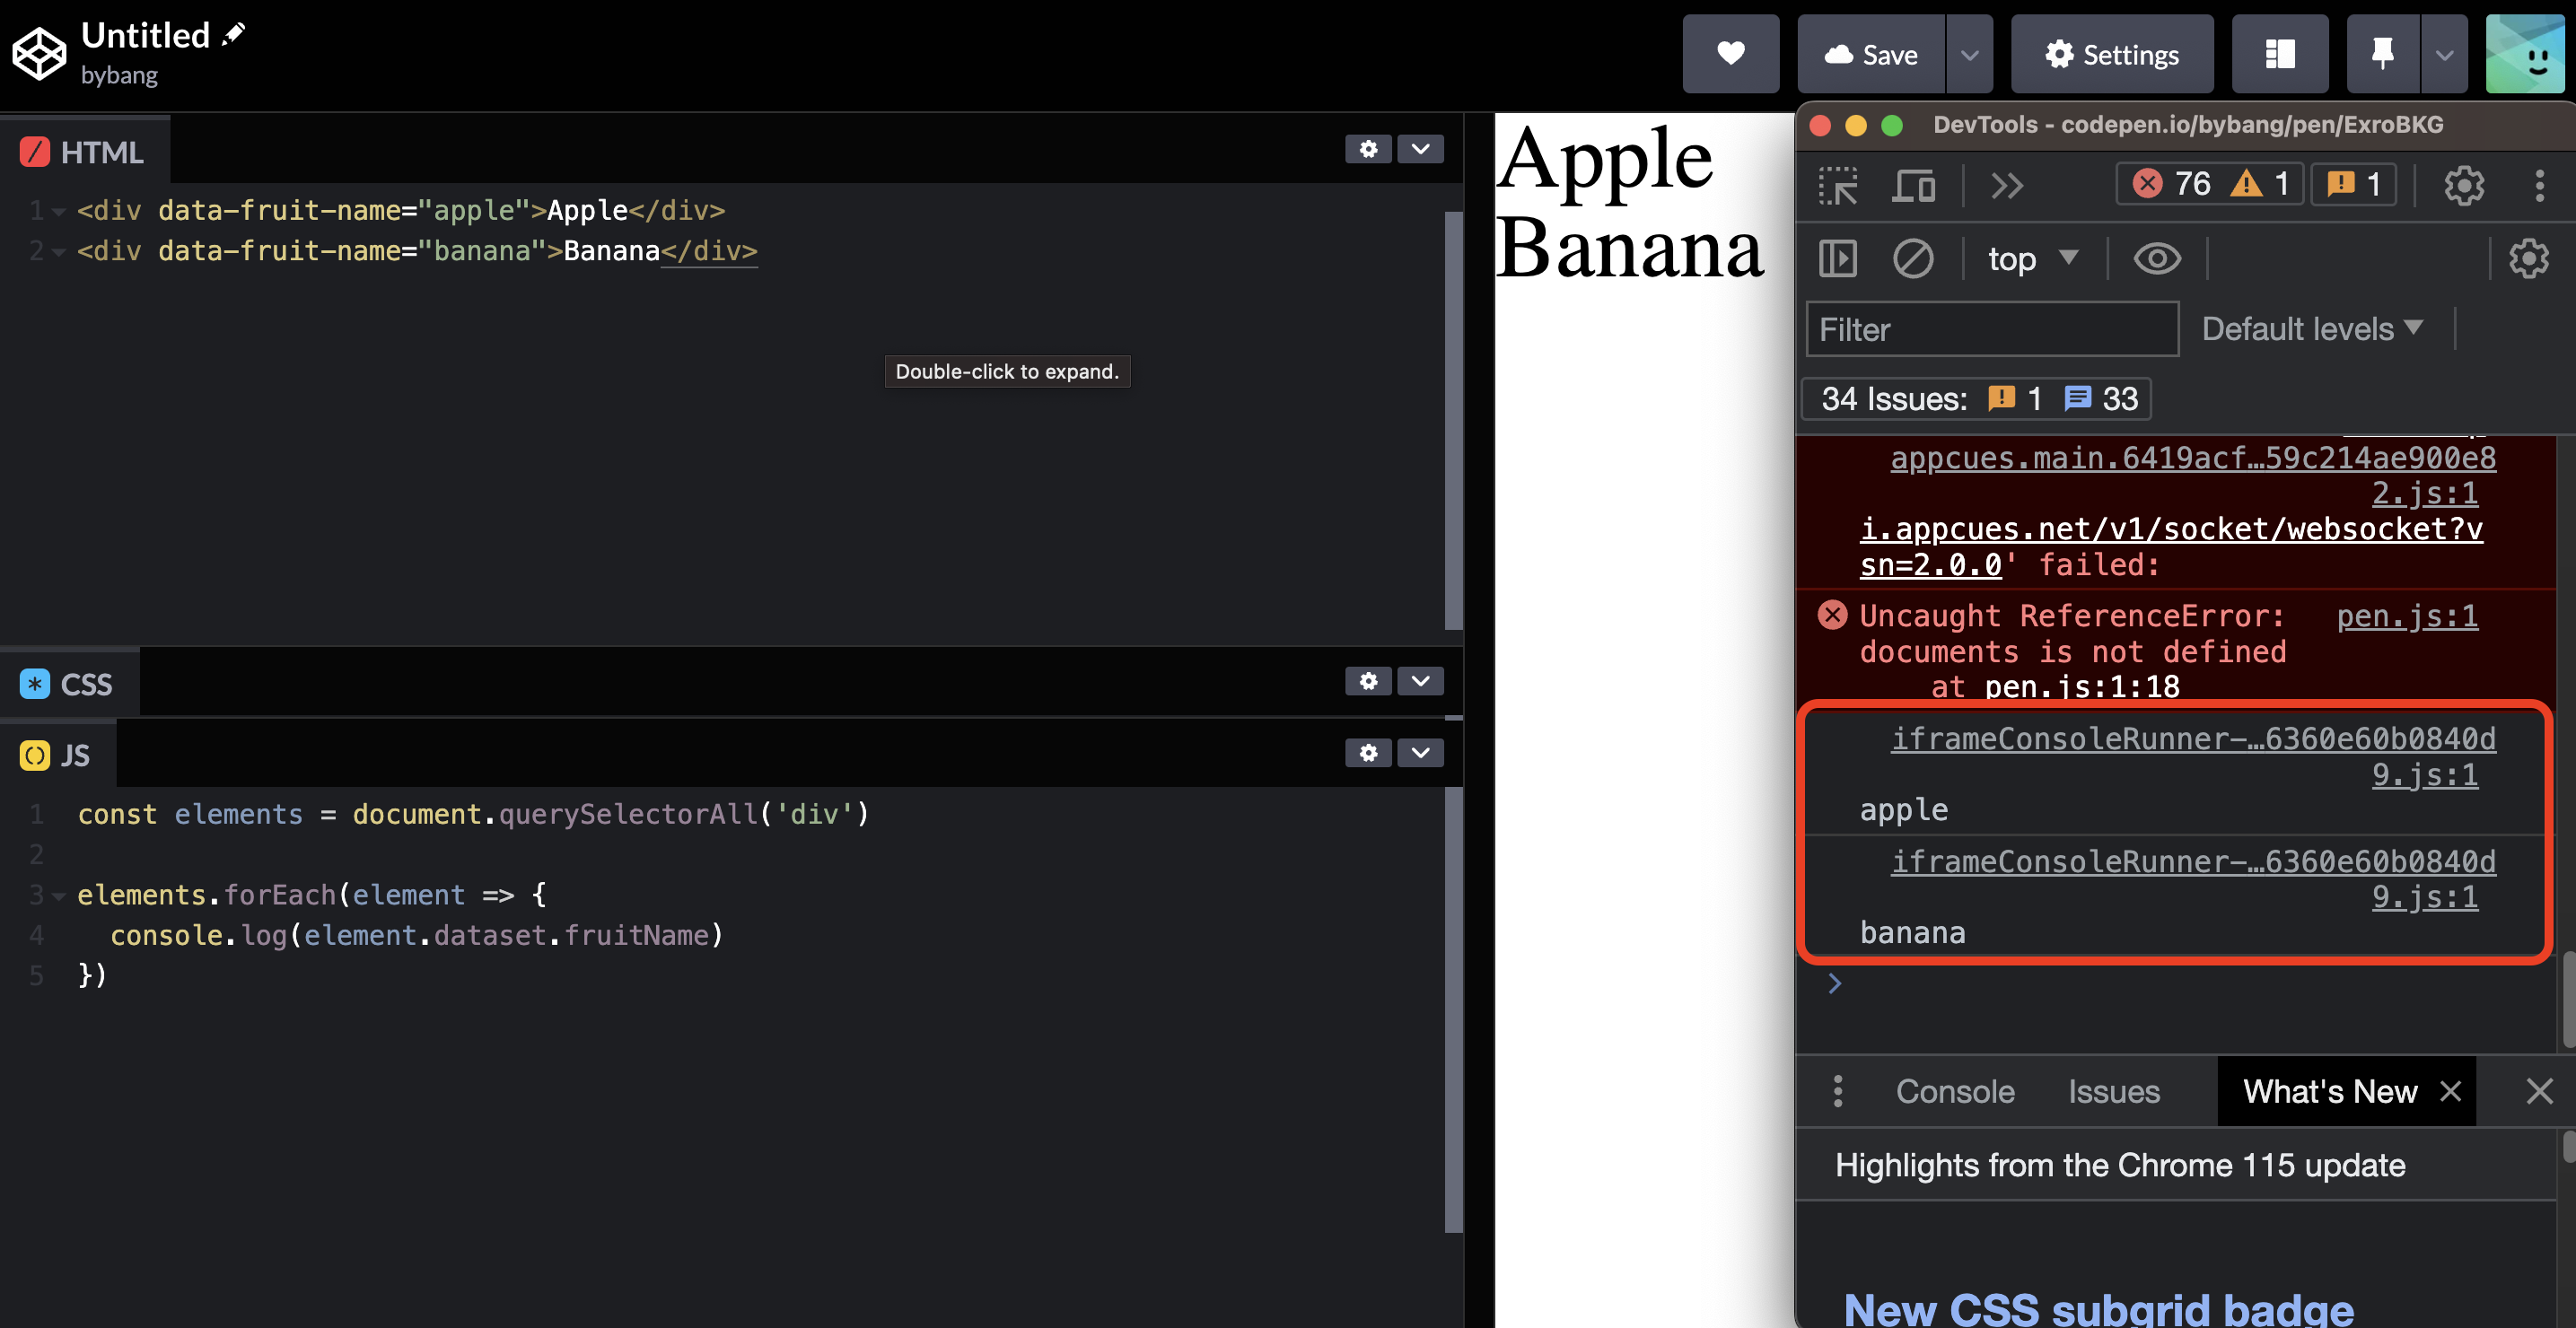
Firstly, we set the data-* attribute, which has the attribute name fruit-name and the value apple or banana.
In JavaScript code, we declare a variable called elements, with the value of whatever we get from the document.querySelectorAll('div'). The document part means we will get all the values from the document with the querySelector having the tag name div.
Think of that variable as a container. The following few lines of code will deal with that container. The container will contain two div tags, and we will do something with each tag. Hence, we name a variable as element, the singular word.
Inside the curly braces, we will log in the console that each div tag’s dataset value has the same name as the fruit-name. But we can’t use a hyphen for a variable name in JavaScript. Hence, we used a fruitName.
On the right side, the console printed out the value of the dataset apple and banana in order from top to bottom in HTML.
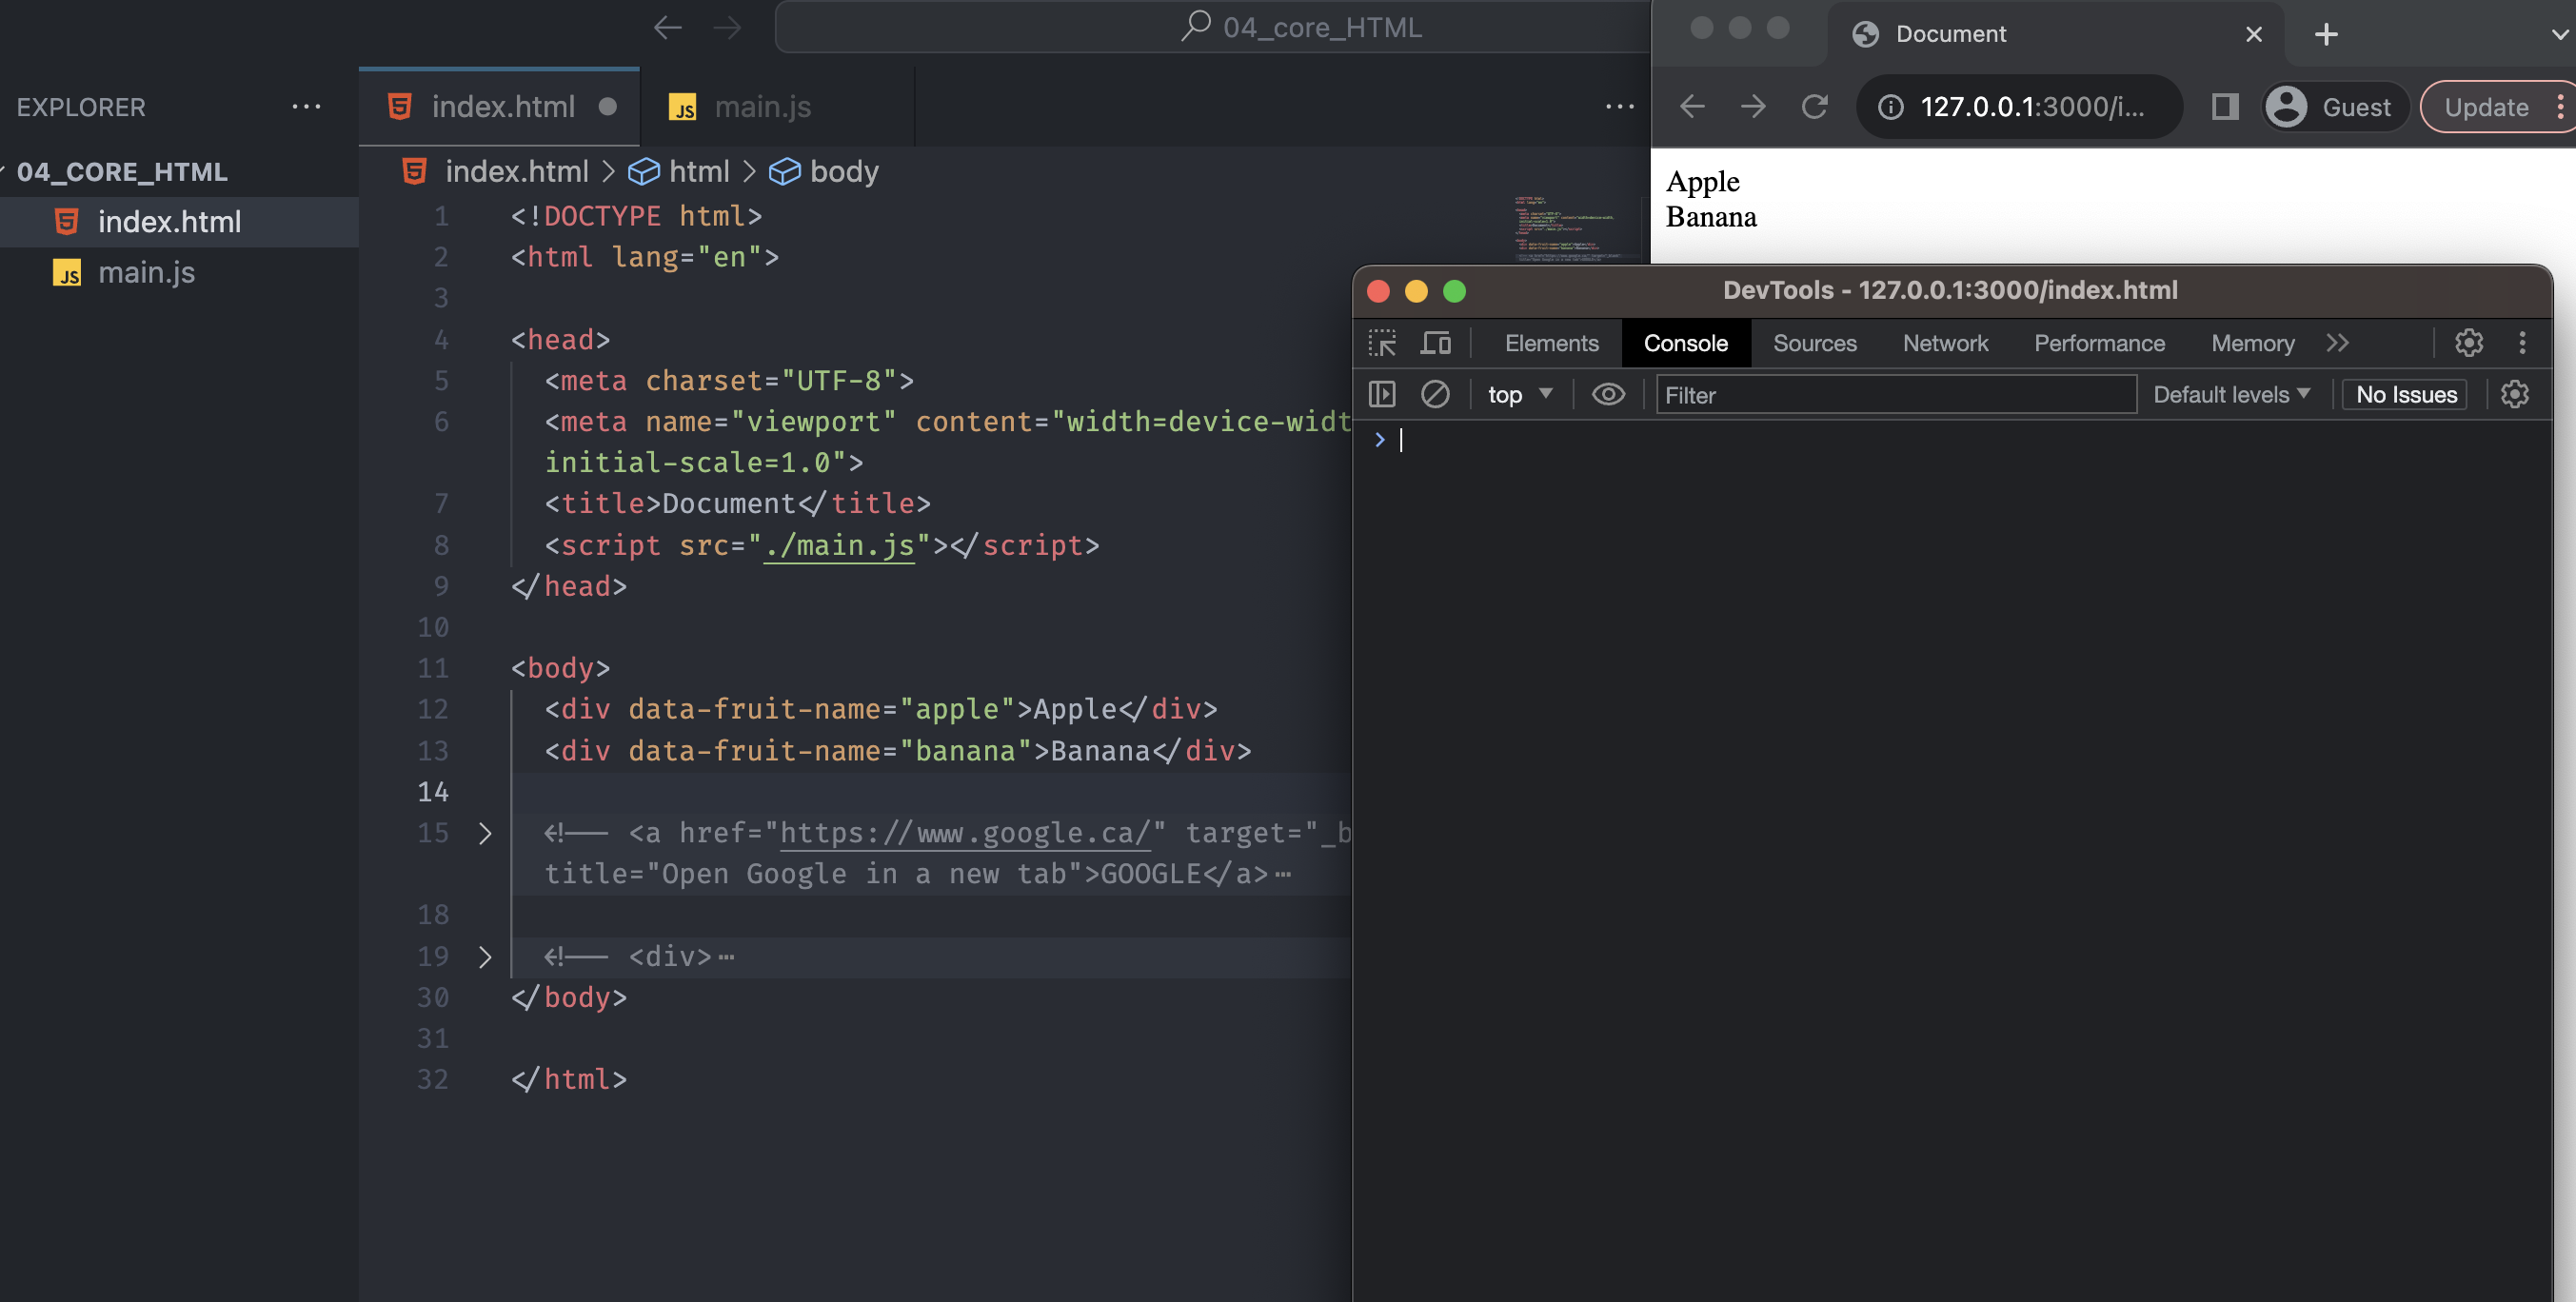
If we bring our code in VS Code, we can’t see the console printing the dataset’s value. The document and JavaScript codes are the same, and we connected the external JavaScript file with the <script> element in the <head> element.
The issue happened because of the <script> element location. It is above the <body>, more specifically the div tag, so when the JS file executes, it reads the code like this:
<!DOCTYPE html>
<html lang="en">
  <head>
    <meta charset="UTF-8" />
    <meta name="viewport" content="width=device-width, initial-scale=1.0" />
    <title>Document</title>
    <script src="./main.js"></script>
    <!-- The code below has not been interpreted yet
</head>

<body>
  ...
-->
  </head>
</html>
Notice no body or div tag exists when the JS function triggers. There are a few different ways to solve this issue, and the simplest way is to add the defer attribute in the <script> element.
<script defer src="./main.js"></script>
It means that we will set the script to be executed after the document has been parsed. More information about the defer is in here.
📌 Takeaway
- We should avoid using
h1many times in the same document because it is the most important heading. - If using the
pelement is unclear, we can use thedivtag instead. - Heading and paragraph elements are the block-level elements.
- The
imgelement embeds an image into the document. It’s an inline element but can use width and height attributes. - The
srcandaltattributes are essential for theimgelement. If theimgtag doesn’t have the essential attributes, the website is not following the web standard. - The
inputelement creates interactive controls for web-based forms to collect data from users. - The
inputelement is inline-block by default, which can have inline-level content attributes and some block-level content attributes. - The
inputattributecheckboxneeds to be wrapped with thelabelelement. Thelabelelement will inform the user of the purpose of thecheckbox. - The
radioattribute allows the selection of a single value among the multiple choices. Thenameattribute is used to group multiple radio buttons. - The heading font size is not important as we will reset the browser style.
- The global attributes are common to all HTML elements that can be used on all elements.
- The
titleglobal attribute contains a text representing advisory information related to the element it belongs to. - The
styleglobal attribute and the<style>element in theheadelement mainly allow for quick styling like testing purposes. - The
classglobal attribute allows CSS and JavaScript to select and access specific elements viaclass selectorsor functions like the DOM method. - We can use the
data-*global attribute to store some value temporarily, and that stored value in the script with JavaScript codes. - The
deferattribute will execute the script after the document has been parsed.
💻 Solution
- None
🔖 Review
- We use the
divelement when we want to group different tags and set the area of those tags. - The
ulandlielements are one set because, without the list items, the list doesn’t exist. - The
aelement creates a hyperlink to webpages, files, etc. - There are many situations in which the browser can’t load the desired image. Hence, we should correctly name the
altattribute. - We can use comments when we need to leave a memo or hide the code output temporarily.
- The
idglobal attribute defines an identifier, which must be unique in the document.
Comments