
[Frontend] TIL Frontend project - Overview of HTML

FASTCAMPUS Frontend Project
Overview of HTML
패스트캠퍼스 - 프론트엔드 웹 개발의 모든 것 초격차 패키지 Online 과정
🧩 What I Should Learn?
- How to reset the browser style
- Emmet
- Basic Syntax
- Understand Parent-Child Relationships
- Empty Tags
- Text and Boxes
🎯 What I learned today
How to reset the browser style
Default Style
Let’s create another index file and stylesheet.
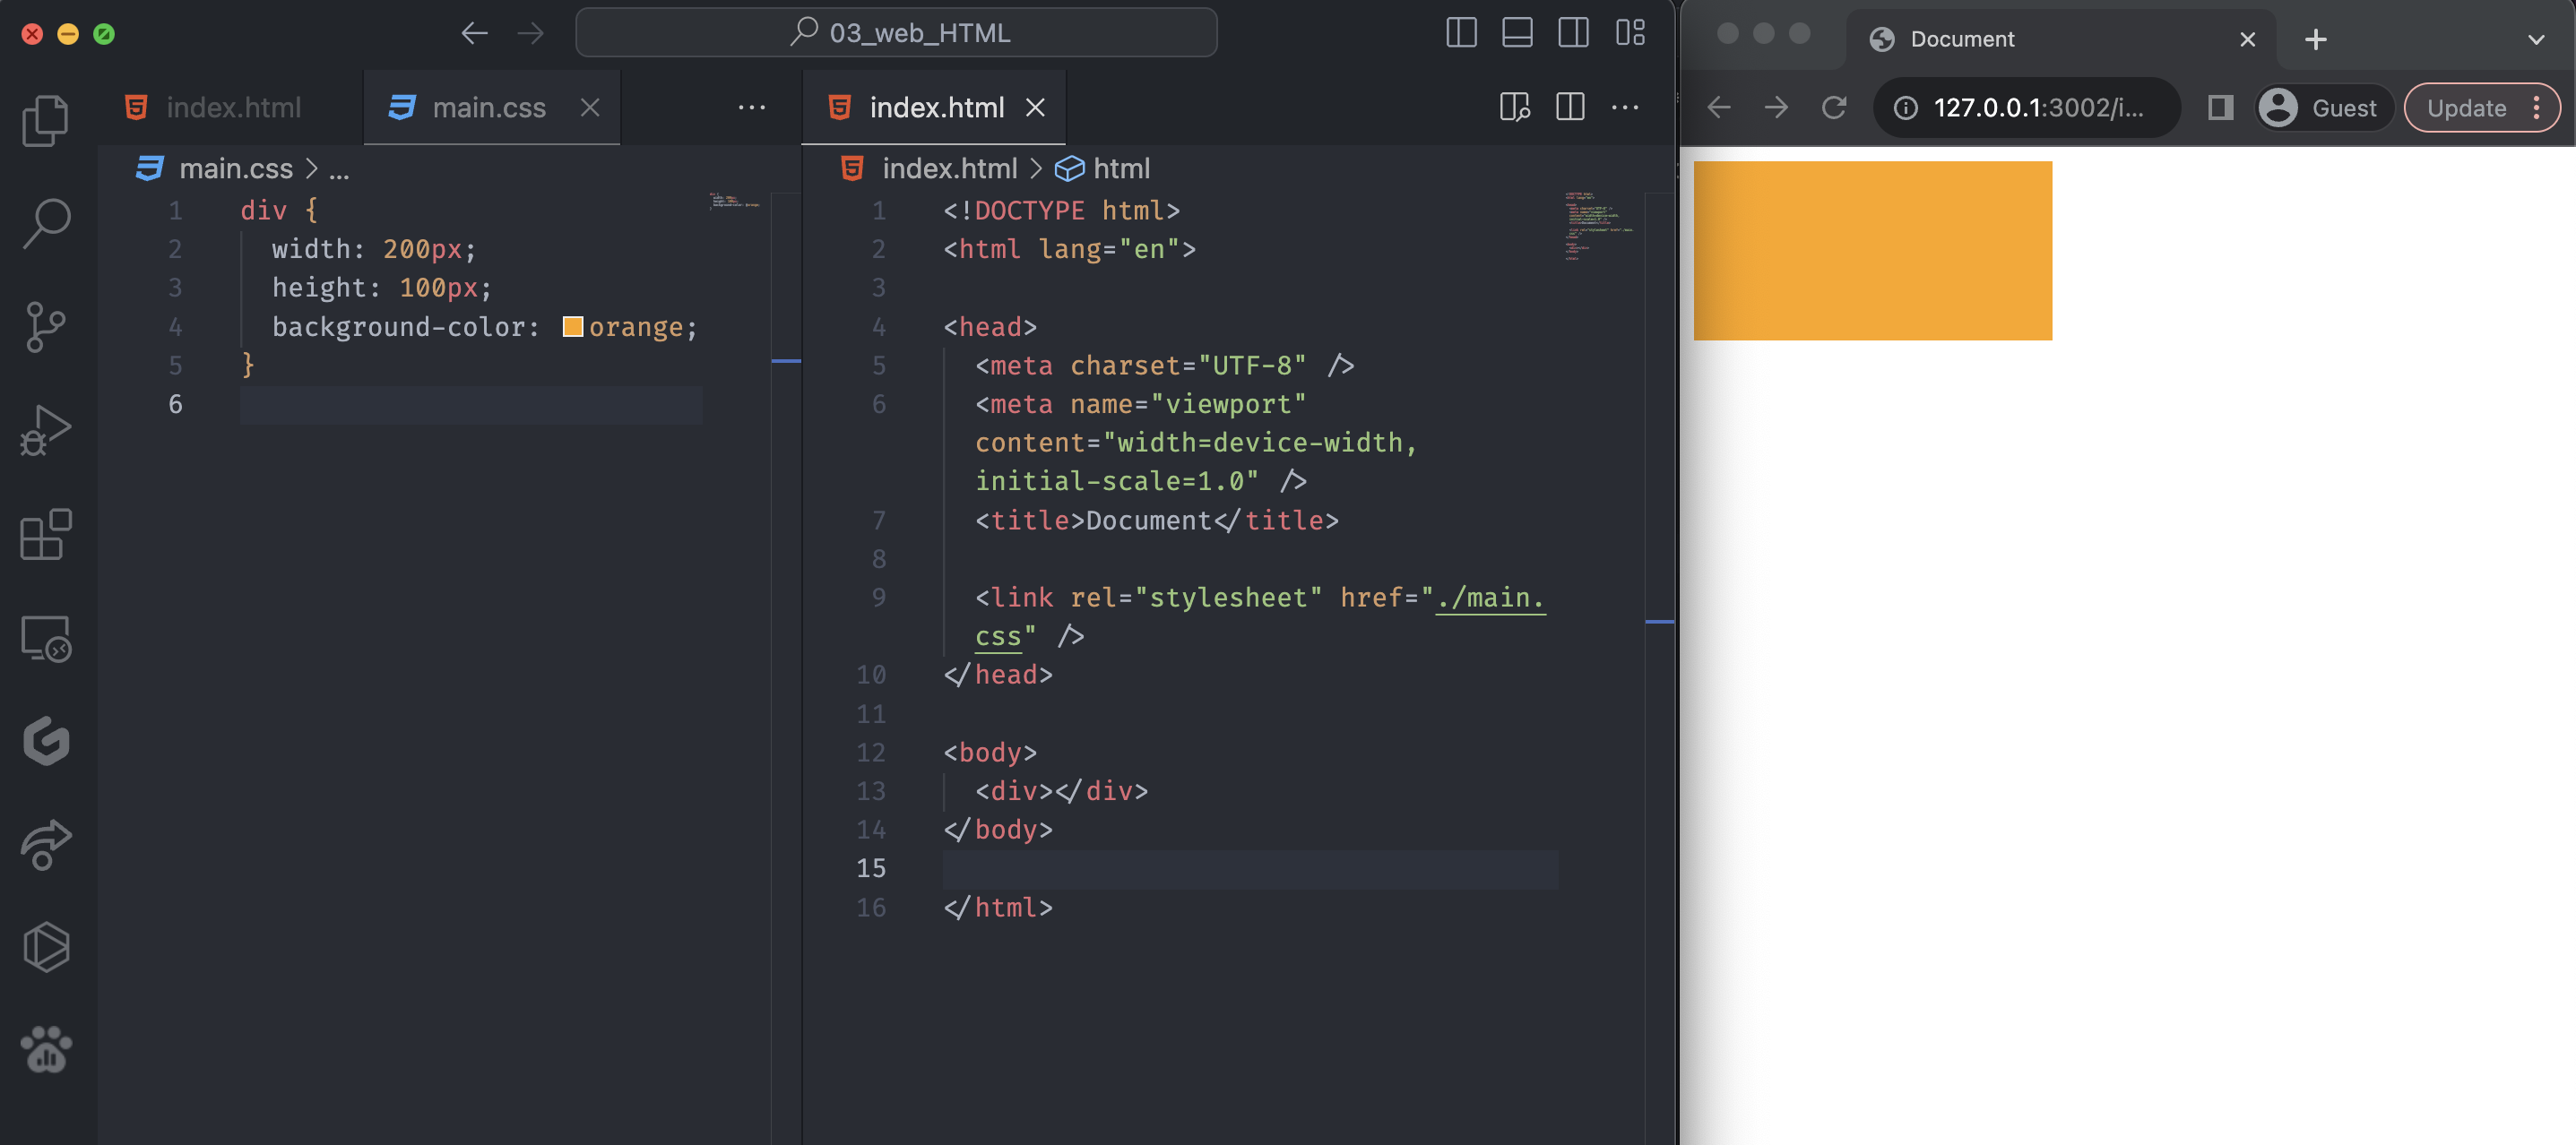
Notice we set the background-color as orange. Since the div doesn’t have color, we have to paint it to see the div area.
If we check this div element with the inspector, the div tag has the style from main.css. Also, inspect the body tag, and we can see this picture below:
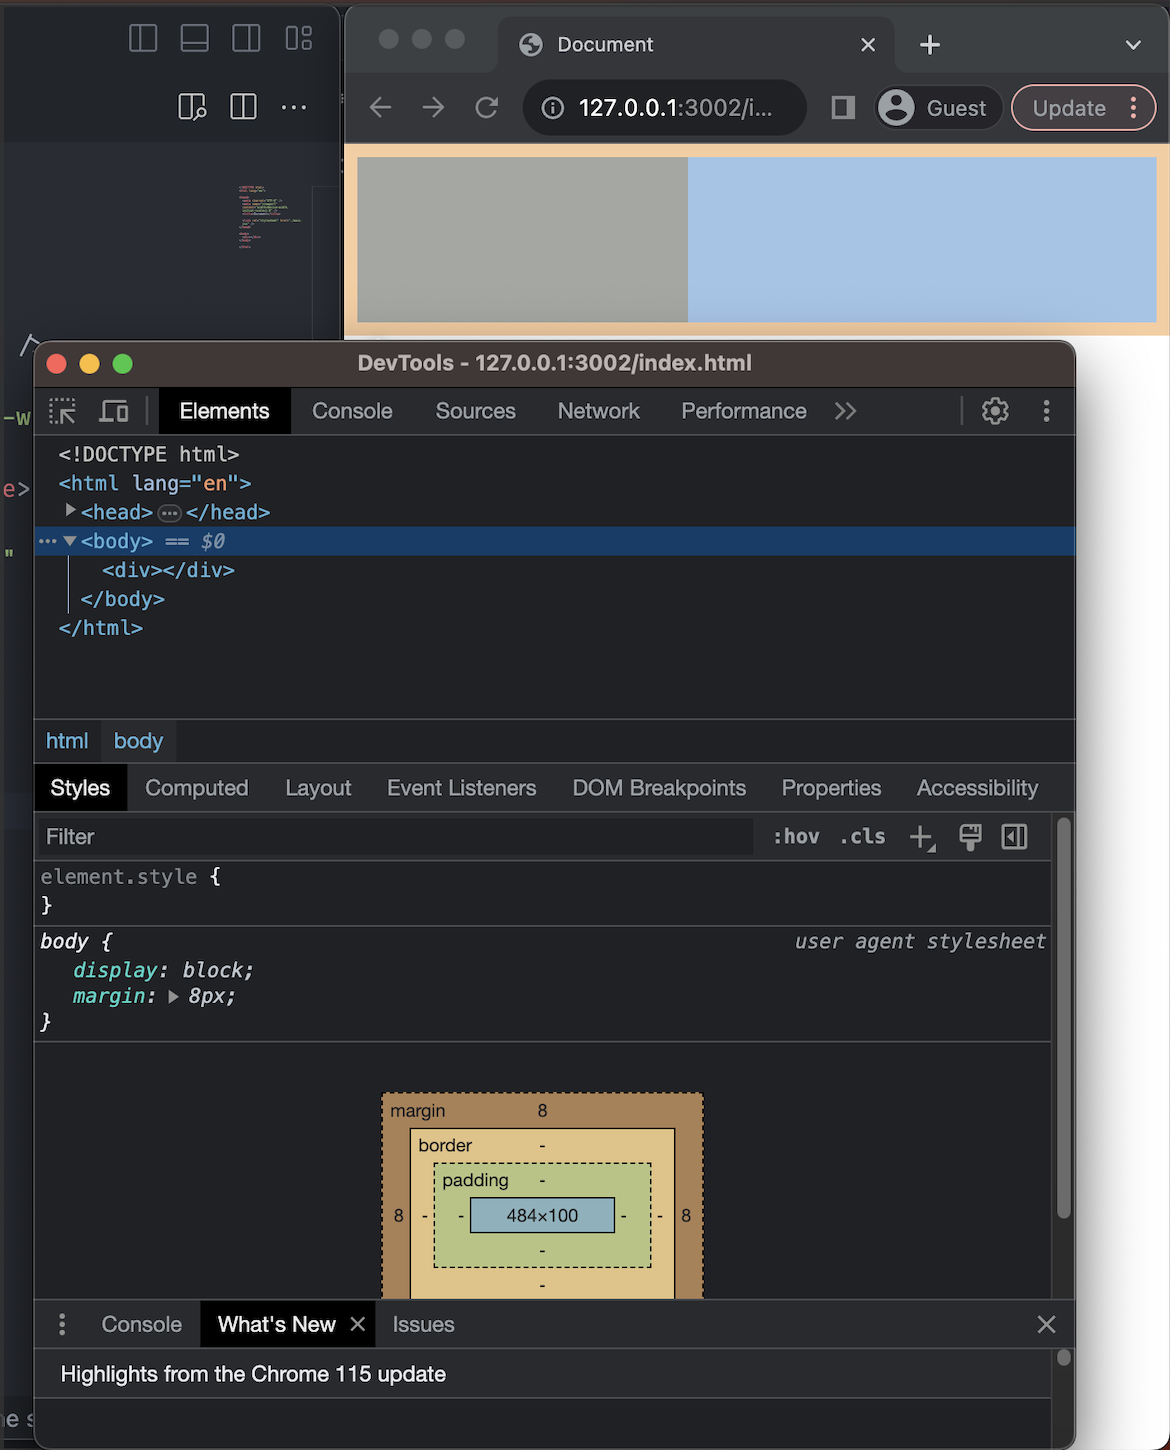
Notice the body tag has a margin of 8px, but we didn’t type anything in the stylesheet.
The issue happens because the Chrome browser automatically sets 8px of margin. The default settings are similar, but different browsers can have different default settings.
Avoid cross-browsing issue
Recall cross-browsing, which allows browser vendors to interpret web standards their own way and apply them to their browsers.
The browser’s default settings are different, so it may cause the styling issue. Hence, we need to reset the browser style manually to avoid the cross-browsing issue.
We can search for the reset.css cdn and copy it from here.
The external file uses the absolute path, and by including this link, we can reset the browser style like this:
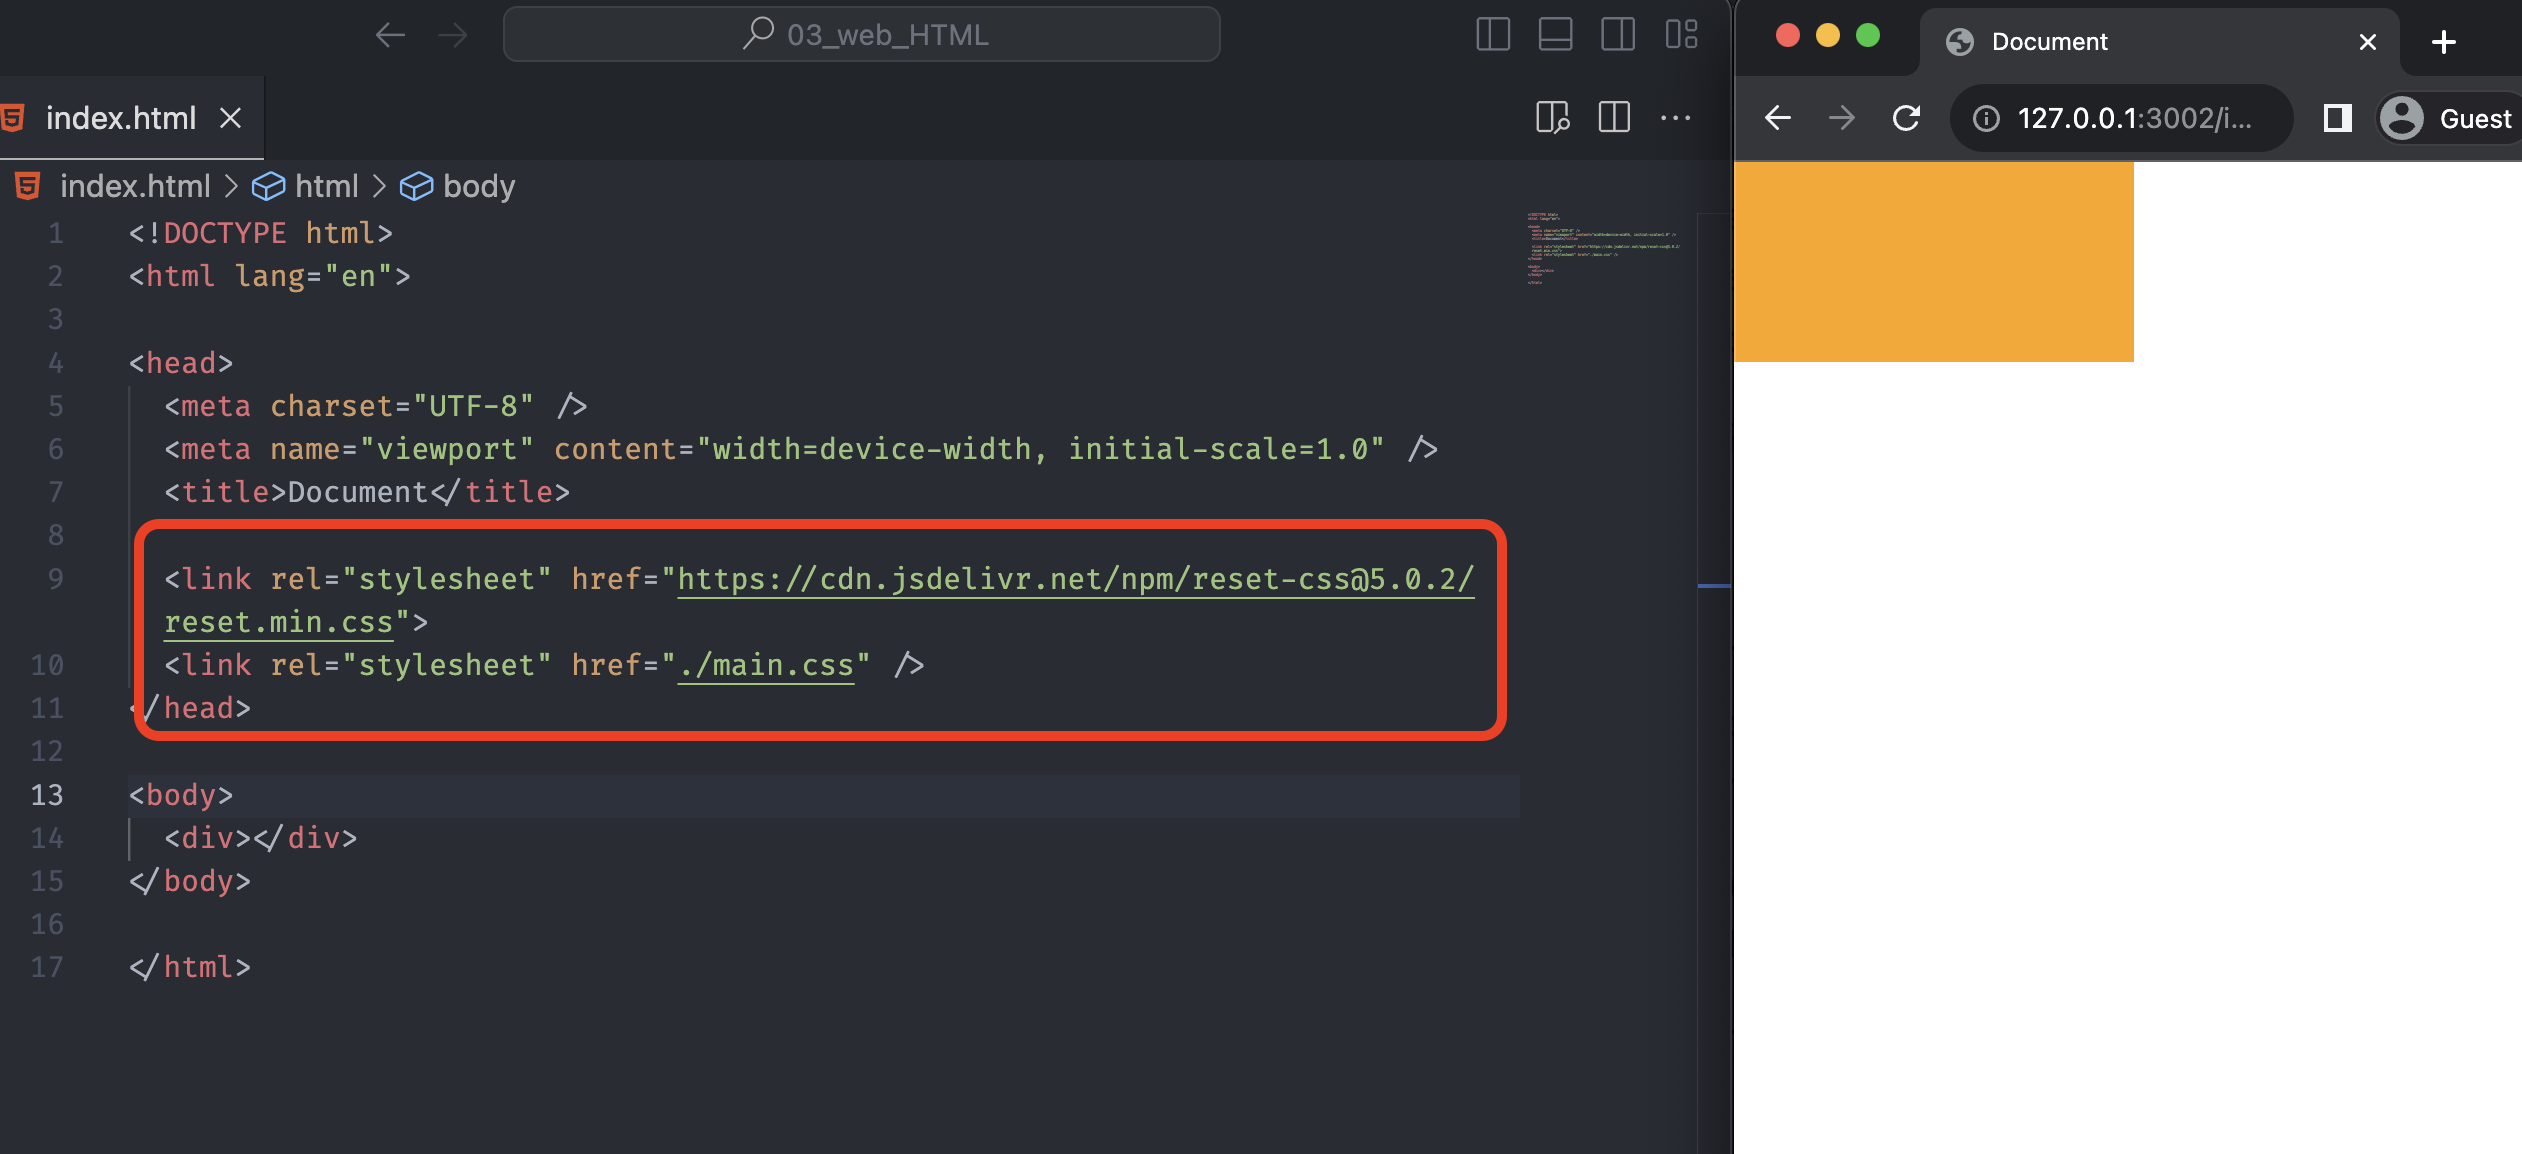
Notice that our orange box or div has no extra space or margin value. Another thing that we keep in mind is that we place an external link tag right above our main.css. That’s because HTML reads the file from top to bottom and applies the first style first.
Emmet
When we type in VS Code or any coding site, we can use a tab key to auto-complete the code.
We can use this feature because of this very special piece of software called Emmet.
By using emmet, we can reduce much time to writing the code. Here are some useful commands:
- div.{classname}: produce a
classname,<div class="classname"></div> - In CSS,
w:200 + tabproduce awidth: 200px - Same as width,
h:100produces aheight: 100px - The background-color can be produced by
bc:orangelike so.
After learning CSS selector, we can use a more complicated version of emmet like this:
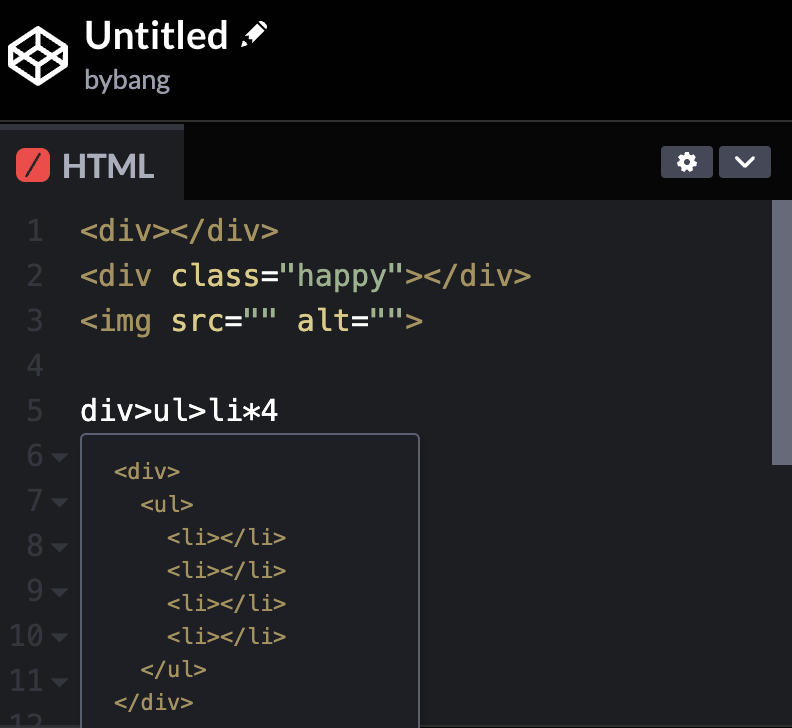
Notice we can see the preview version of emmet that indicates what structure will be created by this emmet.
Basic Syntax
Anatomy of an HTML Element
Until now, we have created a few different tags, and this time, we will look at the details of the basic structure of it.
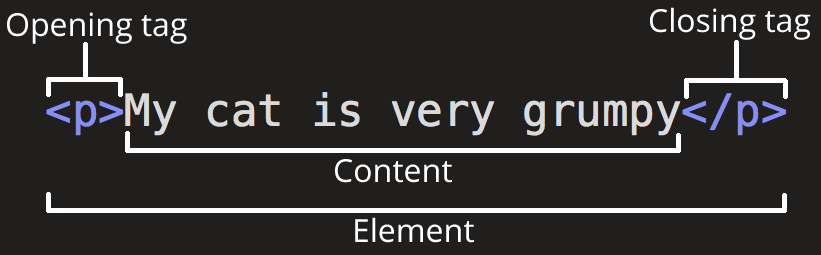
The main parts of the above paragraph element have the structure, and most other elements have a similar pattern.
The element comprises the opening and closing tags and the content.
Opening and closing tags are wrapped in angle brackets and state where to begin or start to take effect and where to end. The difference between opening and closing tags is that the closing tag has a / sign before the element name.
The content is the content of the element. It can be different by its element and wrapped with opening and closing tags.
Understand Parent-Child Relationships
Parent Element
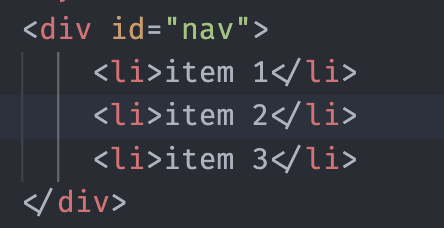
Recall that we made some structure with li tags in Codepen. The picture below has a structure similar to that without the ul tag.
The parent element wraps the child element, or we can say the parent element is directly above and connected to a component in the document tree.
Child Element
The child element is the element wrapped by the parent element and often has content like text or pictures. The child element is an element directly below and connected to an element in the document tree.
We use the indentation to distinguish the child and parent elements. Suppose we have the structure like this:
<div><li>item 1</li><li>item 2</li><li>item 3</li></div>
We can’t easily see where the child element starts and ends, and it looks unnecessarily sophisticated.
To avoid this issue, we indent the child element to separate from the parent element. Well-organized code is an essential skill to learn as we eventually work in a team. The colleagues prefer not just correct code but also visually pretty code.
Ancestor and Descendant Elements
Let’s go back to our code.
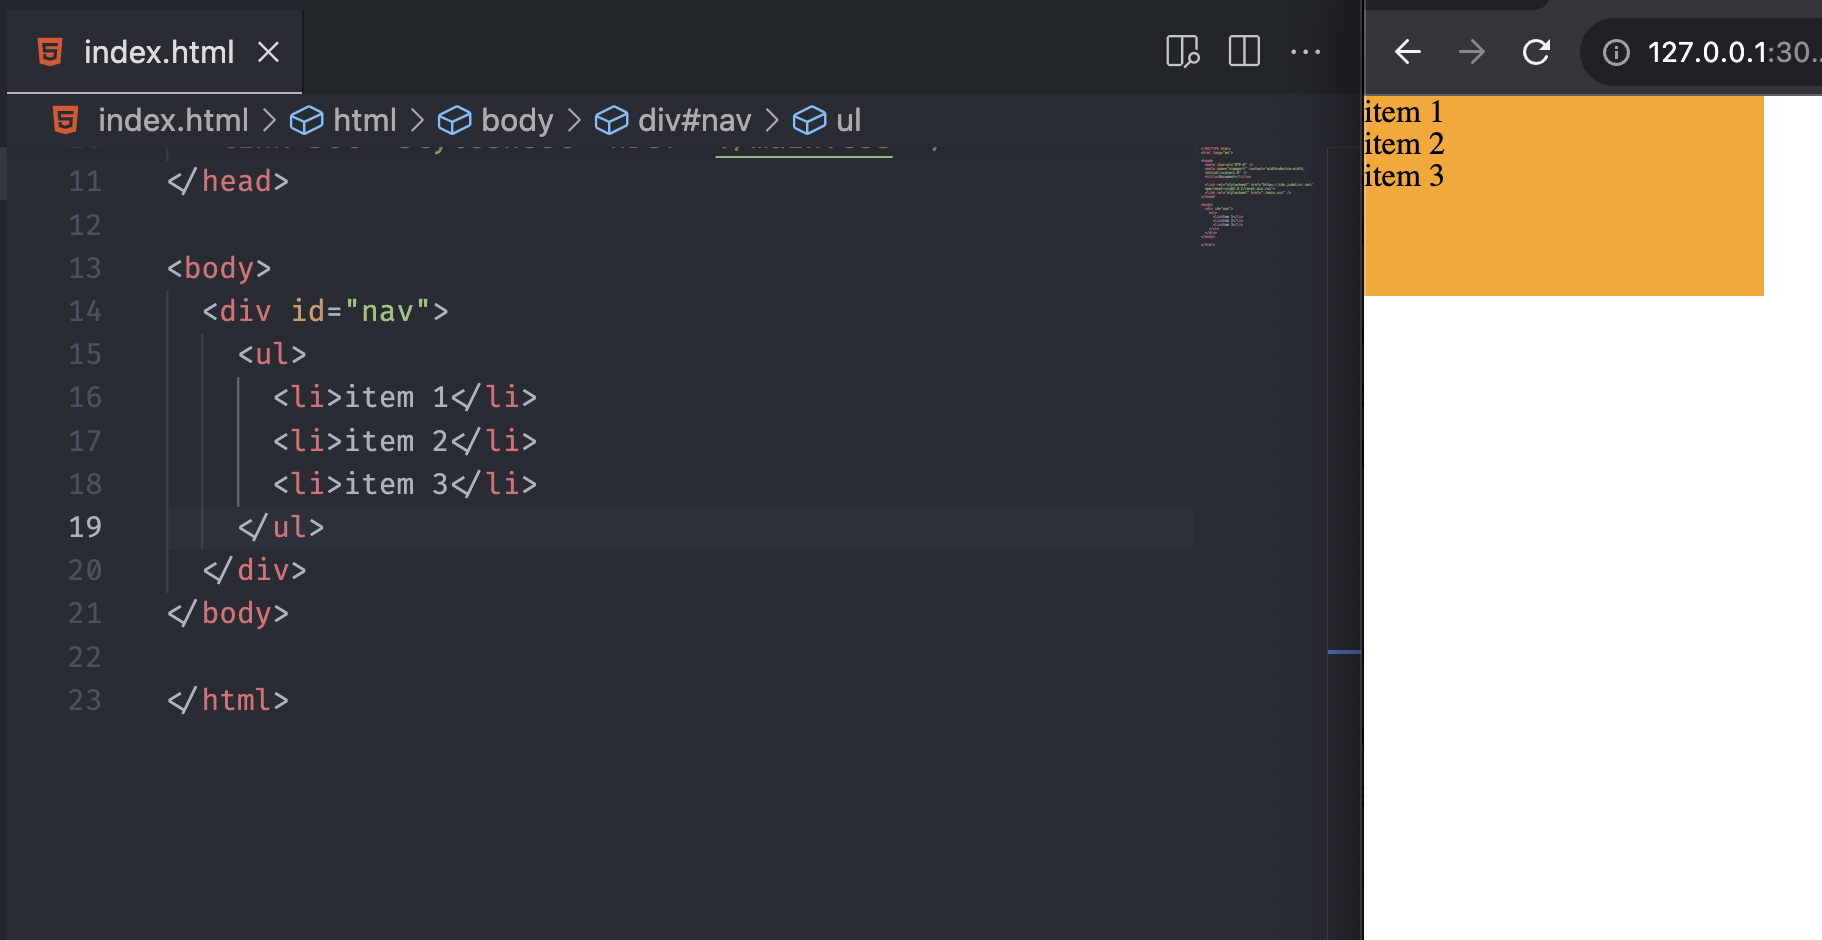
Notice that we have the ul tag as the parent element for the li tags, and the div tag is the parent element of the ul tag.
The elements above the children are called ancestor elements. In the code snippet above, these ancestor elements can be div or body.
Contrary, if we consider the div, the ul tag is the child element. The li tags below the ul tag can be the descendant elements.
To sum up, the ancestor elements are all the elements, including the parent element, above the current element that wraps the current element. The descendant elements are all the elements below the current element, including the child element.
Notice the elements are changing from the reader’s perspective. Be aware that the current element’s position is the key to reading the proper parent-child relationship. You can check other HTML relationships in here.
Empty Tags and HTML Attributes
Void Element
The void element is an HTML element that cannot have child nodes. The void elements only have a start tag, and the end tag is not specified.
In HTML, a void element must not have an end tag like this:
<!-- invalid -->
<input type="text"></input>

<!-- correct -->
<input type="text">
The void elements in HTML are as follows:
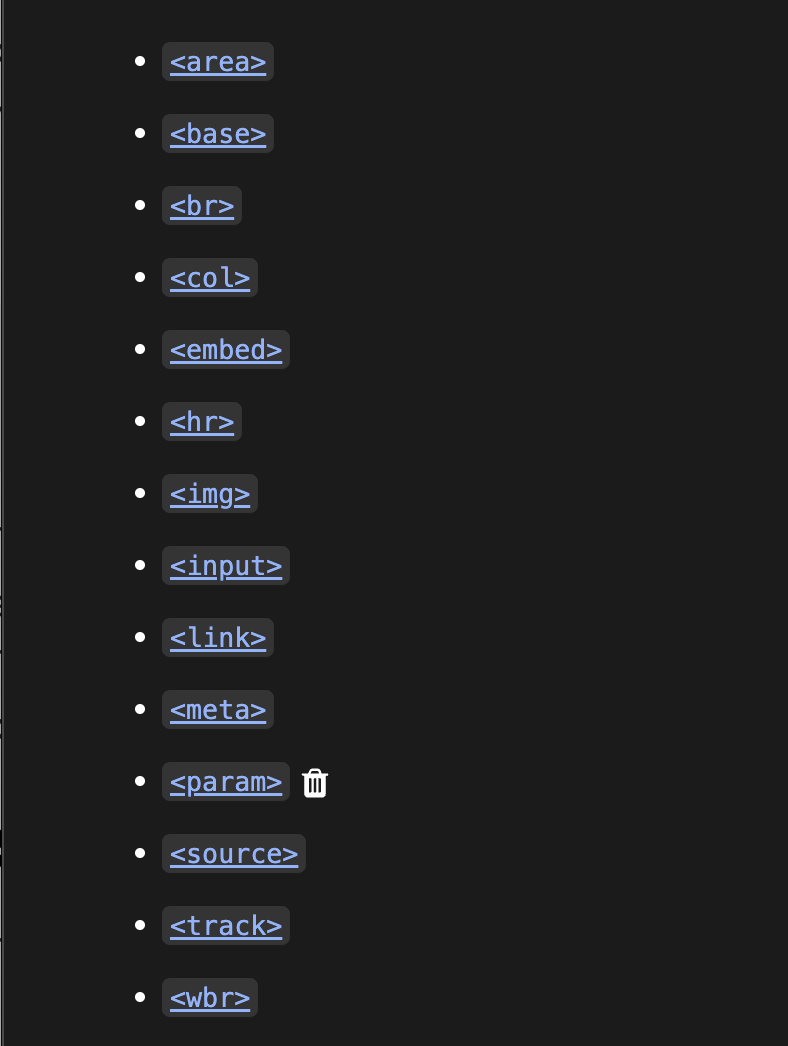
If interested in each void element, you can check the MDN
Self-closing tag
Due to the absence of the end tag, the computer scientists decided to make a syntax to avoid confusion between the regular element and the void element.
From XHTML, the W3C added a self-closing tag and applied the strict rule for the self-closing tag. Check out here for the details.
The current web standard HTML5 embraces both rules, and we can use the self-closing tag or void element itself like this:
<!-- Both valid -->
<link rel="stylesheet" href="./main.css" />
<link rel="stylesheet" href="./main.css" />
Technically speaking, the self-closing tag does not exist in HTML; if the trailing / is in the start tag, HTML parsers ignore the slash character. Hence, we can use both tags in HTML5 and in some special cases, we have to include the trailing slash to avoid the errors.
Check out more information about the self-closing tag from MDN
HTML Attributes
We have seen many HTML elements that have attributes with their value.
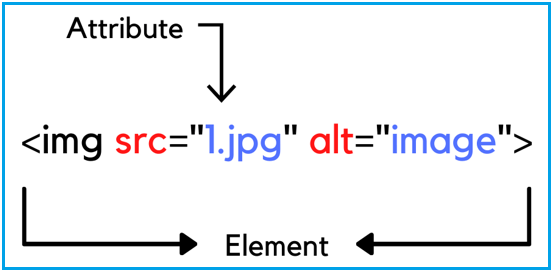
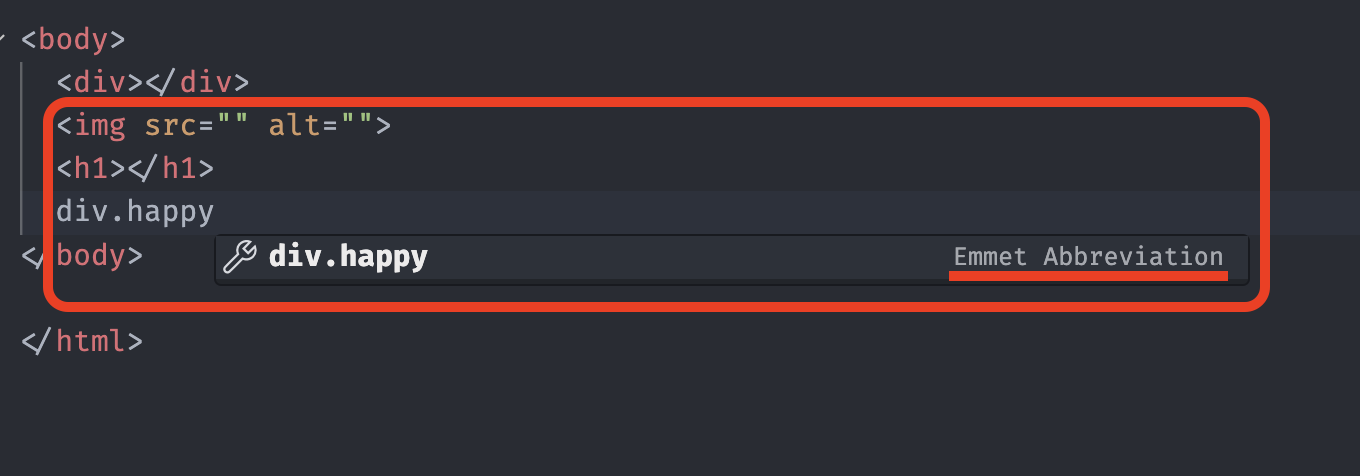
Suppose we have an img tag like this:
<img />
The above img tag means that we want to put some image where the tag belongs. But with the code above, we don’t know what image we want to put in or the name of the image.
In the picture, the img tag has two attributes, the src and alt. Each attribute has a value, in this case, the image file and the text.
These additional values configure the elements or adjust their behavior in various ways to meet the developer’s needs.
In general, the void element has attributes and values because, unlike the regular element, the void element doesn’t have the content part in the element. You can check out which attributes belong to which element from MDN
Text and Boxes
Inline and Block
The inline-level and block-level content is in CSS, but it is fundamental to the website, so we learn the basics from this part.
The inline content is mainly used with text, and the block content forms the layout for the website.
Span Tag
The <span> HTML element is a generic inline container for phrasing content, which does not represent anything. It can be used to distinguish the content area or for styling purposes.
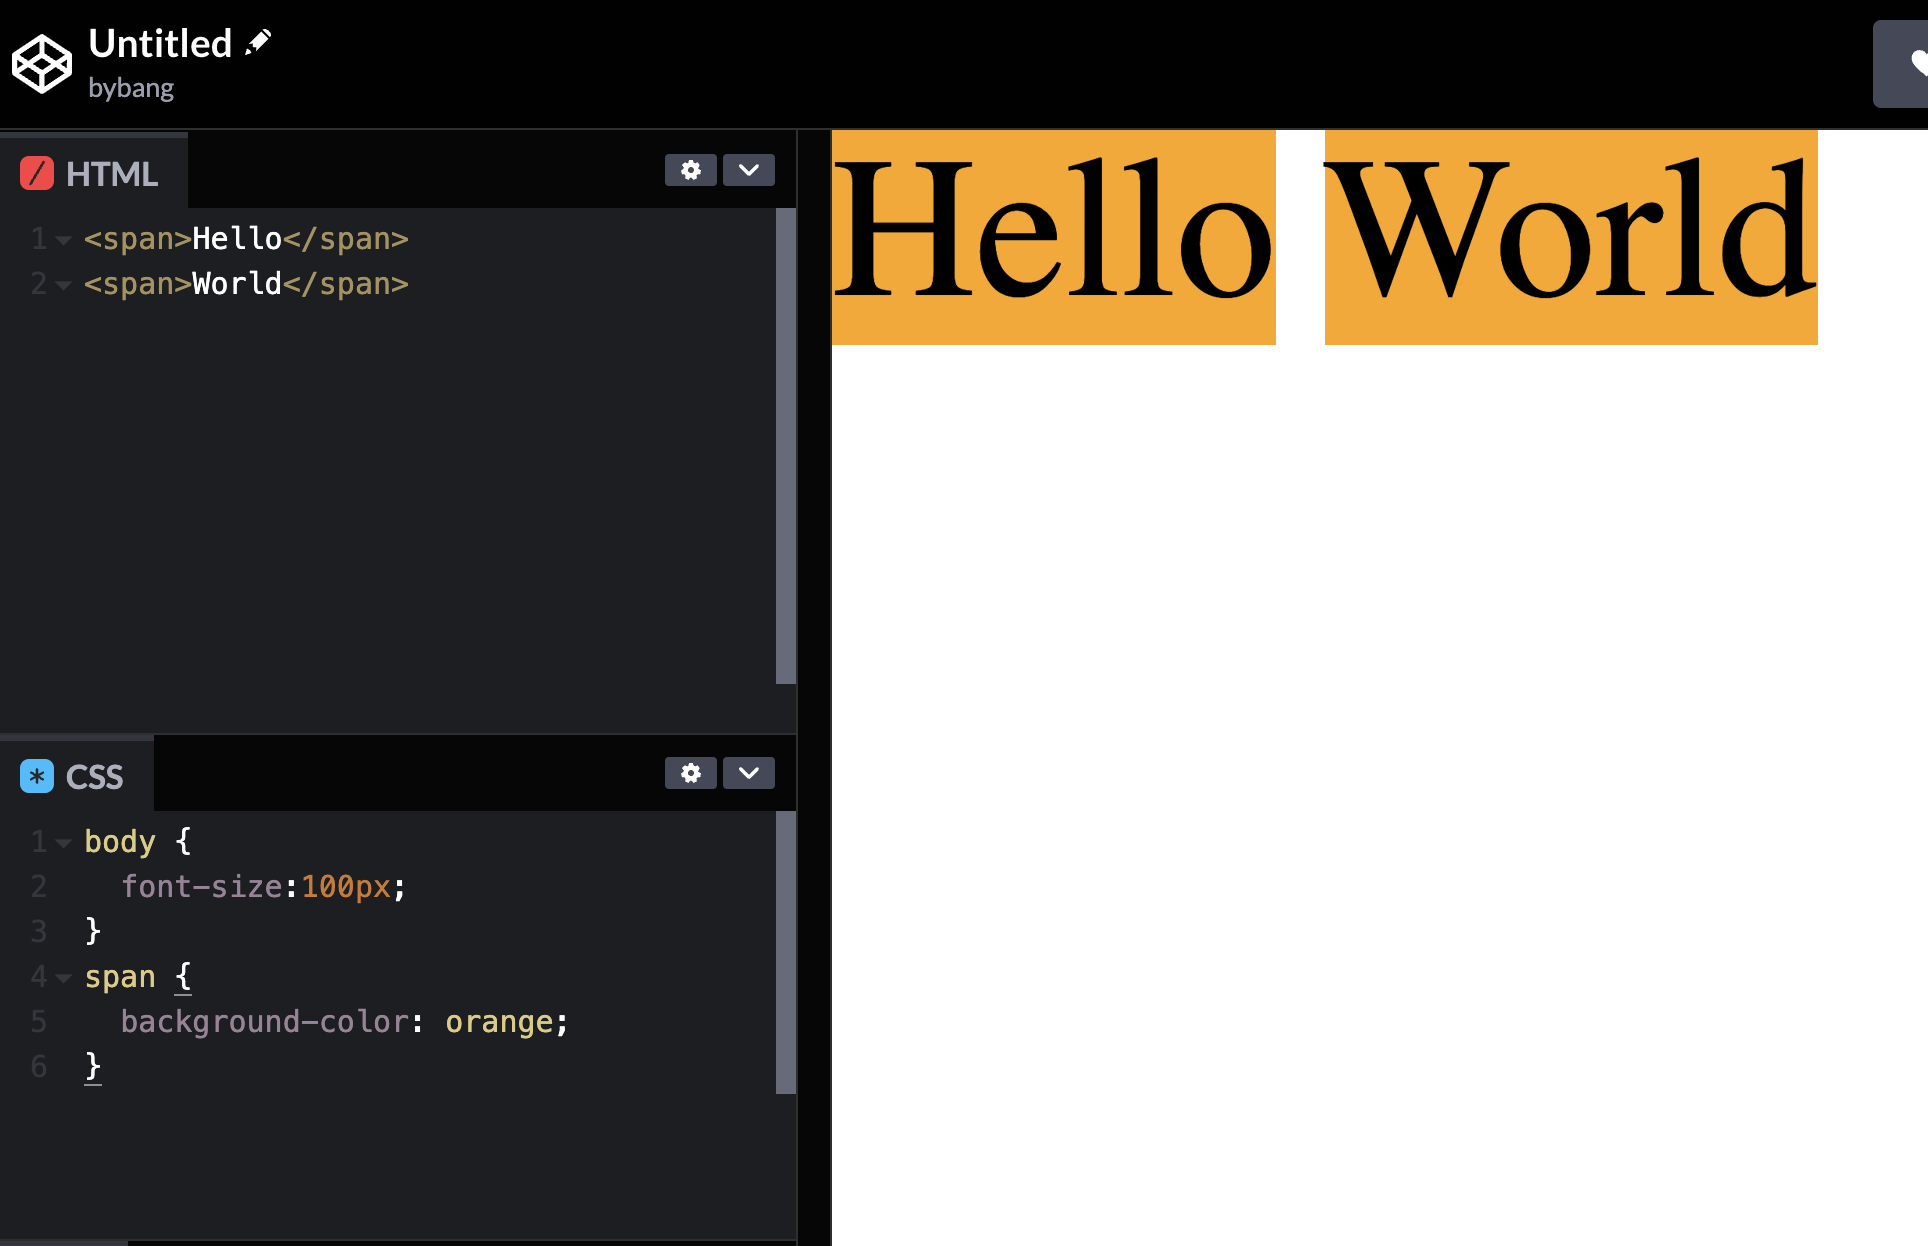
If we look at the code above, there are two span tags with the text. On the right side, whitespace is automatically generated because two span tags are in different lines. We can remove it by adding two span tags in the same line.
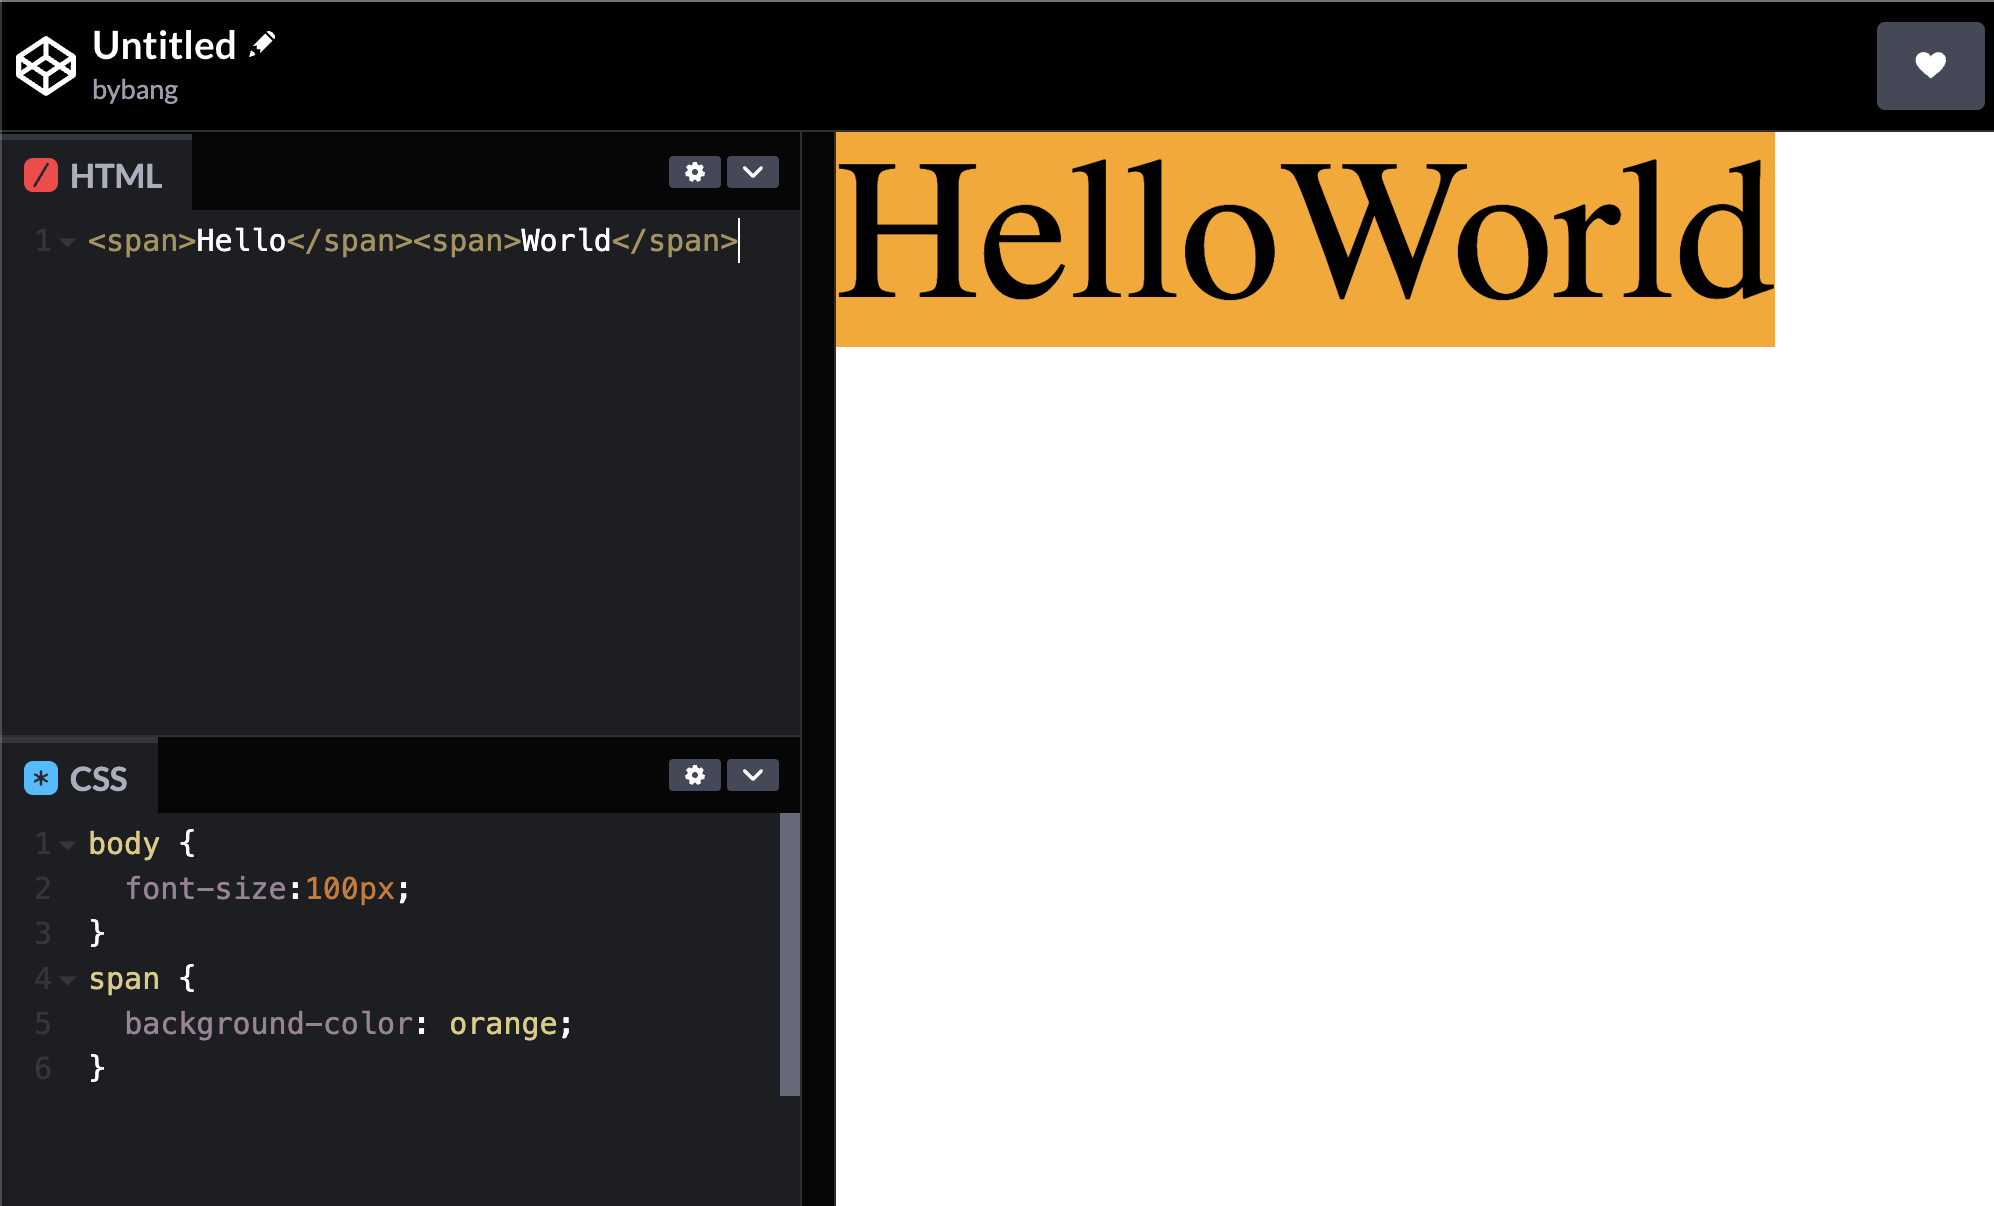
Notice that inline-level content stacks up the elements horizontally and adds space when the elements are in different lines. Another feature is that inline content tends to shrink to match its content size.
Suppose the span tag has the following attributes:
<span style="width: 100px">Hello</span> <span style="height: 100px">World</span>
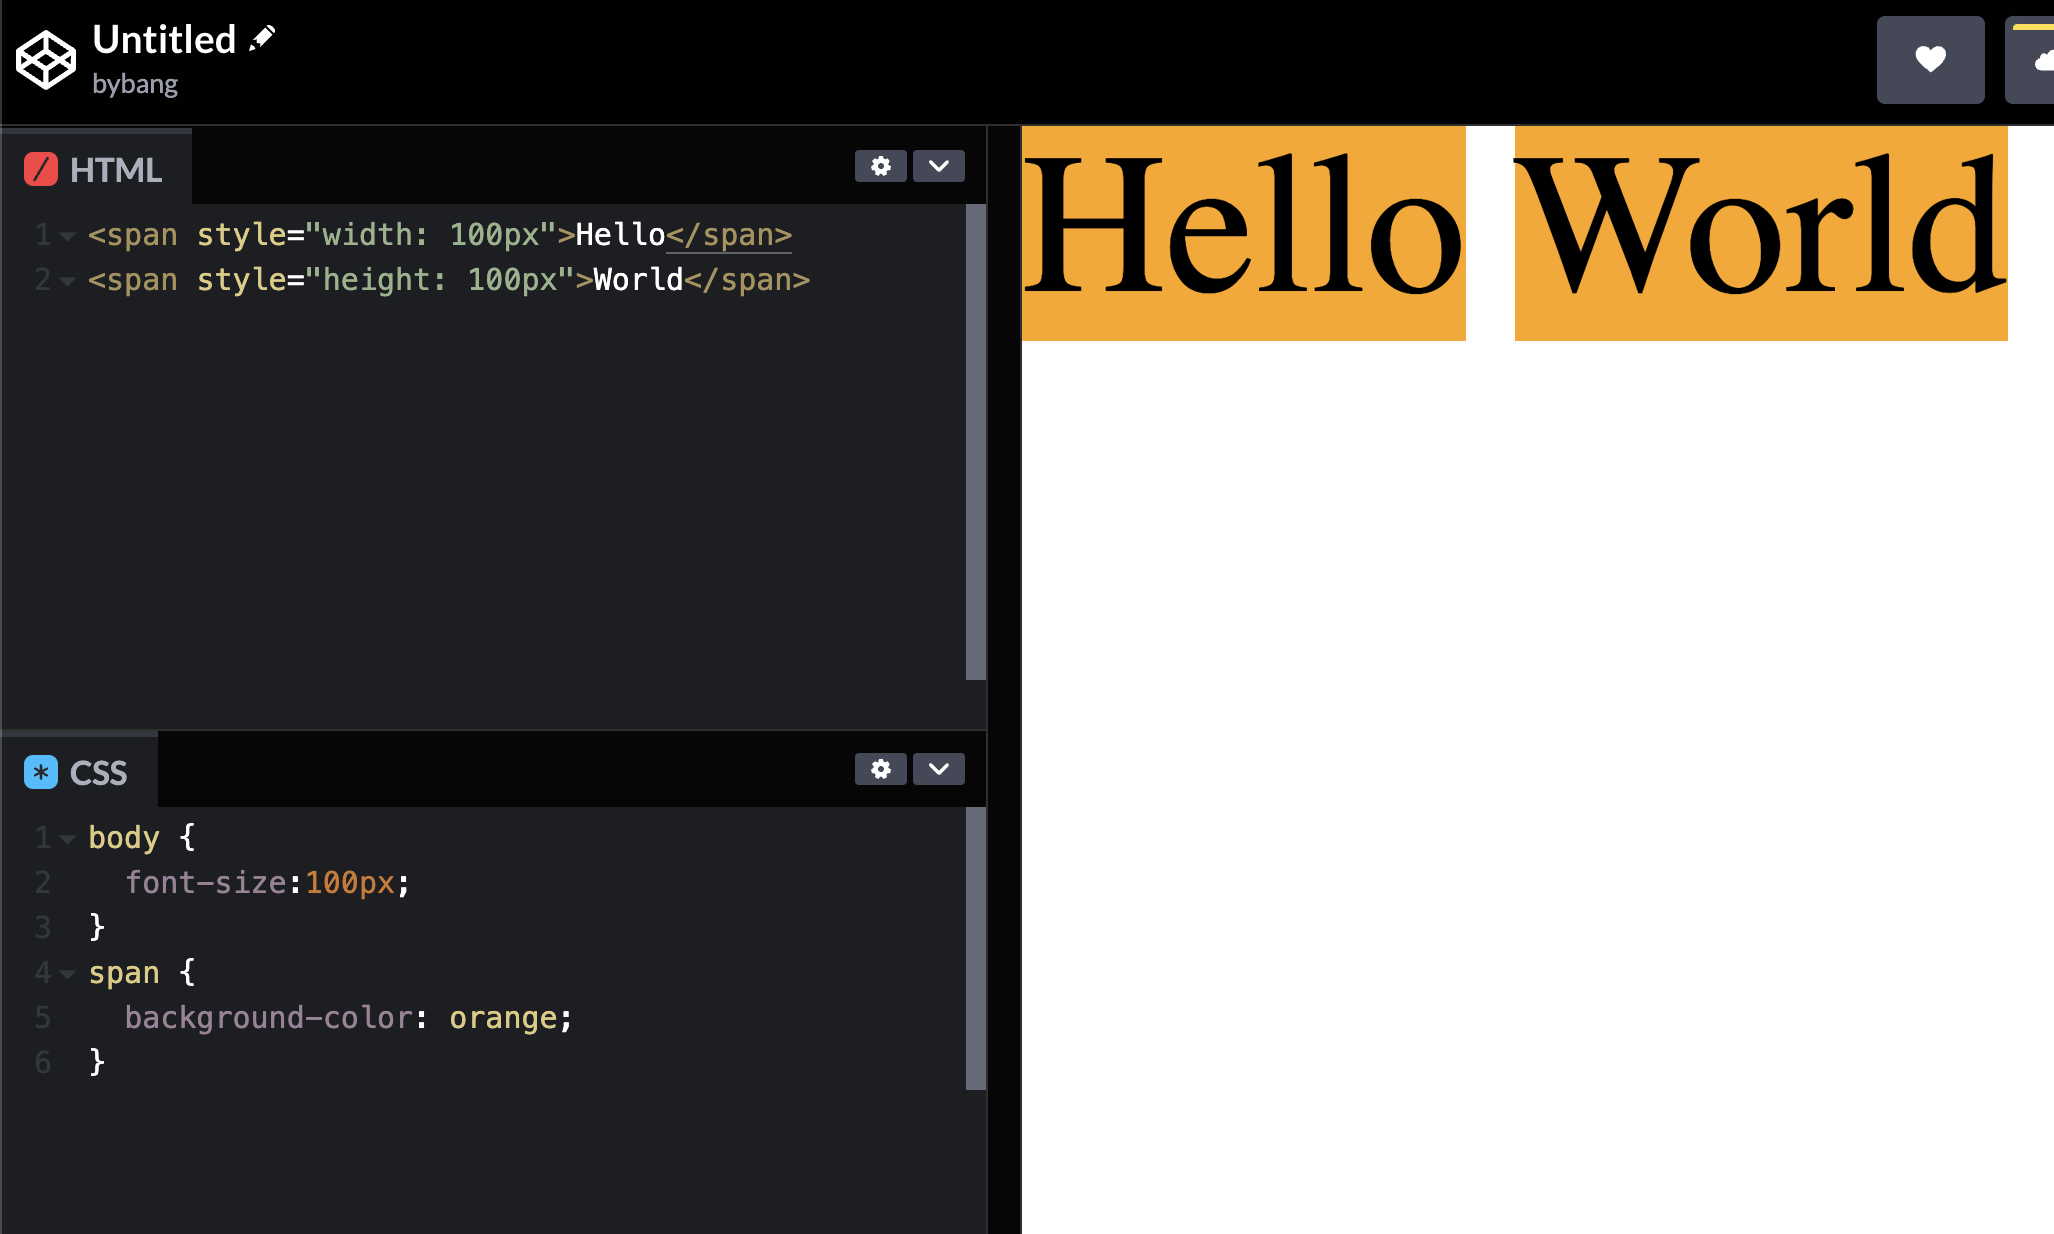
Nothing has changed because the inline-level content treats the text, and the span tag is also considered as text. The text cannot have the width and height, but it has the font size.
Regarding the margin(outer space) and padding(inner space), we can use the left and right sides for each attribute but not the top and bottom sides.
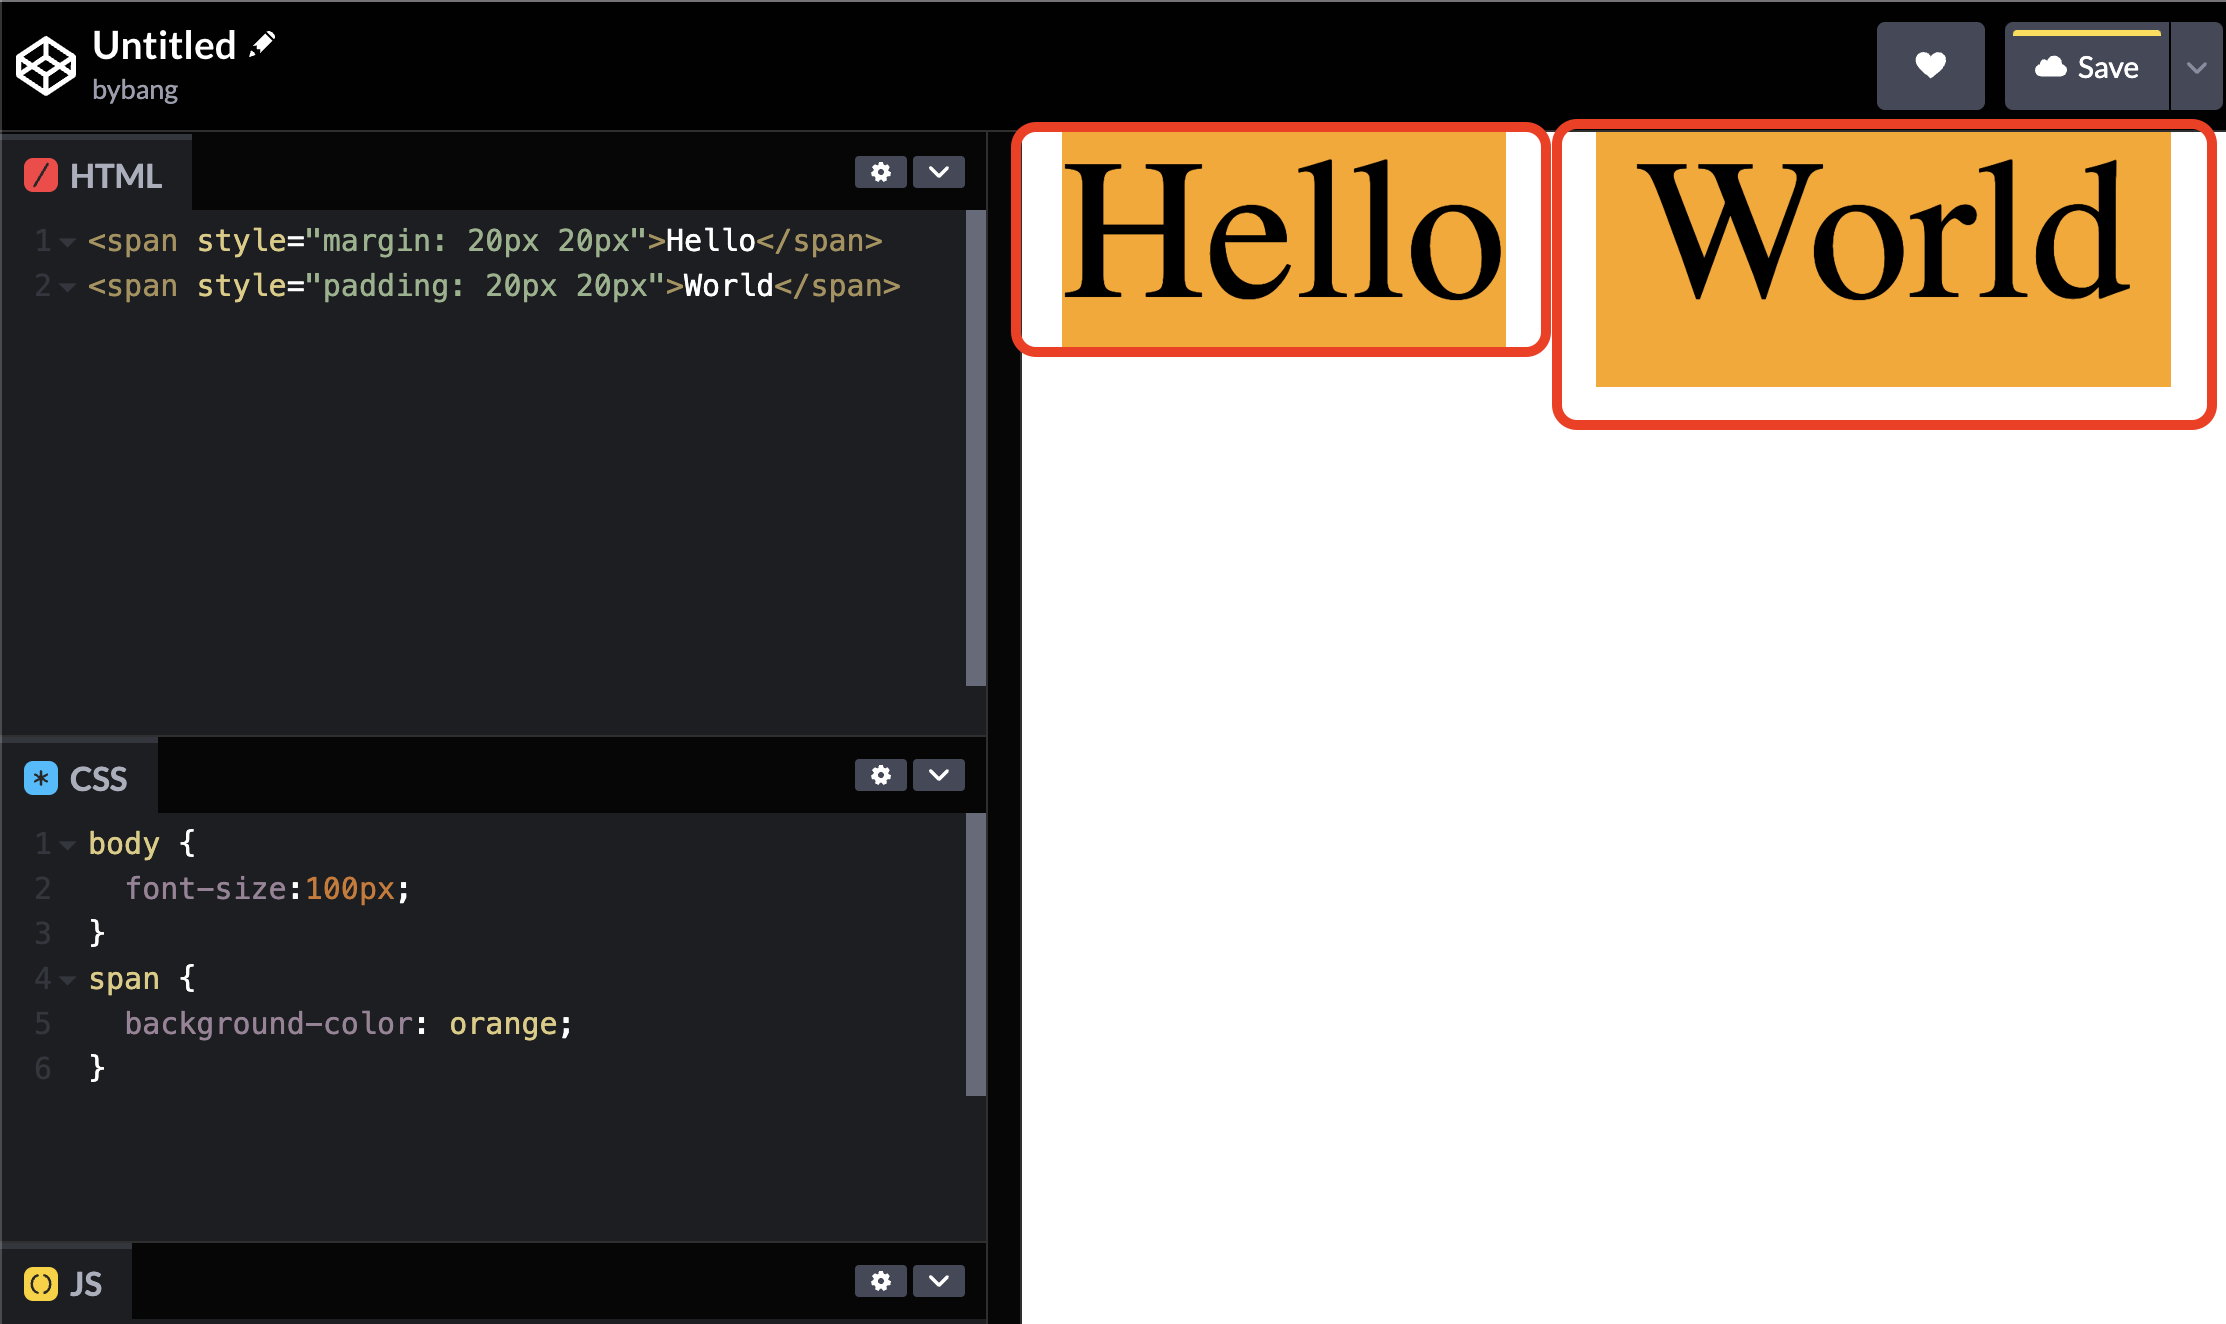
Notice that the first span tag margin-left and margin-right are applied but not margin-bottom/top. The second span tag also has the correct padding on the left/right side but is weird on the bottom/top side.
The last important concept of the inline element is that it cannot have the block content as the child element.
<!-- ❌ invalid -->
<span><div></div></span>

<!-- 🟢 valid -->
<span><span></span></span>
The inline content span is considered as text, so we can’t put it in the box inside the text. But we can add text to another text; hence, we can use the span tag inside the span tag.
Div Tag
The <div> HTML element is the generic container for flow/block content. It has no effect on the content or layout until styled in some way using CSS.

Opposite to the inline content, the block content stacks up the elements vertically. The block content tends to expand itself horizontally along with the parent element size. The above div tags have a body tag as the parent element and are expanded to the full body size.
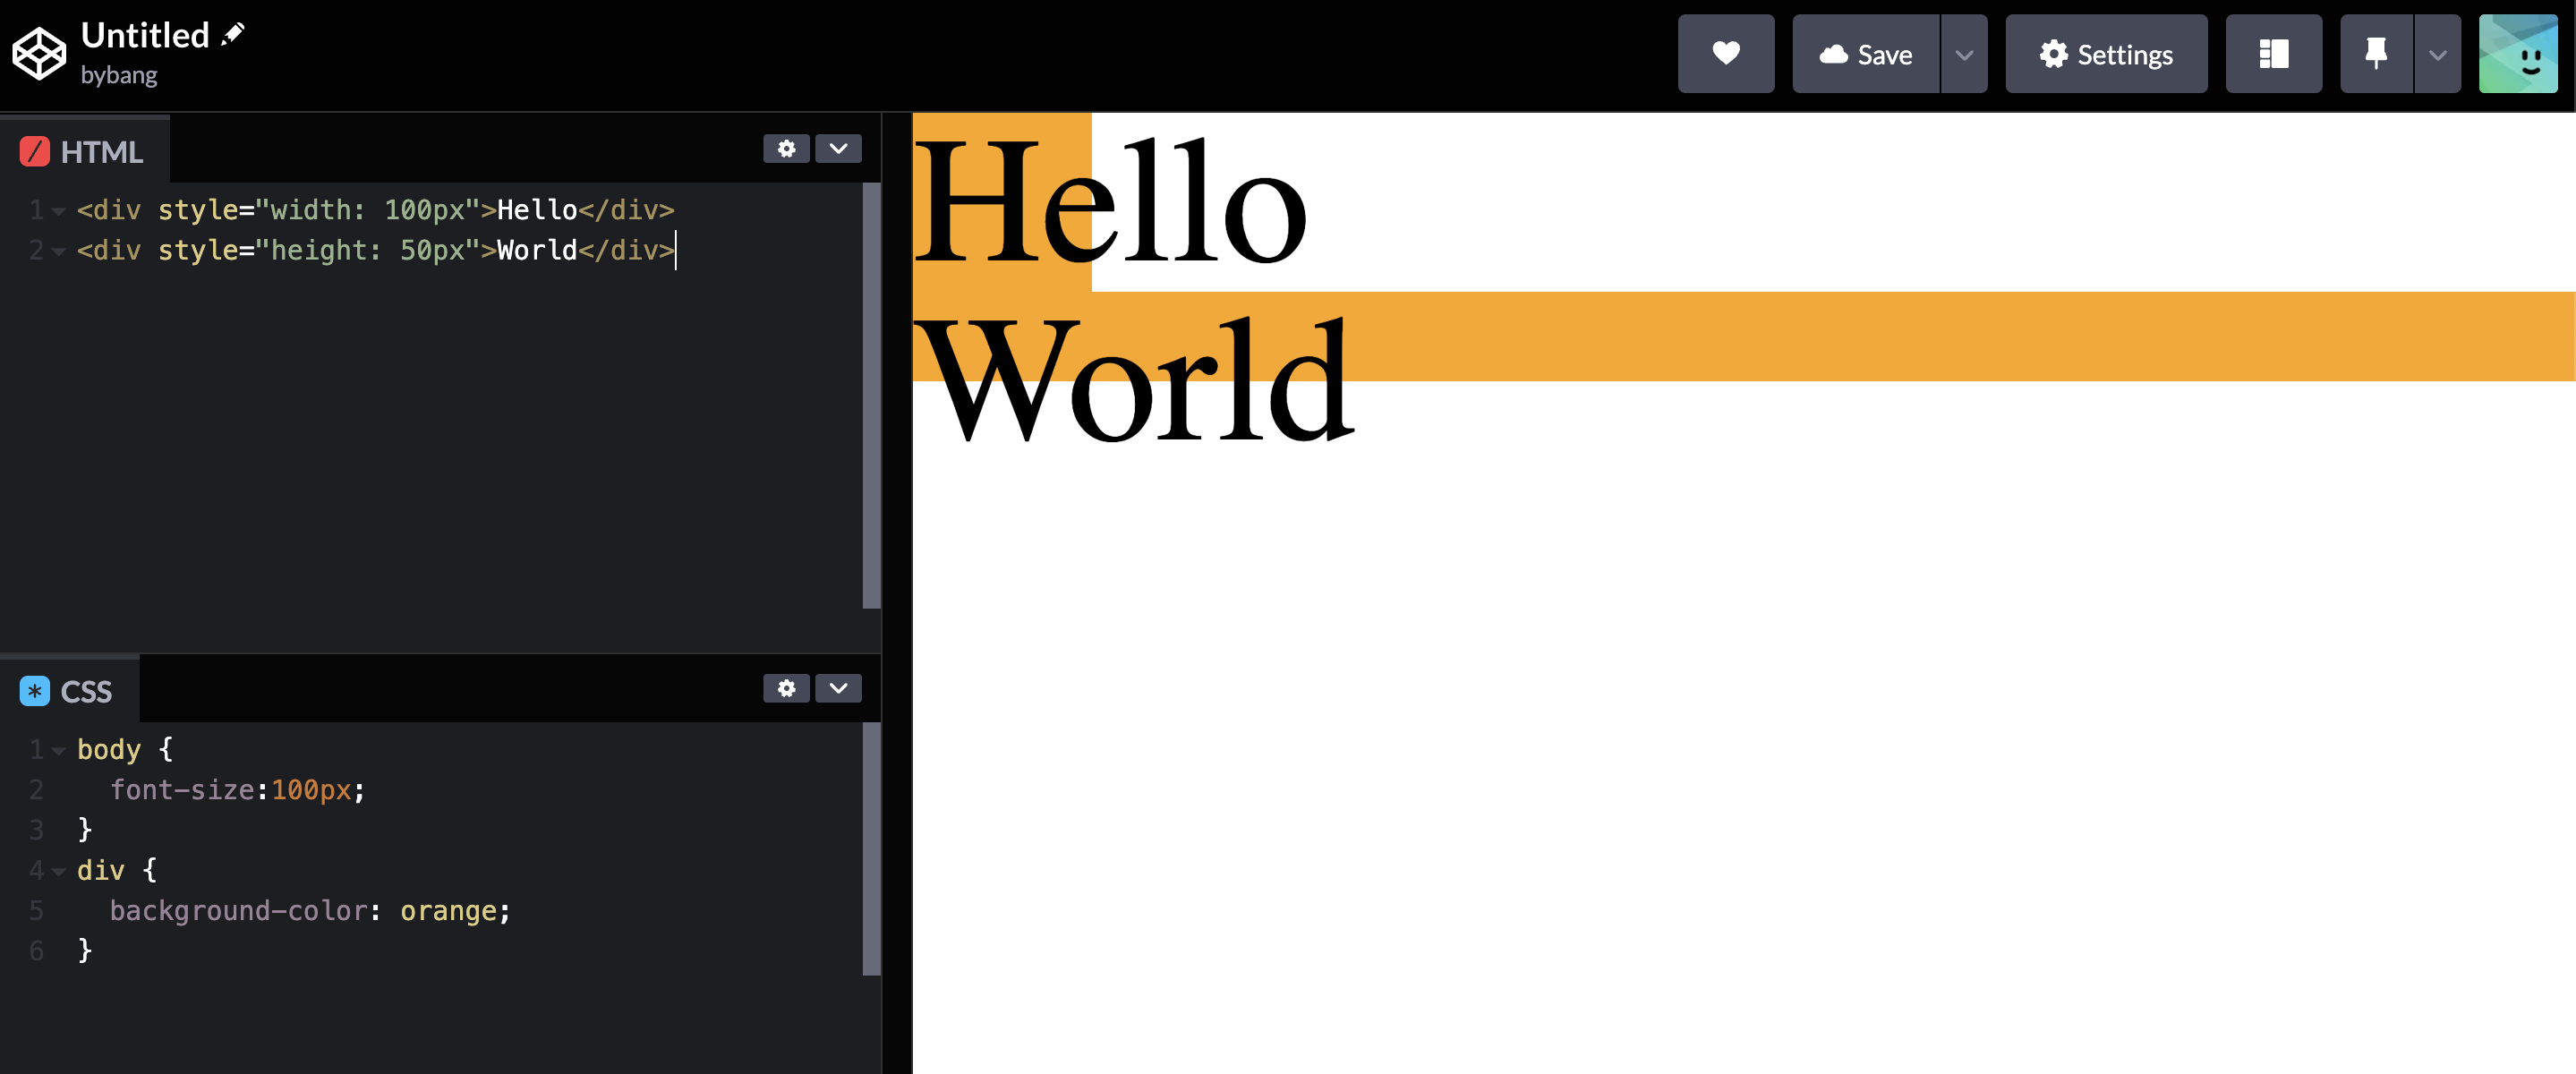
As we can see, the width and height attributes are applied as expected. Why is it different from the inline content? The block content is considered a box, and we can easily modify the size by width and height.
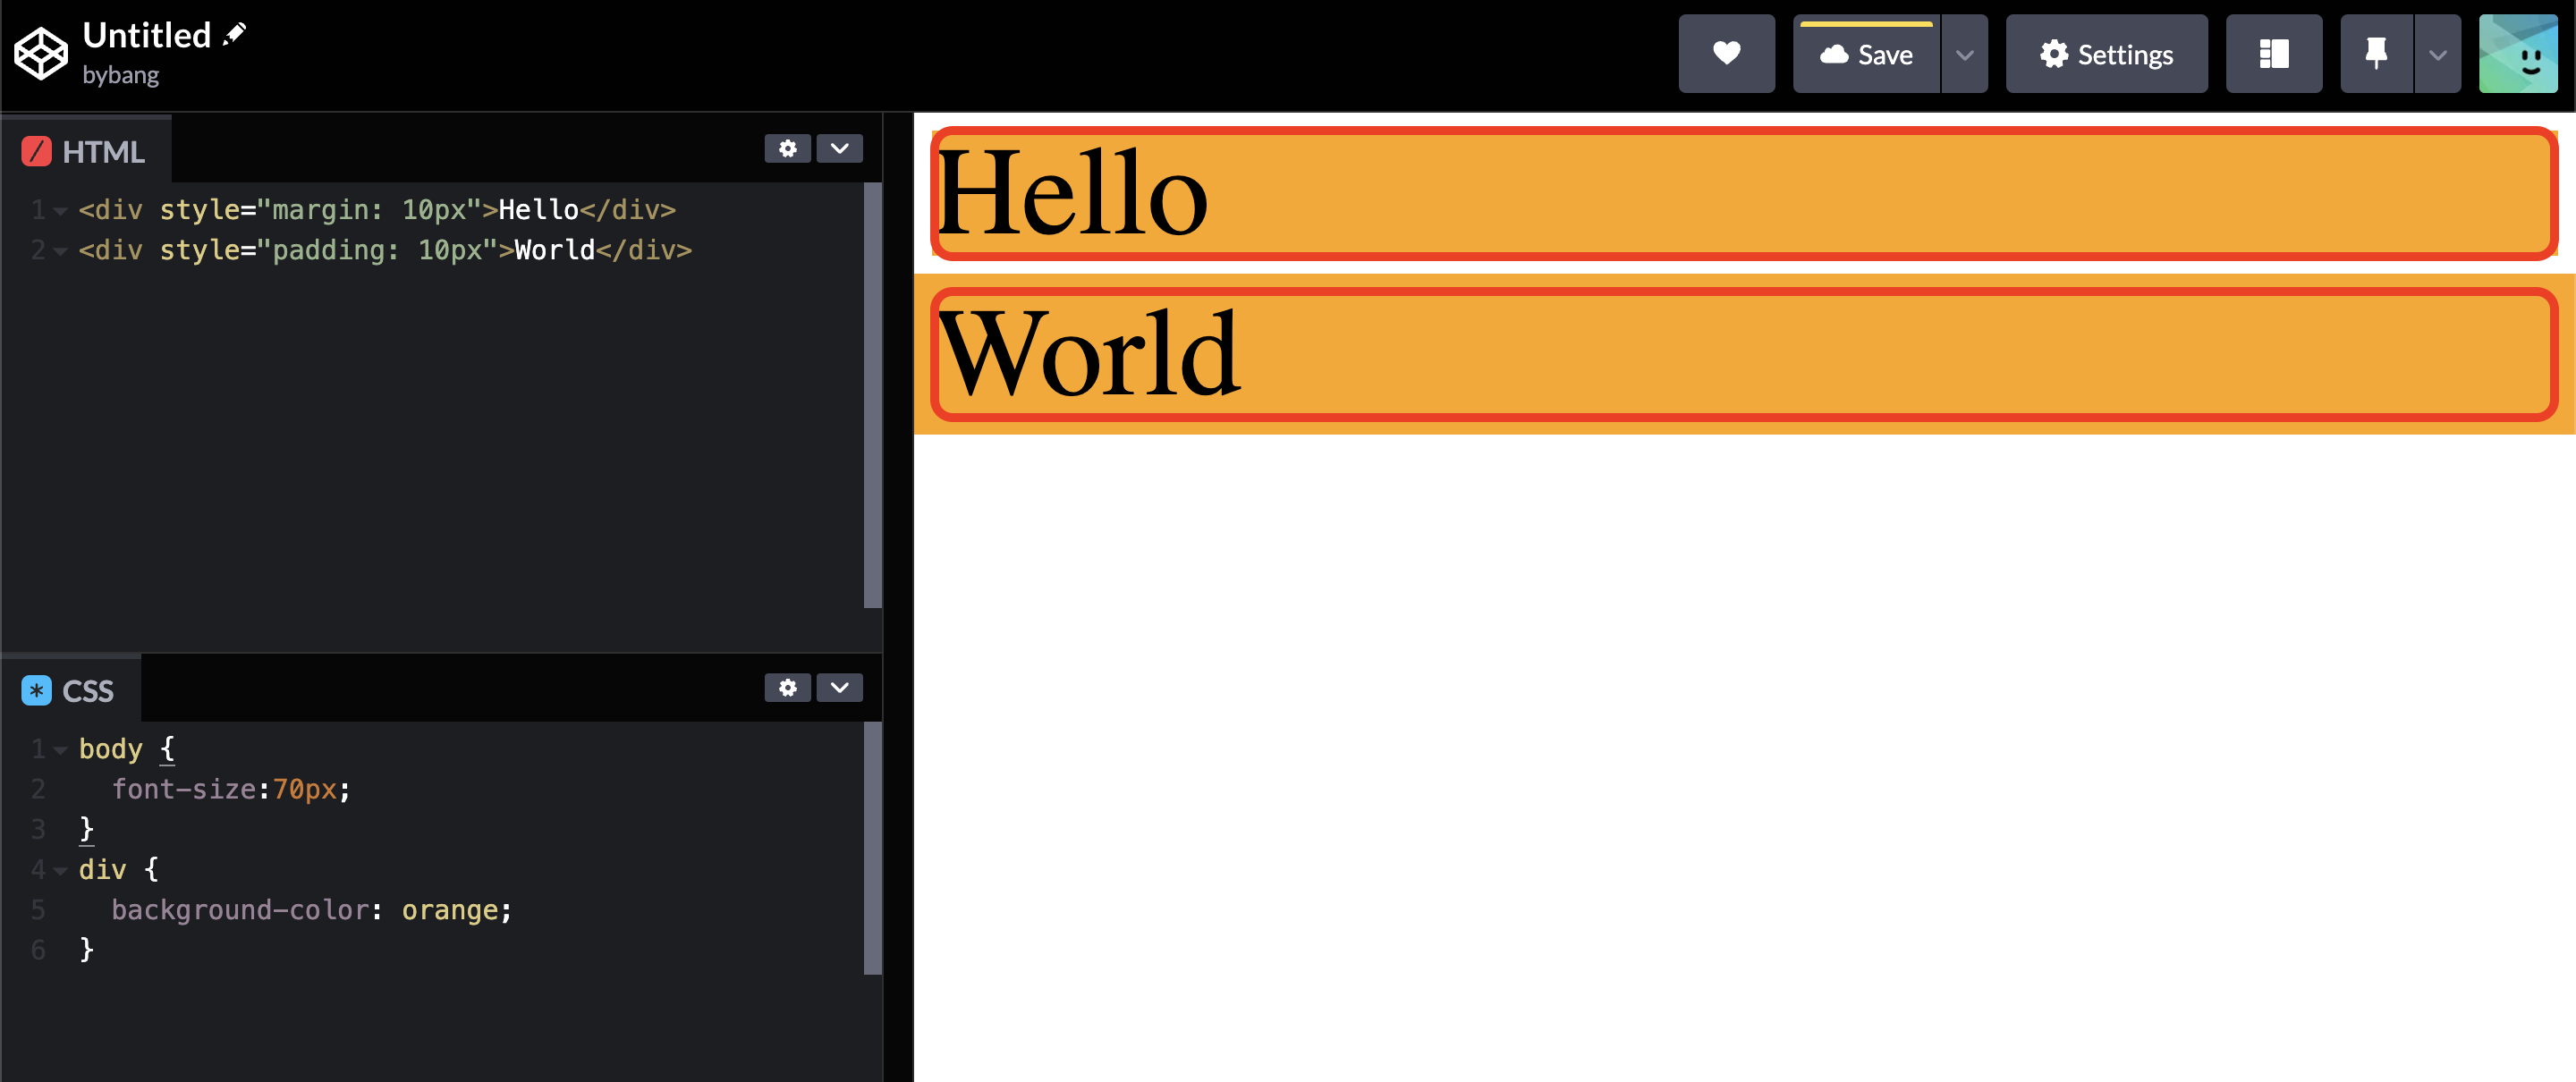
Another attribute that can be applied is the outer space(or the margin) and inner space(or the padding). The first element has a margin of 10px, and on the right, the hello element has a 10px margin on each side. The second element also has the padding of 10px, but it expanded the inner color because it expanded the inner space by 10px.
The block element can contain both inline content and block content as a child element. Hence, the block element takes advantage when controlling the visual aspects.
<!-- 🟢 valid -->
<div><span></span></div>

<!-- 🟢 valid -->
<div><div></div></div>
📌 Takeaway
- Each browser vendor has its own styling. Hence, we need to reset the browser style to avoid cross-browsing issues.
- The emmet is special software that autocompletes the HTML and CSS codes.
- The ancestor element is the upper element, including the parent element.
- The descendant element is the lower element, including the child element.
- The void element is a special element that only has a start tag.
- HTML5 accepted both the tag doesn’t have a closing tag and self-closing tag, but technically the self-closing tag is ignored during parsing.
- Inline-level content or inline elements are used with text, and block-level content or the block element is used with layout.
- The span tag is a generic inline container and doesn’t represent anything.
- The inline element tends to shrink to its element, the text size.
- Because the inline element is the text, it only allows left and right side margins and padding.
- The block element tends to expand to its parent element size.
- The block element is treated as a box, which takes advantage of styling.
💻 Solution
- None
🔖 Review
- The HTML element consists of opening and closing tags and content inside of those tags.
- The parent element is the element right above the current element.
- The child element is the element right below the current element.
- The self-closing tag came out from XHTML to distinguish the regular and empty tags.
- The void element or empty tag doesn’t have the content. Hence, it includes the HTML attributes.
- The div tag is a generic block container and doesn’t represent anything.
Comments