
[Frontend] TIL Frontend project - Dive into Web

FASTCAMPUS Frontend Project
Dive into Web
패스트캠퍼스 - 프론트엔드 웹 개발의 모든 것 초격차 패키지 Online 과정
🧩 What I Should Learn?
- Document Type Definition
- HTML, HEAD, BODY
- Connecting CSS and JS files with HTML
- Exploring Tags
- Displaying images on the website
- Relative Paths vs Absolute Paths
- Divide and Link Pages
- Developer Tools
🎯 What I learned today
Document Type Definition
Structure of Document
When we create an HTML document, it can be divided into three main parts, and at the top of the document, we can see the DOCTYPE tag.

DTD
In simple terms, a DTD or document type definition is a set of rules that describes the structure and legal elements of a specific type of document. Also, the DTD specification file can be used to validate documents.
Nowadays, HTML5 is the standard, but sometimes, if we work with legacy codes, we can encounter the XHTML version, and the following pattern is typical for XHTML.
from wikipeida...

<!DOCTYPE html PUBLIC "-//W3C//DTD XHTML 1.0 Transitional//EN" "http://www.w3.org/TR/xhtml1/DTD/xhtml1-transitional.dtd">
HTML, HEAD, BODY
HTML tag
Recall this HTML structure again from this picture.
Notice that <html></html> tags wrap the entire document. The HTML tag represents the root(top-level element) of an HTML document and is called the root element. - MDN
The HTML tag lets the browser know where the documents start and end of the document’s area. All elements must be descendants of this element.
HEAD tag
The head tag contains machine-readable information, or metadata in technical terms. The head tag has the metadata about the document, such as title, scripts, and stylesheets(CSS).
This information or the content within the <head> tag doesn’t appear as part of the main content but provides important information for browsers.
BODY tag
The body tag represents the content of an HTML document. There can be only one body tag in a document. Also, it is where the structure and presentation of the webpage are defined, as well as the part of the document that users interact with.
The content within the <body> tag includes text, images, links, forms and other HTML elements that make up the actual webpage.
Connecting CSS and JS files with HTML
Create a CSS file
Throughout the course, we have seen the HTML structure and capability of each of the three main parts. Let’s write some actual content in the body tag.
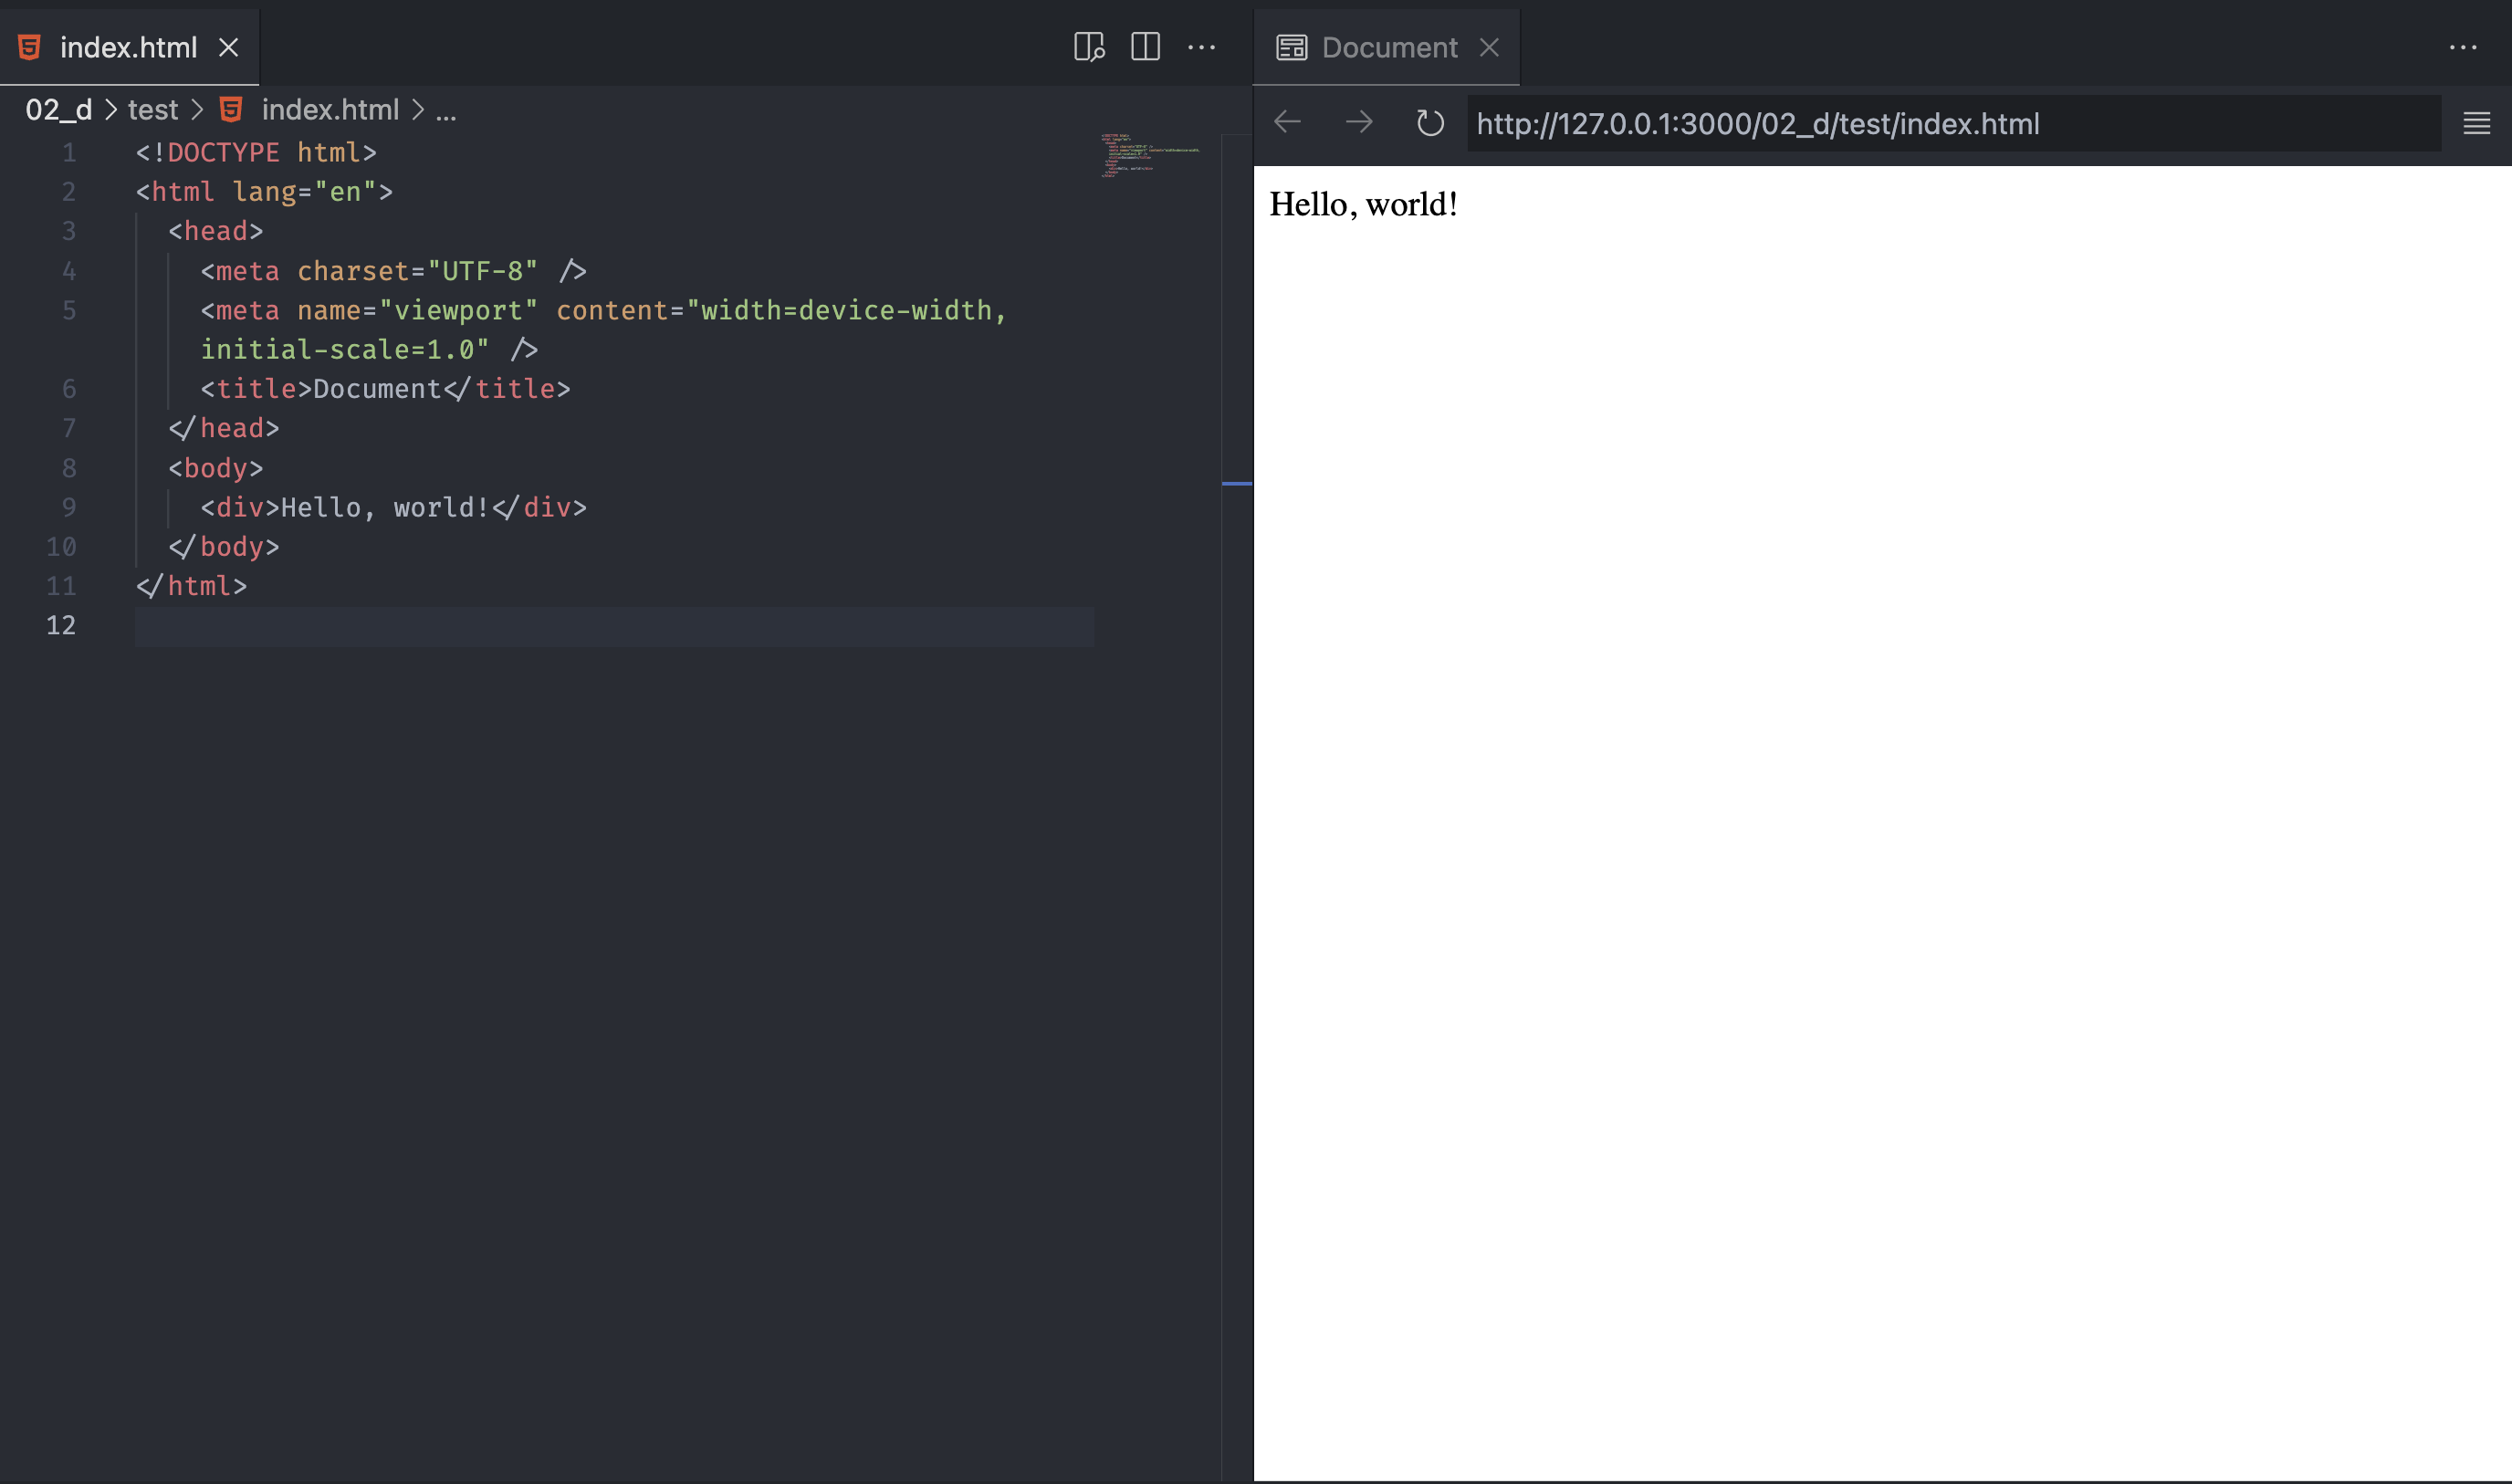
Notice that our content, Hello, world!, goes inside the body tag. To style this HTML document, we need a CSS file.
After creating the CSS file, the HTML file doesn’t know what the CSS file is, so we need to connect the HTML file with the CSS file.
CSS file setting
CSS file has a div attribute and has color: red; and font-size: 100px.
To connect the CSS file, we need a certain form of syntax, and we’ll go over the syntax details later.
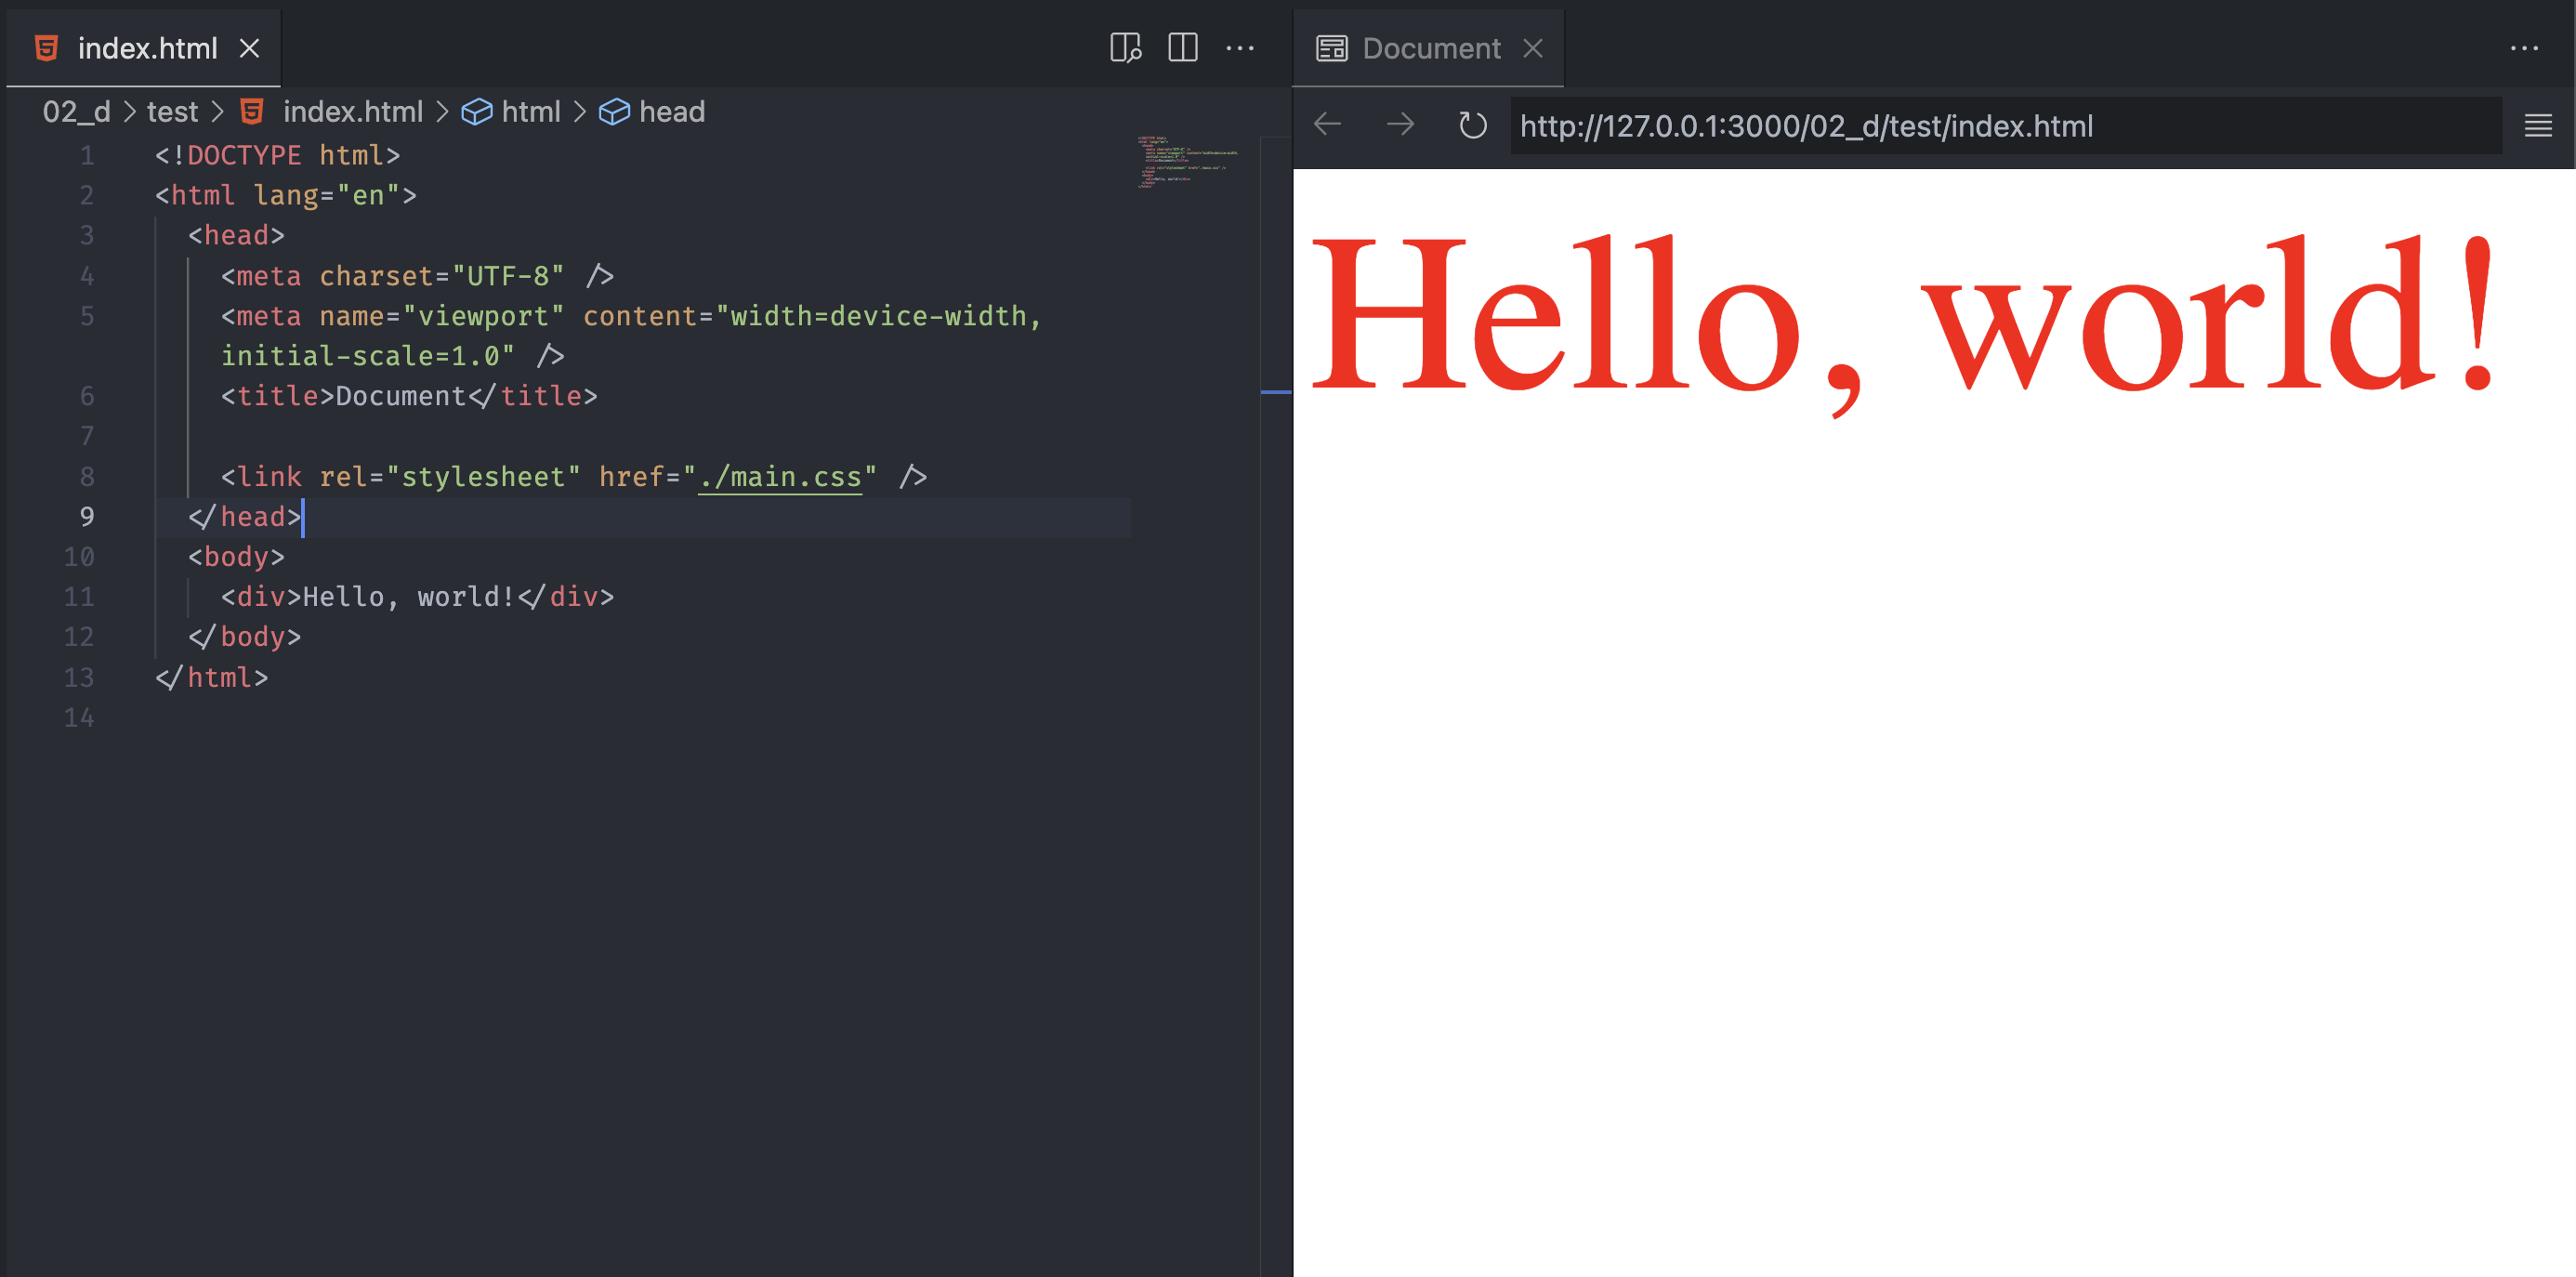
<link rel="stylesheet" href="./main.css" />
The code above is the required syntax to connect or communicate with the CSS file, and if the color changes, the HTML file now applies that color.
In the href="", reference the CSS file path, and ./ means the current directory. This means we are in the same directory and want to call a file called main.css.
JS file setting
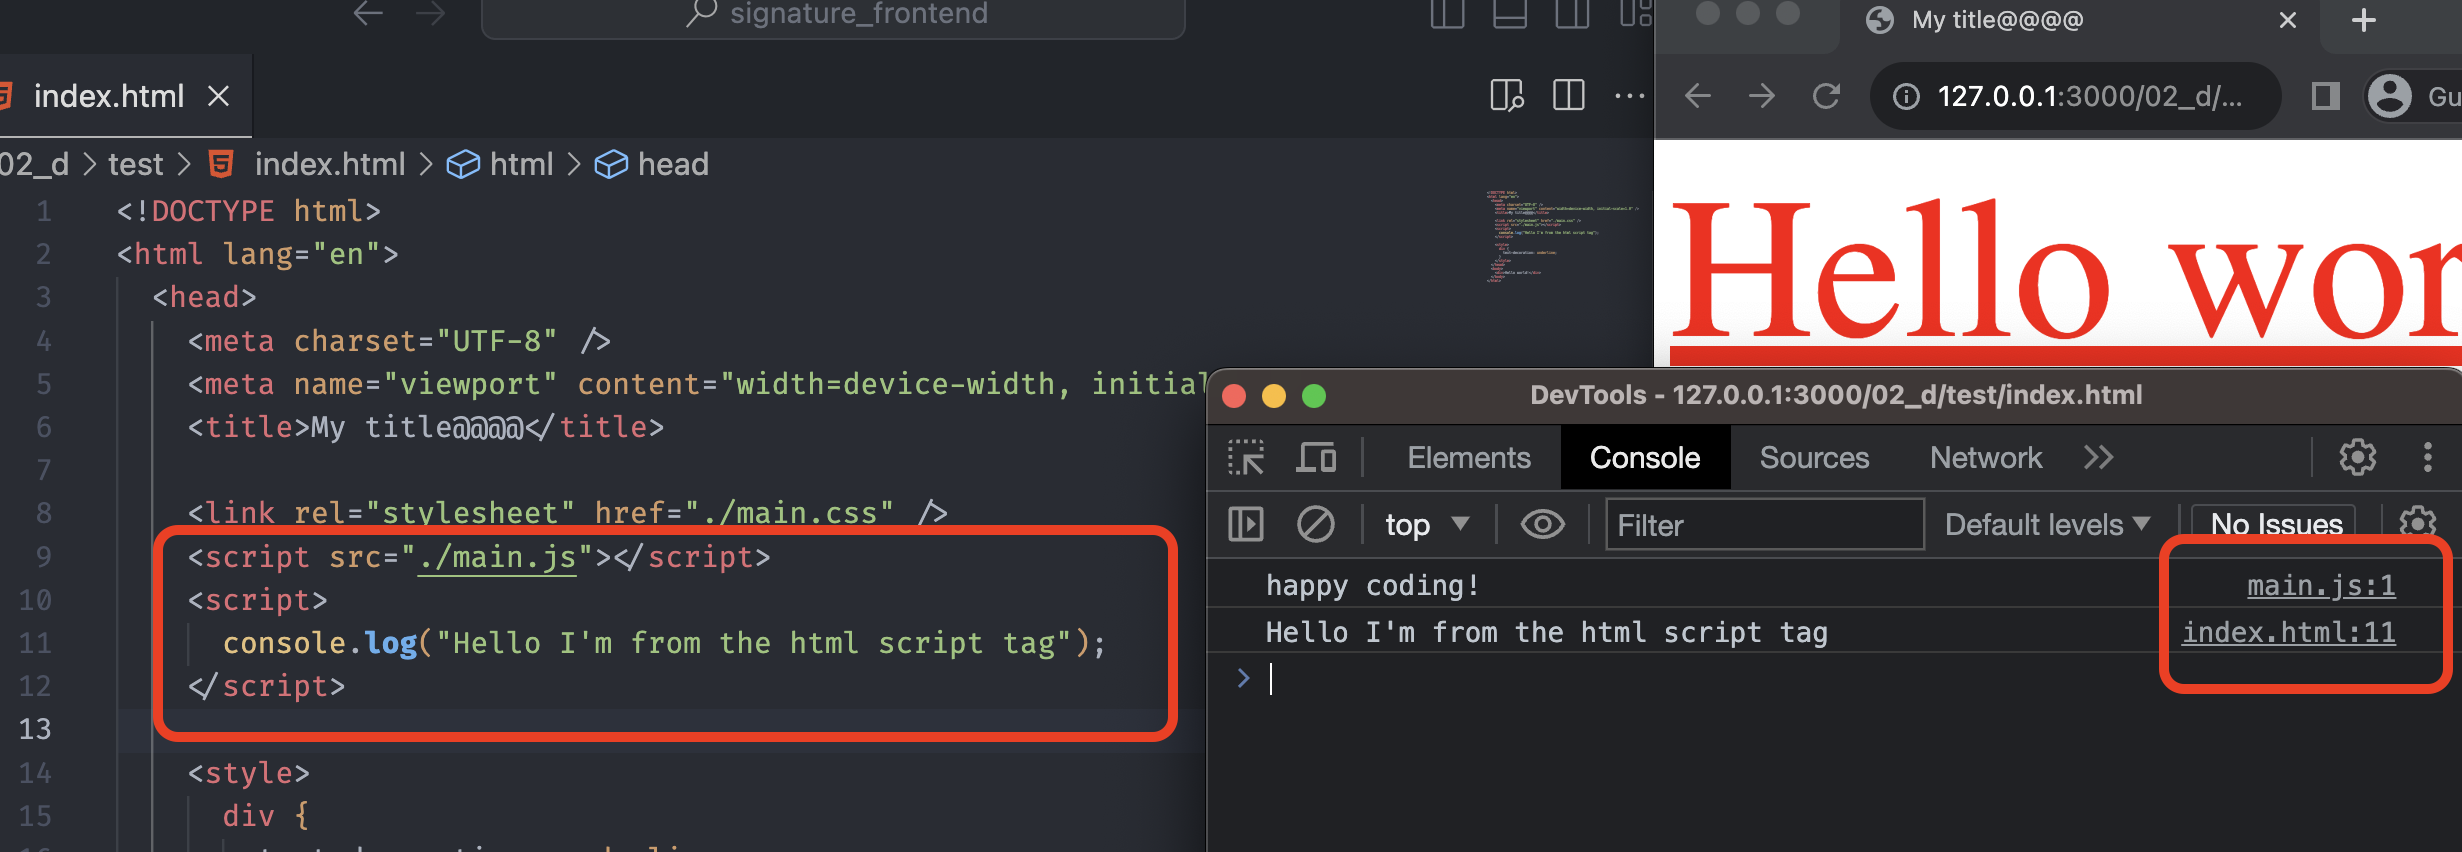
Similar to a CSS file, create a main.js file and type console.log("your message here").
To connect the JS file, we need to add the syntax, and the following code is the syntax for the JS file.
<script src="./main.js"></script>
The src="" asks where the main.js file path is, and by using the same pattern with CSS, we can connect the JS file with the HTML file.
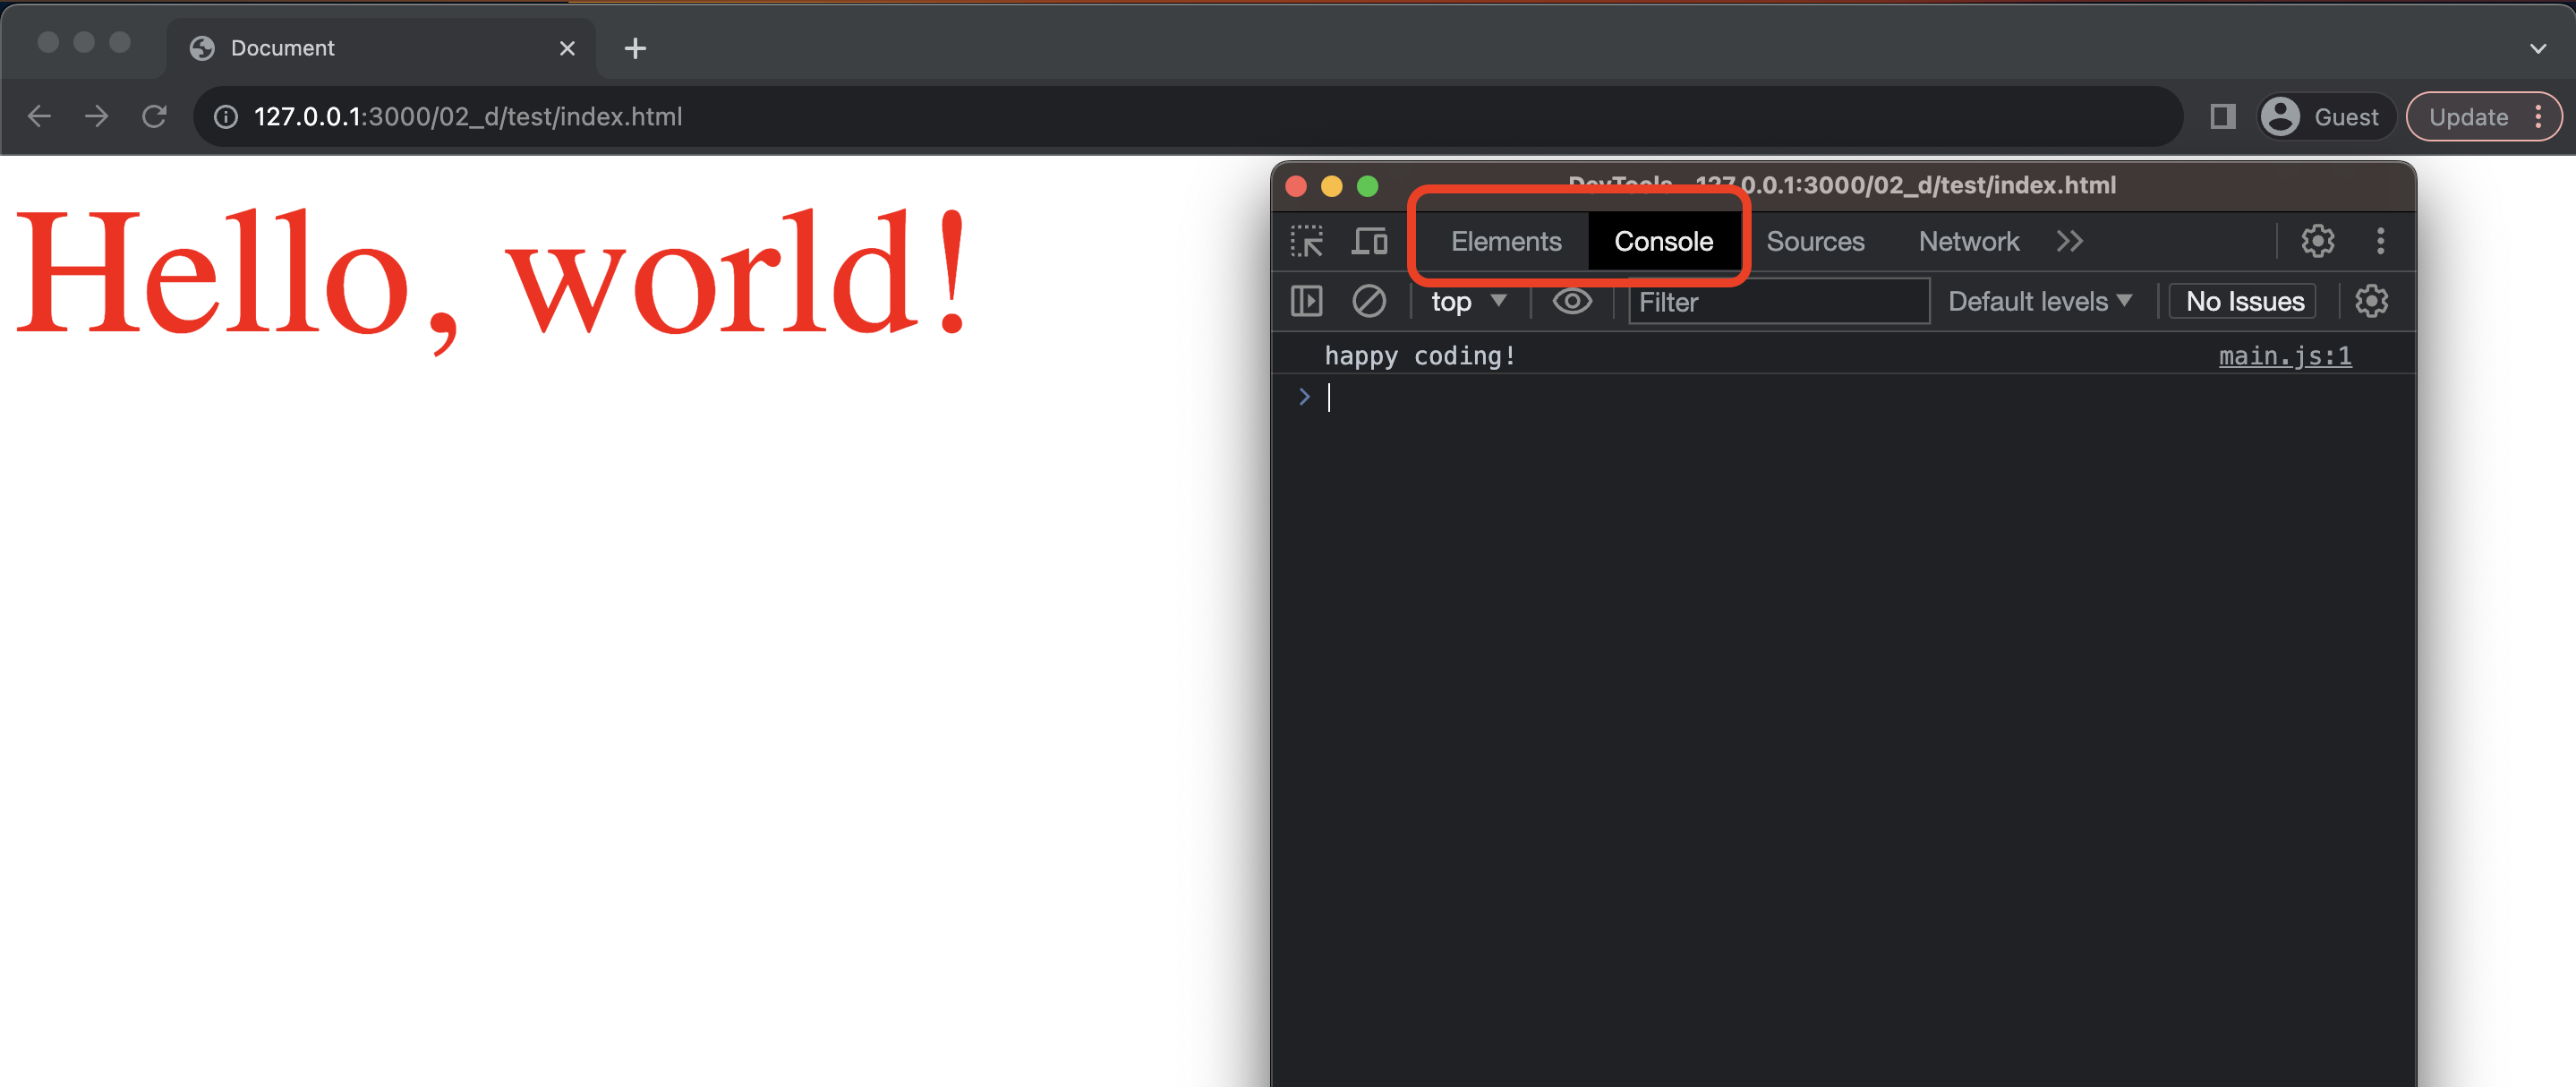
When we go to the browser and open the developer tool with the f12 key, we see that our message is printed in the console tab.
Exploring Tags
Title tag
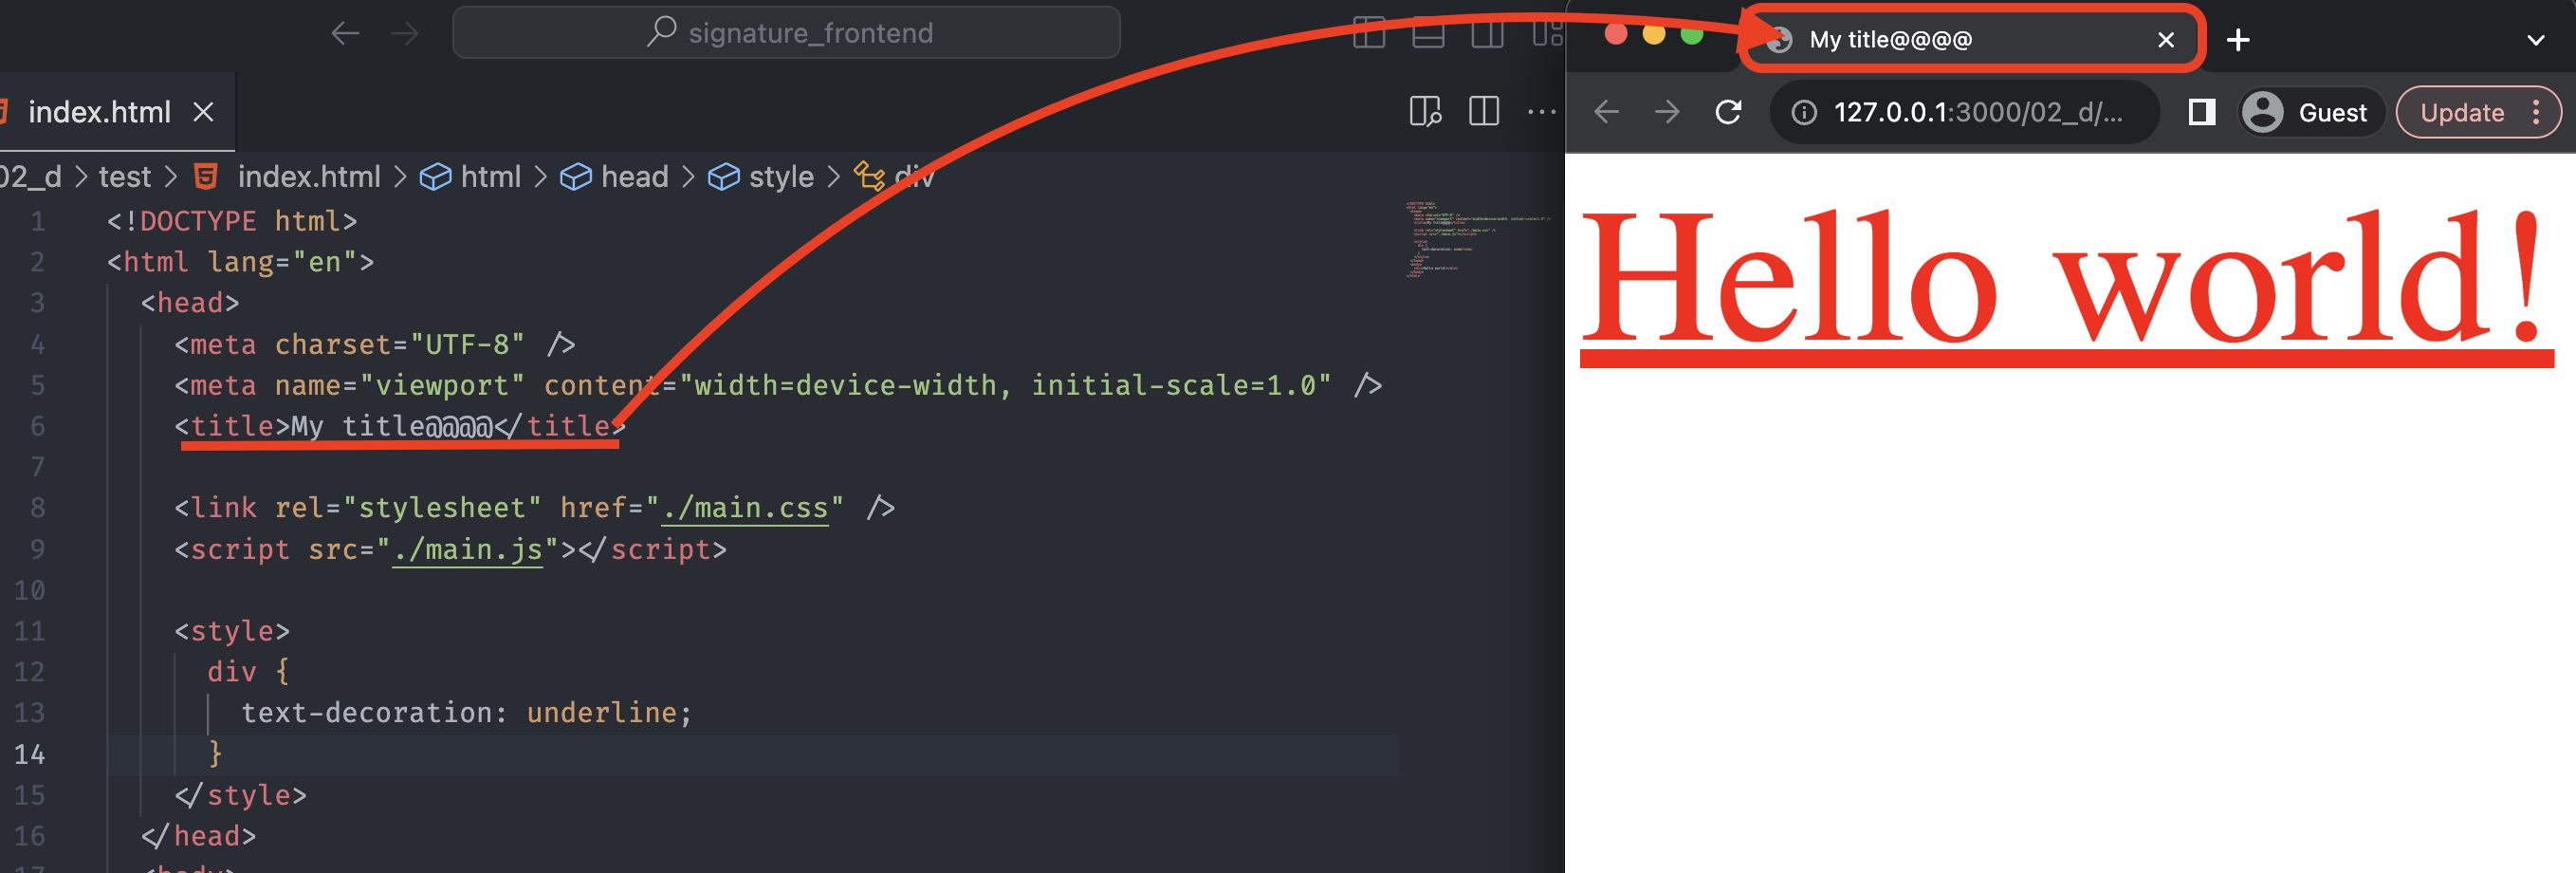
The <title> HTML element defines the document’s title that is shown in a browser’s title bar or a page’s tab.
Link tag
The <link> HTML element specifies the relationship between the current document and an external resource. This element is most commonly used to link to stylesheets, but it is also used to establish site icons.
<link rel="stylesheet" href="./main.css" />
<link rel="icon" href="./favicon.png" />
The rel stands for the relationship, and the href attribute specifies the path to the external resource. In this case, the favicon stands for favorite icon and often says a logo, which is displayed on the page’s tab.
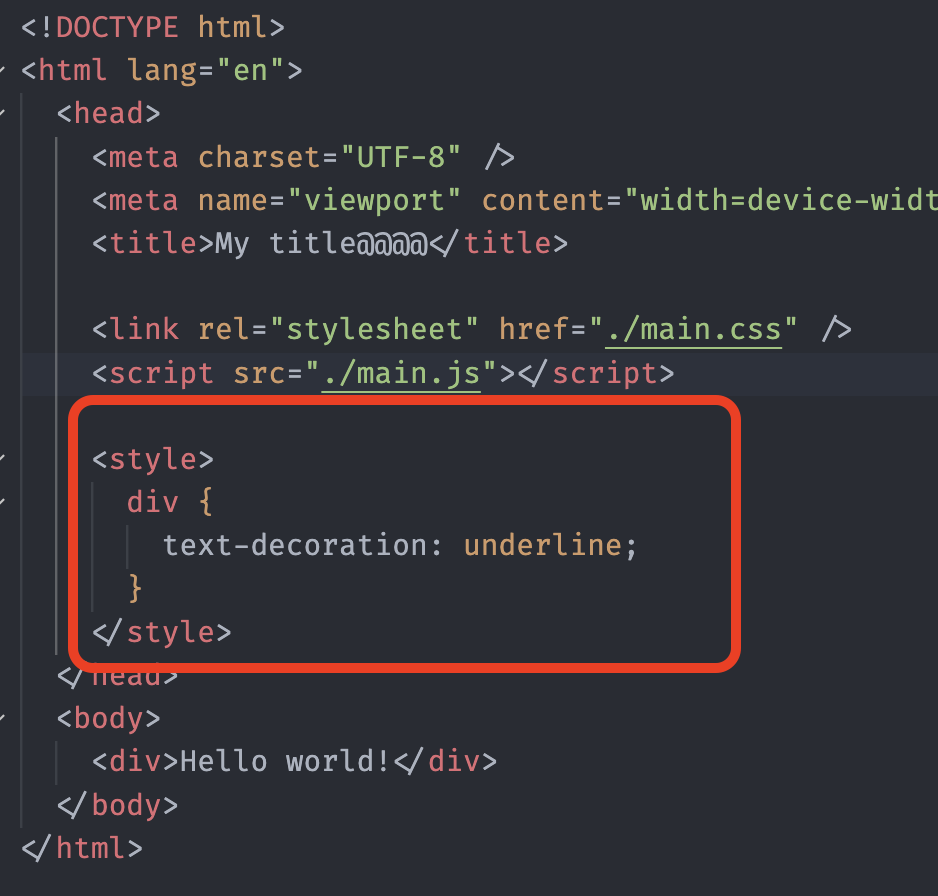
Style tag
The <style> HTML element contains style information for a document or part of a document. It contains CSS, which is applied to the contents of the document containing the <style> element.
In general, it is better to put styles in external stylesheets and apply them using <link> element - MDN
Script tag
The <script> HTML element embeds executable code or data. This is typically used to embed or refer to JavaScript code.
Like the <style> tag, the <script> tag can also link the external resource with the src attribute and the internal JavaScript code inside the tag.
The src stands for the source, and we can also use the path to the external resource here.
Meta tag
The <meta> HTML element represents metadata(machine-readable information) that cannot be represented by other HTML meta-related elements, such as the above four tags.
<meta charset="UTF-8" />
<meta name="author" content="my content" />
<meta name="viewport" content="width=device-width, initial-scale=1.0" />
There is so much information we need to go through to explain what UTF-8 or the viewport means, so if interested, please check out here.
In simple terms, charset attributes declare the document’s character encoding. The UTF-8 is a character encoding standard related to Unicode.
The name and content attributes are used to provide document metadata in terms of name-value pairs. The name attribute gives the metadata name, and the content attribute gives the value.
The viewport is the area of the window in which web content can be seen. The tag above is a typical mobile-optimized site’ tag, in which the device means our mobile device, and the initial-scale controls the zoom level when the page is first loaded - more information on MDN.
Displaying images on the website
Basic folder structure
Before diving into displaying images, download your logo from the internet. We can use the developer tools to download it or simply download it from the internet.
To manage our logo and the other files, we follow the basic HTML folder structure like following:
test(project)
│   index.html
│
└───css
│     main.css
│
└───images
│     logo.png
│
└───js
│     main.js
│
└───────────
To those who may not understand the structure above, this is the folder structure from VS Code. Important note that the index.html file should always be in the root folder because the browser finds the HTML file called index foremost.

Displaying image and correct the file path
To display our image on the website, we need to add a <img> HTML element with the src attribute. Keep in mind that this element goes right below the div.
<div>Hello world!</div>
<img src="./images/logo.png" alt="github-logo" />
Notice that the local server is now displaying the image. If it is not shown, check the typo or the picture size, which is too big to display, so that we can give it a size shortly.
There is one more weird thing going on: Our text was red before, but now it is not. That’s because we have the wrong path.
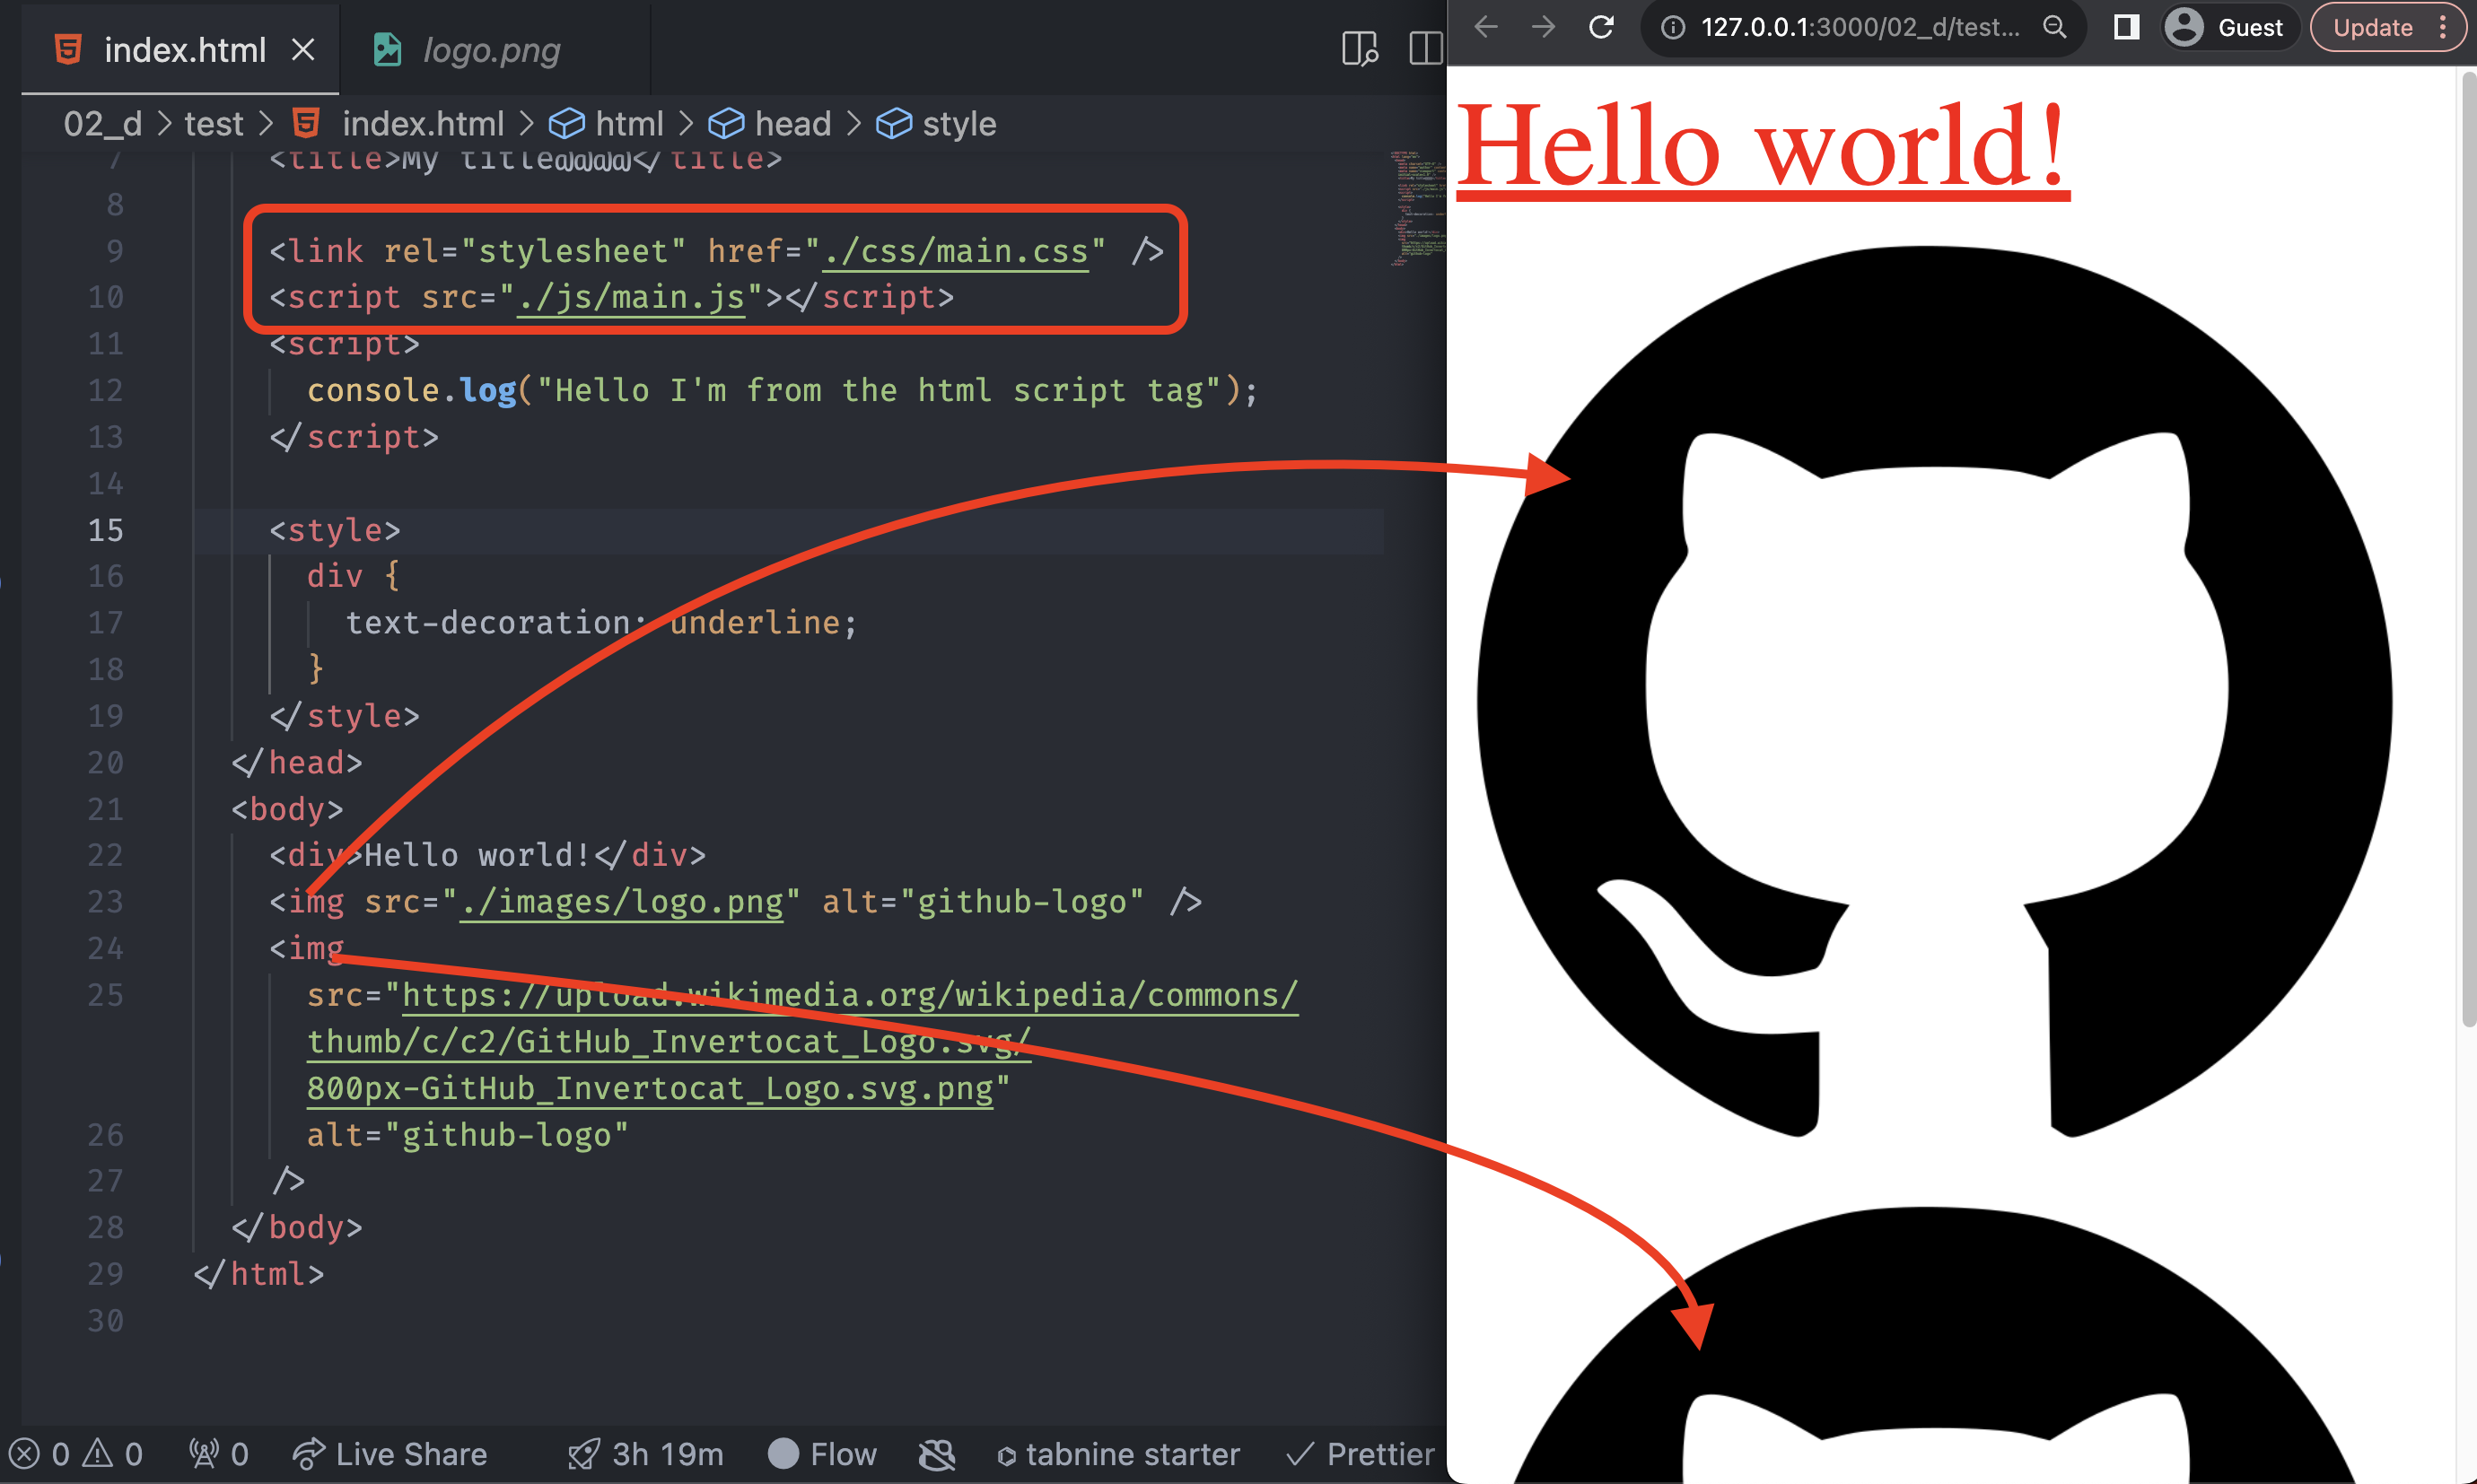
Fix the file path, same as the picture above. The bottom img tag indicates we can display image files from various paths. Additionally, the HTMLImageElement property alt provides fallback(alternate) text to display when the image is not loaded.
Relative path vs Absolute path
Relative path
A Relative path or Relative path name specifies a directory or file based on the current working directory. The relative path name traces the path from the current working directory through its parent or subdirectories and files.
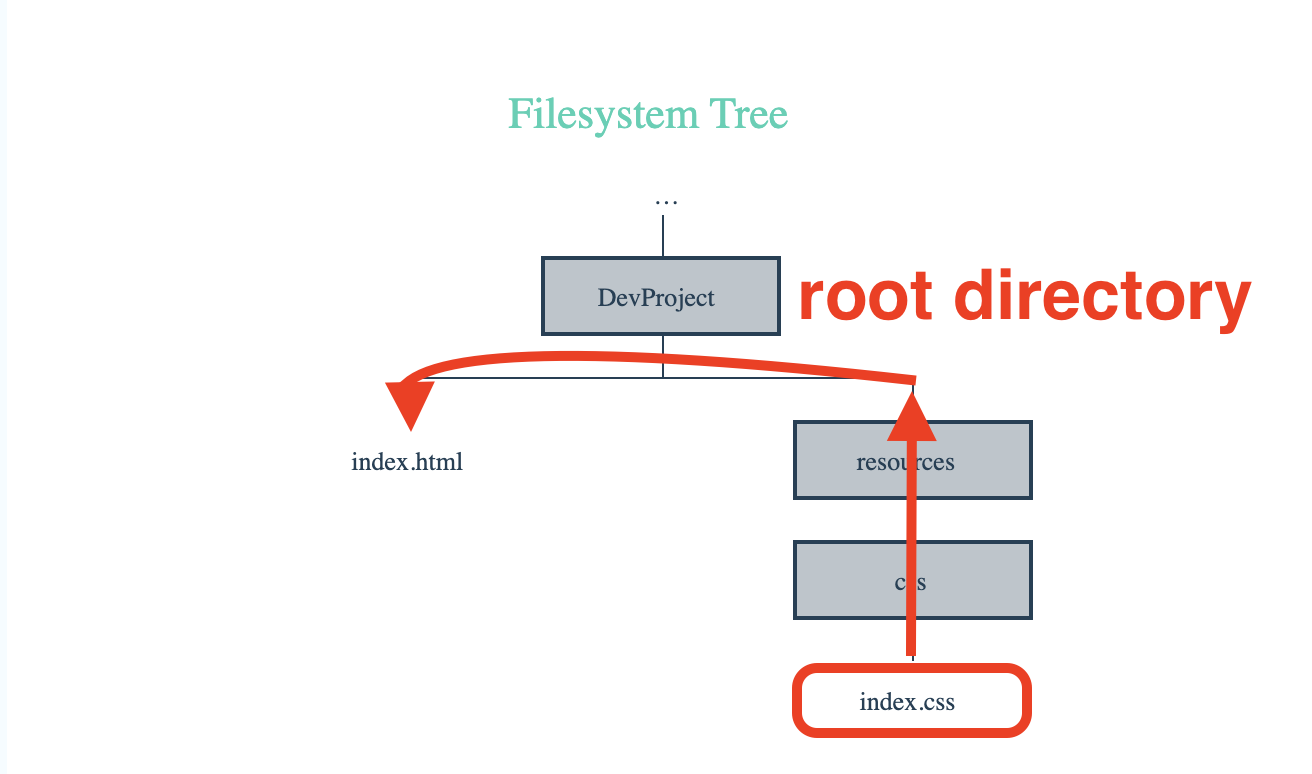
When our project folder structure looks like this, and we want to bring index.css to index.html, we have to use the ./ symbol since the resources folder and index.html file is at the same level.
Then, go into the resources folder with the file name ./resources/css/index.css. Alternatively, we can omit ./ and use resources/css/index.css in the way we discussed above.
Additionally, suppose we have an image folder like our folder structure above and want to use it in a CSS file. In that case, we should go up to the root directory and find the images/logo.png.
# From our folder structure, to get logo.png from CSS file ../images/logo.png
To wrap up, ./ represents the concept of navigating through nearby files and directories, while ../ represents moving up to the parent folder and exploring surrounding files and directories.
Absolute path
Absolute path or Absolute path name represents the complete name of a directory or file from the / or (root) directory downward. Regardless of the current working position in the file system, we can always find a directory or file with the absolute path name.
The absolute path name traces the path from the root directory and always begins with the / symbol. It comes with the HTTP protocol, which usually means the recourse address on the internet, like the image address we copied for the image above.
We can achieve the same result above by adding this line in the HTML and CSS files.
# To get logo.png from both index.html and CSS file

/images/logo.png
Notice that we don’t have the . or .. sign and solely the / sign. The / sign means we are starting from the root. More precisely, our address bar contains a local address similar to http://localhost:{portnumber}/{foldername}/index.html.
We are accessing from that address, the root folder, and getting the index.html file. Same process, but by running /images/logo.png, we get the logo file from this address http://localhost:{portnumber}/images/logo.png.
To make a long story short, we can access the public website with the above method, and the difference is the https:// protocol, and the address part is not the local address but the public address.
Localhost
If we check the live server, the port number should be displayed. On the browser, the address bar has the address below:
# The port number can vary; in this case, the number is 3000
http://127.0.0.1:3000/...{your path name}/index.html
http://localhost:3000/...{your path name}/index.html
Localhost is a hostname that refers to the local machine currently making the request. In essence, localhost is our development environment, and it is the local environment.
Divide and Link Pages
How to link another page
To link another page into the index.html file, we can use the <a> HTML element.
The anchor element and its href attribute create a hyperlink to web pages, files, email addresses, locations on the same page, or anything else a URL can address.
The href, which stands for hypertext reference, is an attribute where we can input the path and navigate to the provided URL.
We can link to another page with this <a> tag like this:
<a href="https://www.google.com">Google</a>
Notice that we type the Google because we need content to interact. We will see the blue text; when we click the text, it brings us to the provided URL.
Create and Link a new page
Suppose we want to add another page called about. We need to create the HTML file and link to that file as follows:
<a href="/about/about.html">About</a>
The anchor tag means that we are going to explore the path from the root to the About folder. Then, it finds the file named about.html.
The address before the / is omitted, and it can be our local address or the actual web page address when we upload this file to the server.
Important note that the browser finds index.html as default so that we can change the about.html inside of the about folder to index.html.
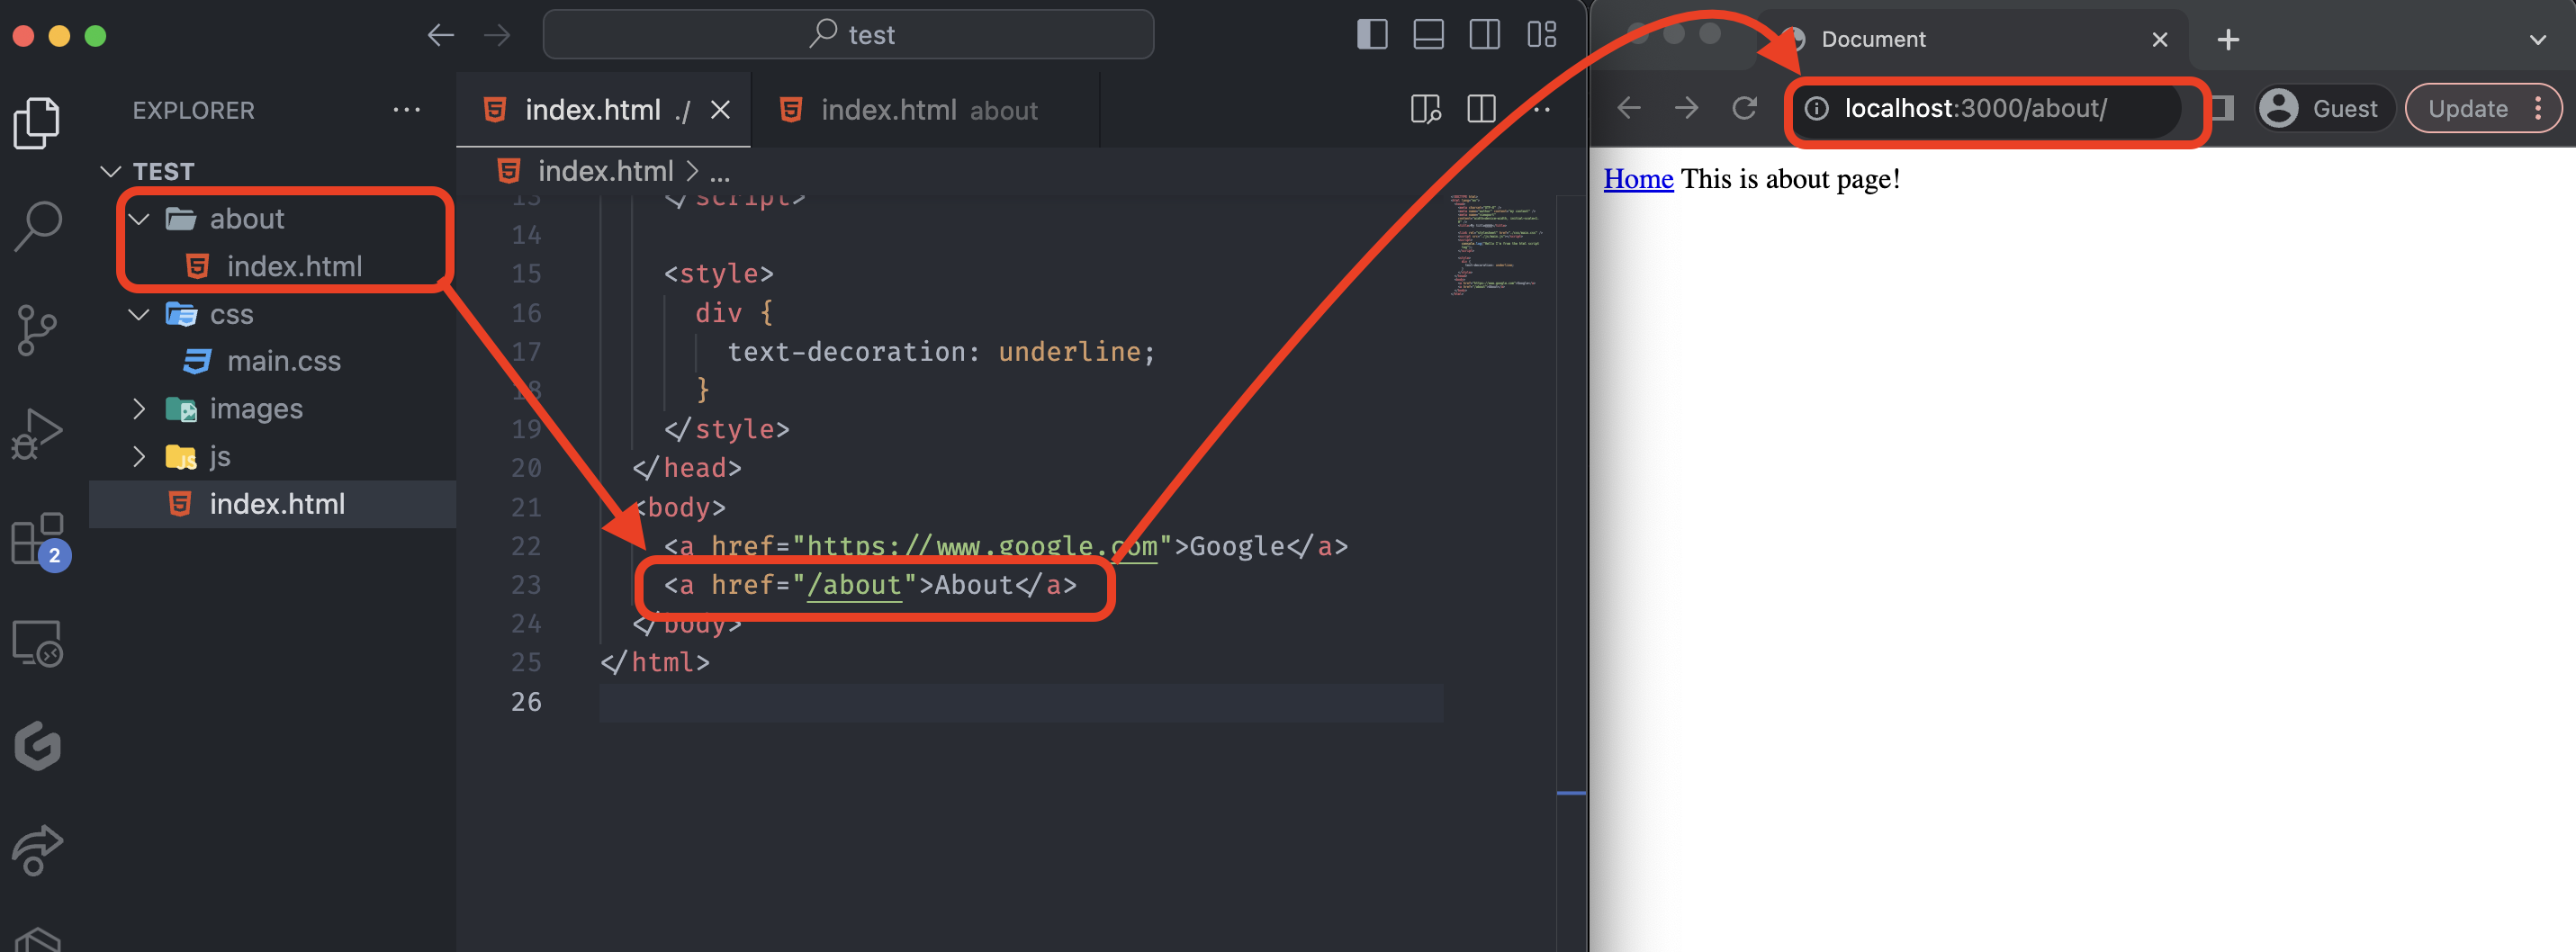
Then, we can change our path above to this:
<a href="/about/about.html">About</a> # old address

<a href="/about">About</a> # new address
Also, we can add a Home button like the below picture.
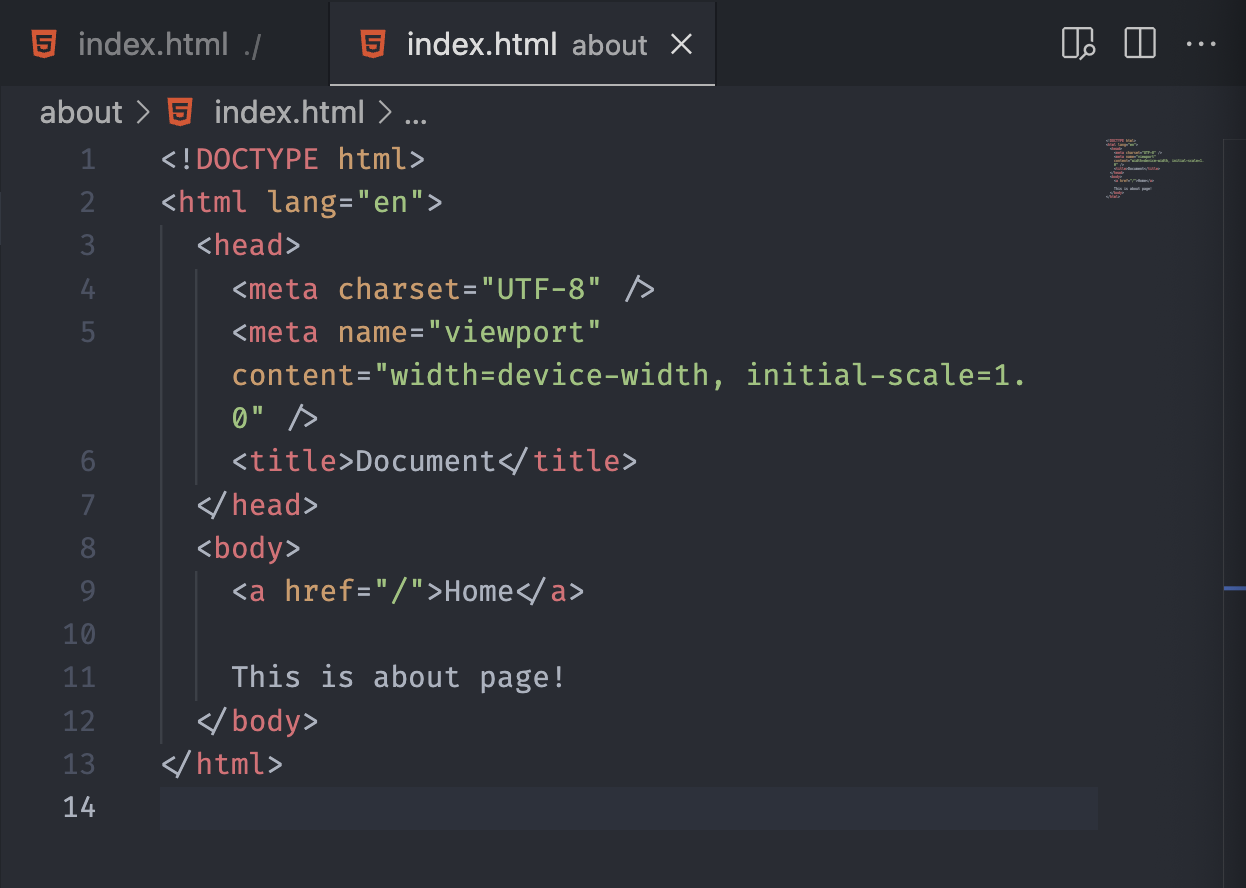
We learned that the root path is the absolute path and means our localhost address or the published webpage address. Hence, the href="/" means href="{our address}/index.html" but omitted, and it brings us to the root path or a homepage.
Developer tool
Temporary style change
When we open up the developer tool in the browser, we can see many different tabs are opened. We focus on HTML now, but later, we will interact much more with the console when we start using JavaScript.
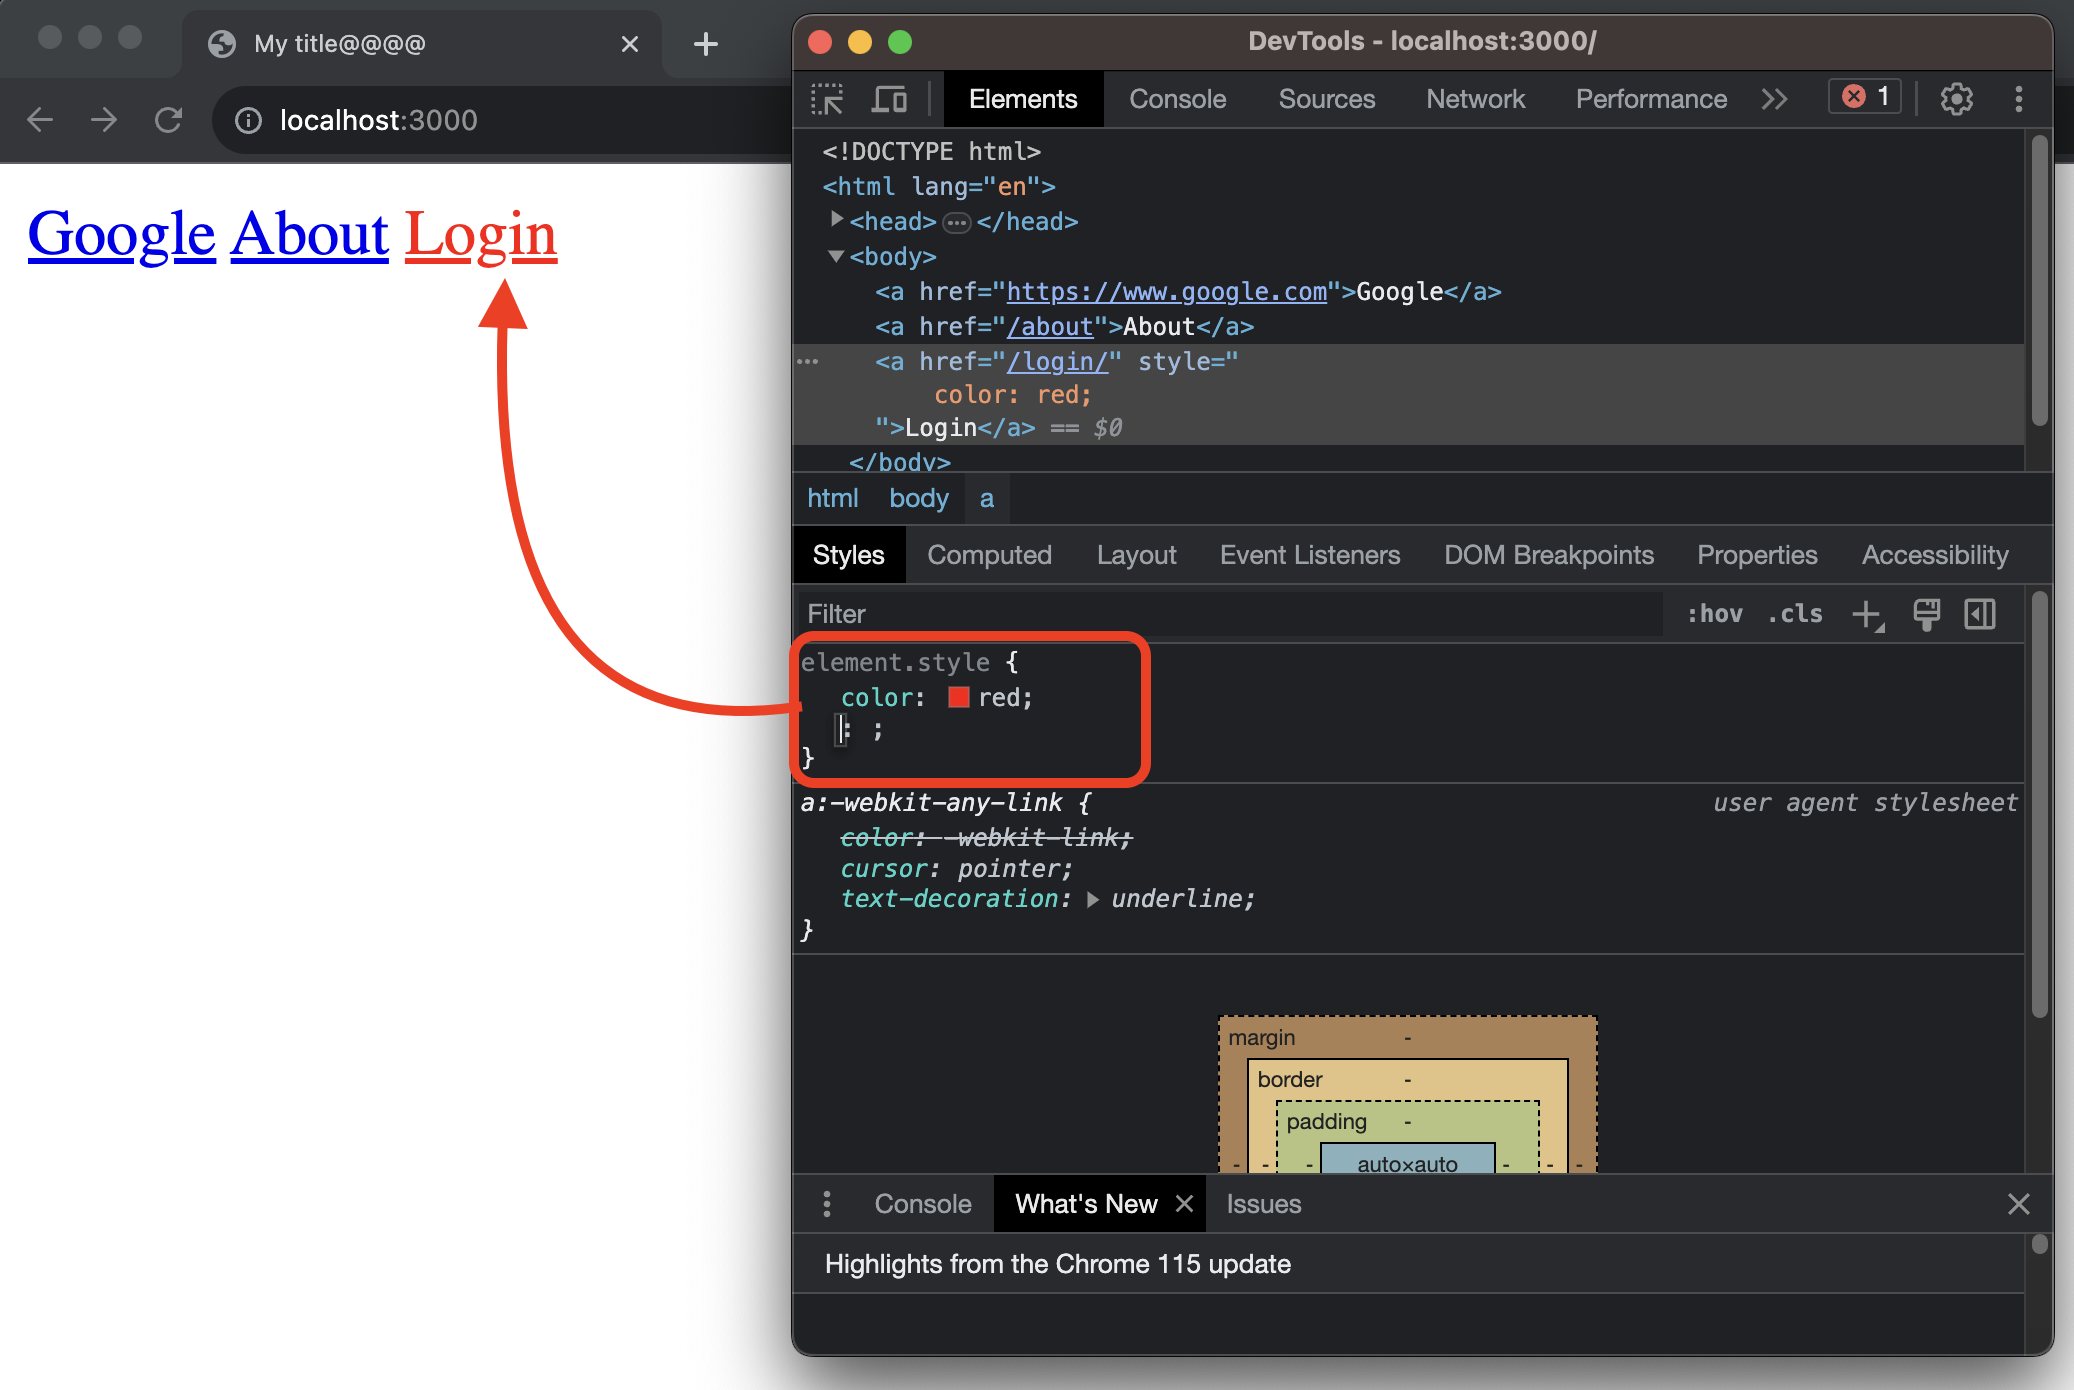
Click the element with the developer tool inspector or press cmd + shift + C and click the element. Modify the color or any attribute you want to add; once you reload the page, all the changes will disappear.
Another interesting thing that we can do is when we hover over the image or text, the web content interacts with the mouse pointer.
We will go through the CSS selector and what it means in the CSS chapter, but when we click the :hov button and check the checkbox, we can see what kind of styles are applied to that content.
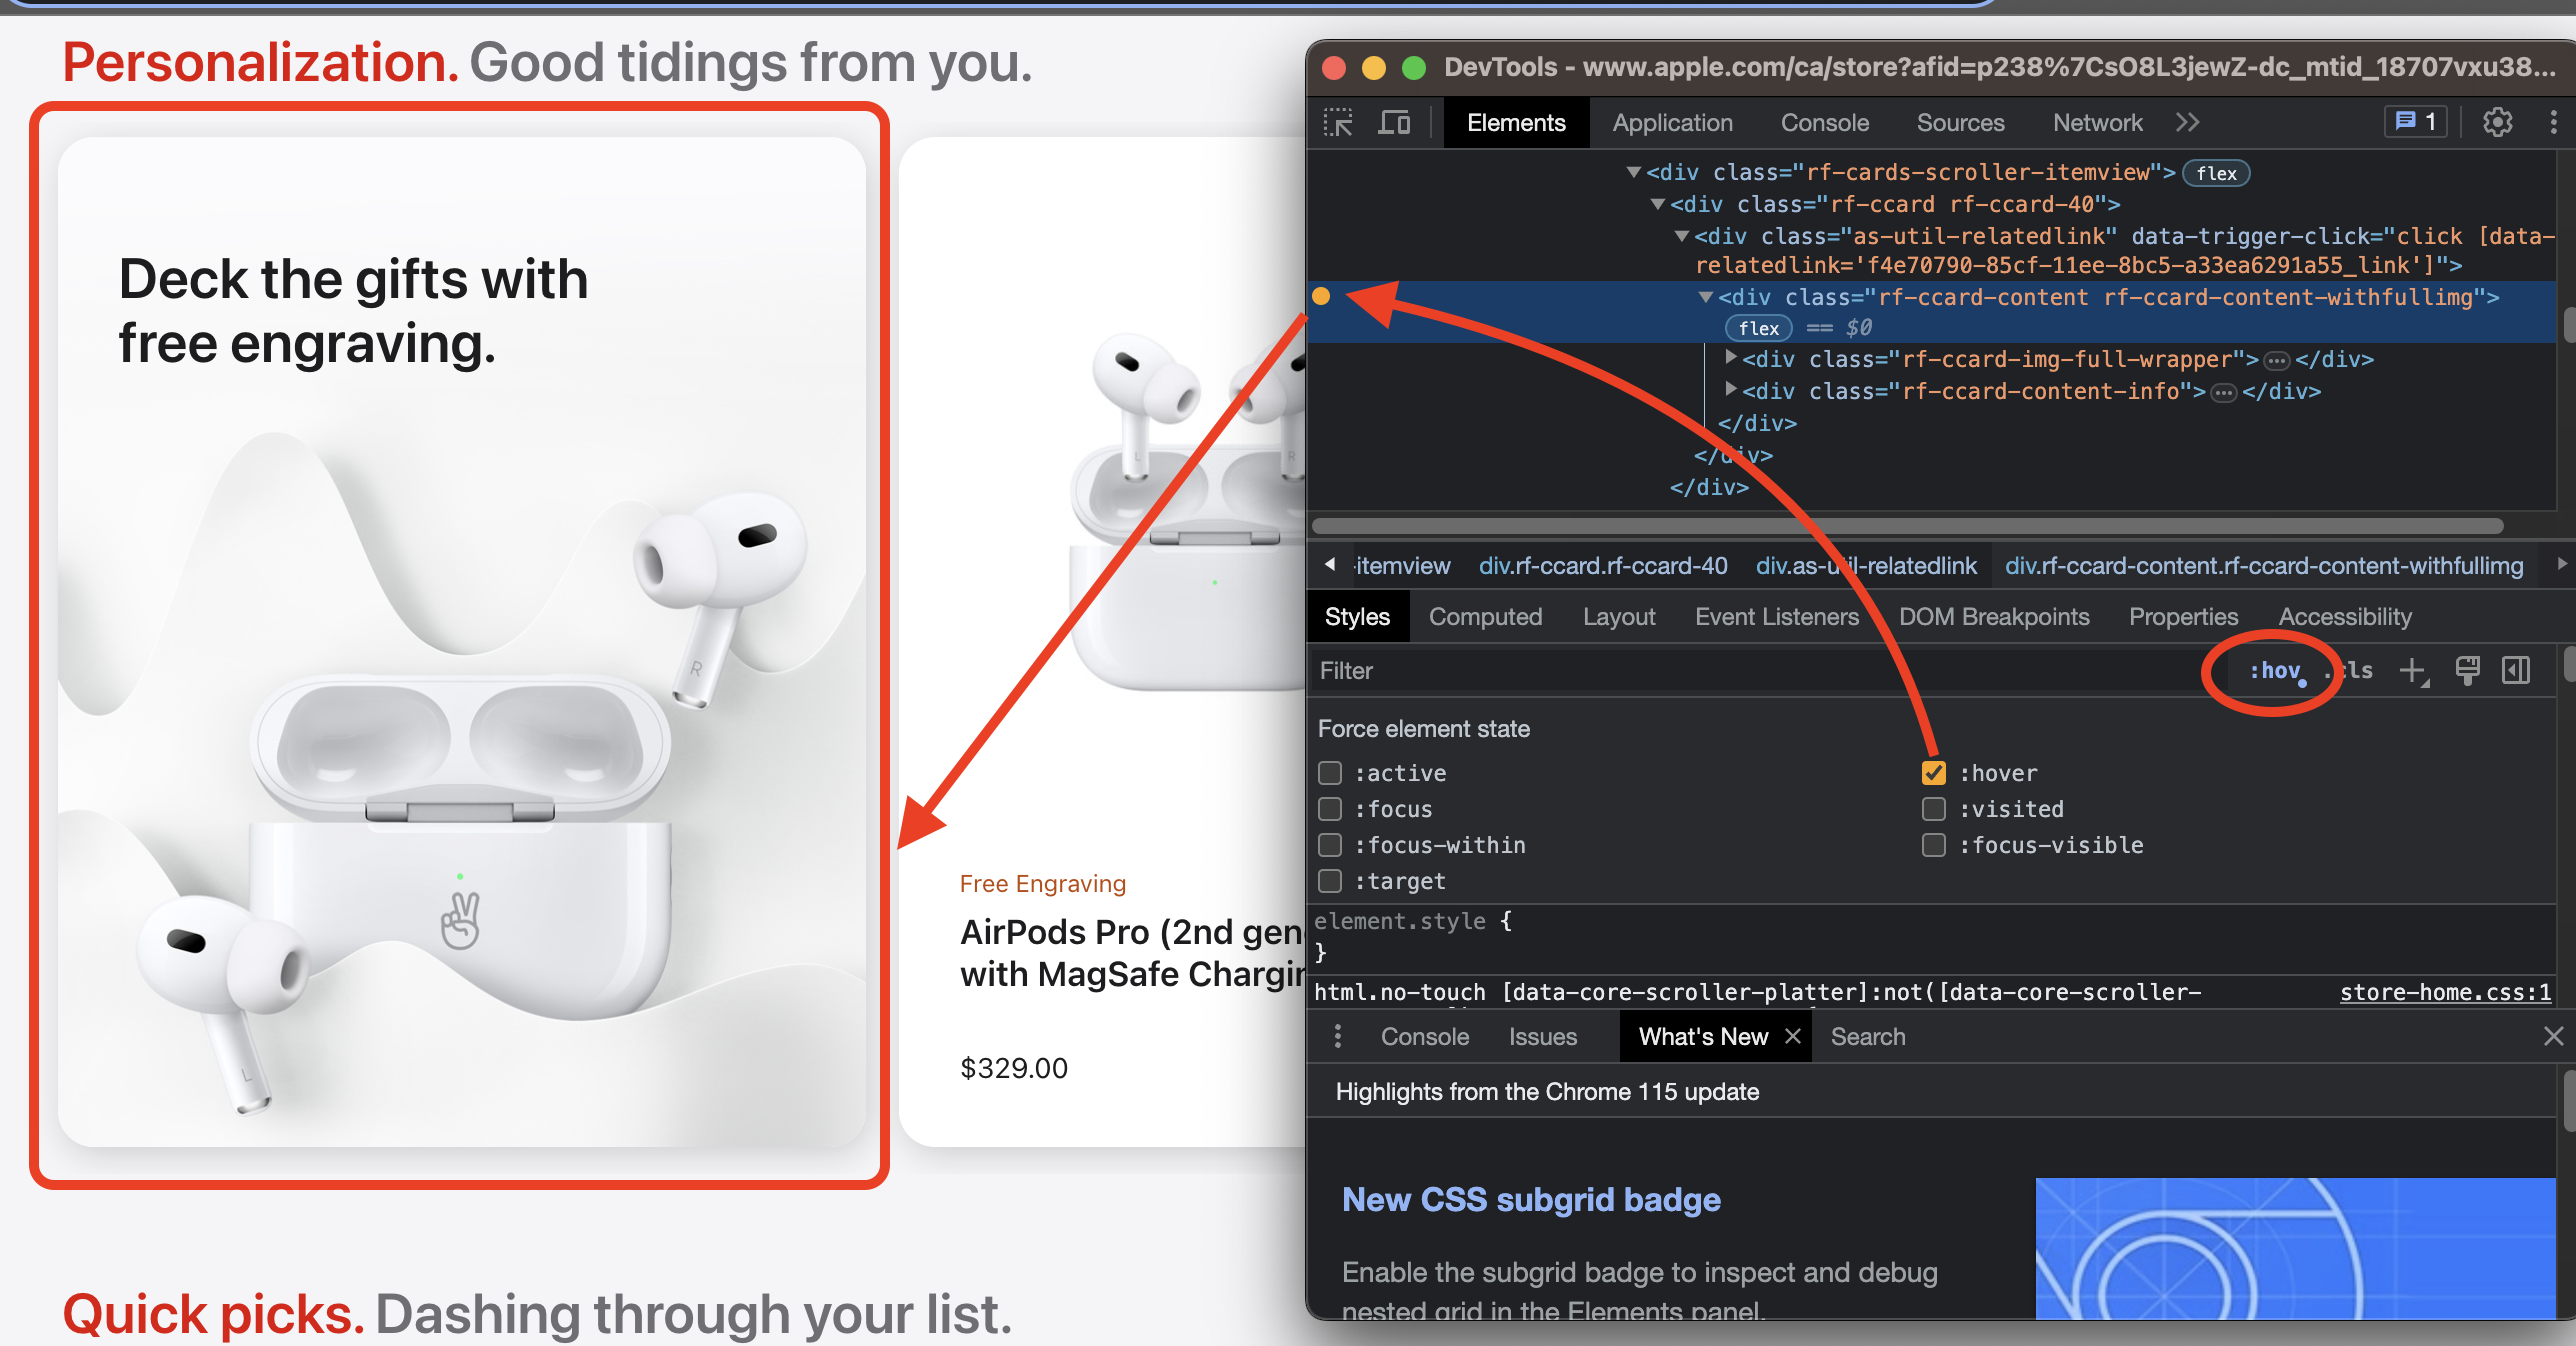
Notice the checkbox is orange, and the HTML tag is also colored orange. The content on the web is now showing the hover style even though we don’t place the mouse pointer there. Interact with those tags and see how the website changes accordingly.
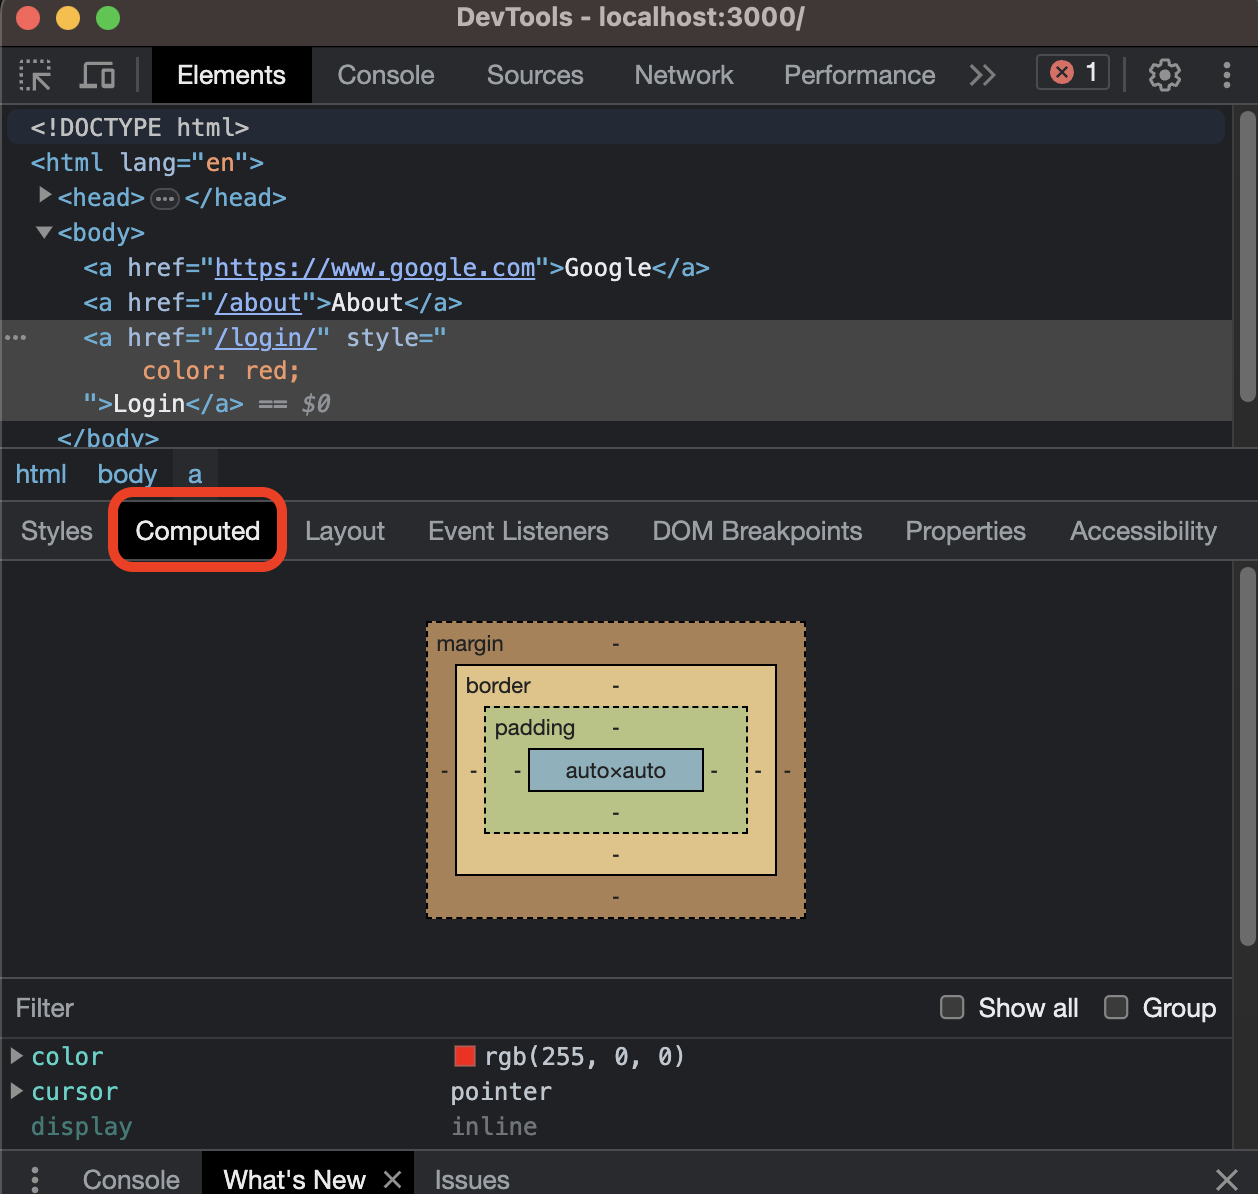
Another tab, computed, shows the selected element’s CSS style implementation details and box model for margin, border and padding.
📌 Takeaway
- DTD stands for Document Type Definition and means a set of rules defining the structure and a specific type of the document.
- Nowadays, the Doctype uses HTML5 as standard, but sometimes we use a legacy code composed with XHTML.
- The
<html></html>tag decides and tells the area of the document. All the elements must be descendants of this element - The
<head></head>tag contains machine-readable code calledmetadata, which includes CSS, JS and title. - The
<body></body>tag can be only one for each document. - The
<script>element is used to embed executable code or data. - The
<meta>element represents metadata that cannot be represented by other HTML elements. - Relative path specifies a directory based on the current working directory.
- Absolute path represents the complete name of a directory or file from the root directory downward.
- Localhost is a hostname that refers to the local machine currently making the request.
- The browser finds
index.htmlas default, so we can name each directory’s content asindex.htmland use the path accordingly. Instead of using/about/about.htmlor/about/index.html, we can use/about.
💻 Solution
- None
🔖 Review
- The
<body></body>tage represents the content of an HTML document. - To connect external resources, we have to use certain syntax such as
<link>or<script>for the CSS or JS file inside of the<head>. - The
<title>element defines the document title that is shown in the title bar or a page tab - The
<link>element specifies the relationship between the current document and external resources. - The
<style>element has style information for a document or part of a document. - Relative path uses
./or../ - Absolute path uses
/, and the actual addresses are omitted. - We can use
<a>called anchor tag to link one page to another. - The
<a>element has ahrefattribute, which stands for hypertext reference and creates a hyperlink to another content. - The root path can be represented by
/. It has omitted the address in front andindex.htmlin the back. - The dev tool or the developer tool contains much information about the HTML document, and we can interact with it.
Comments