
[Java] TIL Java Spring Boot - Movie Review Site 003
Full Stack Development with Java Spring Boot, React, and MongoDB – Full Course
This is the course from freeCodeCamp to learn Java with react
You can find the video on YouTube here: https://youtu.be/5PdEmeopJVQ?si=uyg8MHc6LDpfd3kw
🧩 Problem
API Controller
Movie Controller
We created Movie and Review models and connected the mongoDB with this application. The next thing we are going to make is the API controller.
As same as we did for the test API, we have to annotate this class as @RestController.
Next, instead of mapping it to localhost:8080, we will map it to /api/v1/movies with @ResquestMapping("/api/v1/movies"). With this setting, any requests to the /api/v1/movies endpoint will be handled in this MovieController controller.
Create the GET method inside the class by adding @GetMapping. We will add a random string and check the connection.
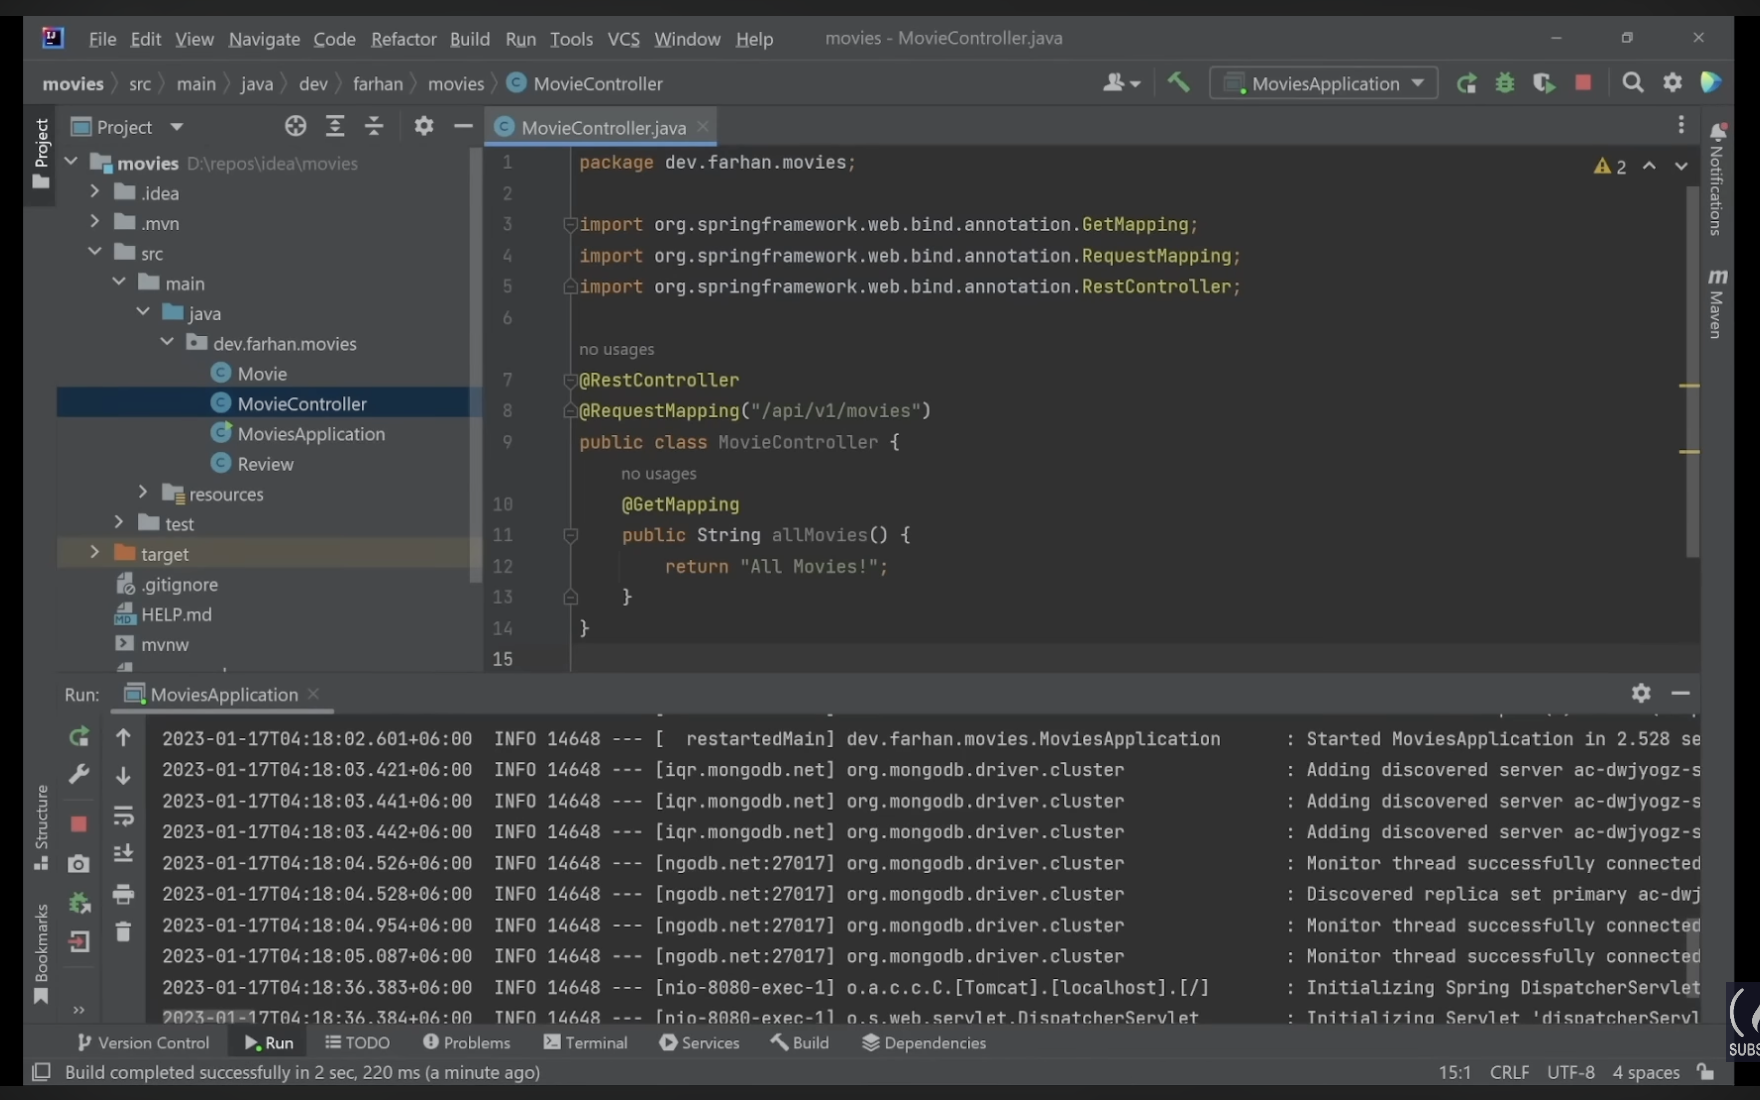
If you see All Movies from the browser, we are ready to move on.
Although it is okay to return the String, it is always better to return ResponseEntity. We will set up the ResponseEntity<String> and return new ResponseEntity<String>() instead of plain string. Inside of the parenthesis, we set the return value and the HttpStatus code.
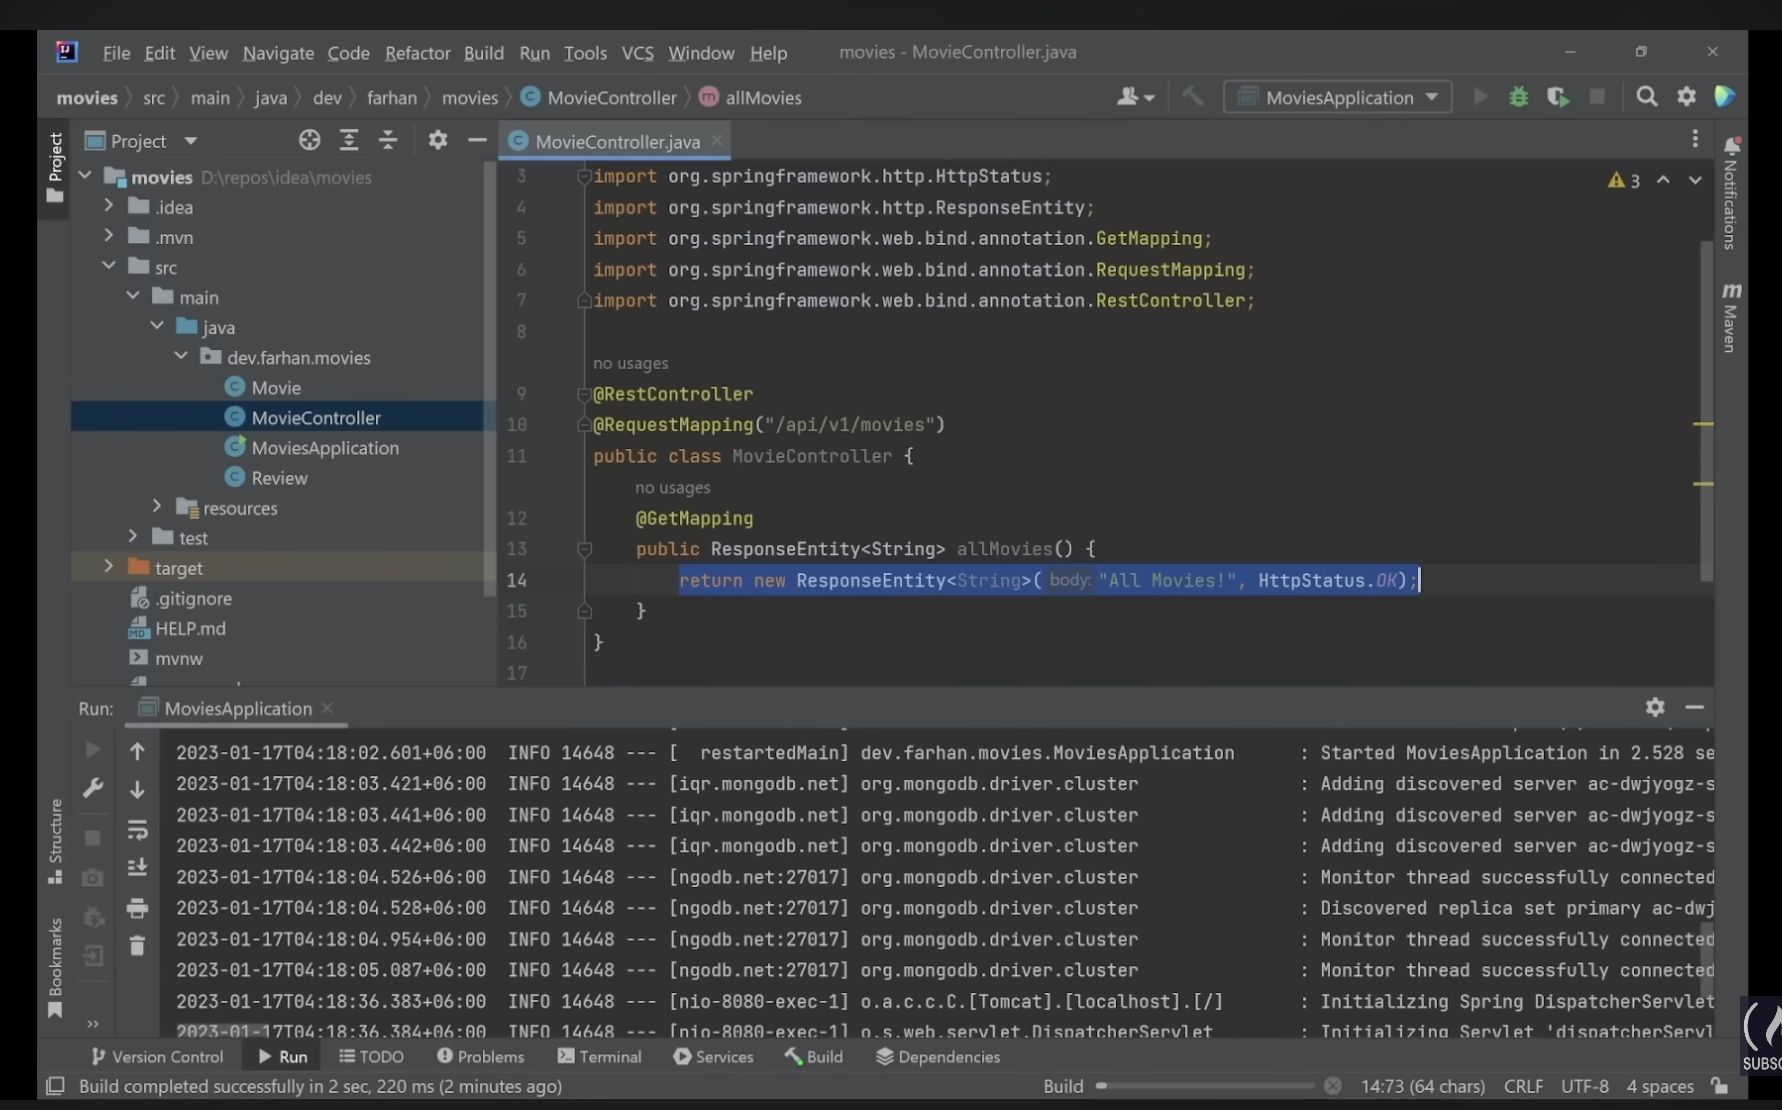
The browser might look the same, but we are actually returning the 200 status code. We can check this by running the following command.
$ curl -i http://localhost:8080/api/v1/movies
Using Movie Class
We made the Movie class before, and to use it and pull data from the database, we will make the Service class and the Repository class.
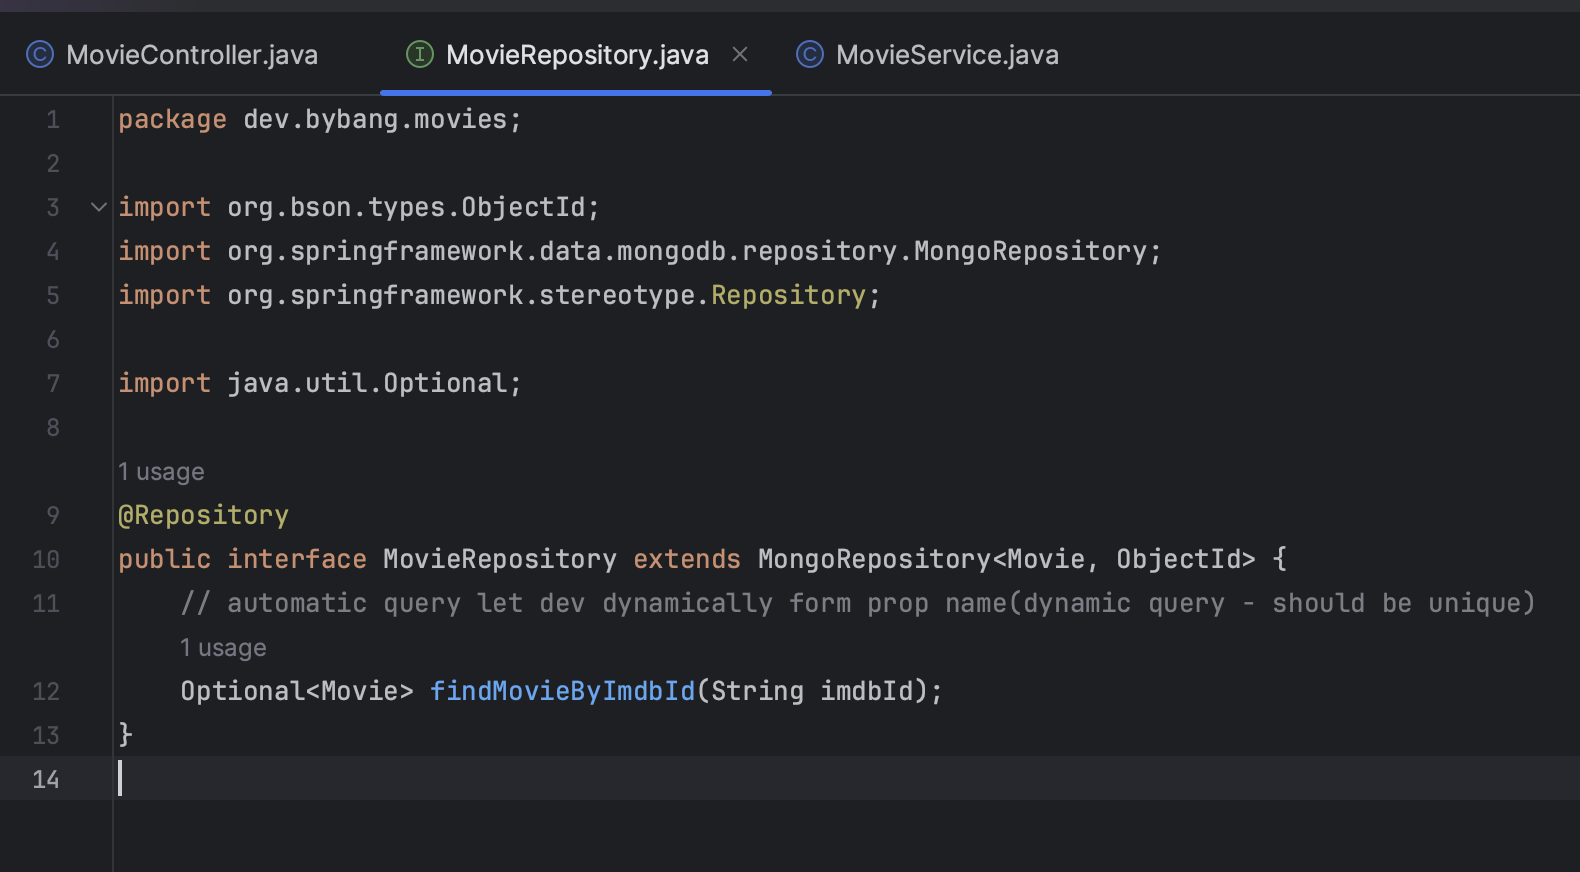
Because the repository is a type of interface, we have to make the interface class.
This interface extends MongoRepository<>, and we must let the generic type know what type of data and ID we are dealing with.
So it becomes <Movie, ObjectId>, and we should annotate this as @Repository so the framework knows this interface as a repository.
Next, create a Service class.
Annotate this class as a service with @Service. In this class, we are going to write this database access method.
The first method will be public allMovies() and change the controller name to getAllMovies() because it is a GET mapping.
Go to
MovieControllerand change the method name
Put the return type in front of the allMovies(). We are going to return a list of movies from this method. Hence, the code should be similar to the following.
public List<Movie> allMovies() {}
Inside of this Service class, we need a reference of a repository. We can call MovieRepository with this code.
private MovieRepository movieRepository
In Java, we have to initialize this code using a constructor or the @Autowired annotation.
The @Autowried lets the framework know that we want the framework to instantiate the class MovieRepository.
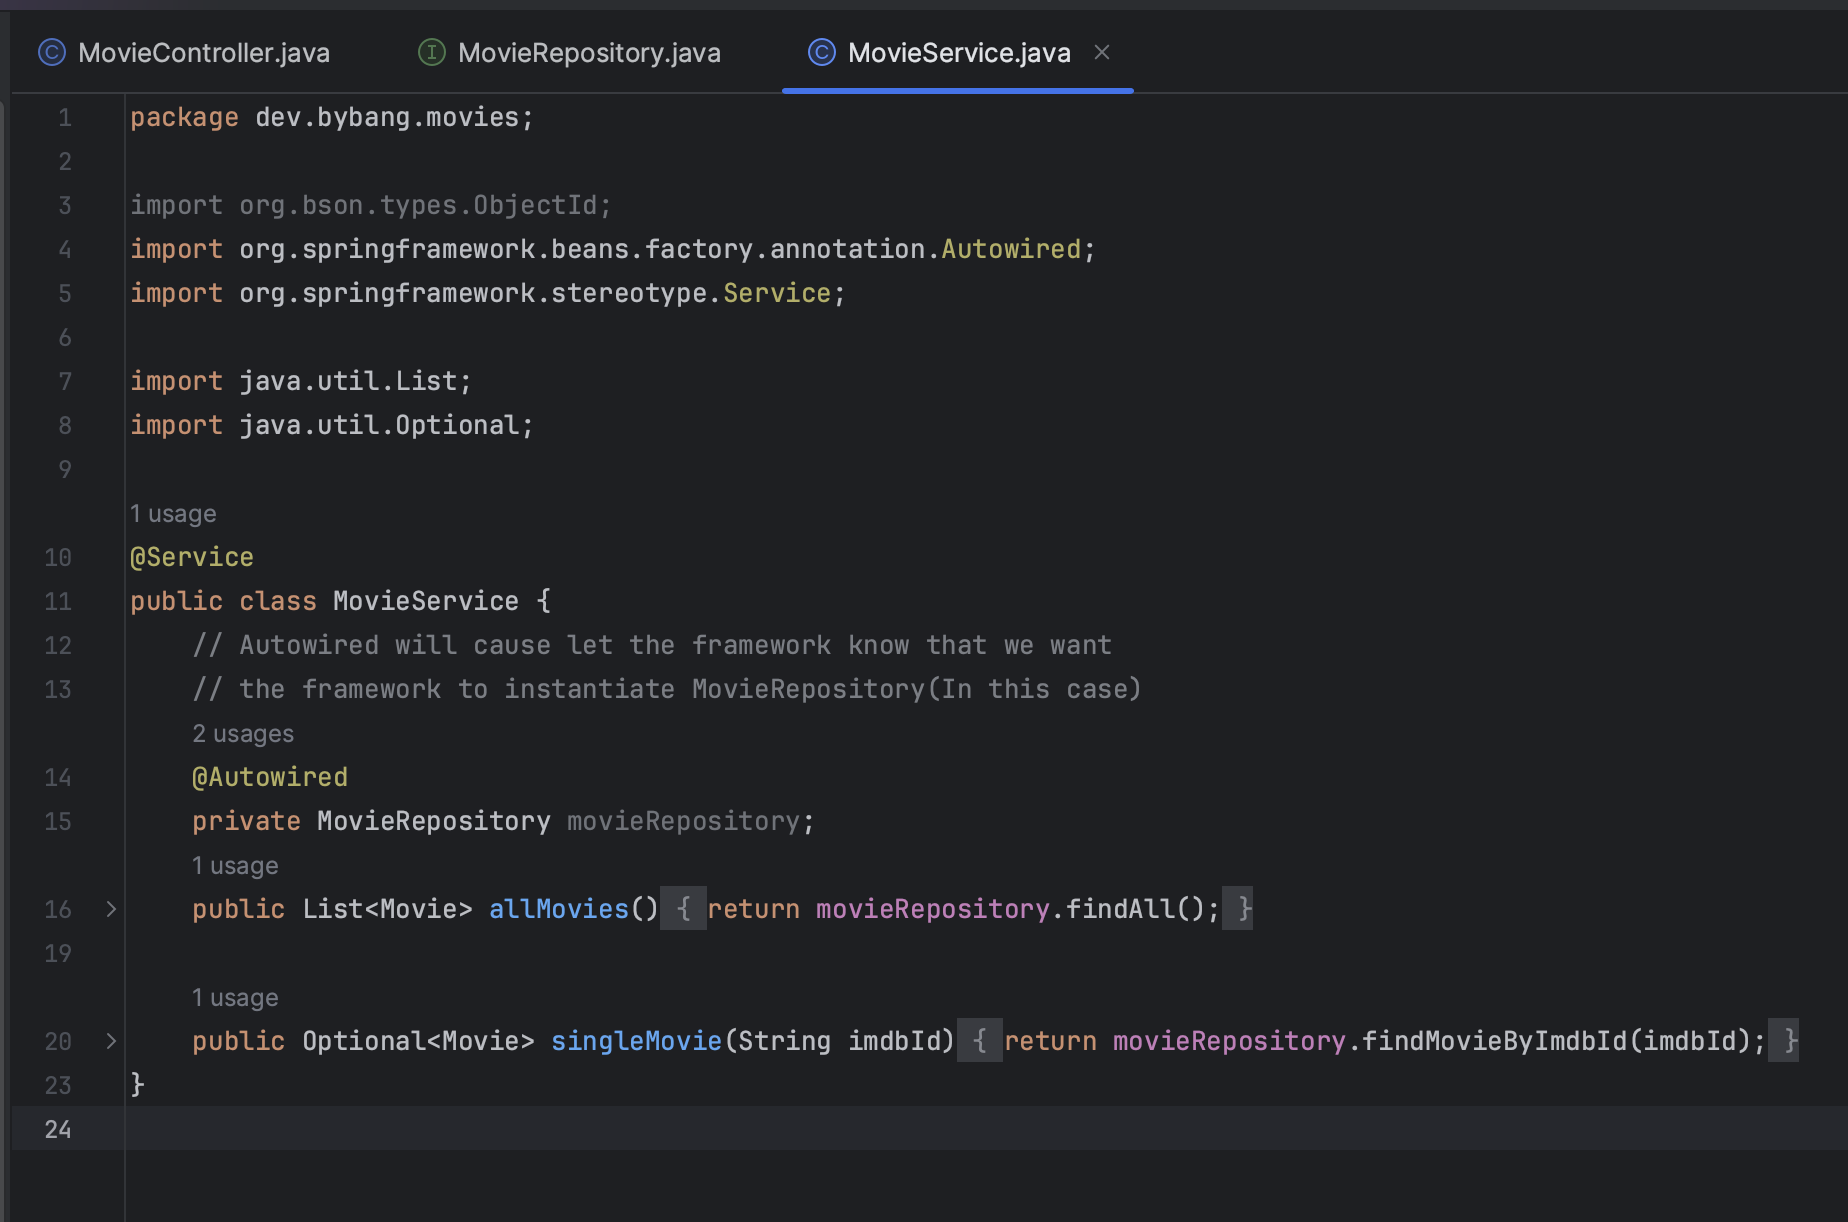
Use the method from mongoDB, and we can find the findAll() method returns a list of data types.

Go back to the MovieController and add a reference to the Service class by adding this line. Make sure to autowire two classes together with the annotation.
@Autowired
private MovieService movieService;
We now know that the data from the Service class is a list of movies. Let’s change accordingly by using the following code.
@GetMapping
public ResponseEntity<List<Movie>> getAllMovies() {
	return new ResponseEntity<List<Movie>>(movieService.allMovies(), HttpStatus.OK);
}
Run the application, and check the browser that the database is printed in JSON format.

To wrap up, in REST API, there are multiple layers. Below is how the MovieController class, MovieService and MovieRepository works.
- One of the layers is
MovieController, which is also one of the API layers. - This only concerns the task of
GET, which means getting arequestfrom the user and returning aresponse. - The
MovieControllerusing theServiceclass and delegating to thatServiceclass the task of fetchingallMoviesfrom the database. - When the controller gets the
request, it calls theallMoviesmethod inside of theMovieServiceclass. - The
MovieServiceclass gets the list of the movies and passes it to theMovieController. - The
MovieControllerreturns the list of the movies with theHttpStatuscode. - The
MovieControllerjust fetches the request since it’s the API layer. - Most of the business logic lives under the
Serviceclass. - The
Serviceclass uses theRepositoryclass. It talks to the database, gets the list of the movies and returns to the API layer. - The
Repositorylayer is the data access layer for the API. - The
Repositorylayer is the layer that talks with the database and gets the data back.
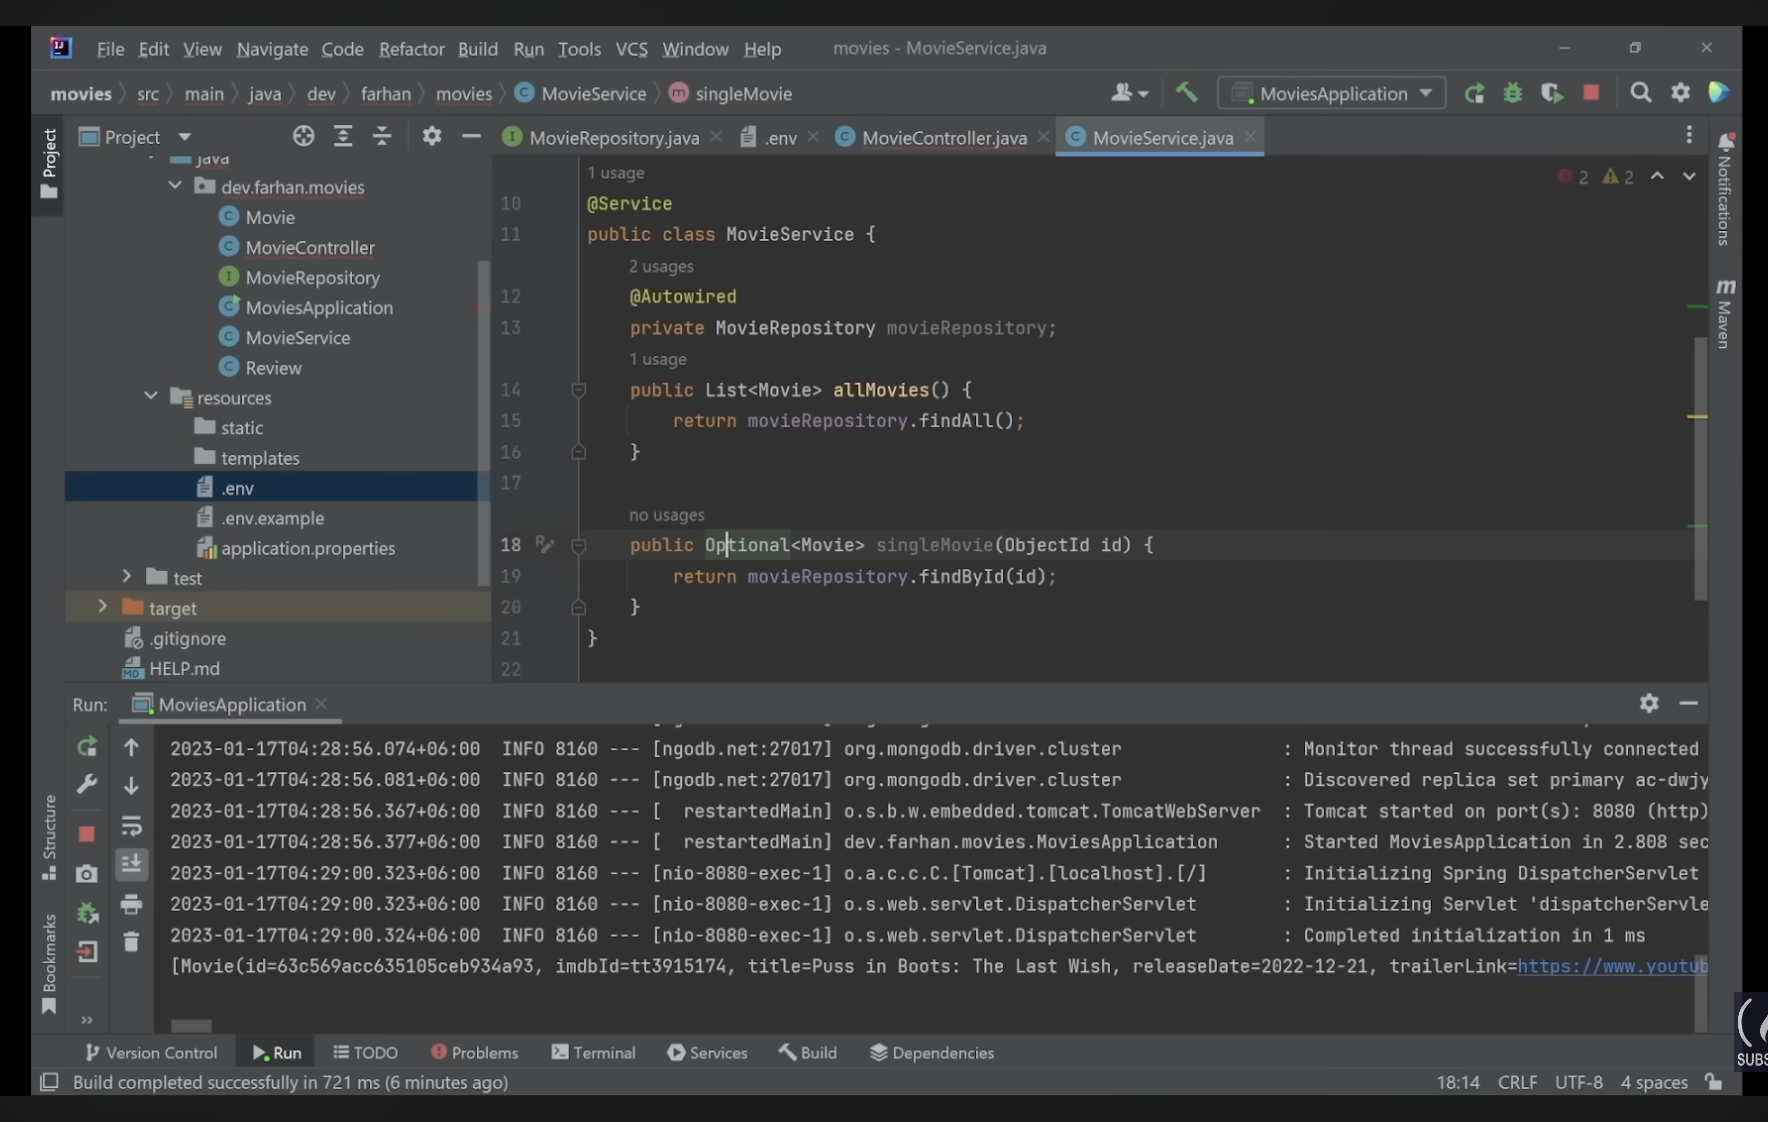
Accessing Single Movie
We learned about the flow of how each of the classes and repositories works. We will now add a logic to get a single movie instead of the movie list.
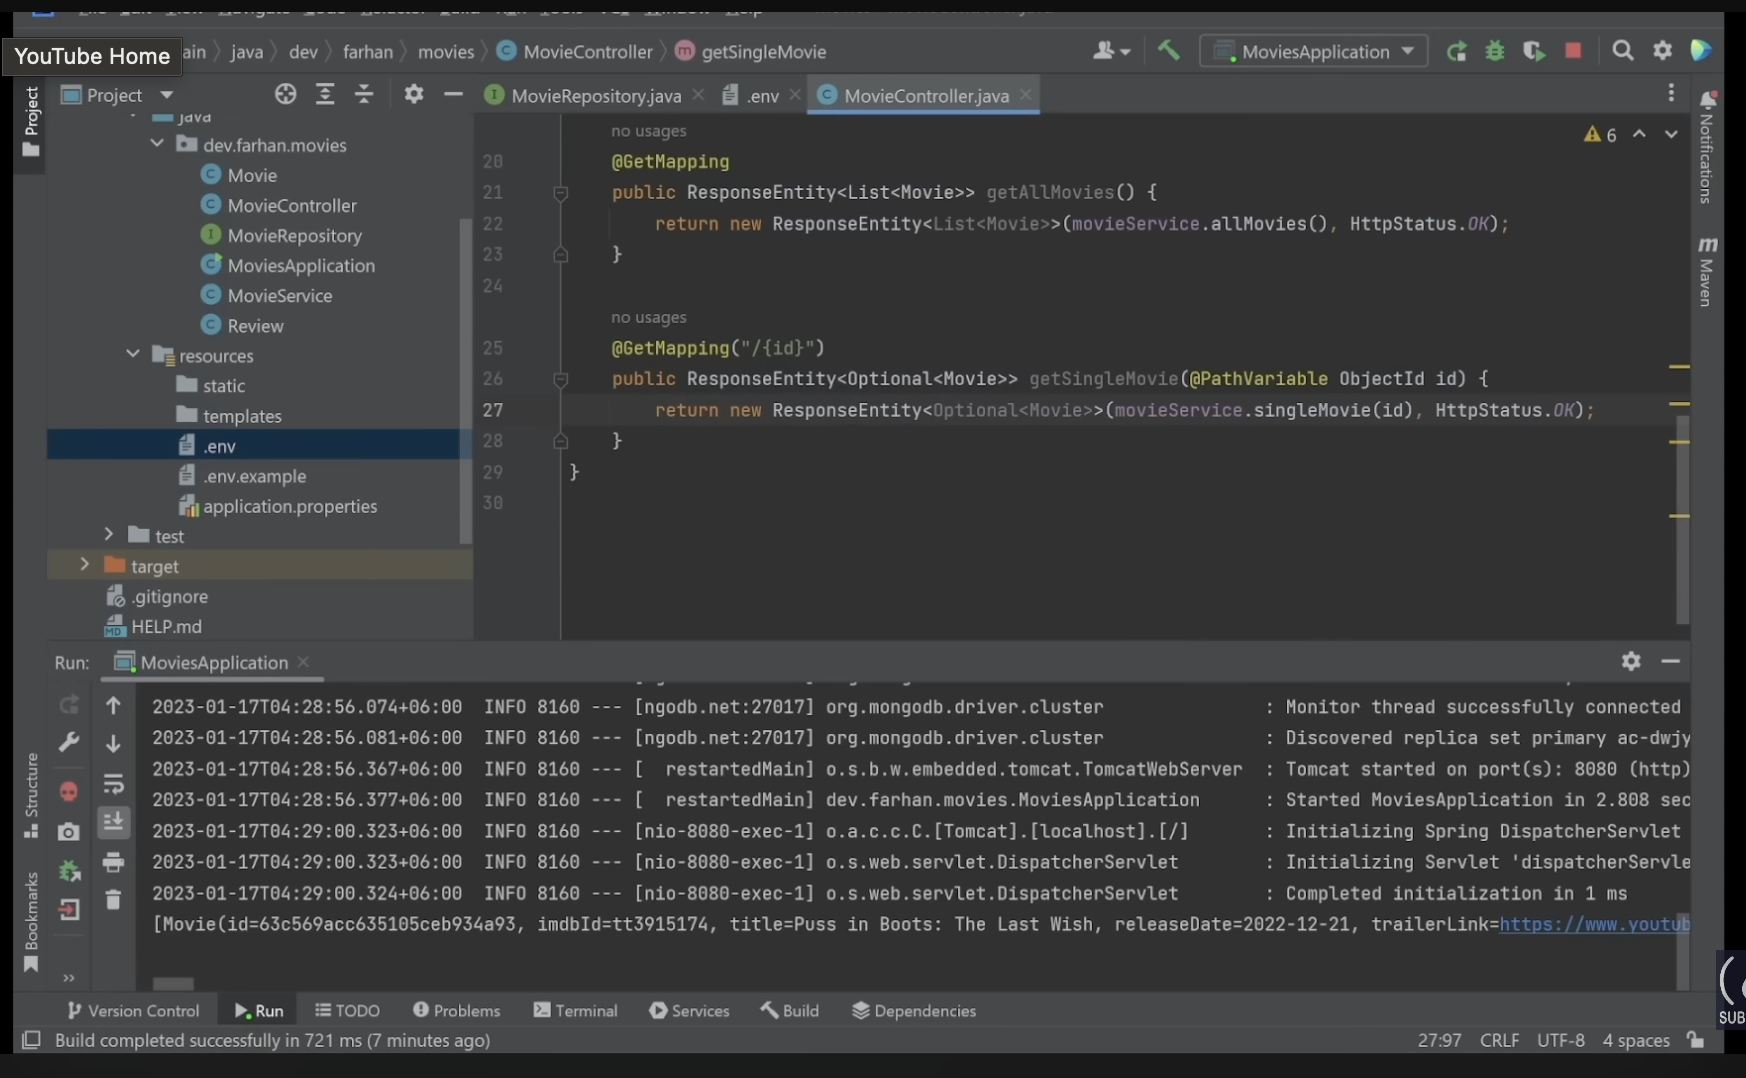
Add an annotation for mapping, but this time, we will map to a specific address. By adding "/{id}", we can search a movie by its ID.
@GetMapping("/{id}")
public ResponseEntity<Movie> getSingleMovie(@PathVariable ObjectId id) {
}
This time we will get the single movie, so we added <Movie>, and inside the parenthesis, we have the @PathVariable. This annotation will let the framework know that we will be passing the information we got in the mapping as a path variable.
The @PathVariable ObjectId id part means that the data we are getting through the path variable /{id}, we want to convert that to an ObjectId called id.
Next, write a new method in the Service layer.
public Movie singleMovie(ObjectId id) {
	return movieRepository.findById(id);
}

We are getting an error because the findById method may not find the movie at all, or maybe the id has passed doesn’t exist. In these cases, we have to return null.
In react, we can return the optional thing with {option ? <> : <>} or simply adding ? to the variable.
Similarly, we can add the Optional class to the Movie class. Import the Optional class and add it just like the List class.
public Optional<Movie> singleMovie(ObjectId id) {
	...
}
We also need to update the controller with the Optional class. Fix ResponseEntity with the Optional class.
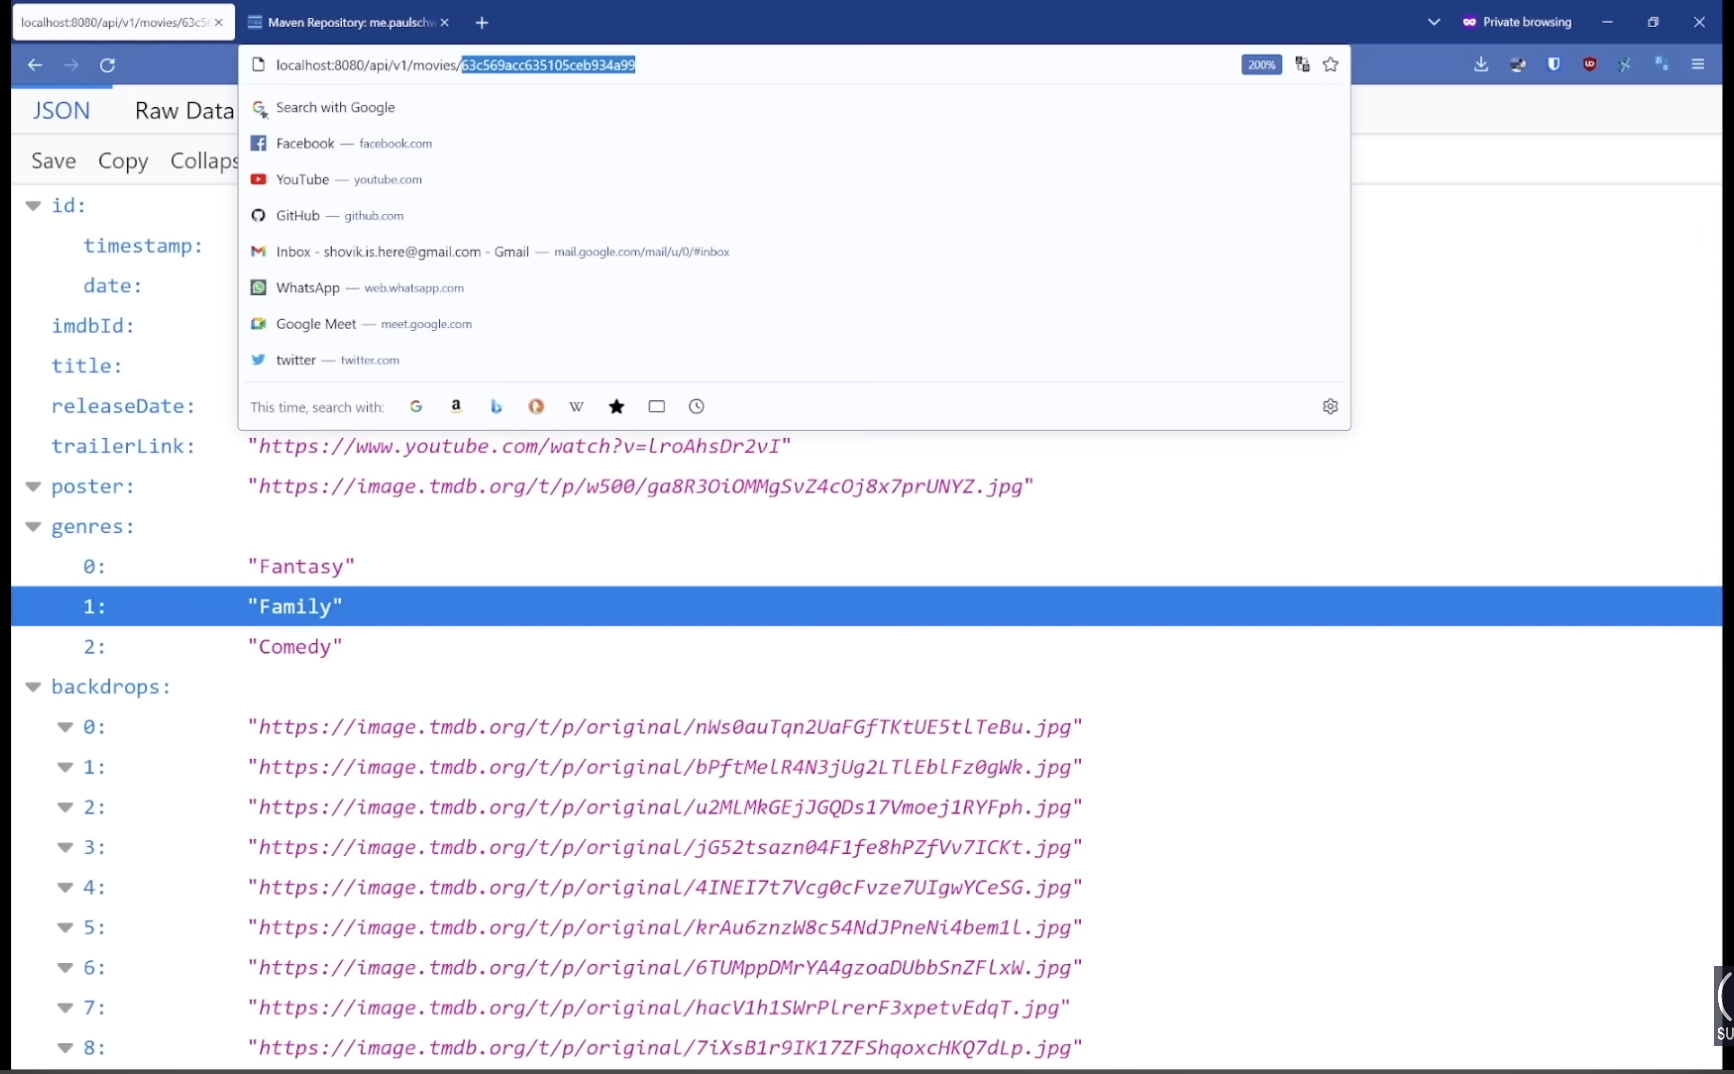
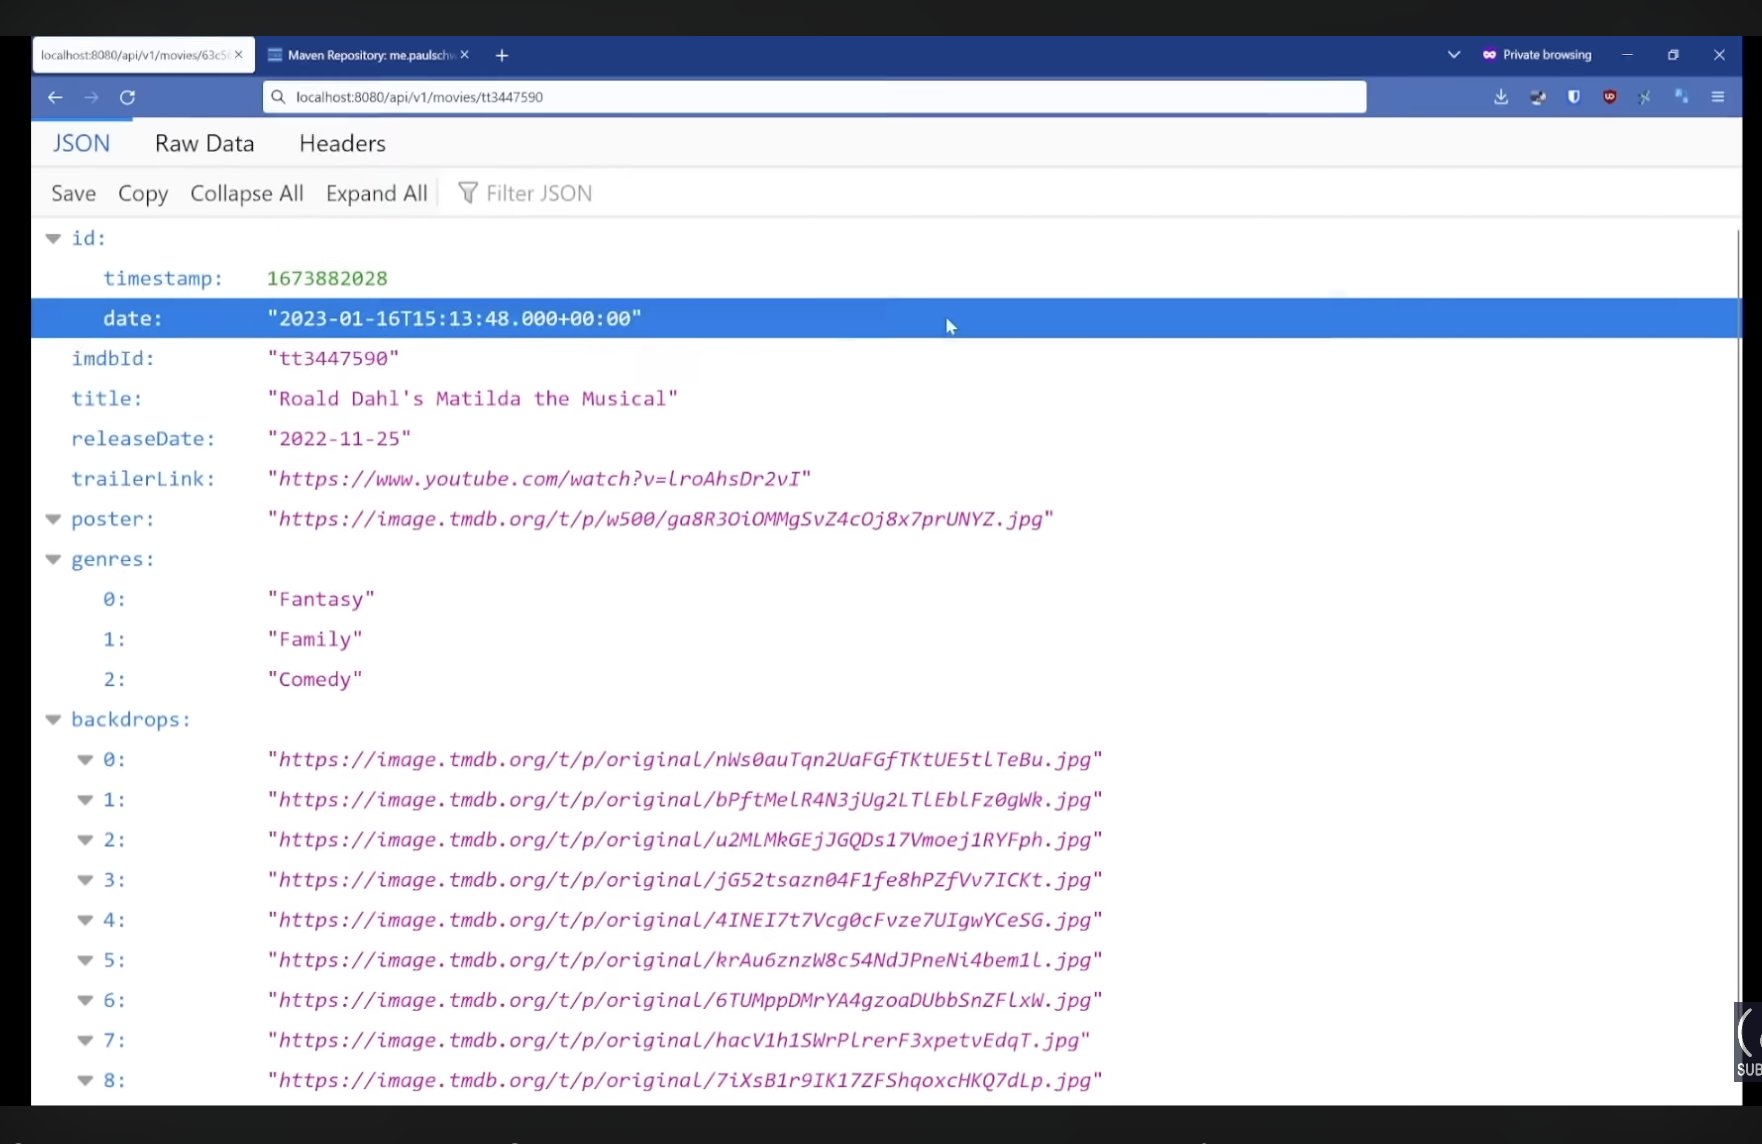
Start the application again and copy one of the id from the mongoDB and add it behind the current address.
http://localhost:8080/api/v1/movies/{id}
We can see the single movie in the browser now, but the problem is for security purposes, we don’t want to expose the ObjectId of the collection entities to the public.
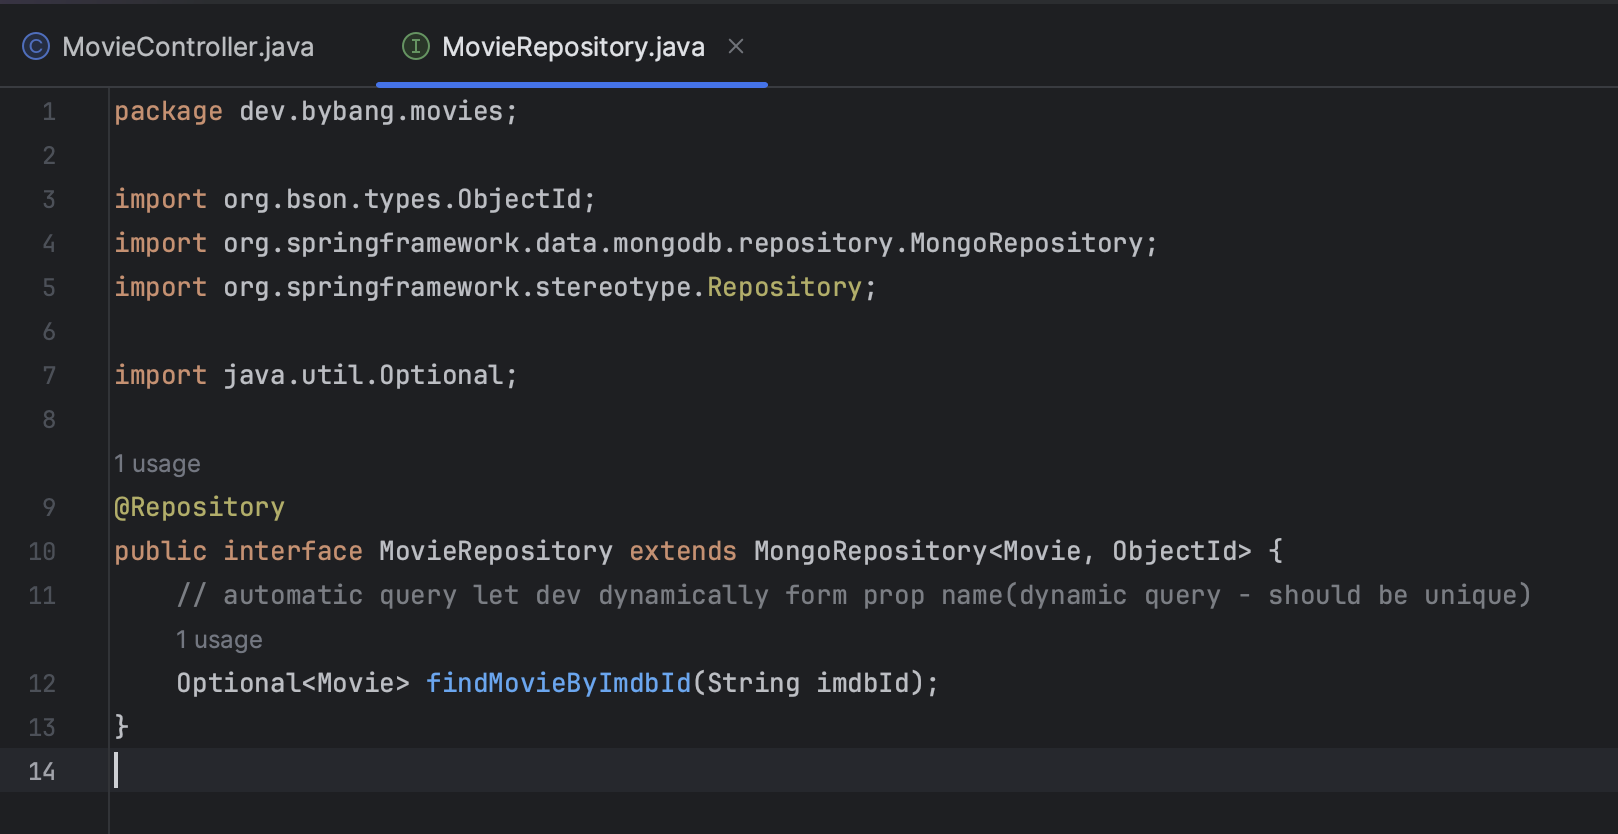
Instead, we will use imdbId to search for the new movies.
Implement a method for imdbId
Although the repository comes with built-in methods for searching with id, it doesn’t have a method for imdbId.
To implement a method for imdbId, go to the MovieRepository, and we use automatic queries.
For more information on query creation on Spring Boot, check out HERE
Import and add the Optional class, and following the above query creation sample, we will name it findMovieByImdbId(String imdbId).
Just naming this method, the Spring data mongoDB will understand what this code is supposed to do.
Go back to the MovieService and update the ObjectId part since we are no longer getting it, but we are getting the String imdbId.
public Optional<Movie> singleMovie(String imdbId) {
	return movieRepository.findMovieByImdbId(imdbId);
}
Don’t forget to update the findById method to findMovieByImdbId, and go to the MovieController and update it correspondingly. Also, check the typo before running the application.
Copy one of the imdbId from the mongoDB compass, and if your browser shows that single movie, our code works as expected.
We can form any dynamic query like this using any property name in the model class. But make sure that the query name is unique. If that is not unique, you will get multiple movies with the same id or name.
🎯 Review Part
Review Layers
Review Service
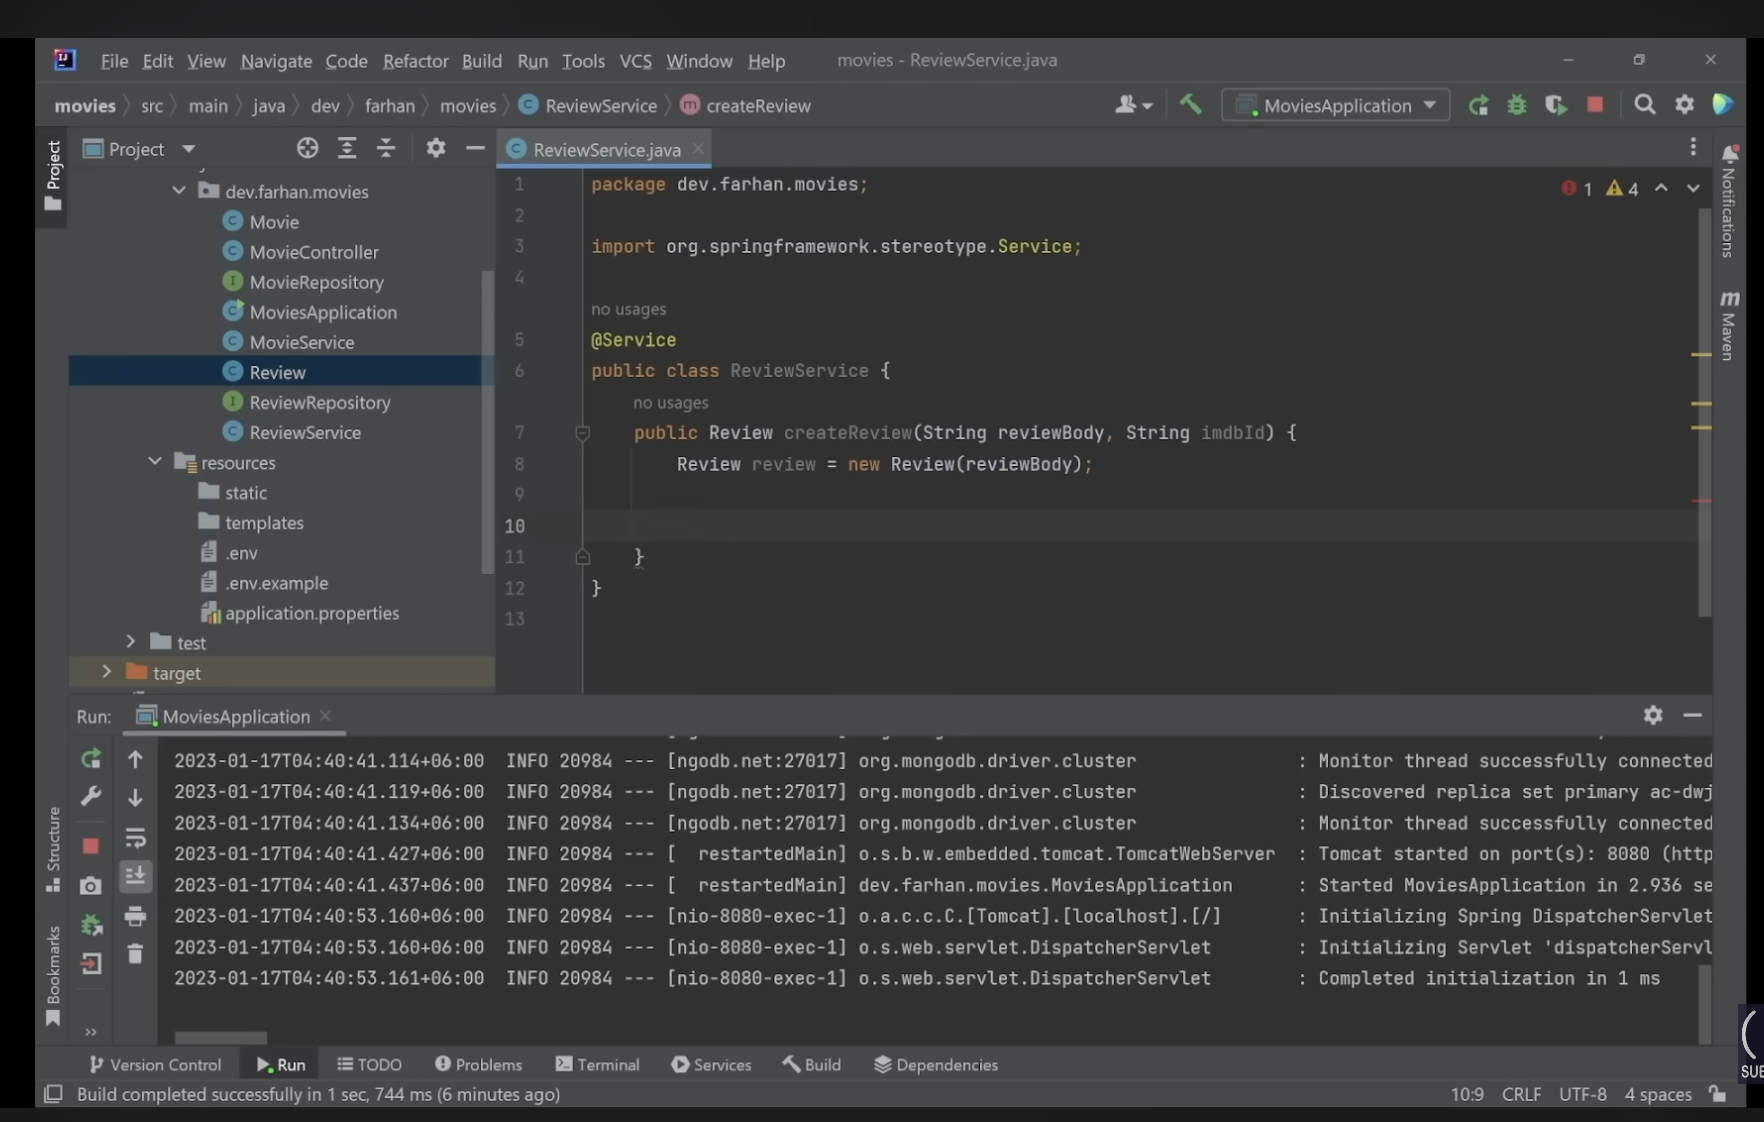
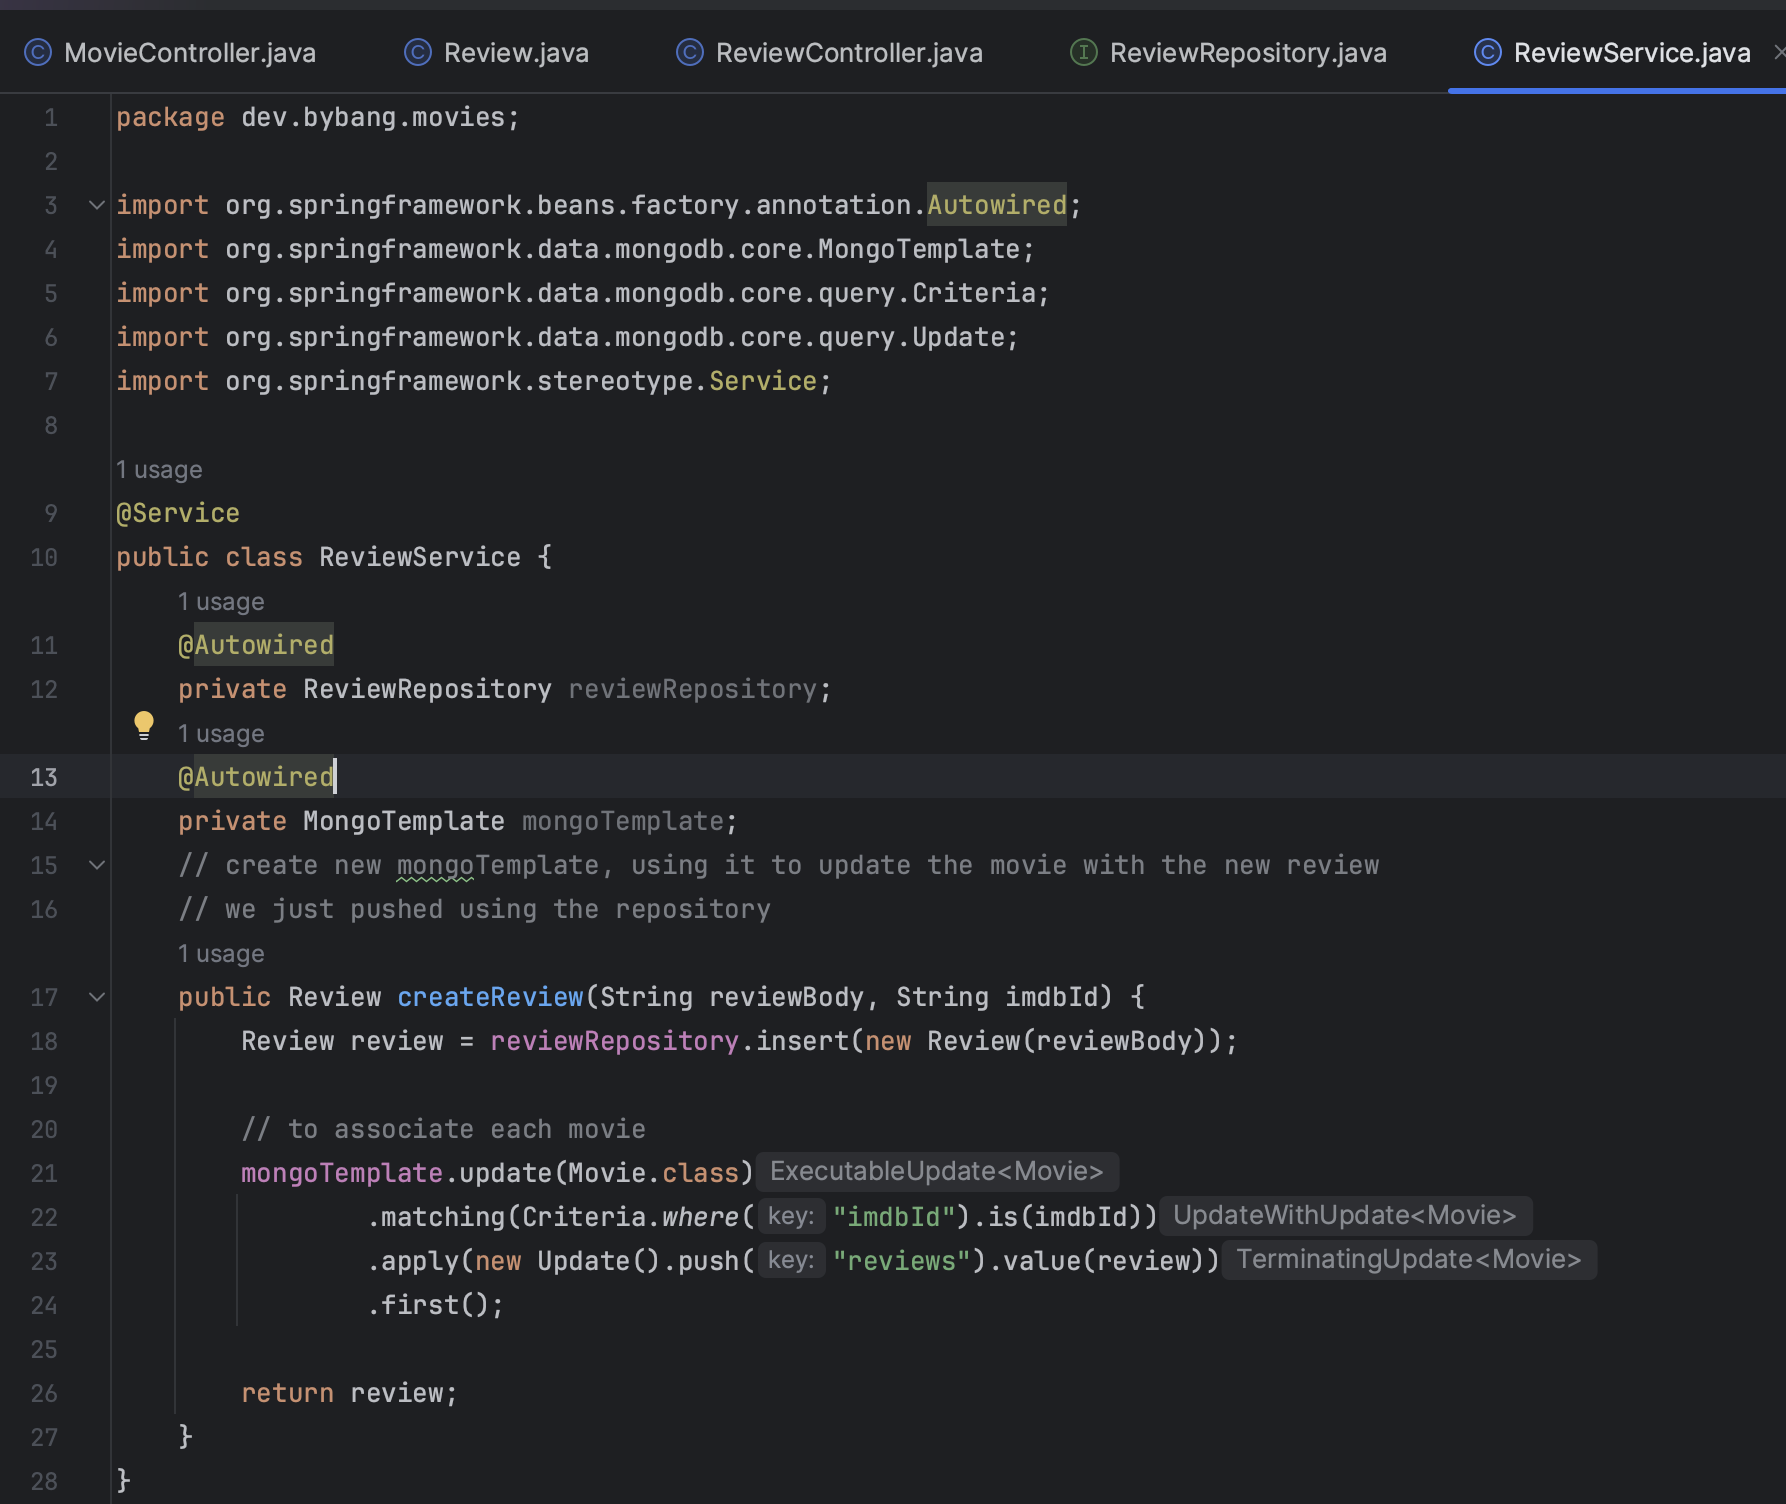
Creating the Review part is a lot similar to the Movie part. Let’s make ReviewController, ReviewService, and ReviewRepository.
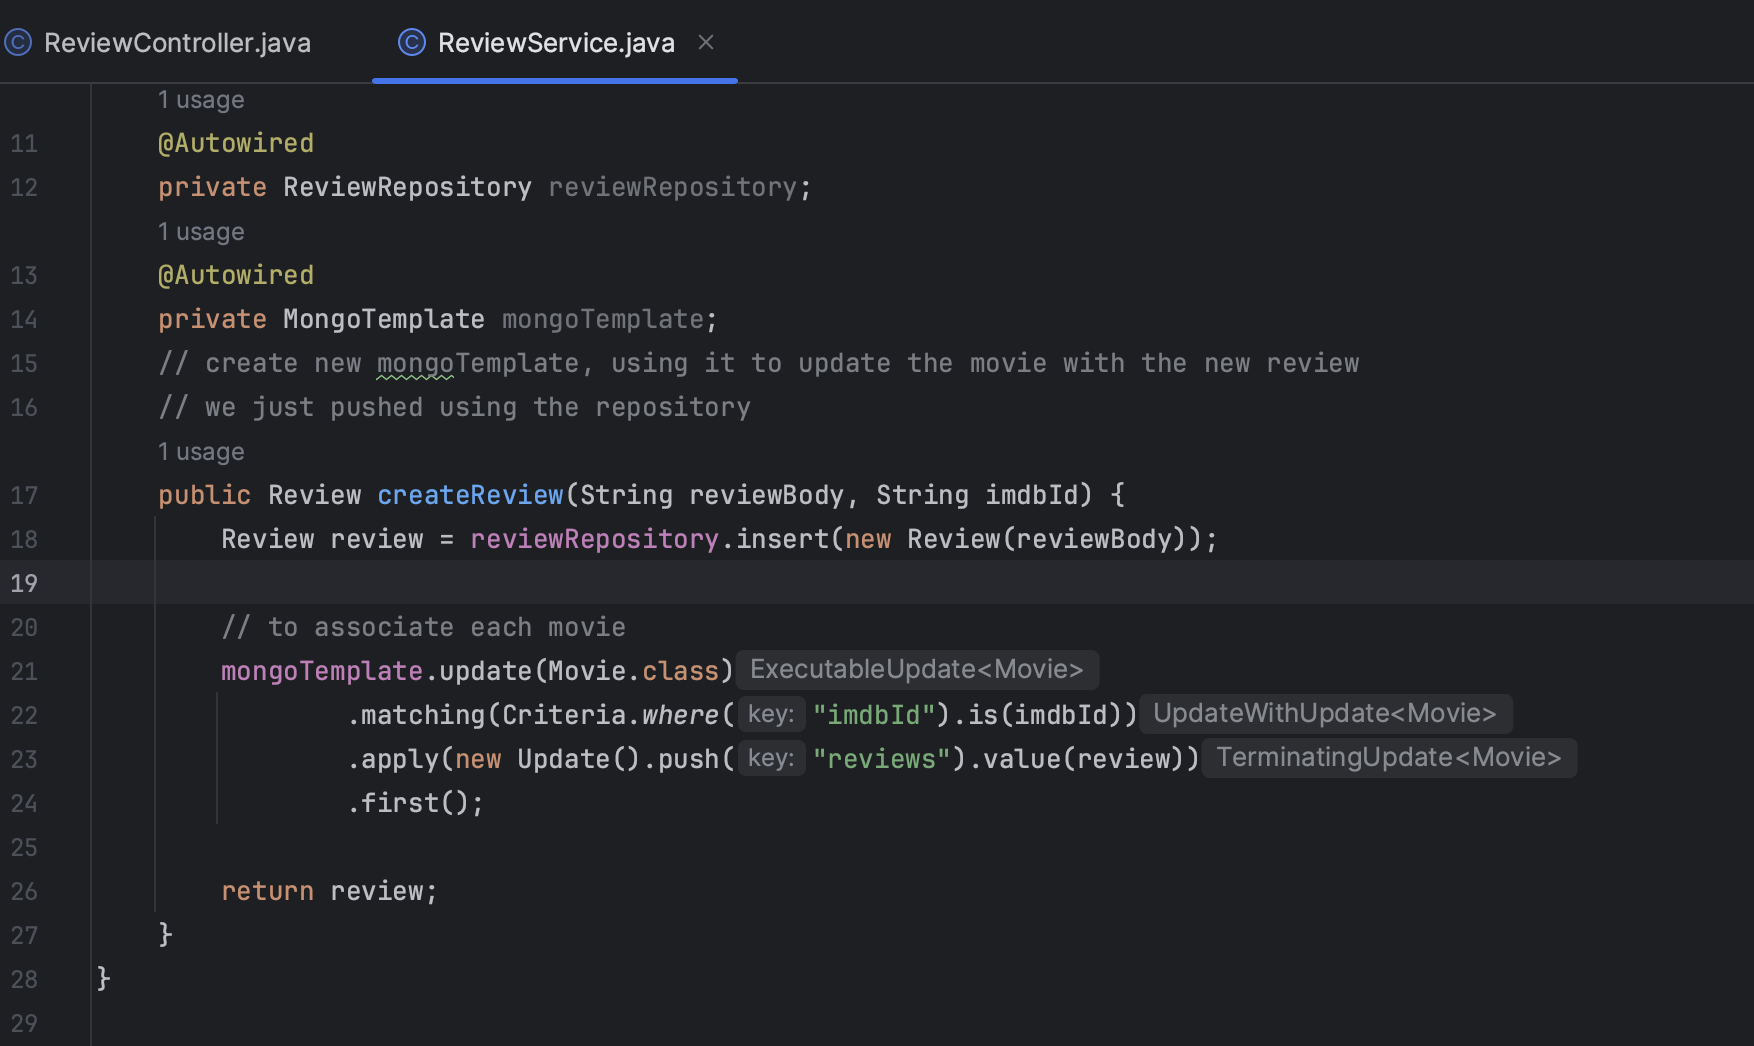
Inside the ReviewService, we will create a method called createReview().
The createReview() method takes two parameters, String reviewBody and String imdbId.
The logic for this method is,
- Look for the movie with the given
imdbId - We will create a new review and associate that review with the movie that we found with the
imdbId
Review Constructor
If you remember the previous post, we created the Review class but didn’t go over the last part, which was the constructor.
from the previous post
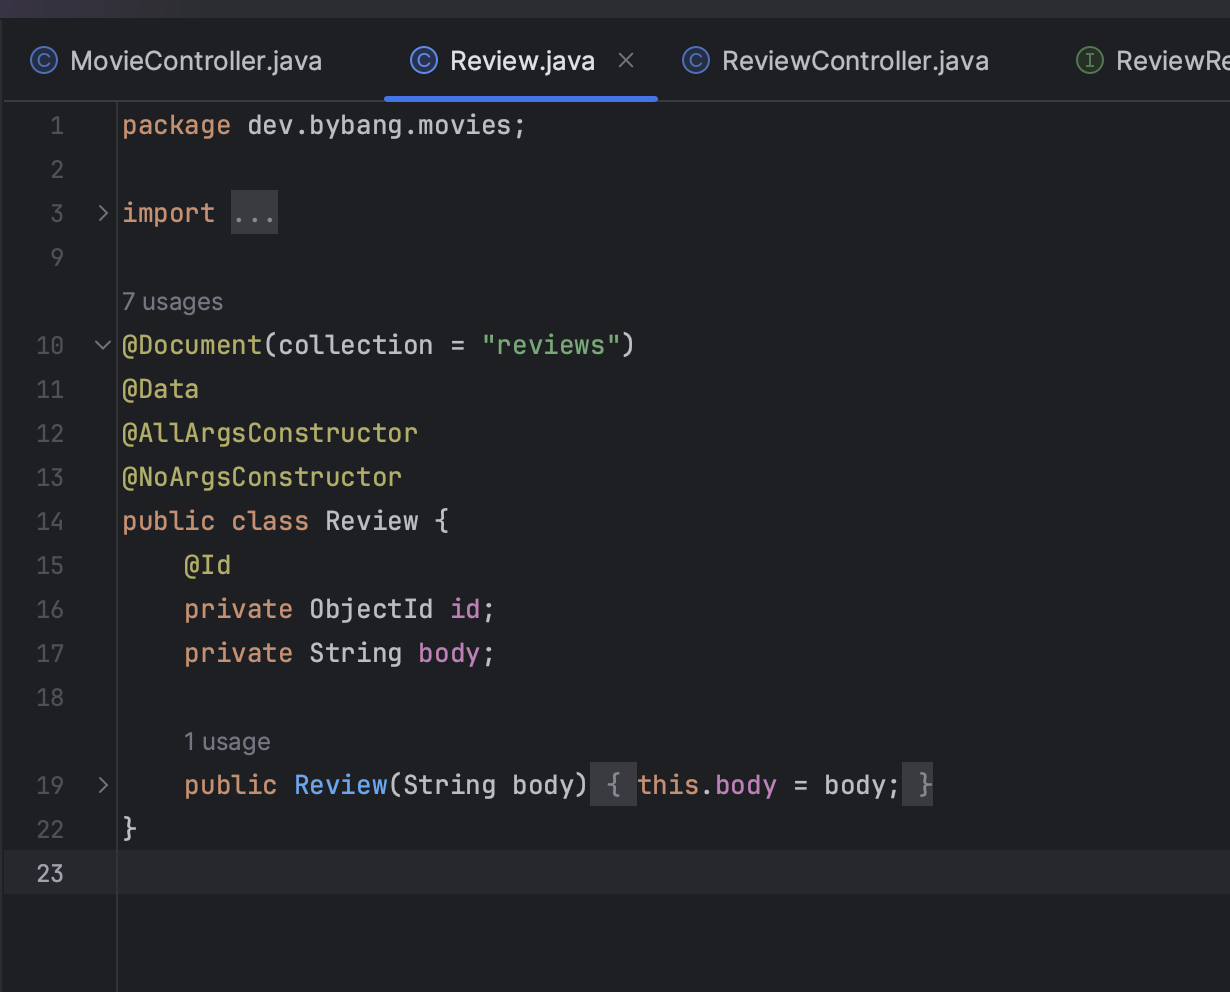
We have AllArgsConstructor and NoArgsConstructor for the Review class, but since Ids are auto-generated, we can’t pass an id to this class.
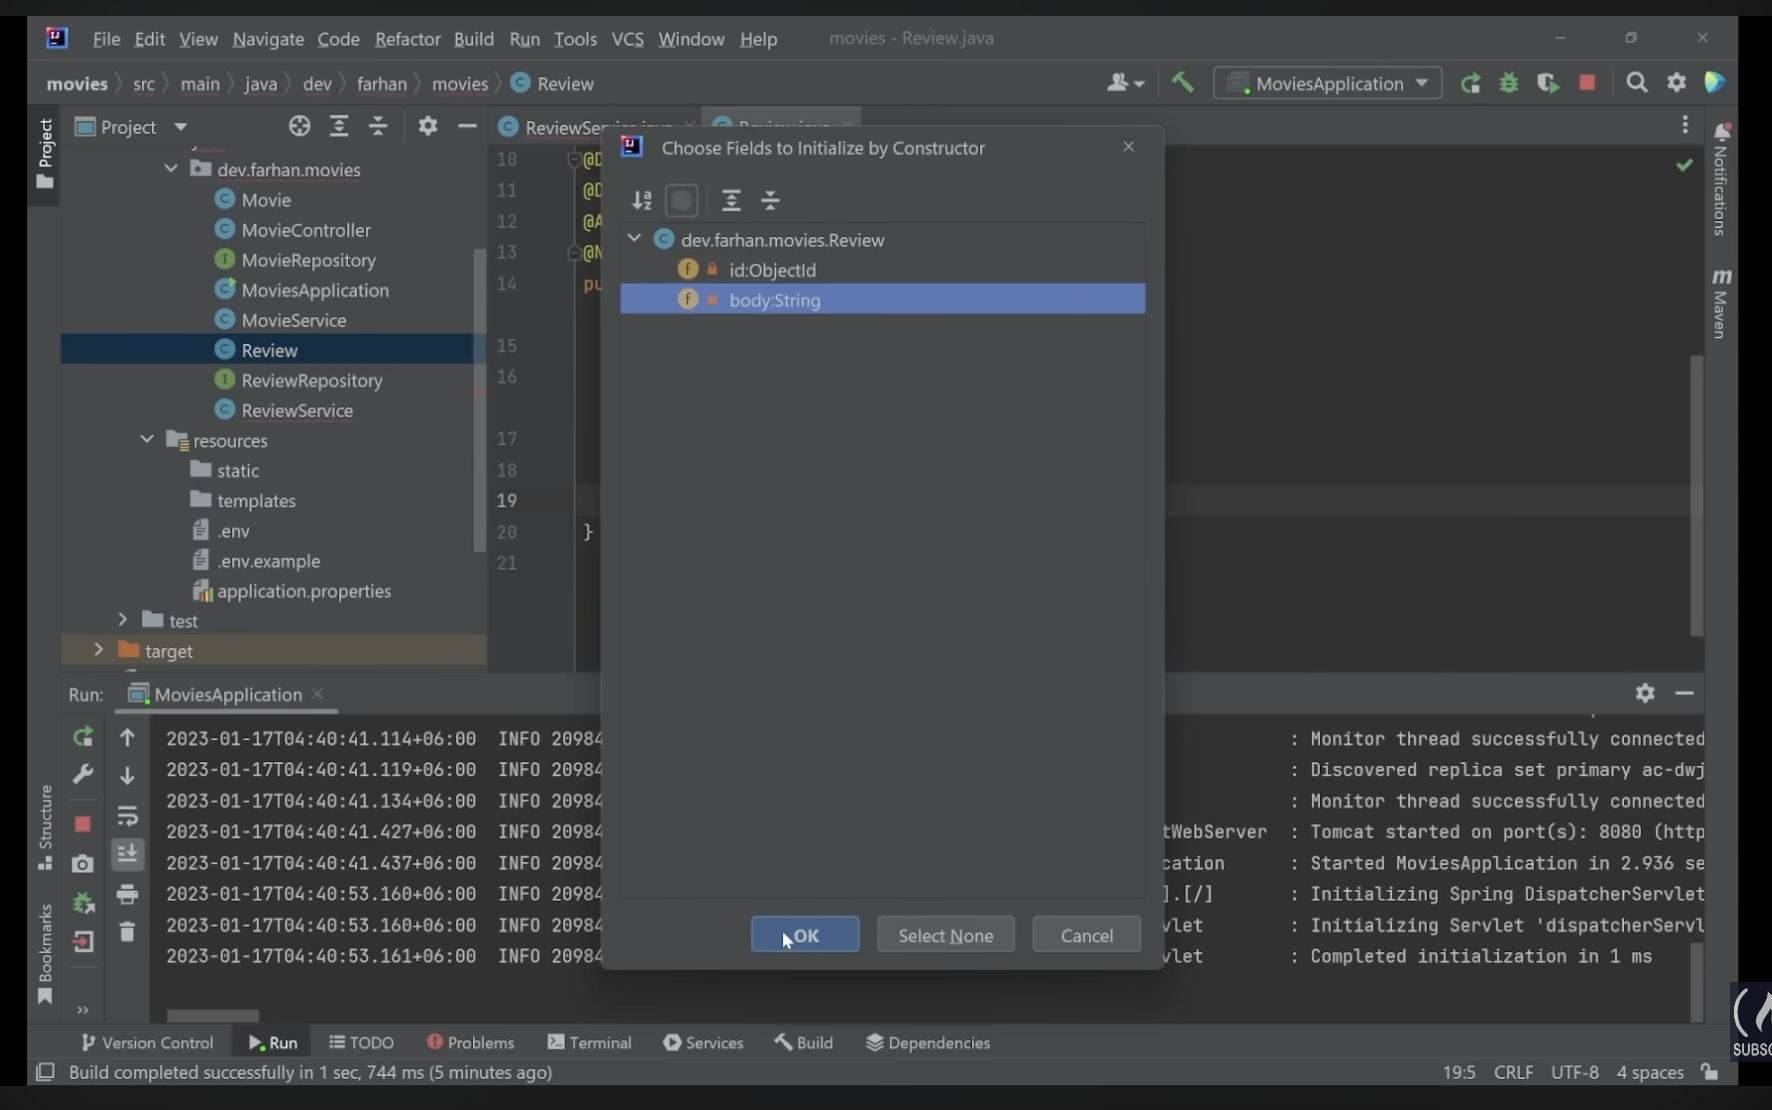
To solve this problem, we will create a custom constructor that only takes the body.
To create a custom constructor, right-click and look for the generate and the constructor. You will see the following window and select the body because we only need the body part.
Create a new Review
We have added a logic to create a new review and imagine we have a new review from the user.
The next step is associating a new review with one of the movies.
From the MovieService, we know that we need a reference to the Repository to communicate with the database.
Let’s add a reference for ReviewRepository and wire it.
@Autowired
private ReviewRepository reviewRepository
As we learned, one of the ways to communicate with the database is using the repository. The other way to communicate with the database is using a template. If you can’t use repository for some reason or doesn’t cut in, maybe the logic is too complex so that it can’t be implemented within a repository, or if you can implement it with a repository but it is not suitable, we can use a template.
We can use this template to form a new dynamic query and do the job inside of the database without using a repository.
As same as the repository, wire it and add the following code.
@Autowired
private MongoTemplate mongoTemplate;
To use this, add a mongoTemplate.update() and, in the parenthesis, decide which class will be updated.
We want to update one of the Movies with a new review. At the end of this method, we can see many operations by adding a dot.
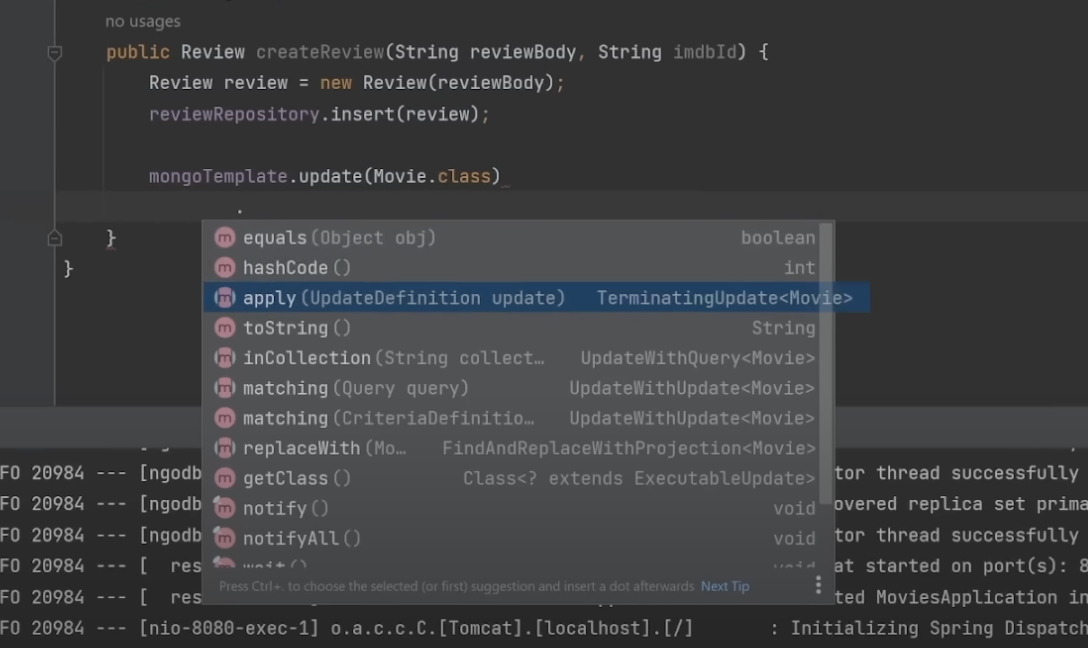
We want to use the .matching() operation to search the movie and set new criteria by following lines of code.
mongoTemplate.update(Movie.class)
	.matching(Criteria.where("imdbId").is(imdbId))
The first "imdbId" is from the mongoDB, so it has to match exactly the same as the database. The second imdbId is the value we pass from the String imdbId.
Next, we will add an updated definition.
mongoTemplate.update(Movie.class)
	.matching(Criteria.where("imdbId").is(imdbId))
    .apply(new Update().push("reviewIds").value(review))
It is important to remember that each Movie in the collection contains an array of reviewIds. Then, go to the database and UPDATE the reviewIds array and PUSH a new reviewId into the reviewIds array.
This logic’s progress can be explained in the following steps.
- If the application gets a new
reviewfrom the user, - Check which movie we want to
UPDATEwith the.matching()operation. - We are updating a movie
WHEREthe"imdbId"of the movie in the database matches theimdbIdthat has been received from the user. - To apply this update, use the
.apply()method. - Create a new update definition, and this will make the change inside of the database
- The definition
Updatewill push a newreviewIdinto thereviewIdsarray from the currentMovie. - The value of the
Movieclass inside of thereviewIdswill be updated withvalue(reivew) - The
Review review = new review(reviewBody);is a review just created, and this will pushed into thevalue(). - This
value()will passed into thereviewIdsarray.
Finally, add some .first() operation to prevent edge cases. The .first() will check we are getting a single movie and updating it.
Fix the Review review = part because when using insert, it returns the data we just pushed inside of the database. As we don’t want to return the review here, fix it accordingly, and your code should be like this.
To sum up,
- Create a new
mongoTemplateand use the template to update theMoviewith a newreviewthat we just pushed using thereviewRepository.
Review Controller
Inside the controller, we will have only one method.
Unlike MovieController, we don’t have to read the review with the controller, but we need to update it.
To update the review, we will need a POST method.
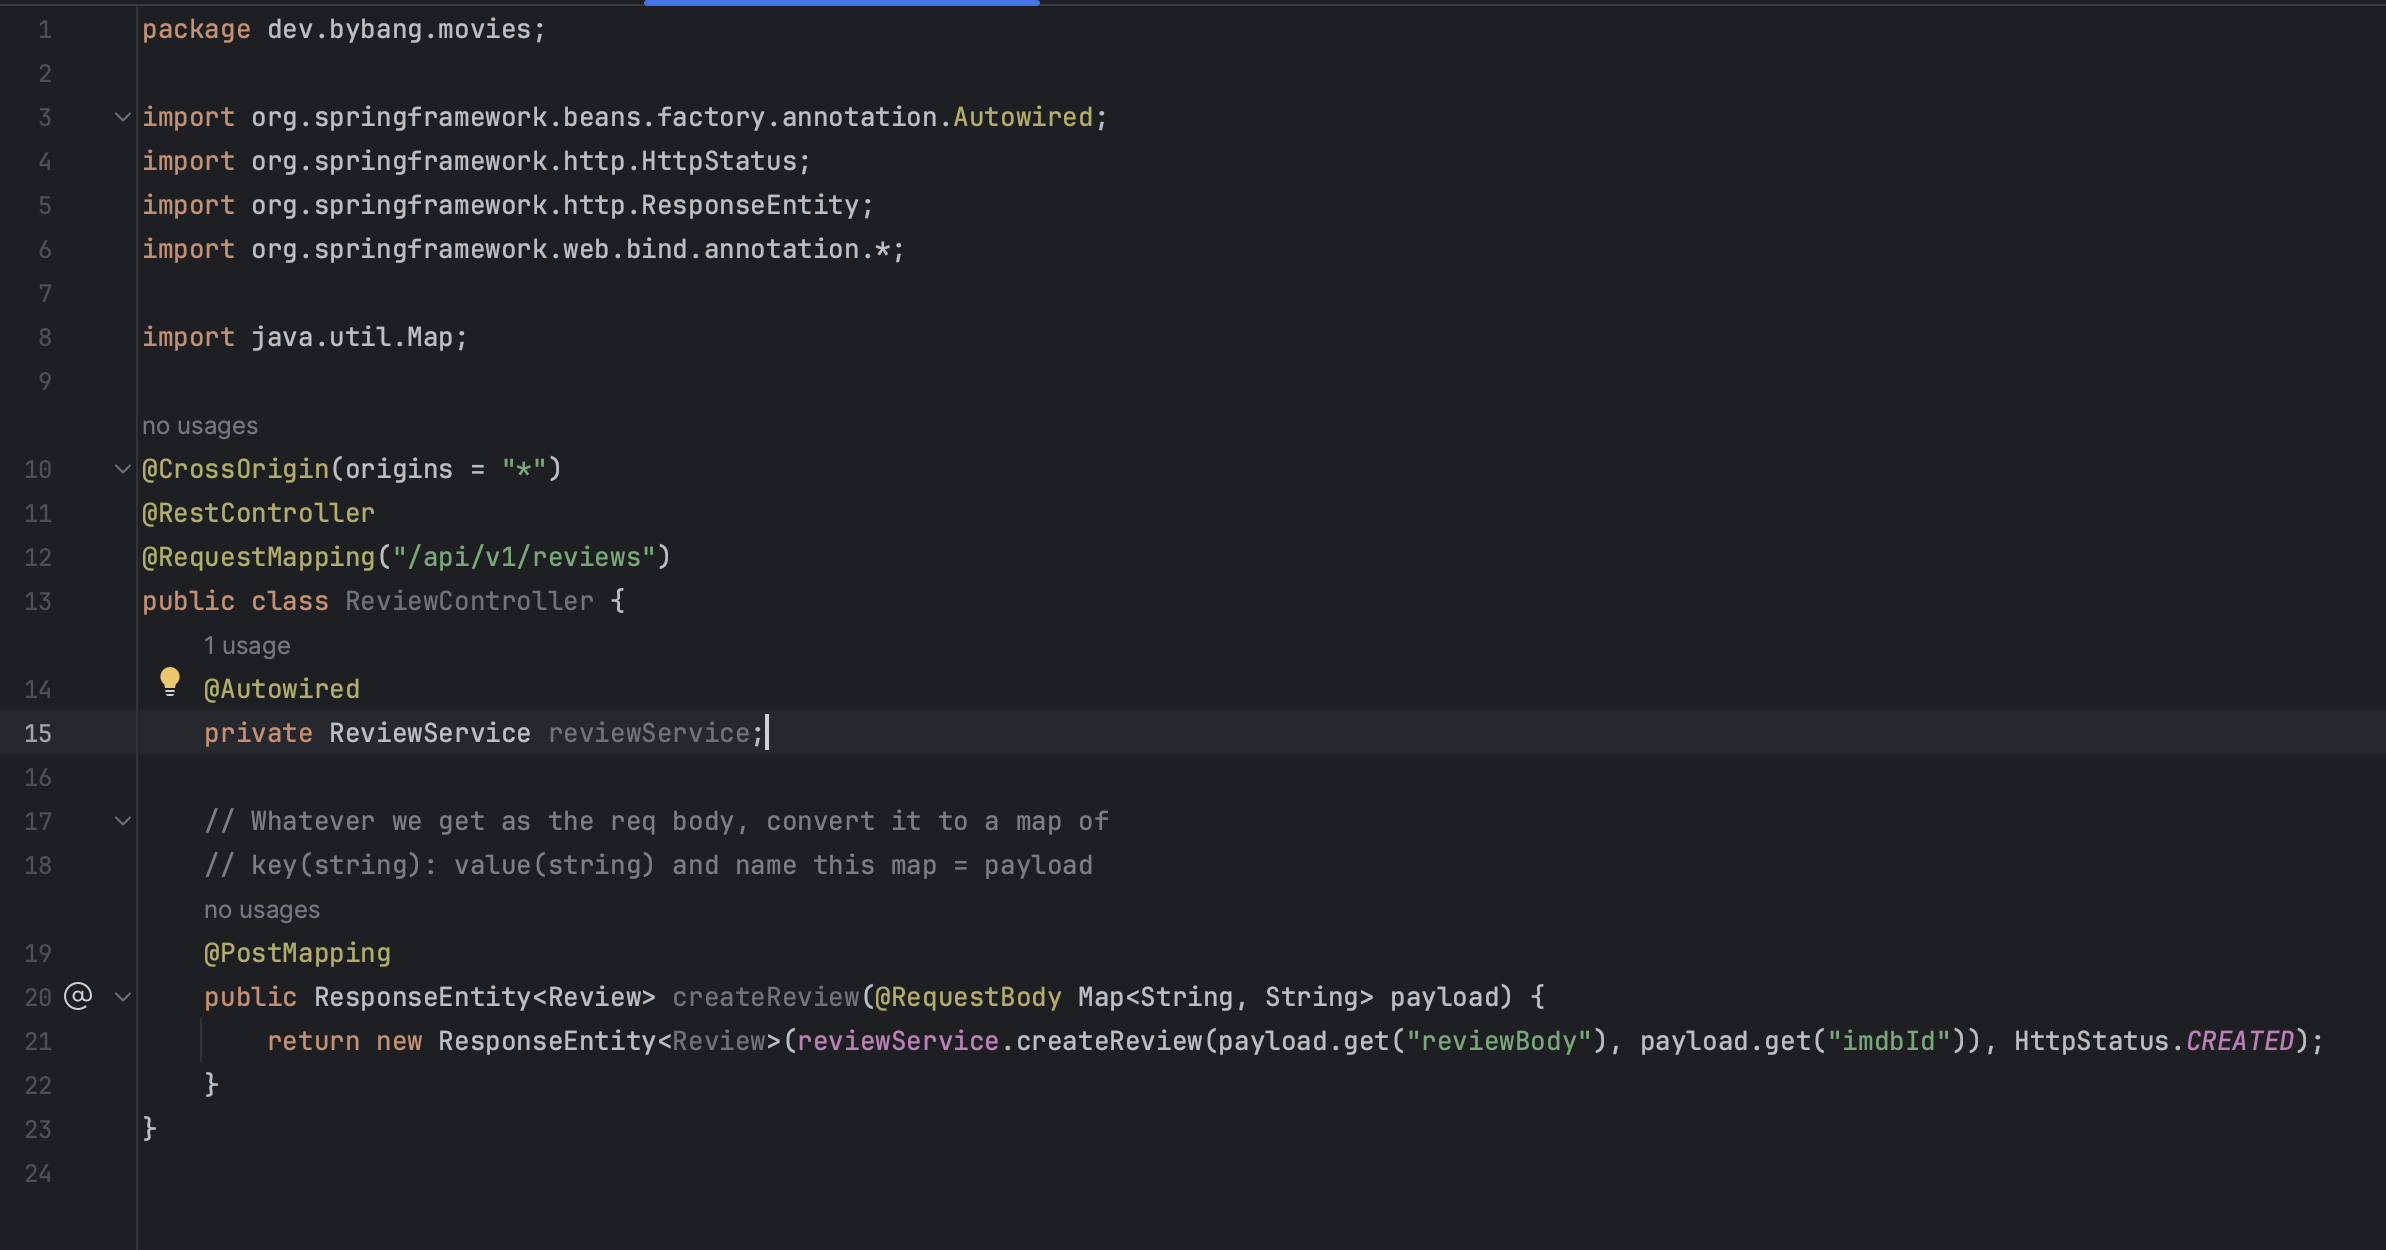
Annotate it as a @RestController and add a @RequestMapping("/api/v1/reviews") to the ReviewController.
Creating endpoints will depend on the projects or the developer’s preferences. We may choose to organize it differently, but the instructor first decides to use
/moviessince the review form will be inside the movie details page or the page where the user sees a single movie. We can request themoviesendpoint instead of creating a newreviewsendpoint. But later, the instructor changed it to/reviews.
The rest of the part is much similar to the MovieController. We will wire the ReviewService, and create a new POST mapping.
The public method will return a ResponseEntity, and the type of this entity will be a type <Review>.
Name method like createReview() and this method takes @RequestBody Map<String, String> payload.
This is different from the
Serviceclass’s createReview. If you need clarification, you can name it differently.
This means the framework should convert the data we get from the request body to the map of key(string):value(string). We will also name it a payload.
Inside of the method, return new ResponseEntity<Review> with the service class. This reviewService class is used with its own createReview(), and it takes two parameters.
The first one is payload.get("reviewBody"), and the second one is payload.get("imdbId"). Pass the HttpStatus with the CREATED code at the end. Since we created a new review, it should pass 201 instead of 200.
public class ReviewController {
    @Autowired
    private ReviewService reviewService;

    @PostMapping
    public ResponseEntity<Review> createReview(@RequestBody Map<String, String> payload) {
    	return new ResponseEntity<Review>(reviewService.createReview(payload.get("reviewBody"), payload.get("imdbId")), HttpStatus.CREATED);
    }
}
If you follow along, your code should be similar to the following picture.
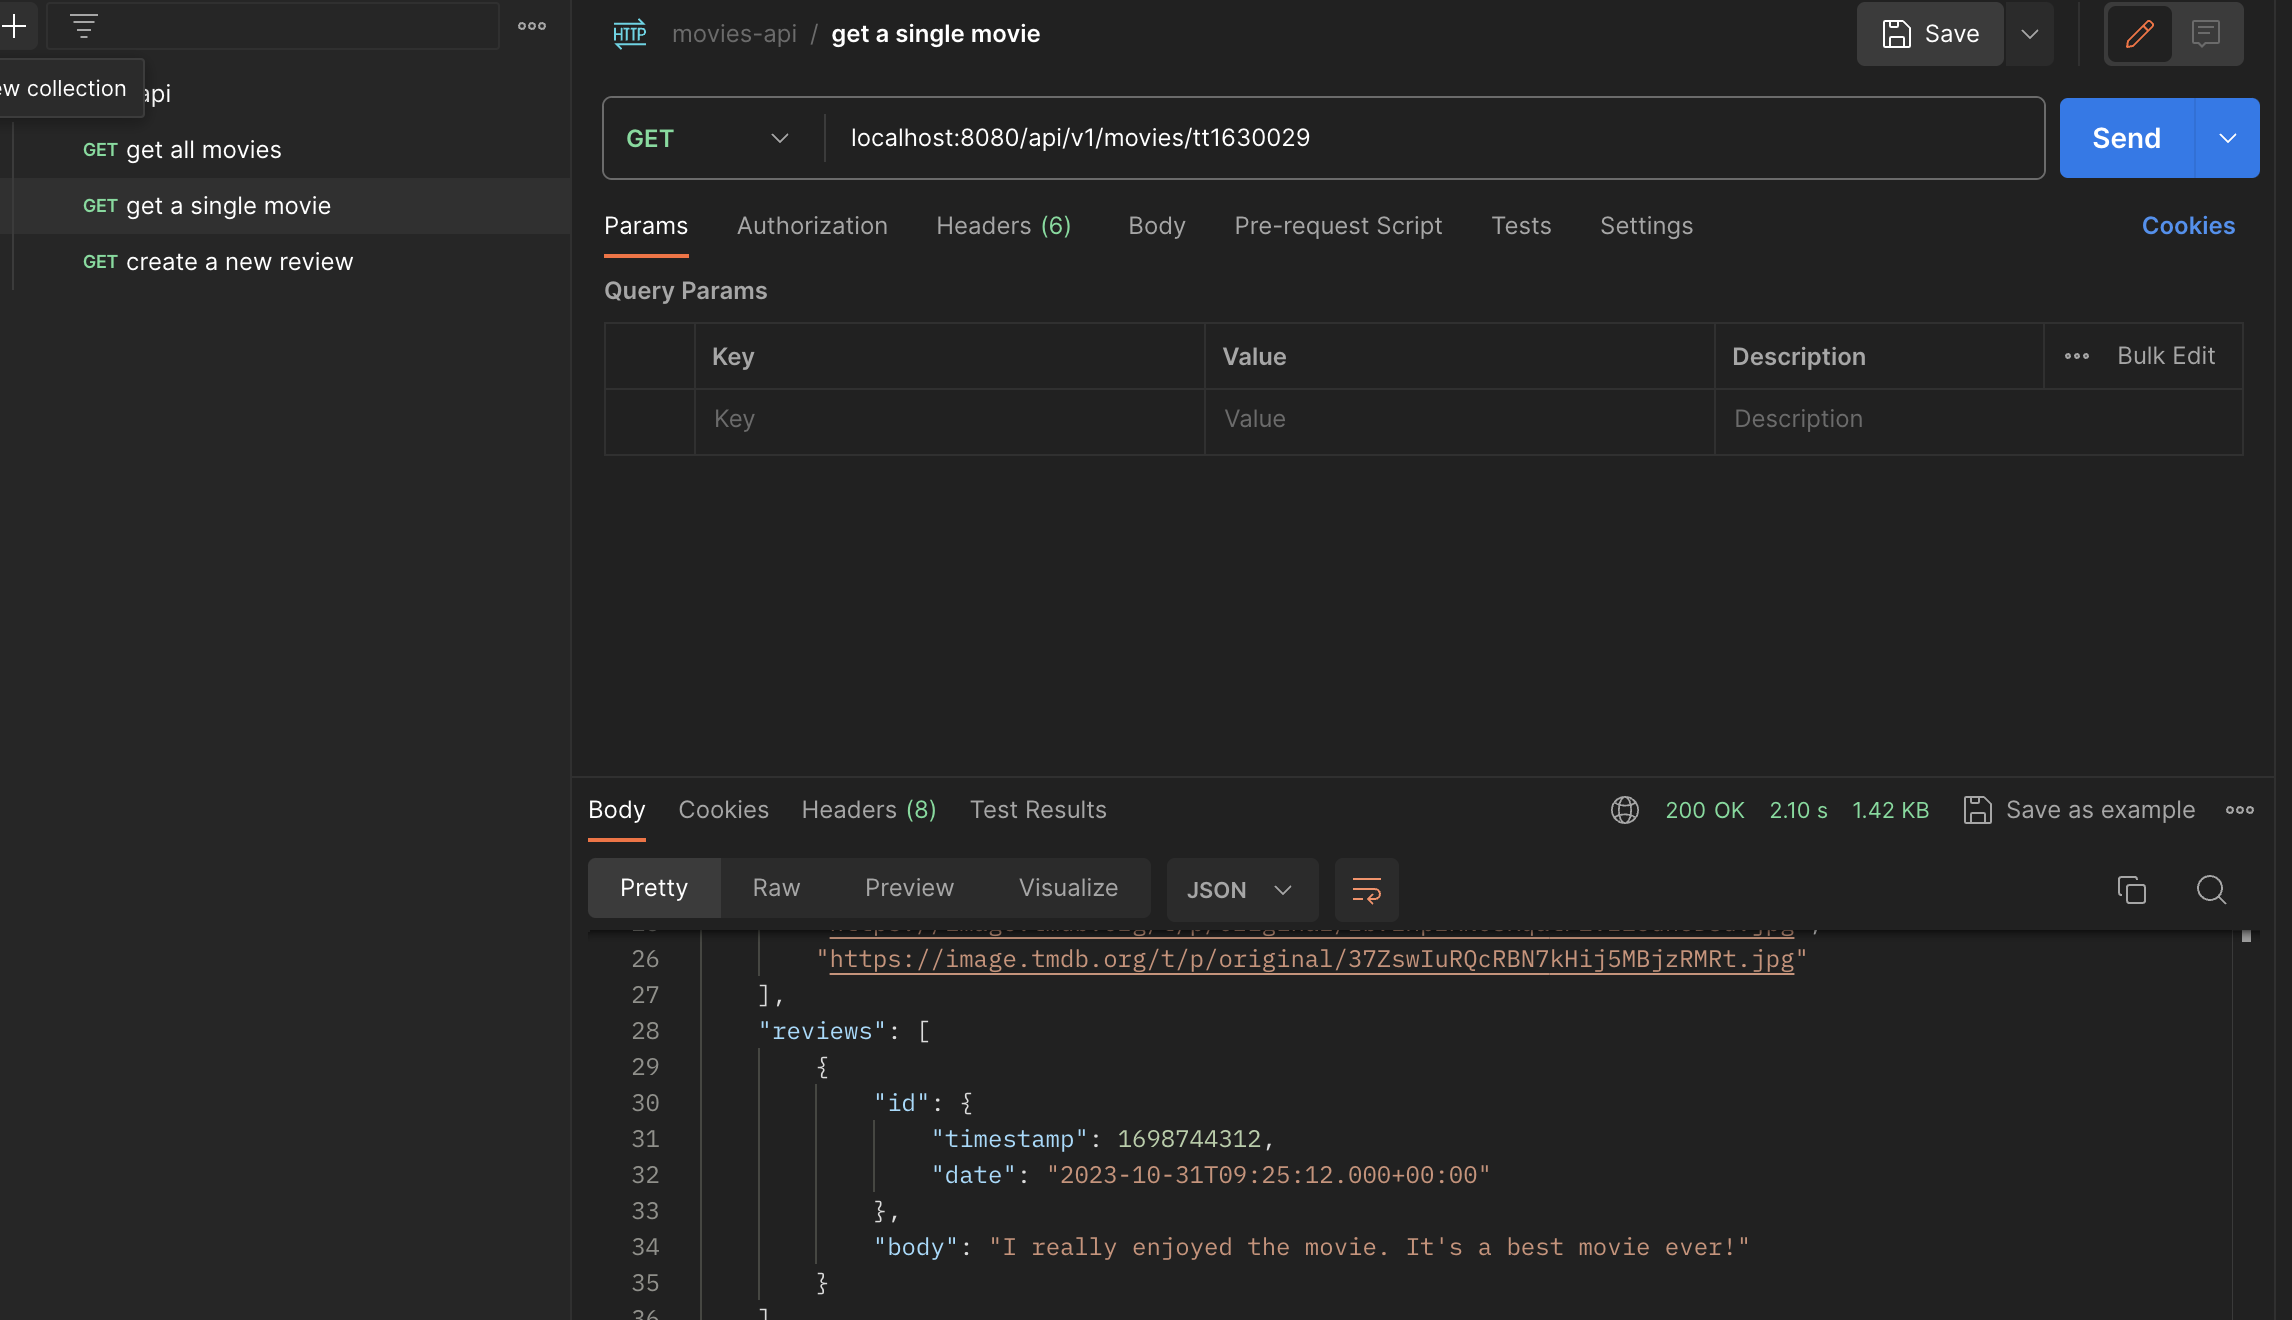
Test with Postman
Create a Collection and Requests
Since this is not a course for the postman, I will not go into details of the postman.
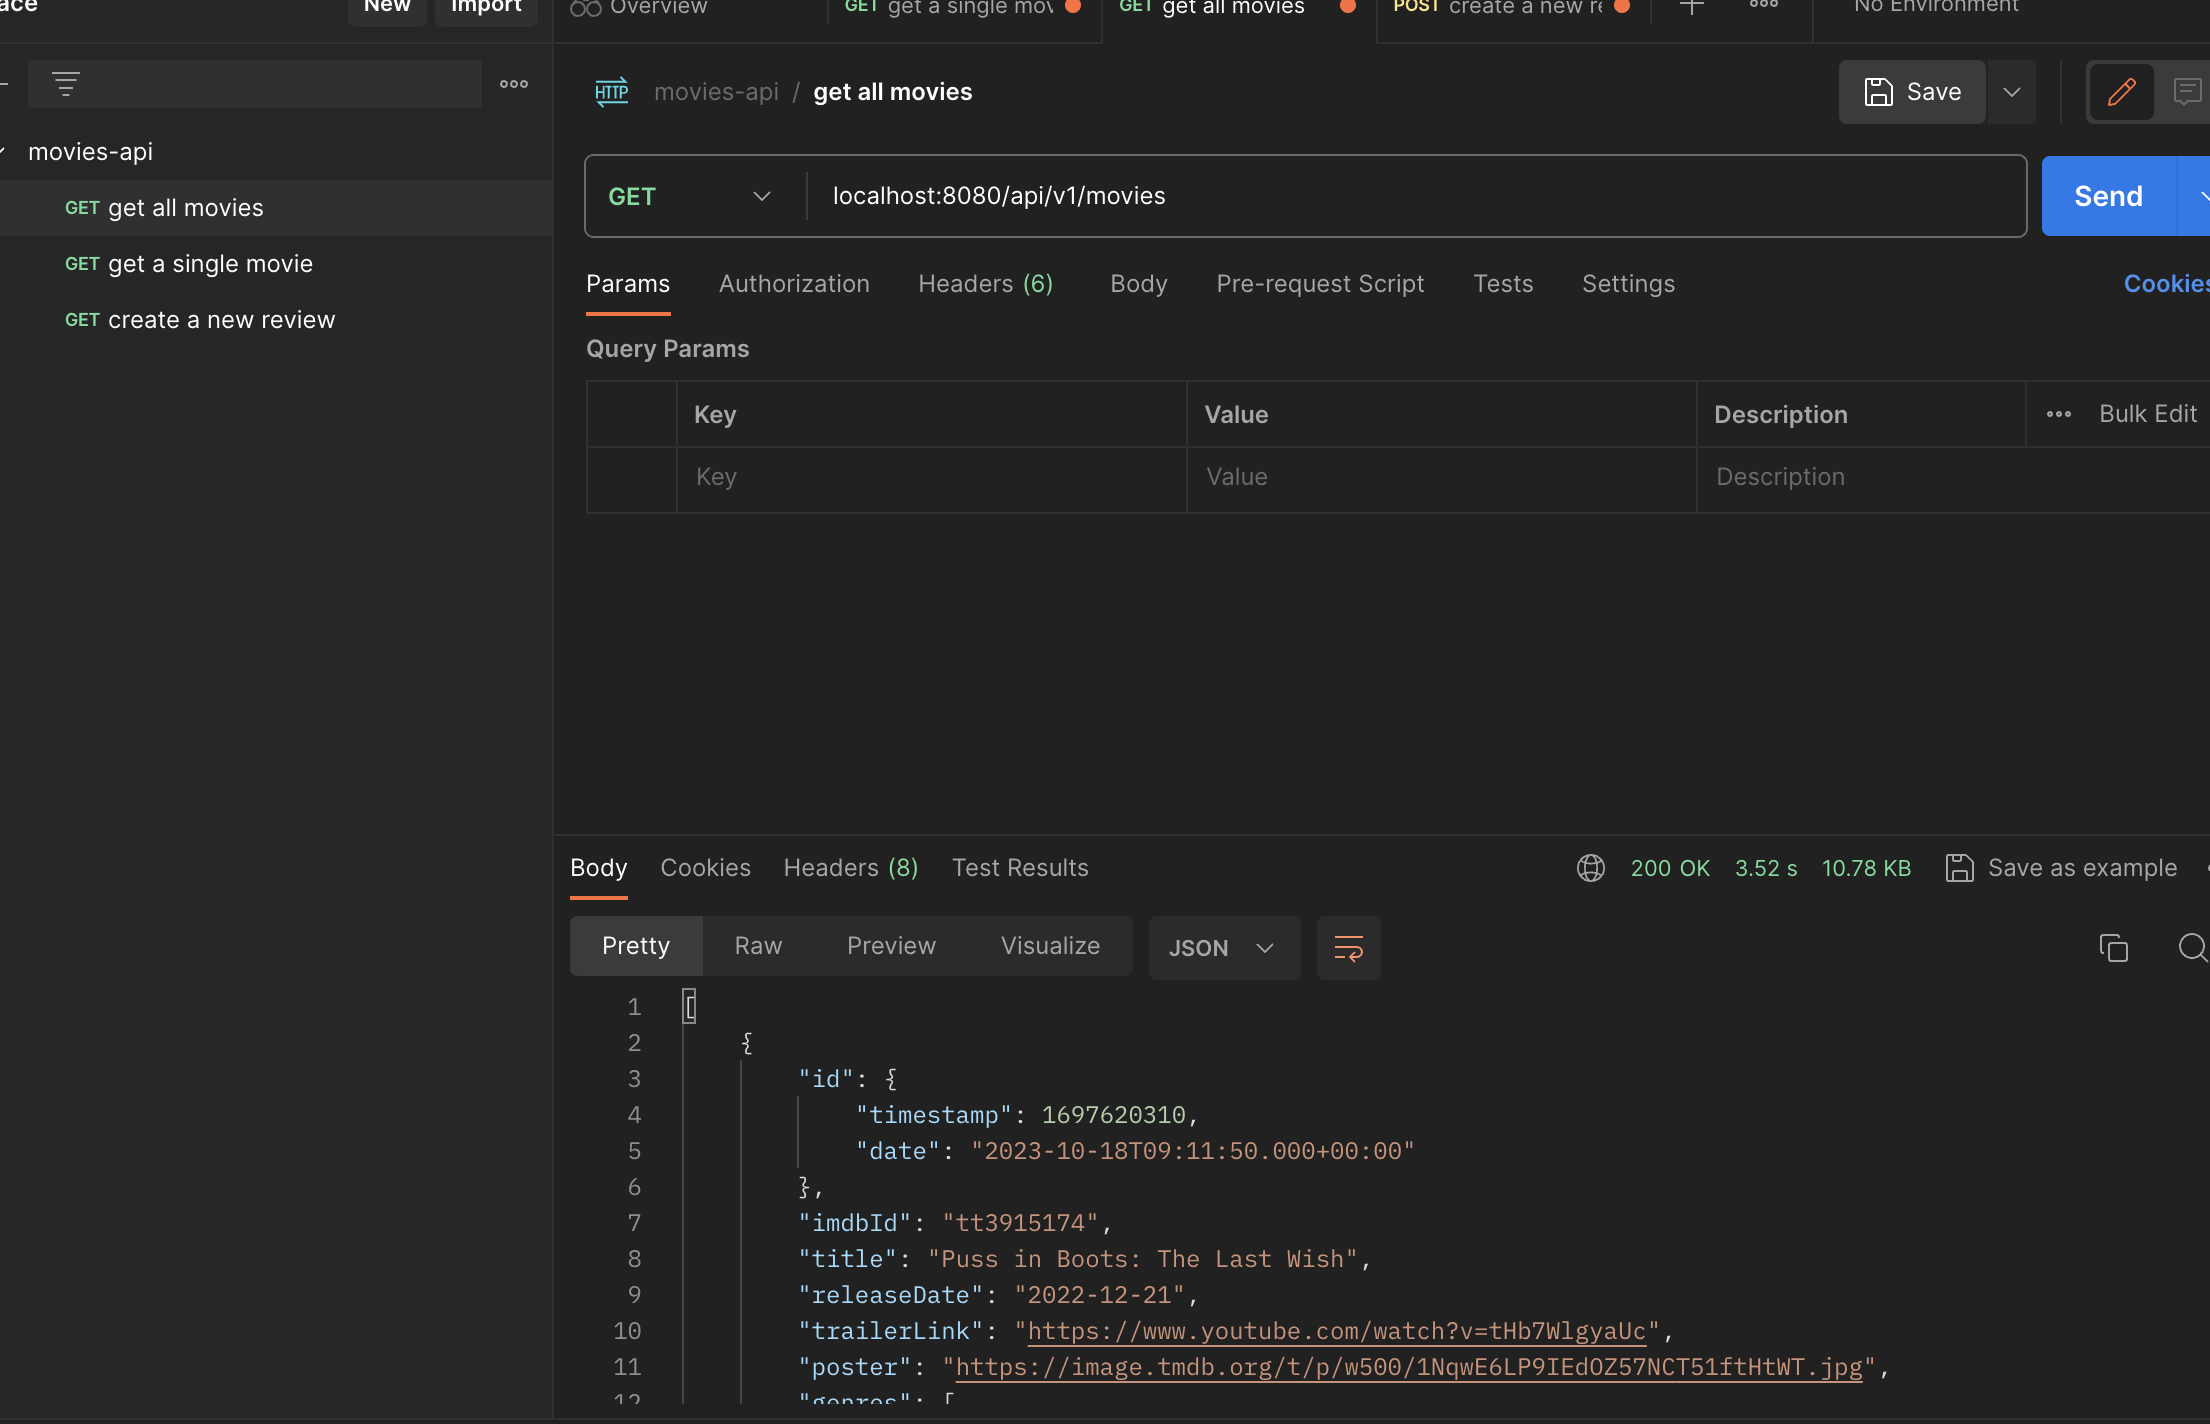
Create the movie-api collection and create some GET requests.
If you don’t know how to create the collection, type it in the red circle to create it.
Next, type the address like we usually do in the browser. If you see the information below, it means your GET request works fine.
If you created the GET request for the POST method, you can change it.
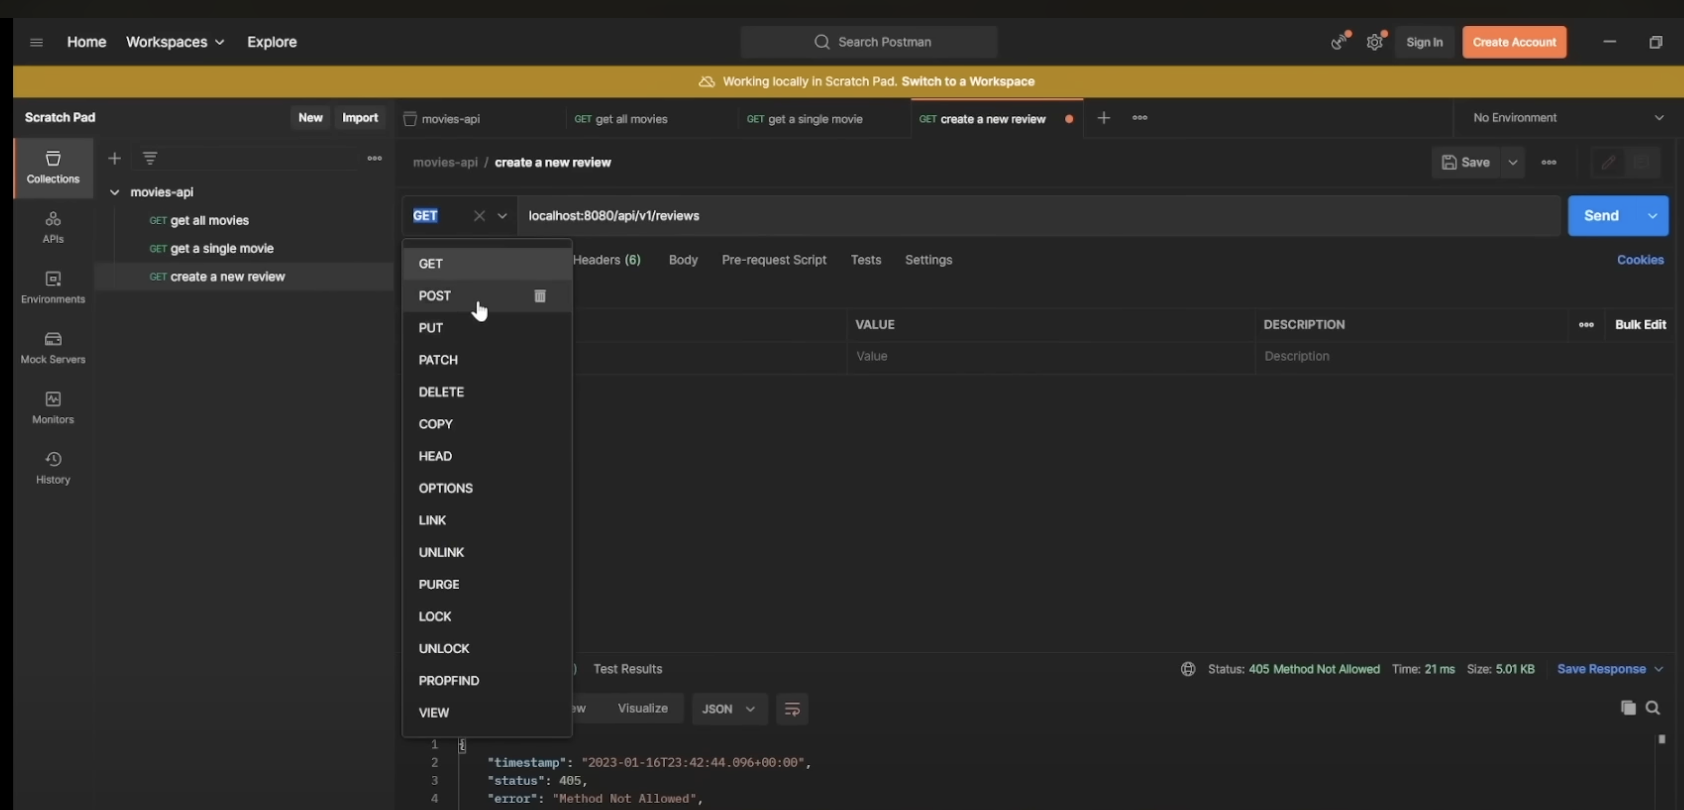
Select the raw data and choose the JSON format. Type the raw JSON data like below and send the request.
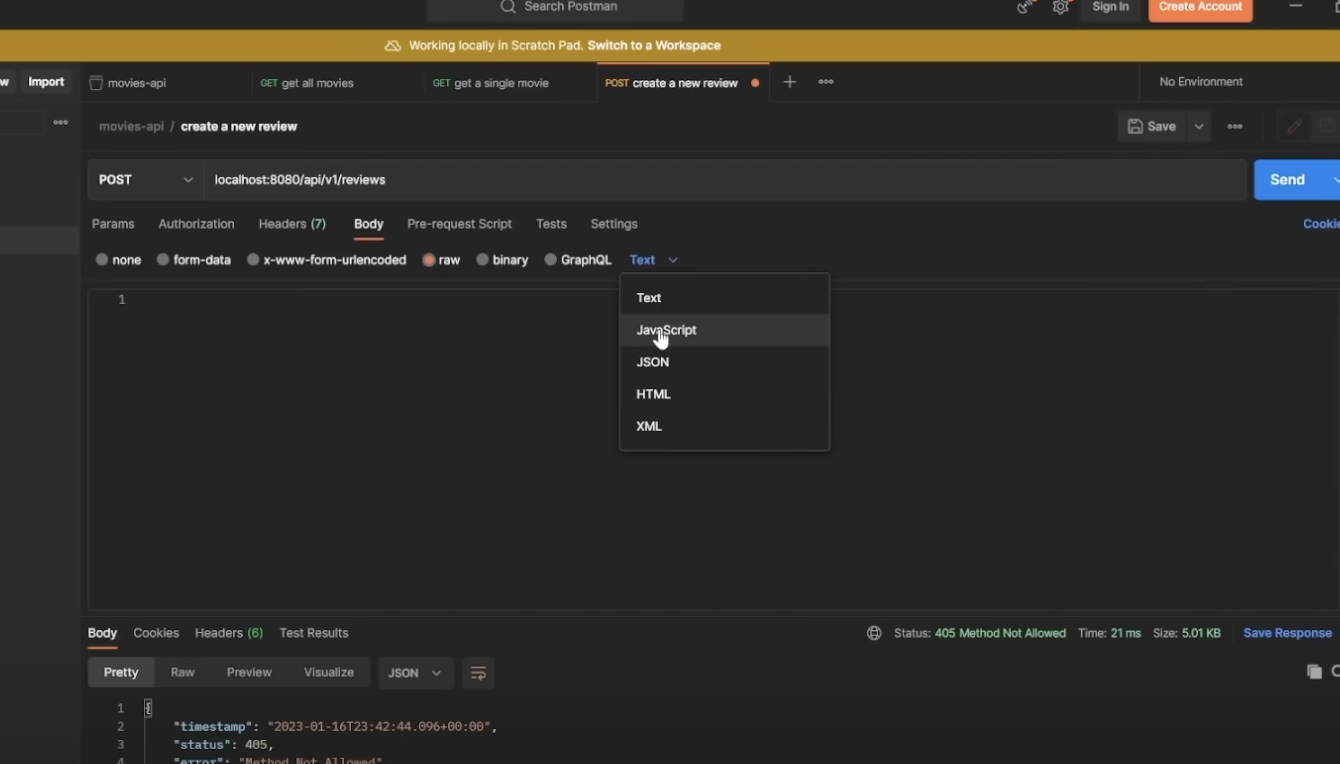
Make sure the key of the JSON data exactly matches the two keys inside of the payload.
{
  "reviewBody": "I really enjoyed the movie. It's a good family movie!",
  "imdbId": "tt10298840"
}
The createReview(payload.get("reviewBody"), payload.get("imdbId")), HttpStatus.CREATED); part will receive the JSON data from the user and convert it into a Map. The Map takes keys and values as String.
From the Map <String, String>, we are able to access the reviewBody and imdbId, which are the string.
Through the ReviewService layer, we can create a new review on the database. Update the movie with the current review, and return the review.
Also, the ReviewRepository works as an intermediary layer between the Service class and the database.
Now, if we send the POST request to the server, we will see the screens below.
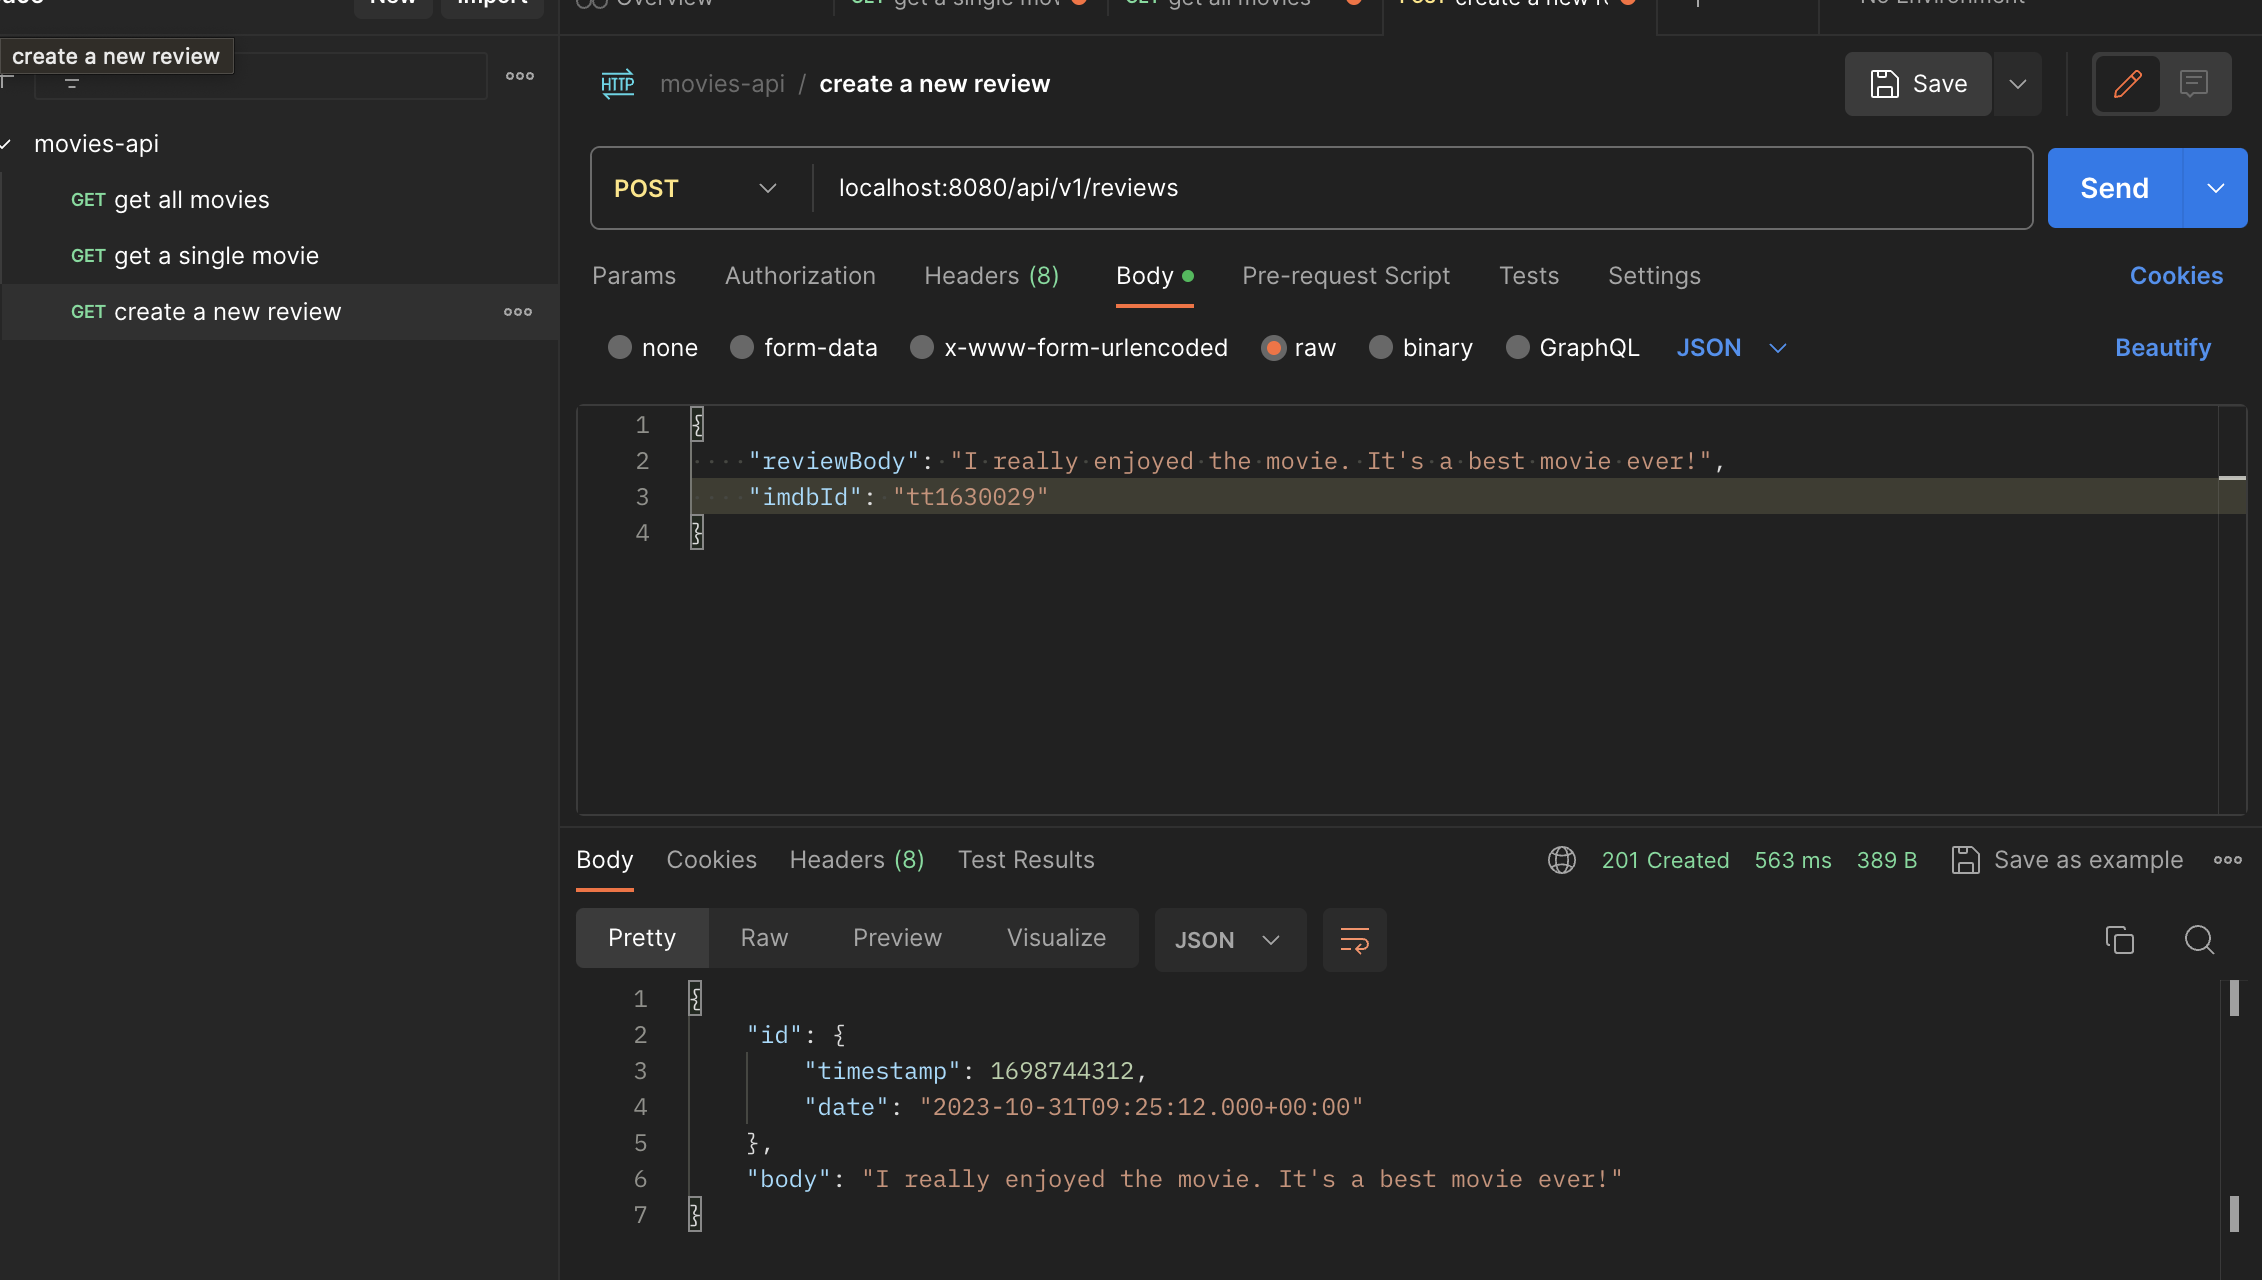
We have 201 created in green text, and in the box, it shows the reviewIds format. If you wish, you can check the single movie with the same id, and indeed it has the review that we just created.
📌 Takeaway
Through this post, I learned about
- how to set up the multiple layers in Java Spring Boot
- the relation between the
API Controller,Repository, and theServiceclass - how to create
REST APIin Java Spring Boot - how to reference each class by
@Autowired - the role of the
Controller,Service, andRepository - how to access a single item from the list of items by
@PathVariable - how the
Optionalclass works in Java - the dynamic query creation
- how to make the custom constructor only use the
body - the difference between the
Repositoryand theTemplate - how to use the operations by using the
template - how to
GETa review from the user, andPOSTto the database with theUpdatedefinition - how to convert the data from the
request bodyto aMap
💻 Solution
- In my case, I needed to change the
reviewIdstoreviewin order to update and communicate with the front-end - Also added
@CrossOrigin(origins = "*")to eachControllerto resolve the cross-origin error. - If anyone doesn’t want to use
ngrok, this might be the alternative solution.
🔖 Review
- In Java Spring, we use
Controllerto create REST API. We can create theGETmethod by@GetMapping. By default, it sets to the parent value("/api/v1/movies"), but we can map to a specific address by adding parenthesis.
The relation between the Layers
-
The
Controlleruses a reference from theService. TheControlleris the API layer and is only responsible forGETandPOSTmethods. When the controller gets the request, it calls the method from theMovieServiceclass and returns the list of the movies. -
The
Servicecommunicates with the database by usingRepositoryMost of the business logic goes under theServiceclass. TheMovieServicegets the list of the movies from theMovieRepositoryand passes it to theMovieController. -
The
Repositoryclass is a data access for the API TheMovieRepositorycommunicates withmongoDBand gets the data from it. It passes the data to theMovieService.
Optional class
- If we use a built-in method like
findById, sometimes we have to return null in case of theiddoesn’t exist or we can’t find the movie. - In this case, we can use
Optional<>to let the framework know this can benullif the result doesn’t exist.
Dynamic Query
- The built-in methods are not always the solution for the business logic.
- In this case, we need to create a query like
findMovieByImdbId. - When the convention matches, the framework automatically catches what we are trying to do and connects it to the correct data.
Create Review
- To create a review, we need several steps.
- More complex business logic goes under the
template - Inside of the
Review, we need a custom constructor because we are going to use onlyreview body. -
The
Servicelogic is following:- Create a new review associated with the
reviewRepositoryand theinsertmethods. - The application gets a new review from the user.
- Check the movie with
imdbId, and this matches the database - Create an updated definition.
- The update definition will handle the changes inside of the database
- With the
.apply()method, theUpdate()will push to thereviewsin the database with the value just created from 1. - For the error handling, put
.first()to avoid updating unintended movie.
- Create a new review associated with the
POST request
- To send a
POSTrequest to the browser, use@PostMapping. - The
@RequestBodyannotation converts the data from the request body into the desired format. - The
createReview()comes from thereviewService, which takes two values,String reviewBody, String imdbId. - Lastly, return the request with the
HttpStatus.CREATEDsince we need 201, not 200.
Front-end part
For the front-end part, I created with React, but since it is basic and didn’t communicate with Spring Boot, I decided to skip the whole process in the post. Instead, I will go over specific components.
The below code is the main logic for the application.
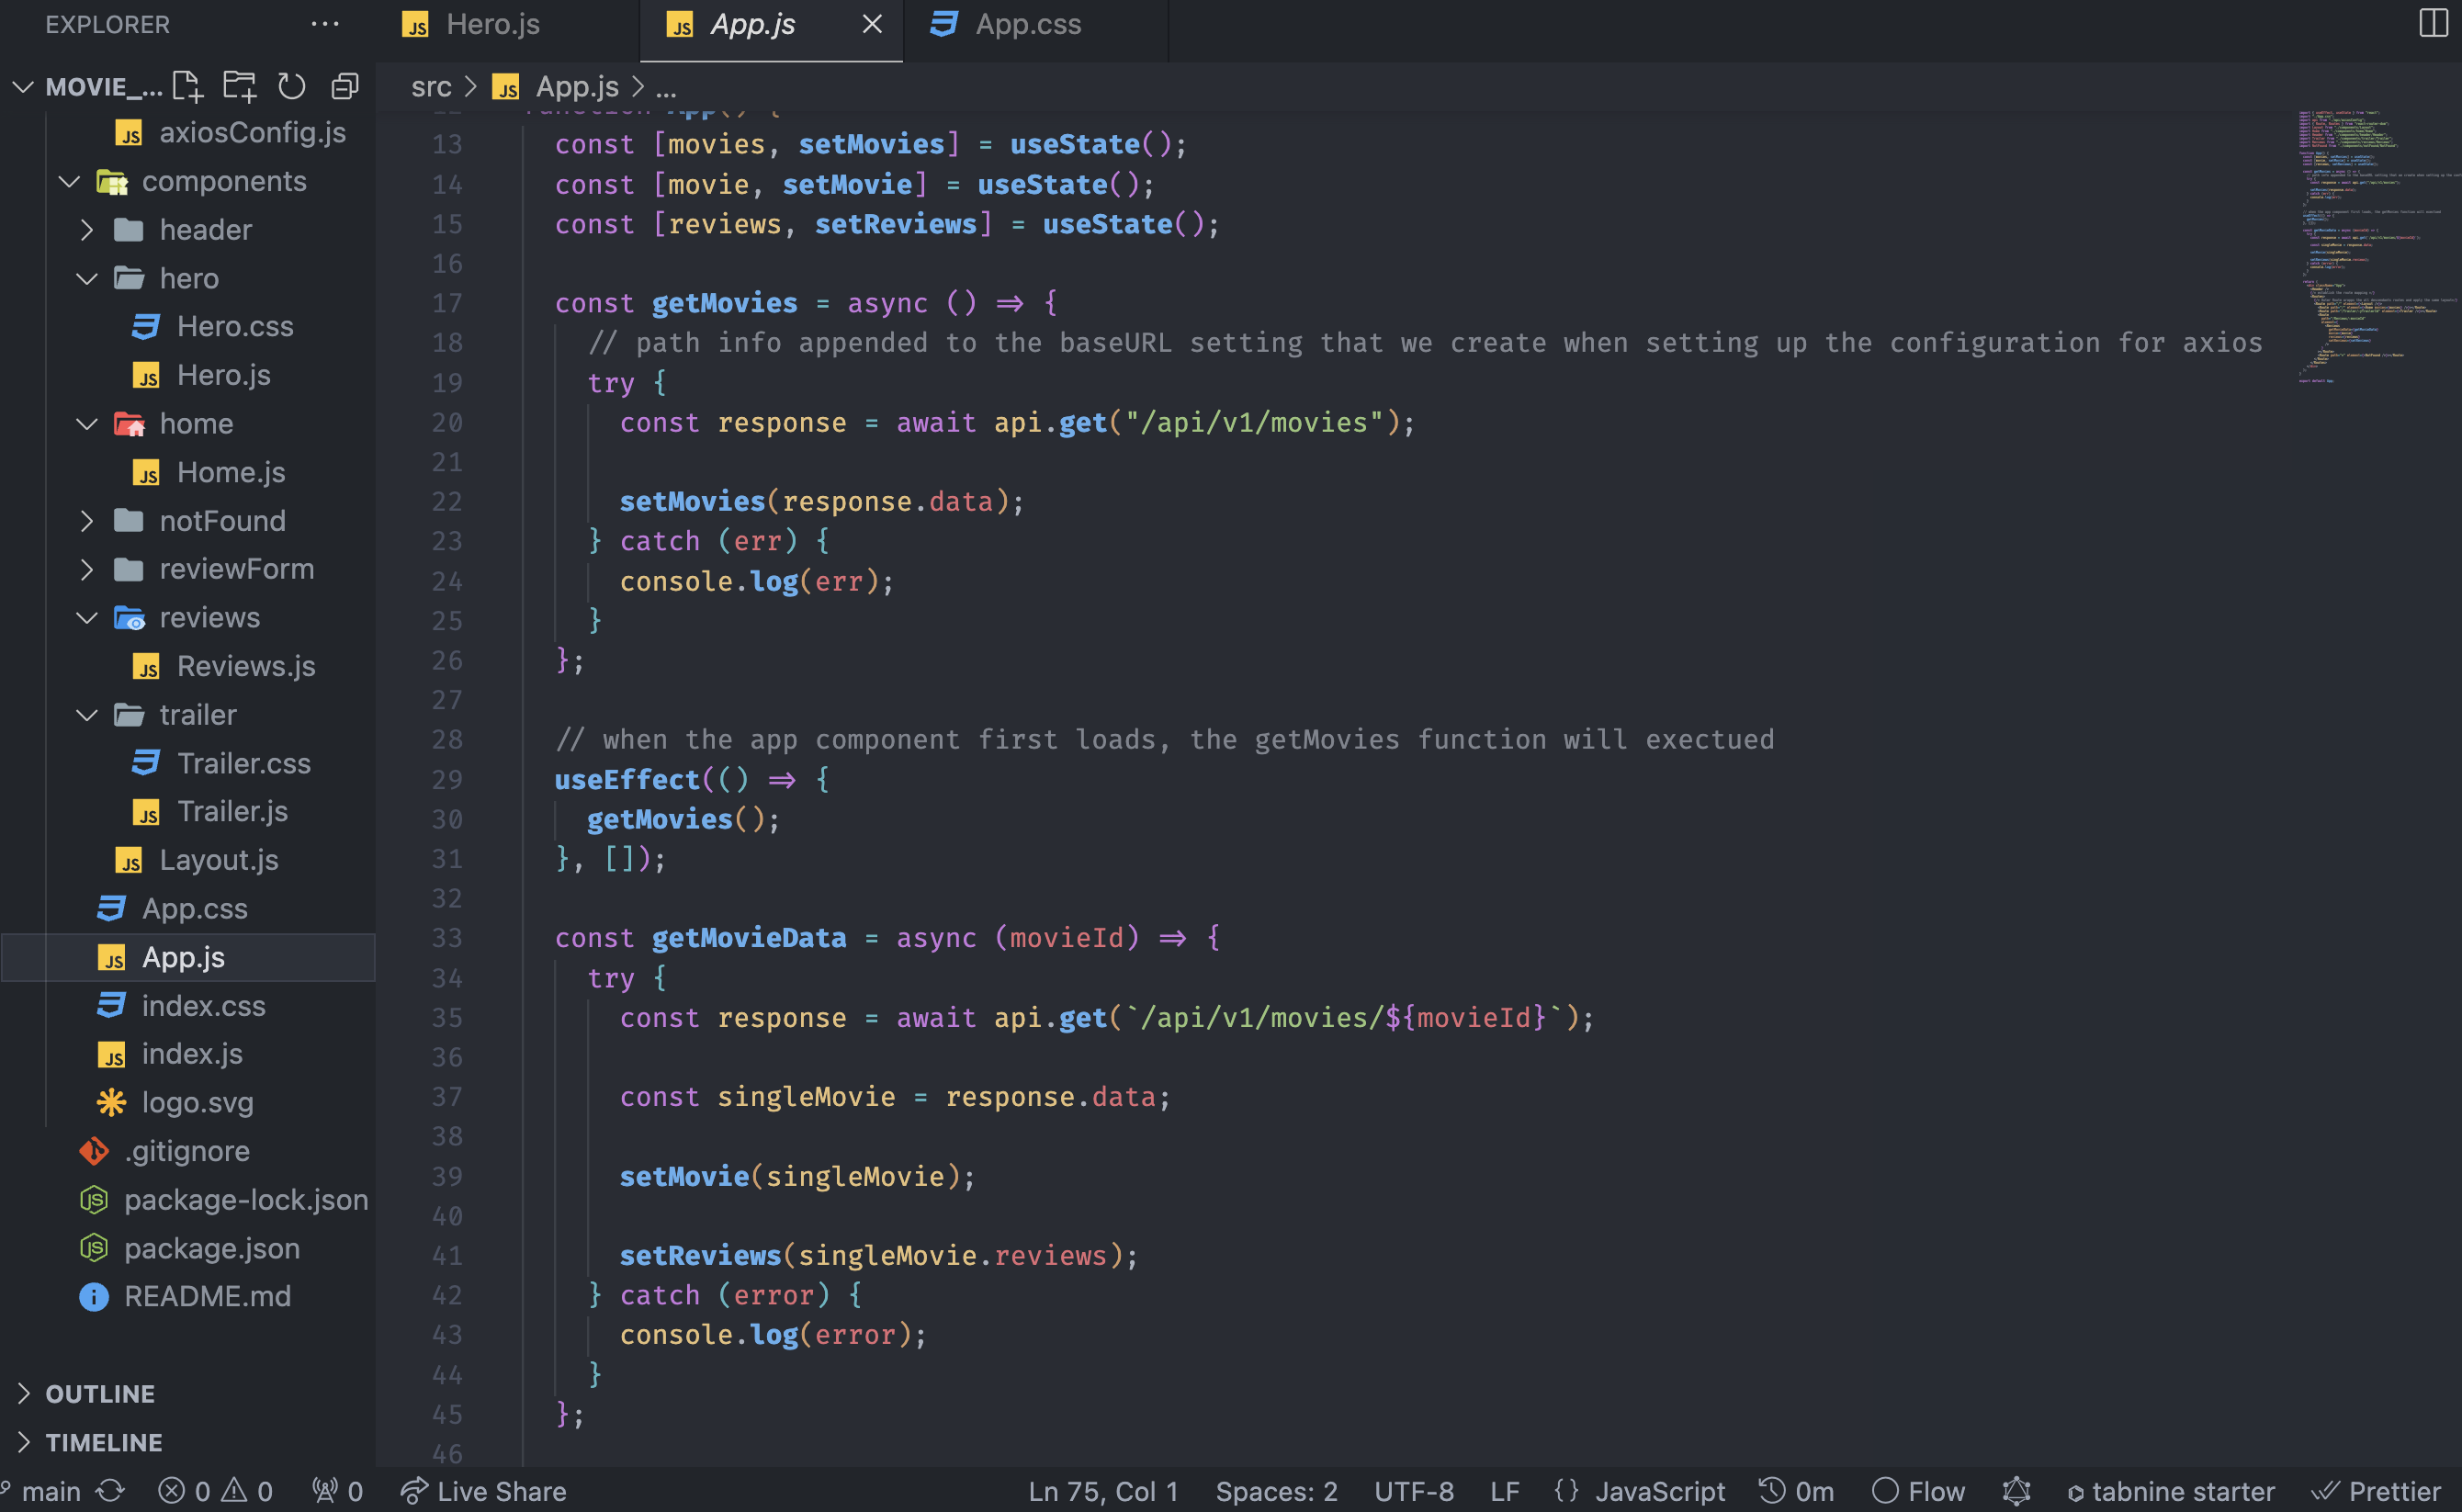
The application gets data from the backend endpoint and uses hooks to set the list of movies, a single movie, and the list of reviews.
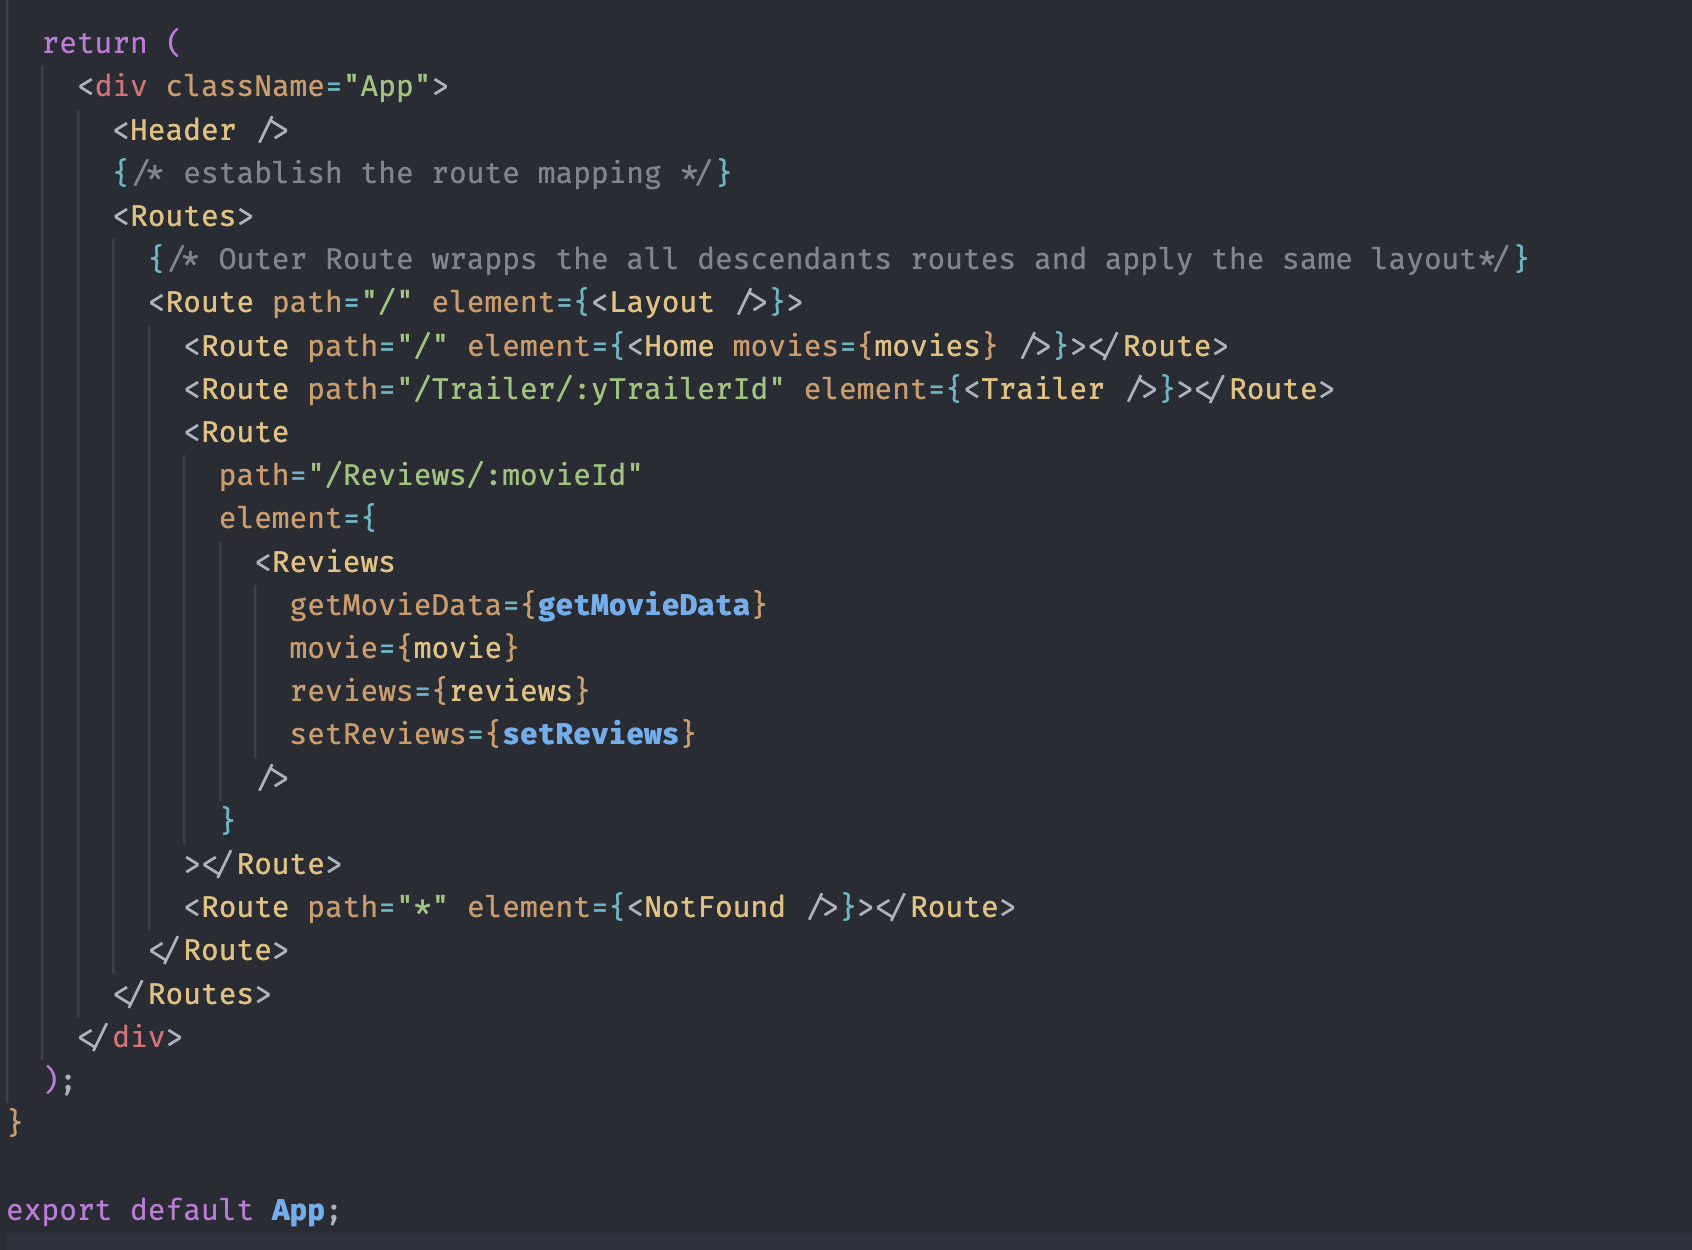
Then, it uses those values as a prop for each component.
Let’s look at the Reviews component since it is the core feature.
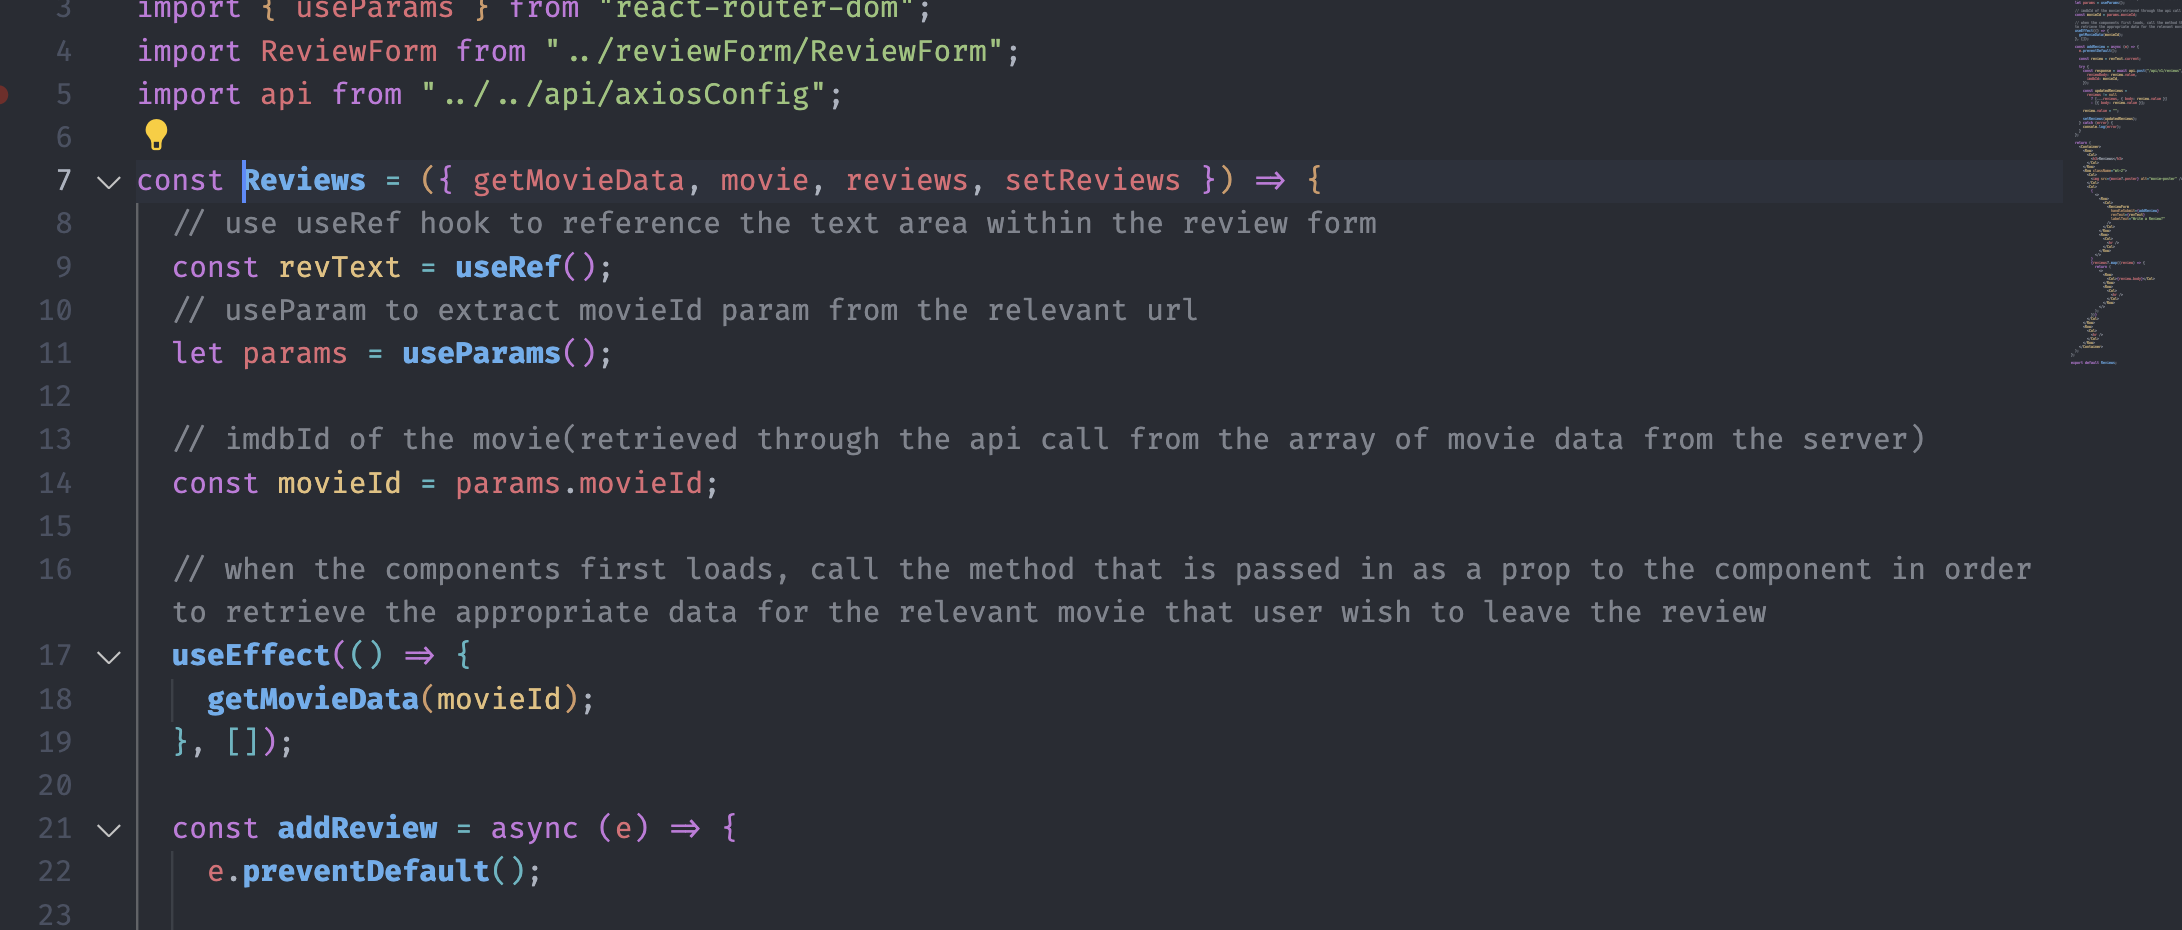
It gets four props from the App.js. When the user visits the review page(/Reviews/:movieId), the useEffect() hook fires with the getMovieData.
And if the user types the review, we have const revText = useRef(); to keep the text area data(review text), use useParams() to extract the movieId from the URL and save it to a variable.
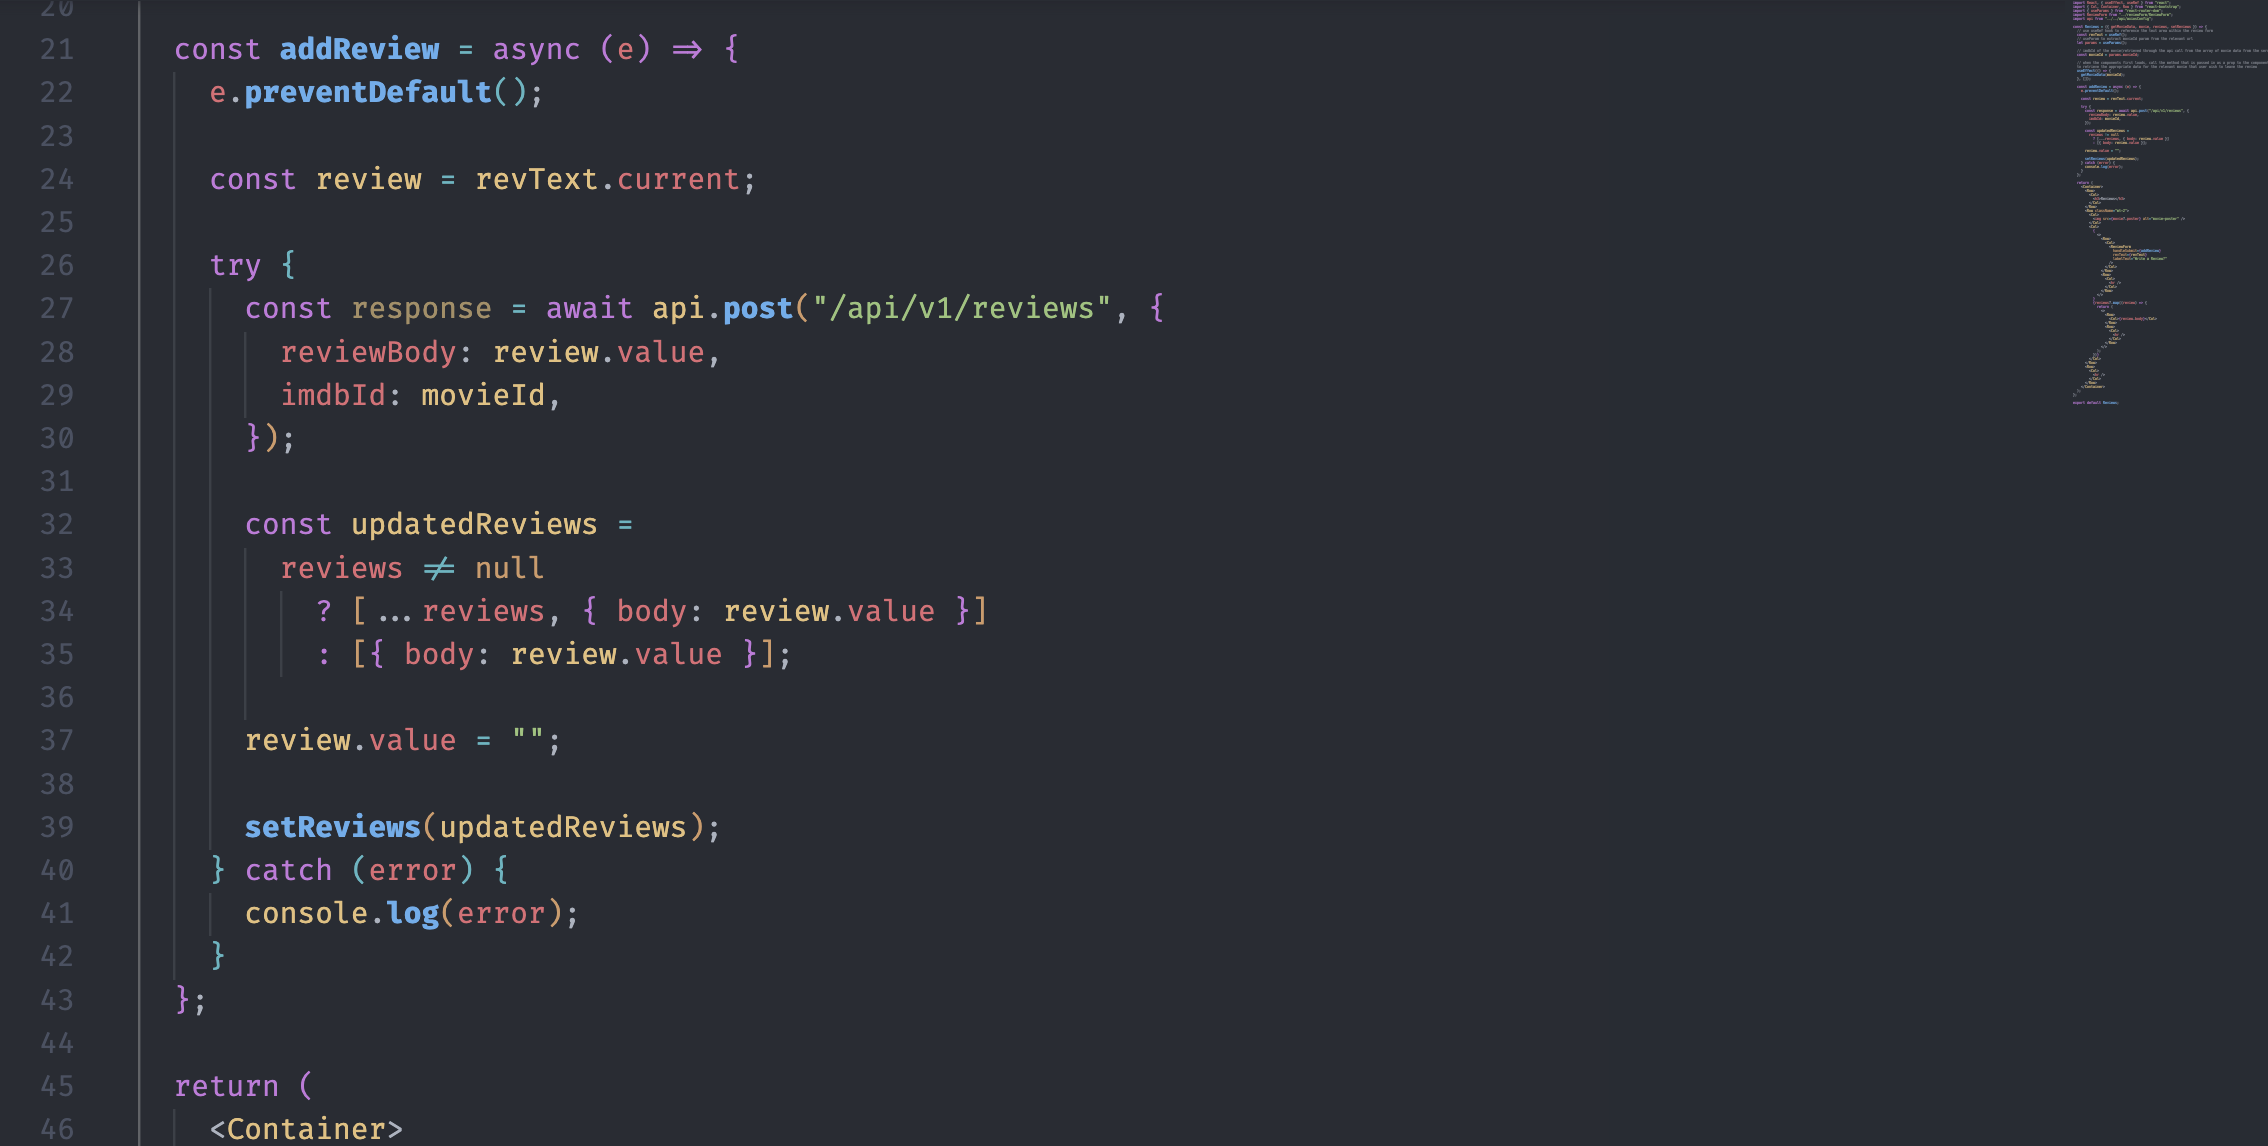
In the addReview function, we use the current reference from revText. After getting the data from the browser, we send the POST request to the backend.
A quick reminder: the
creatReview()class takes two values, which is the reviewBody and imbdId
The updatedReviews variable checks if the reviews prop from the App is not null and updates accordingly.
If the reviews is not null, it uses the existing data from the reviews and updates only the body with the review.value(which is the same as the reviewBody).
If the reviews is null, we simply add the body with the data.
Lastly, the setReviews() changes the current review with the updatedReviews.
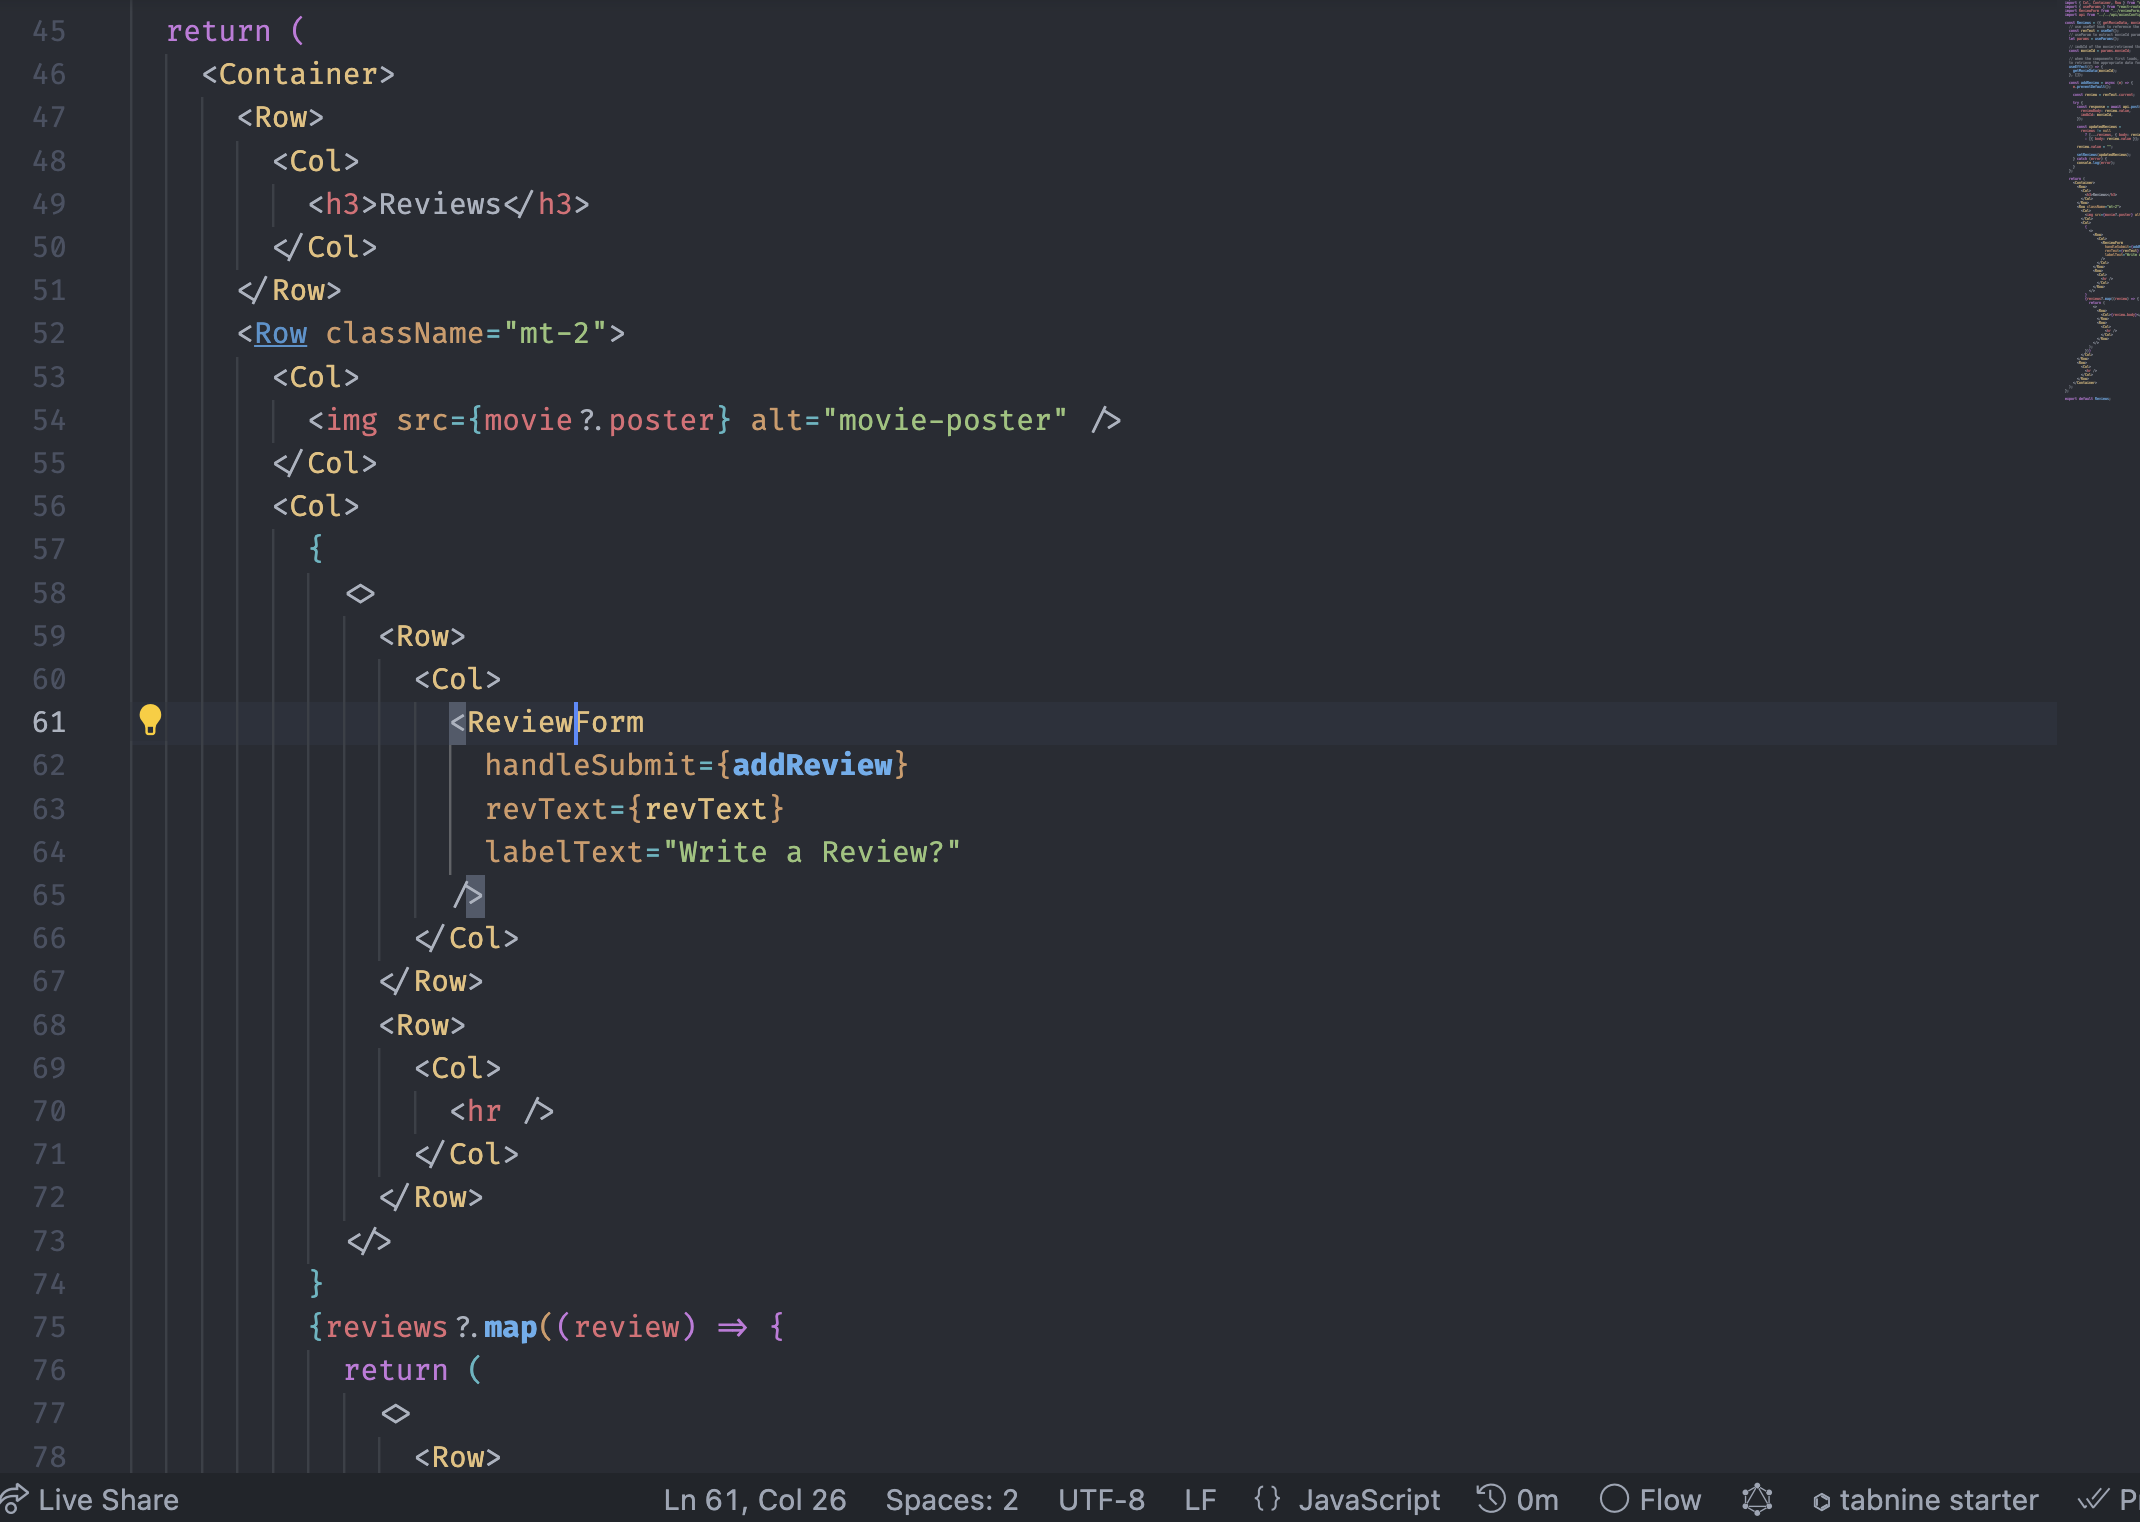
The event e comes from the form, and the ReviewForm component takes three props from here.
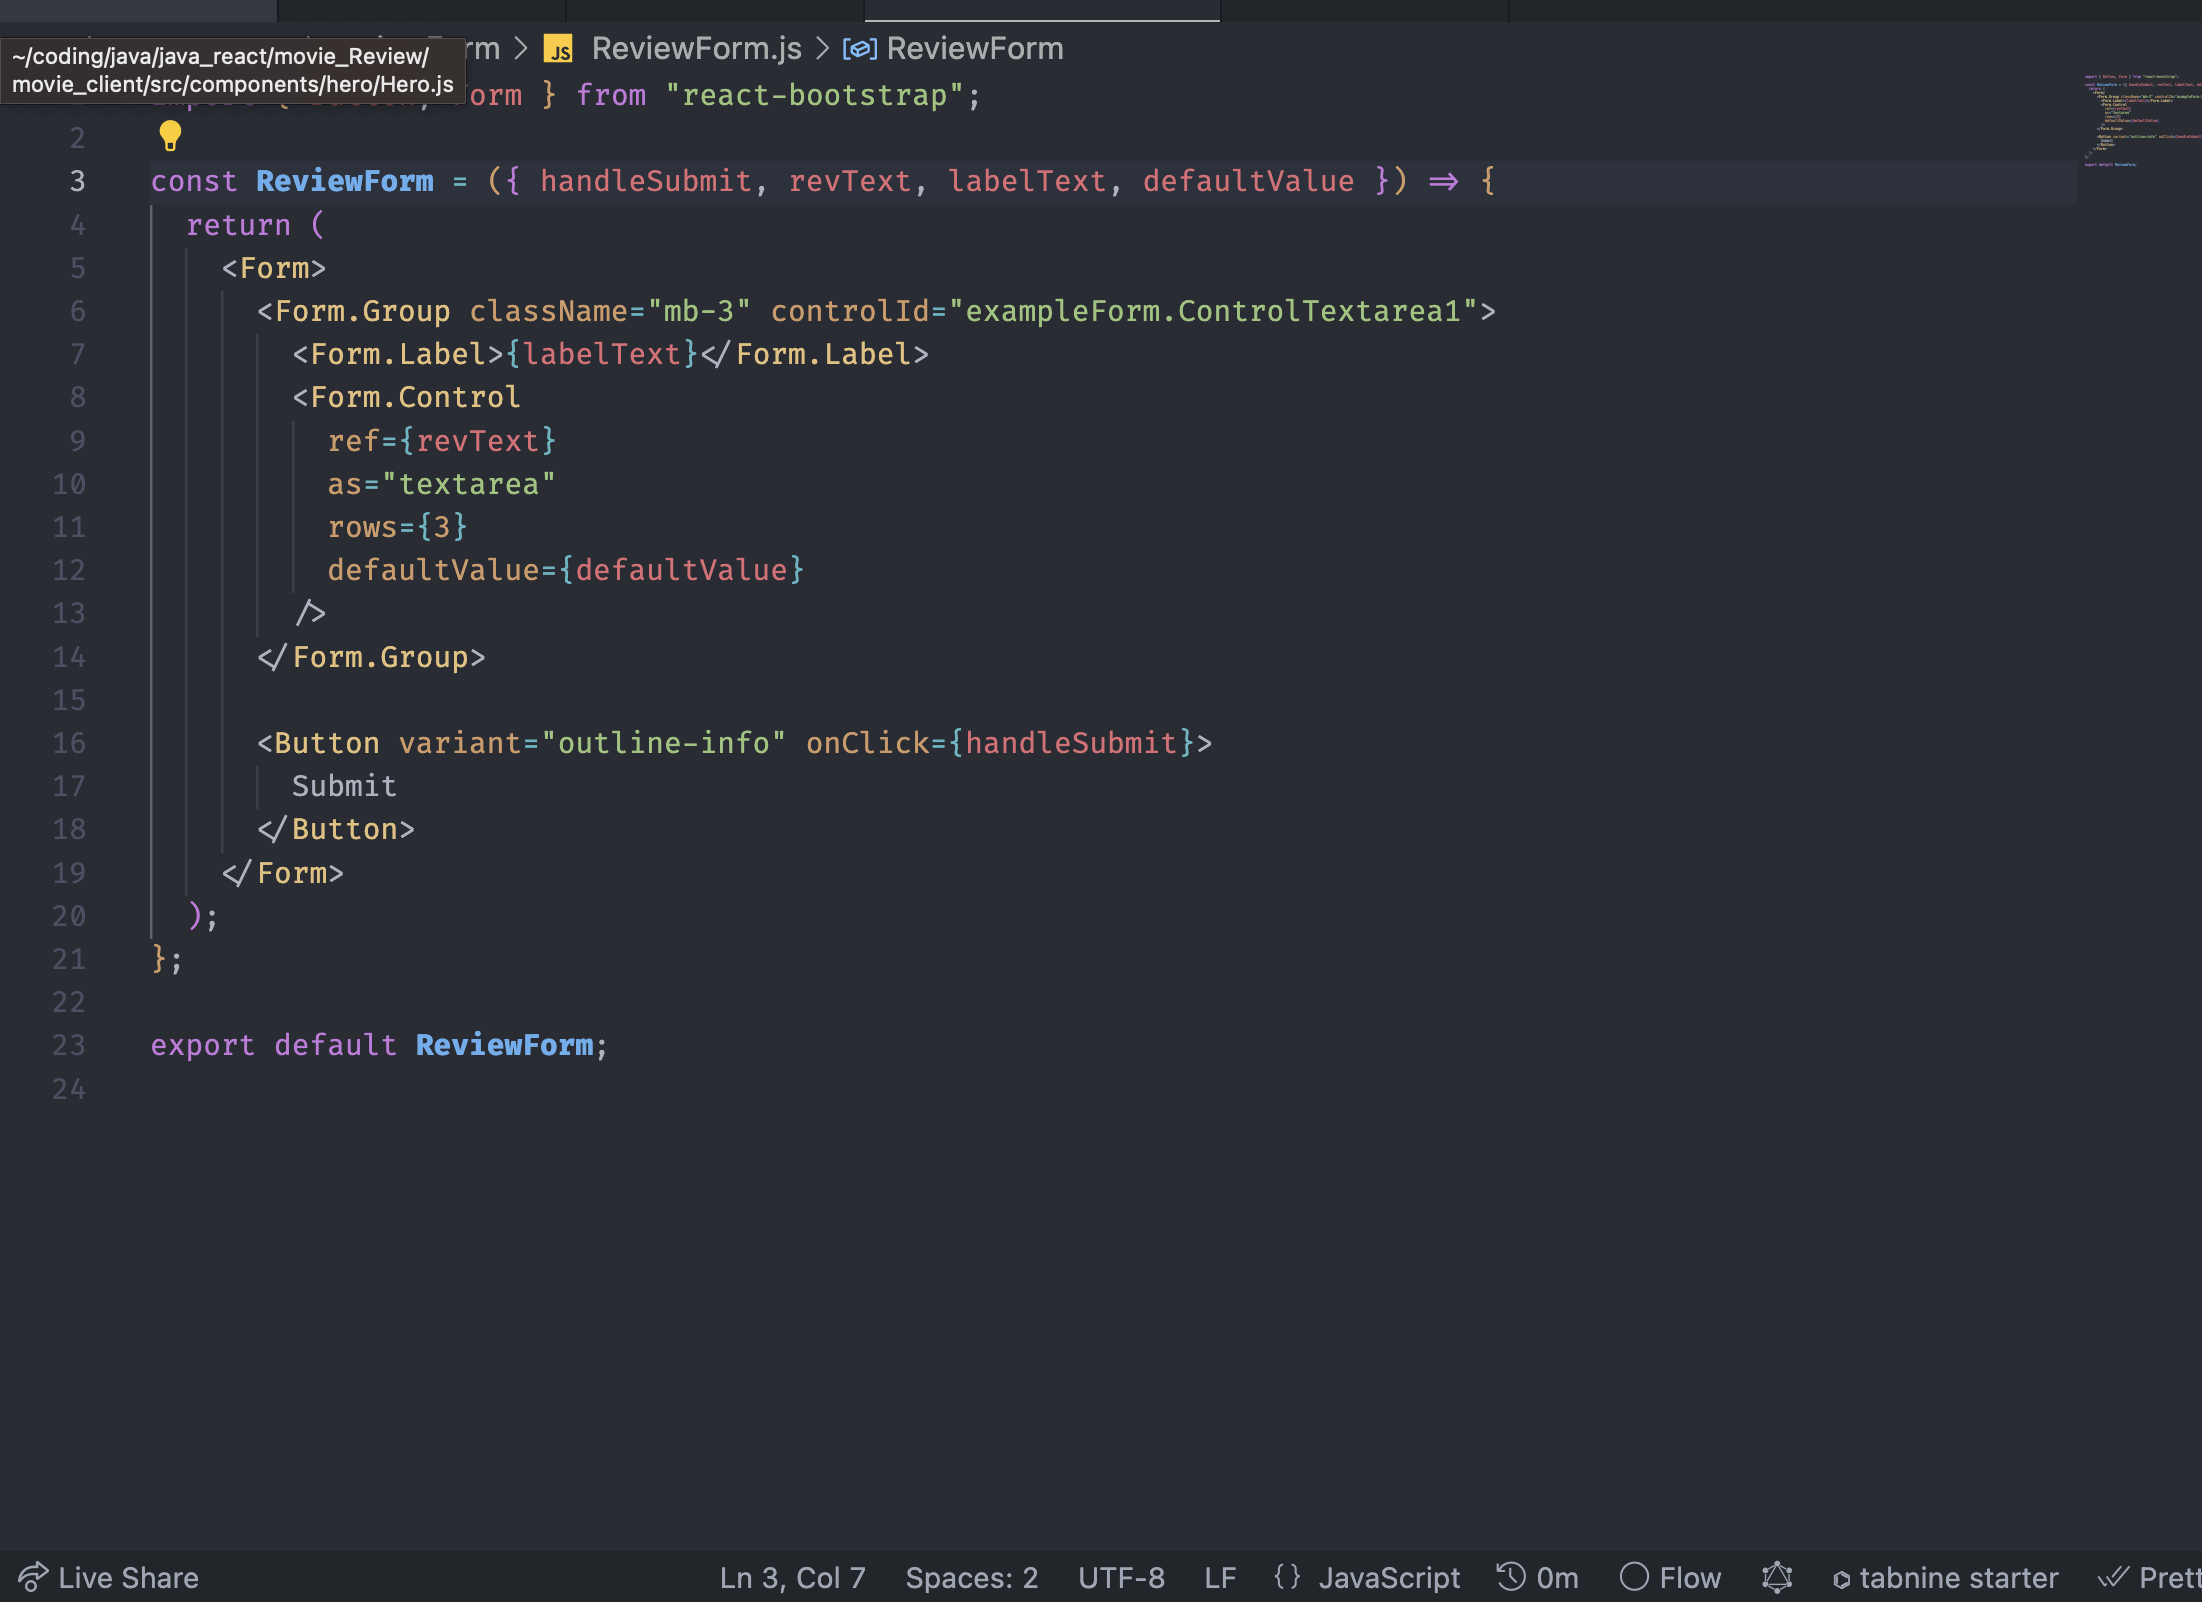
The react-bootstrap library controls the form. The Form.Control needs some props, and the ref comes from the Review component’s useRef() hook.
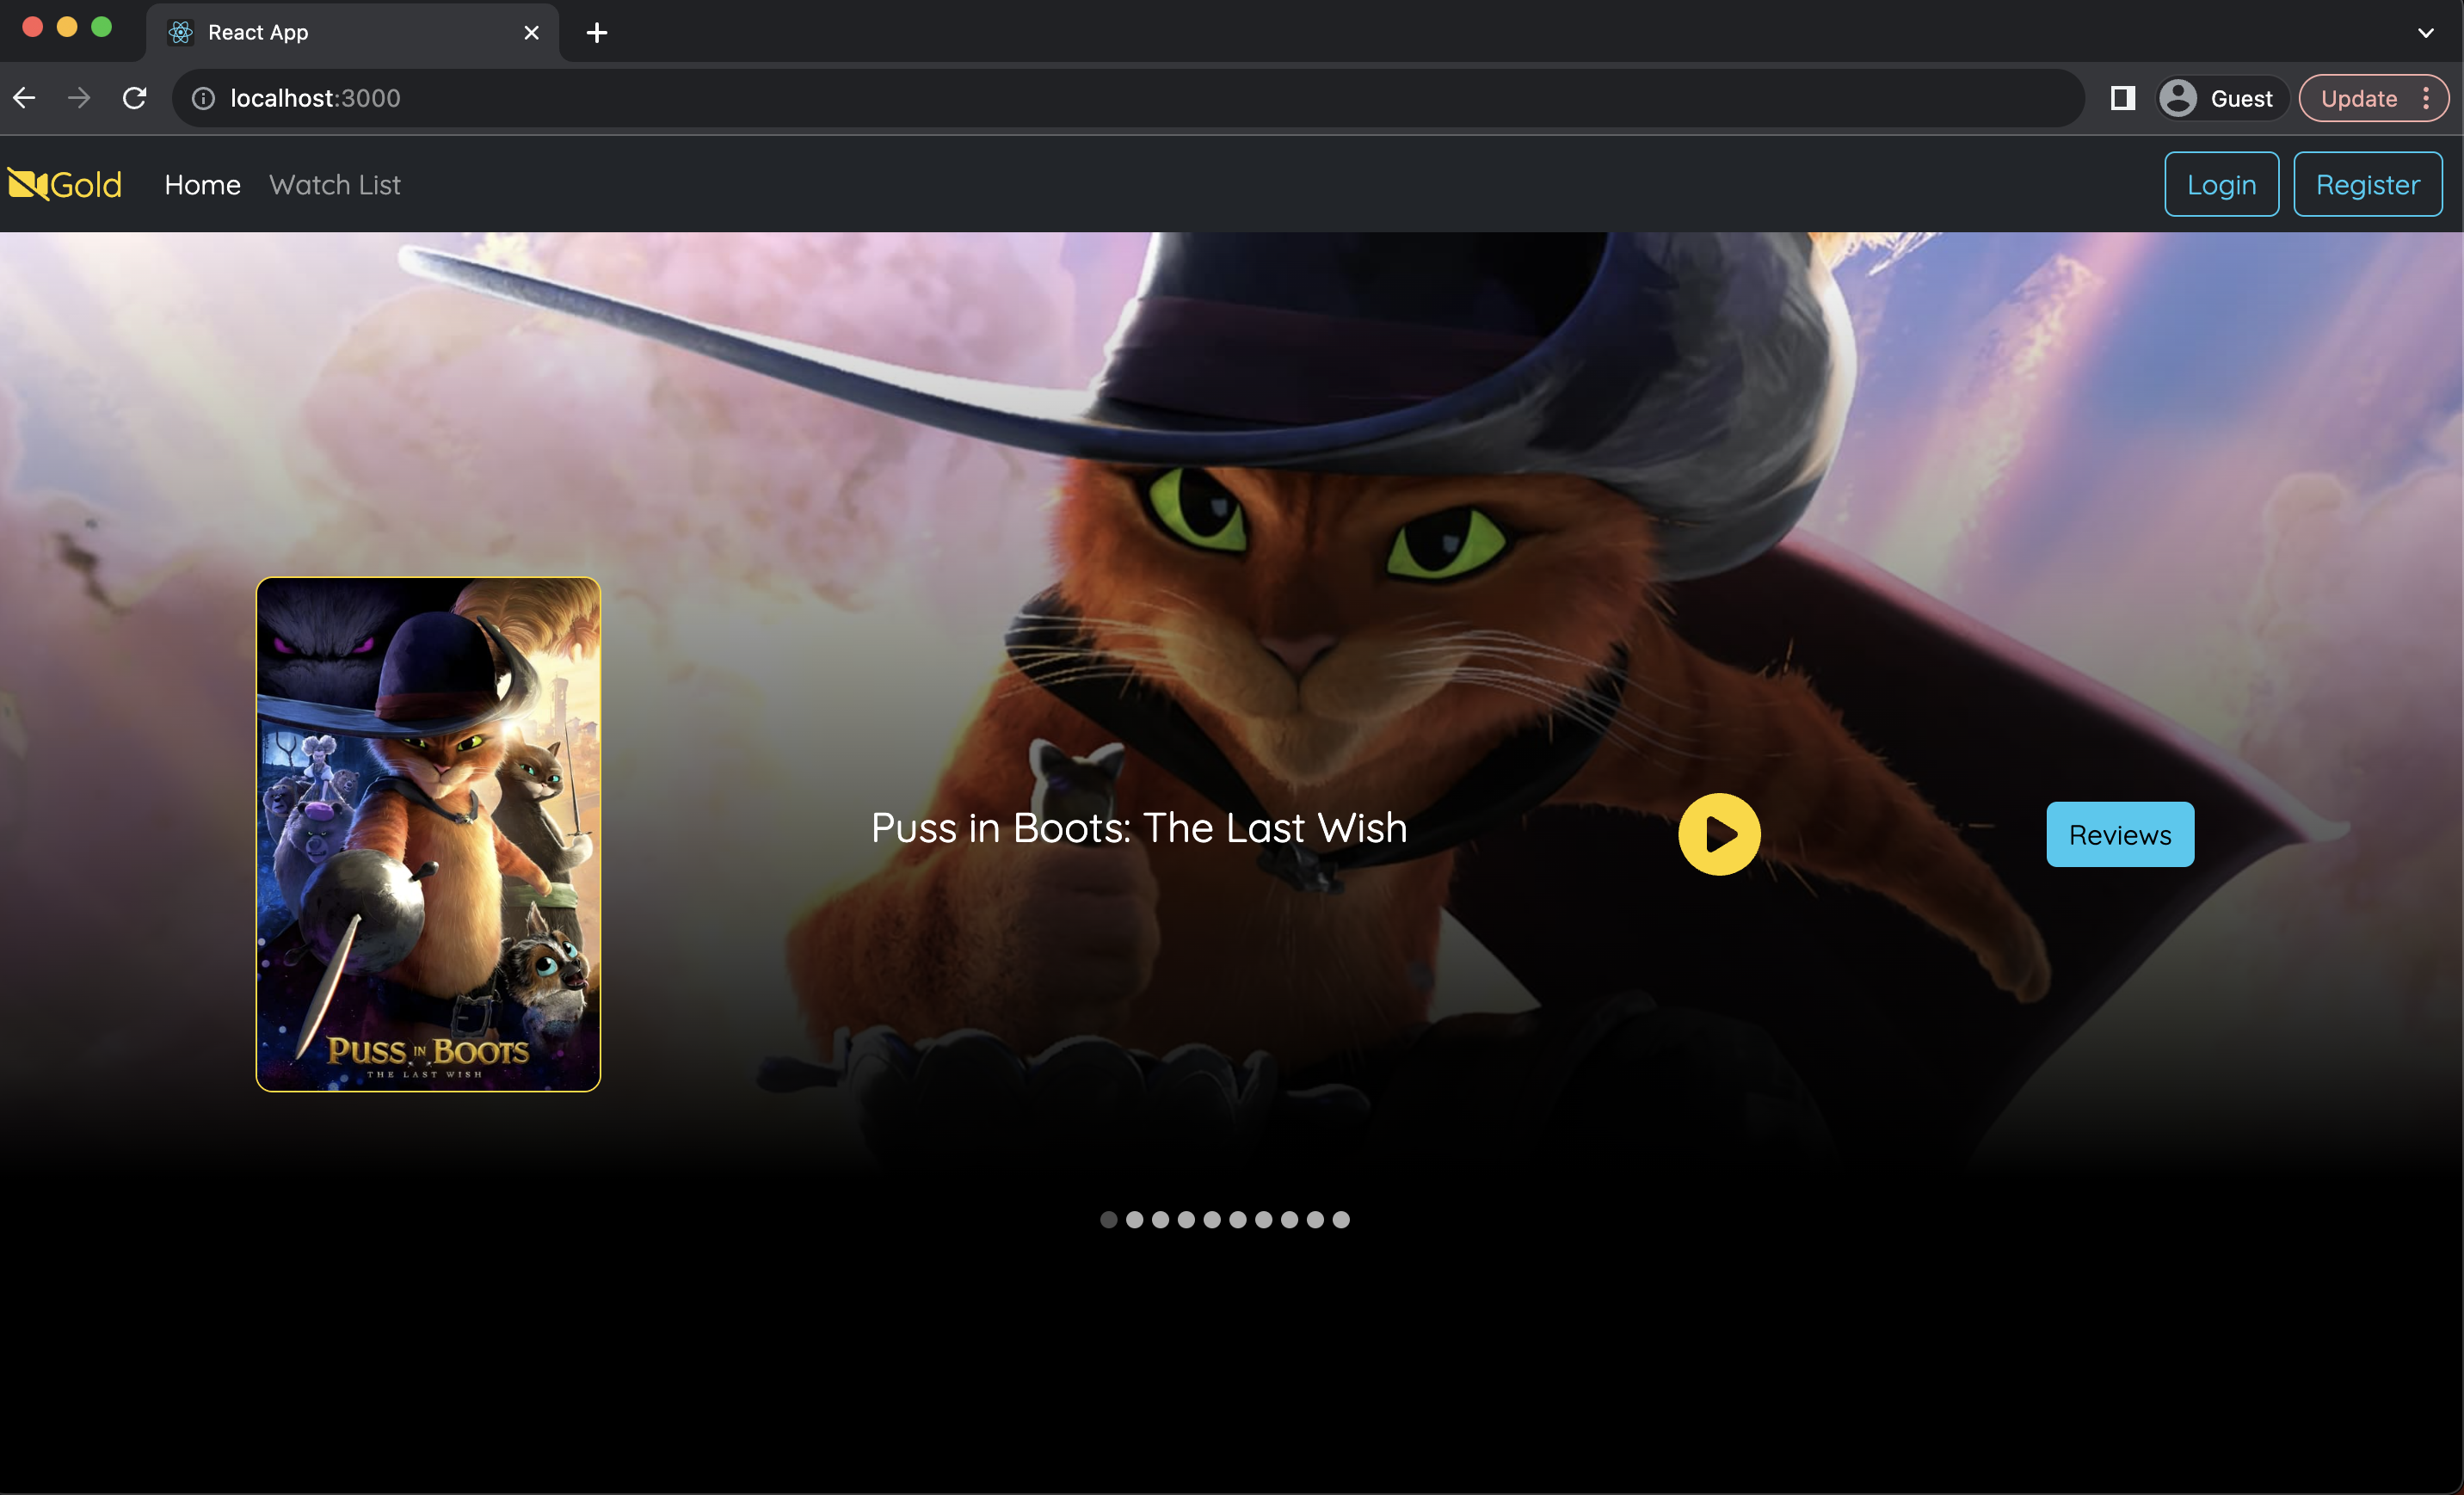
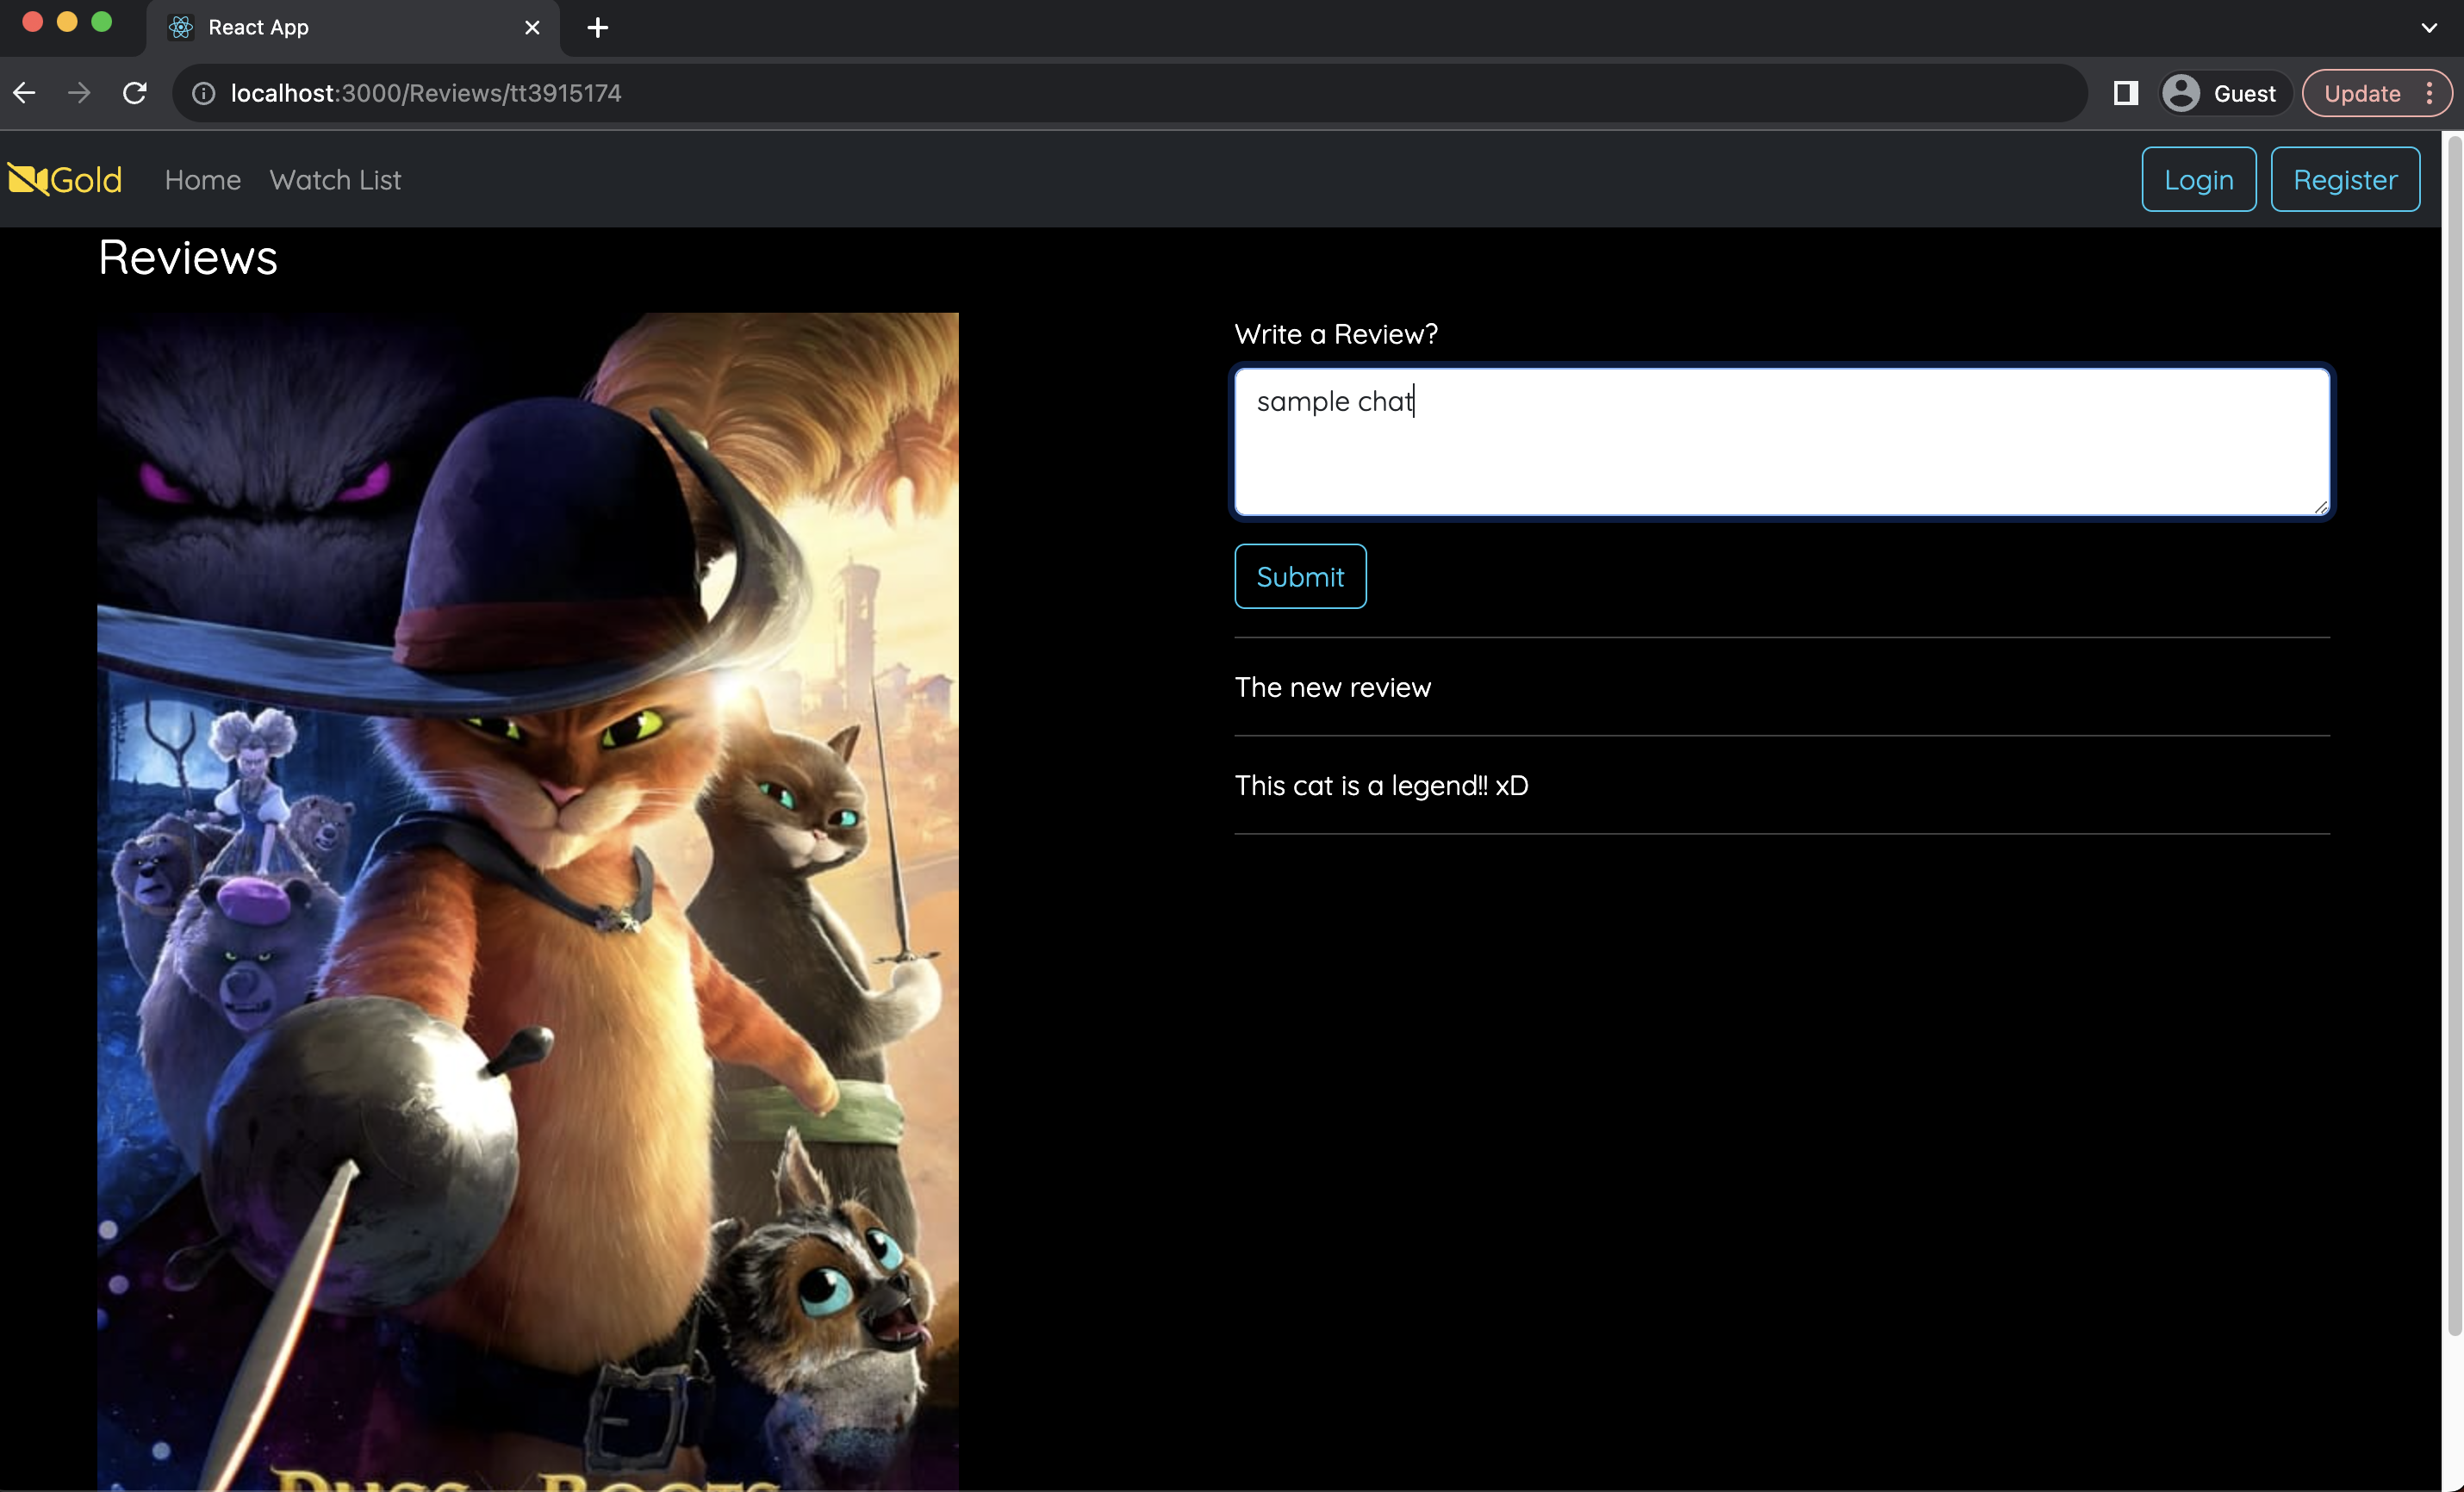
That is the basic logic for the Review part for the front-end. Below are two screenshots of some previews for the page.
-
The Sample landing page
-
The review page
You can find my code from the Repository
Comments