
[Java] TIL Java Spring Boot - Movie Review Site 002
Full Stack Development with Java Spring Boot, React, and MongoDB – Full Course
This is the course from freeCodeCamp to learn Java with react
You can find the video on YouTube here: https://youtu.be/5PdEmeopJVQ?si=uyg8MHc6LDpfd3kw
🧩 Problem
Spring setup
Now, let’s initialize the spring project. Go to start.spring.io, and select Maven project. Choose the language you wish to use and the corresponding Spring Boot version.
Maven is a build automation tool used primarily for Java projects
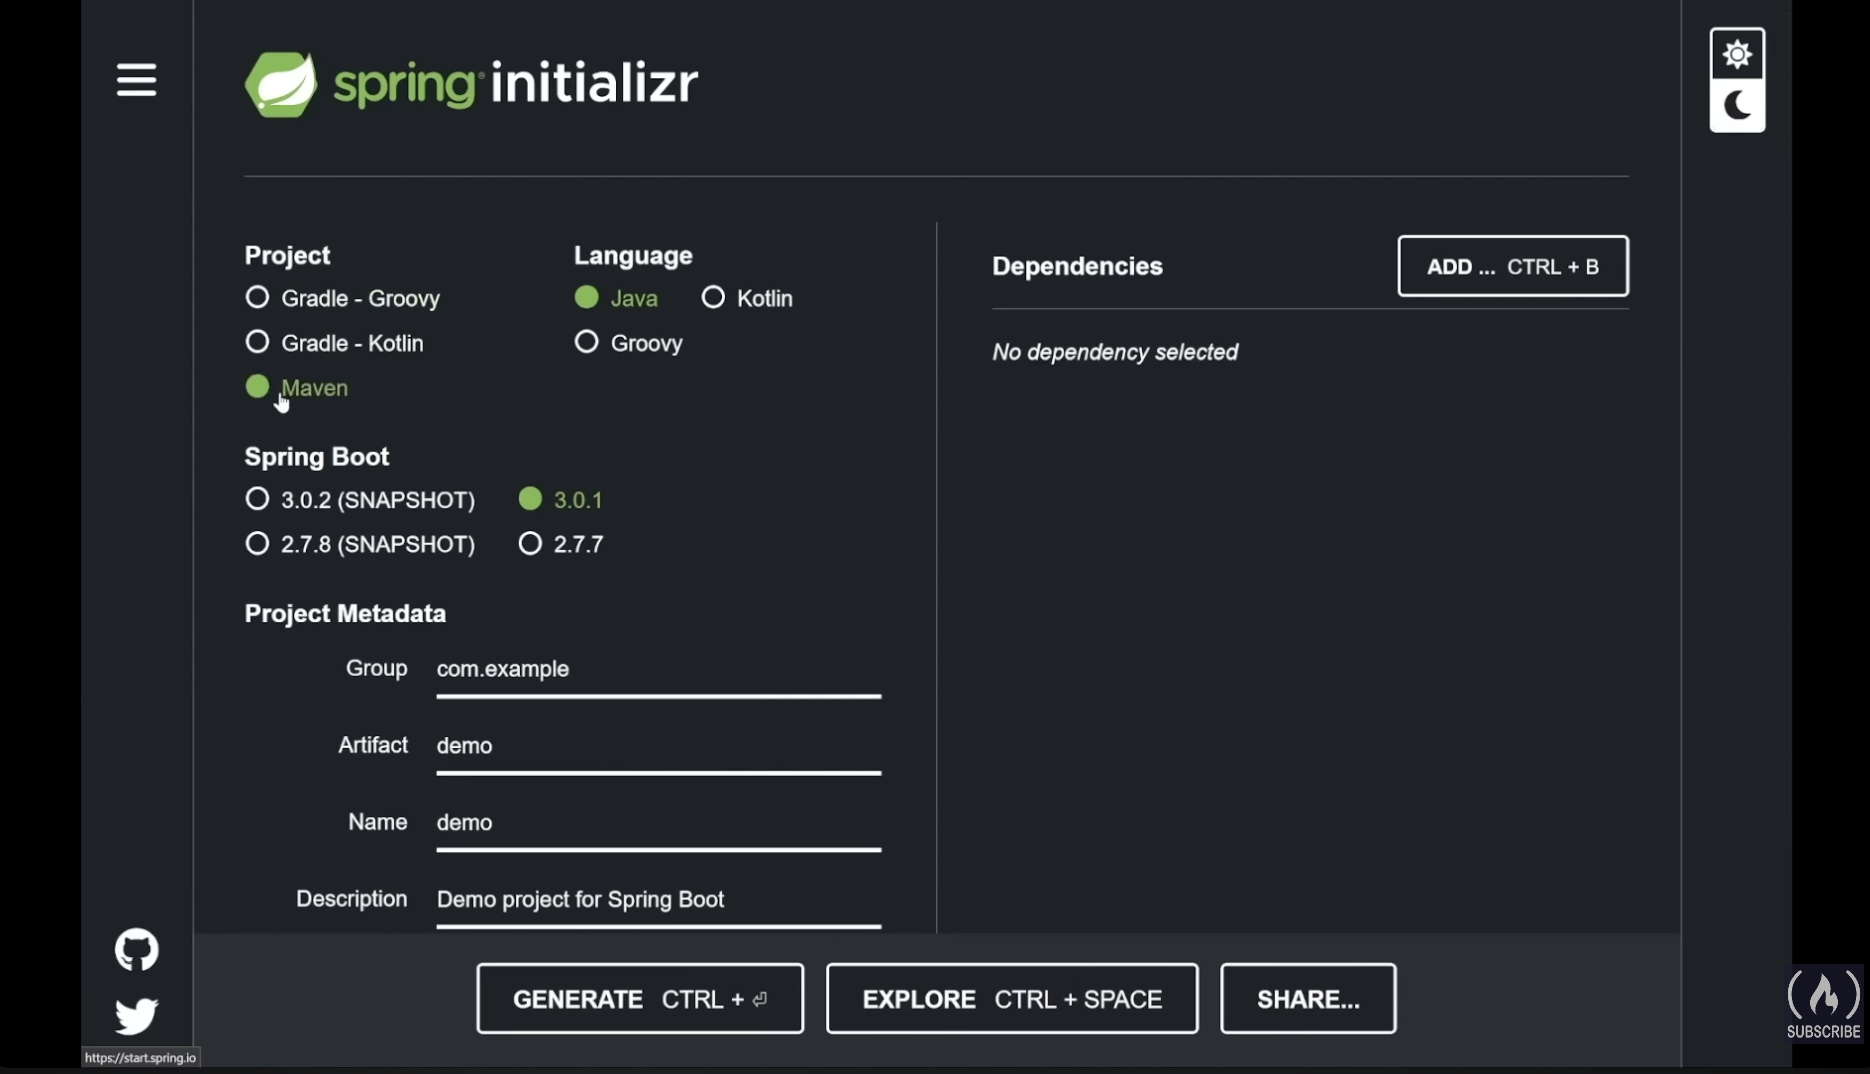
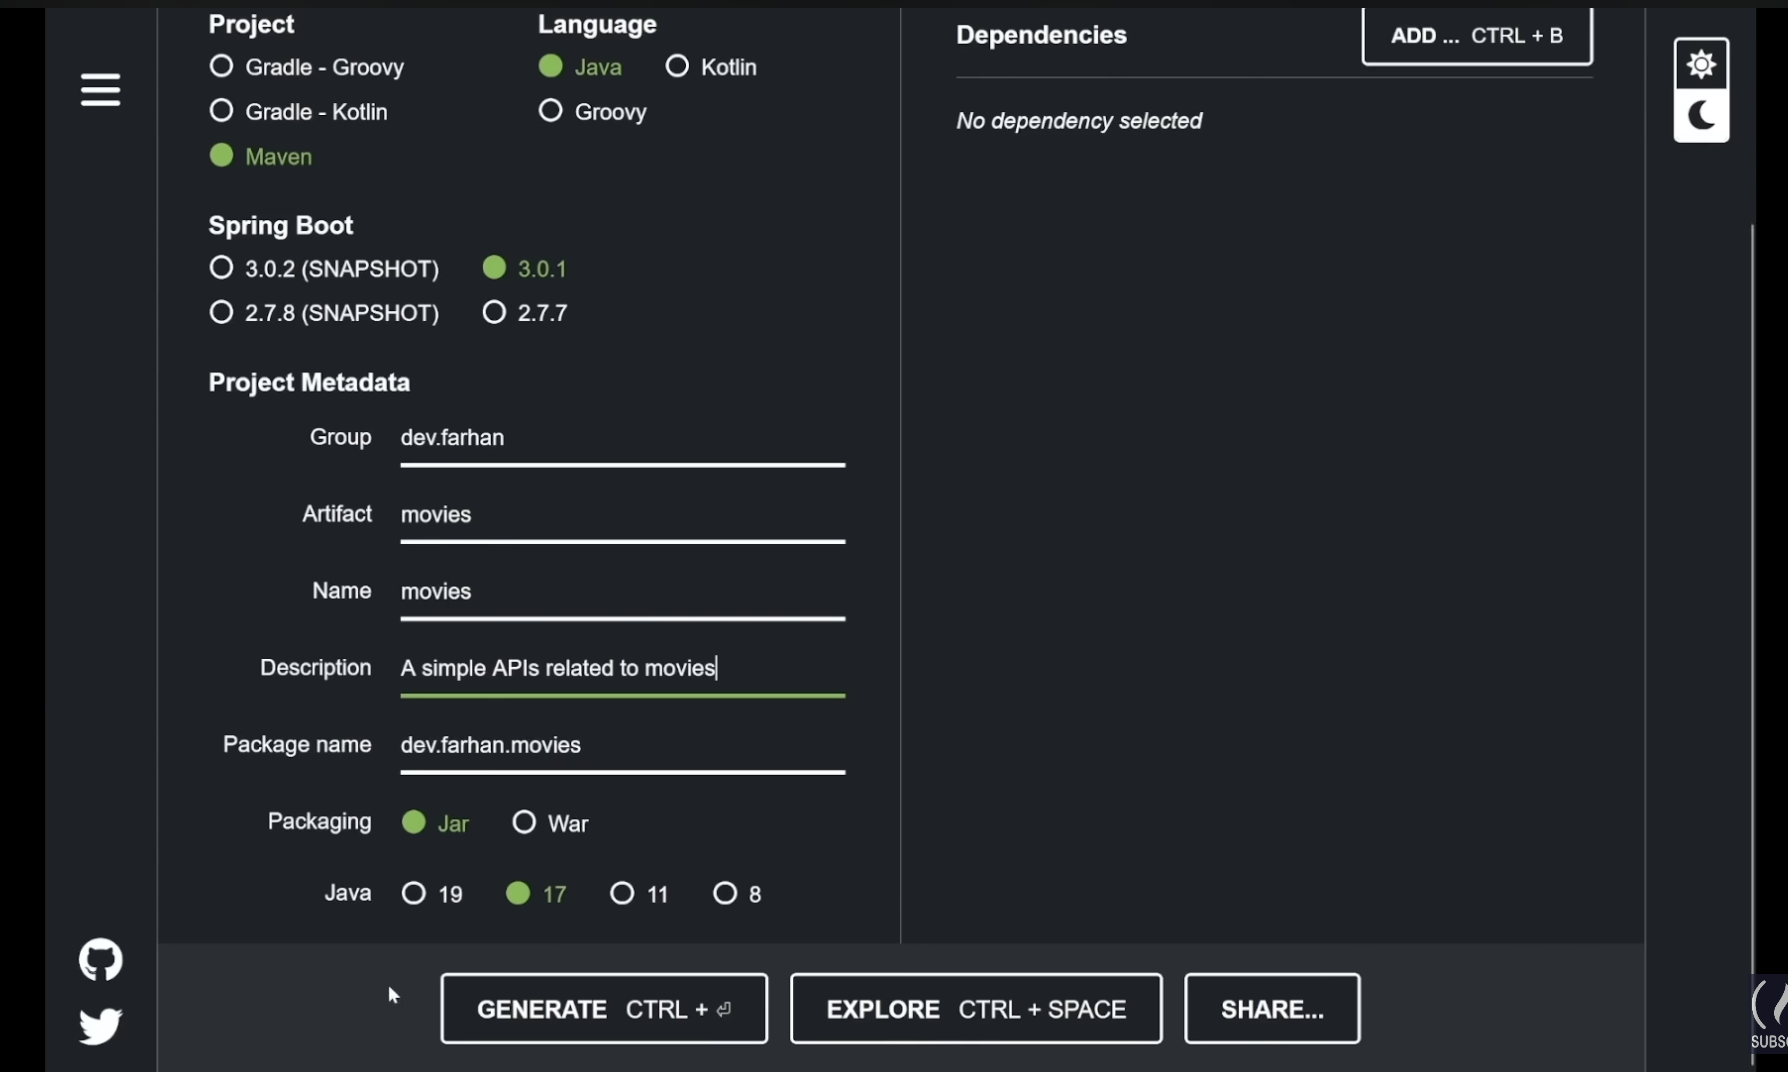
The group is the reversed domain format. If you have your domain address, use it here, or you can name any domain name as long as that domain is not taken.
Artifact is the project’s name, and type the description for your project.
JAR stands for Java Archive. JAR files contain libraries, resources and accessories like property files. It is widely used for packaging and distributing standalone Java applications.
WAR stands for Web Application Archive and is used for web applications. Since it contains web applications like JSP, HTML and Javascript, it can be deployed on any servelt/JSP container.
JAR is more commonly used for Spring Boot projects, and the instructor used it for that reason.
Select the corresponding Java version that you installed previously.
Dependencies and Generate
Unlike VScode, we will install dependencies in this page and add up if needed.
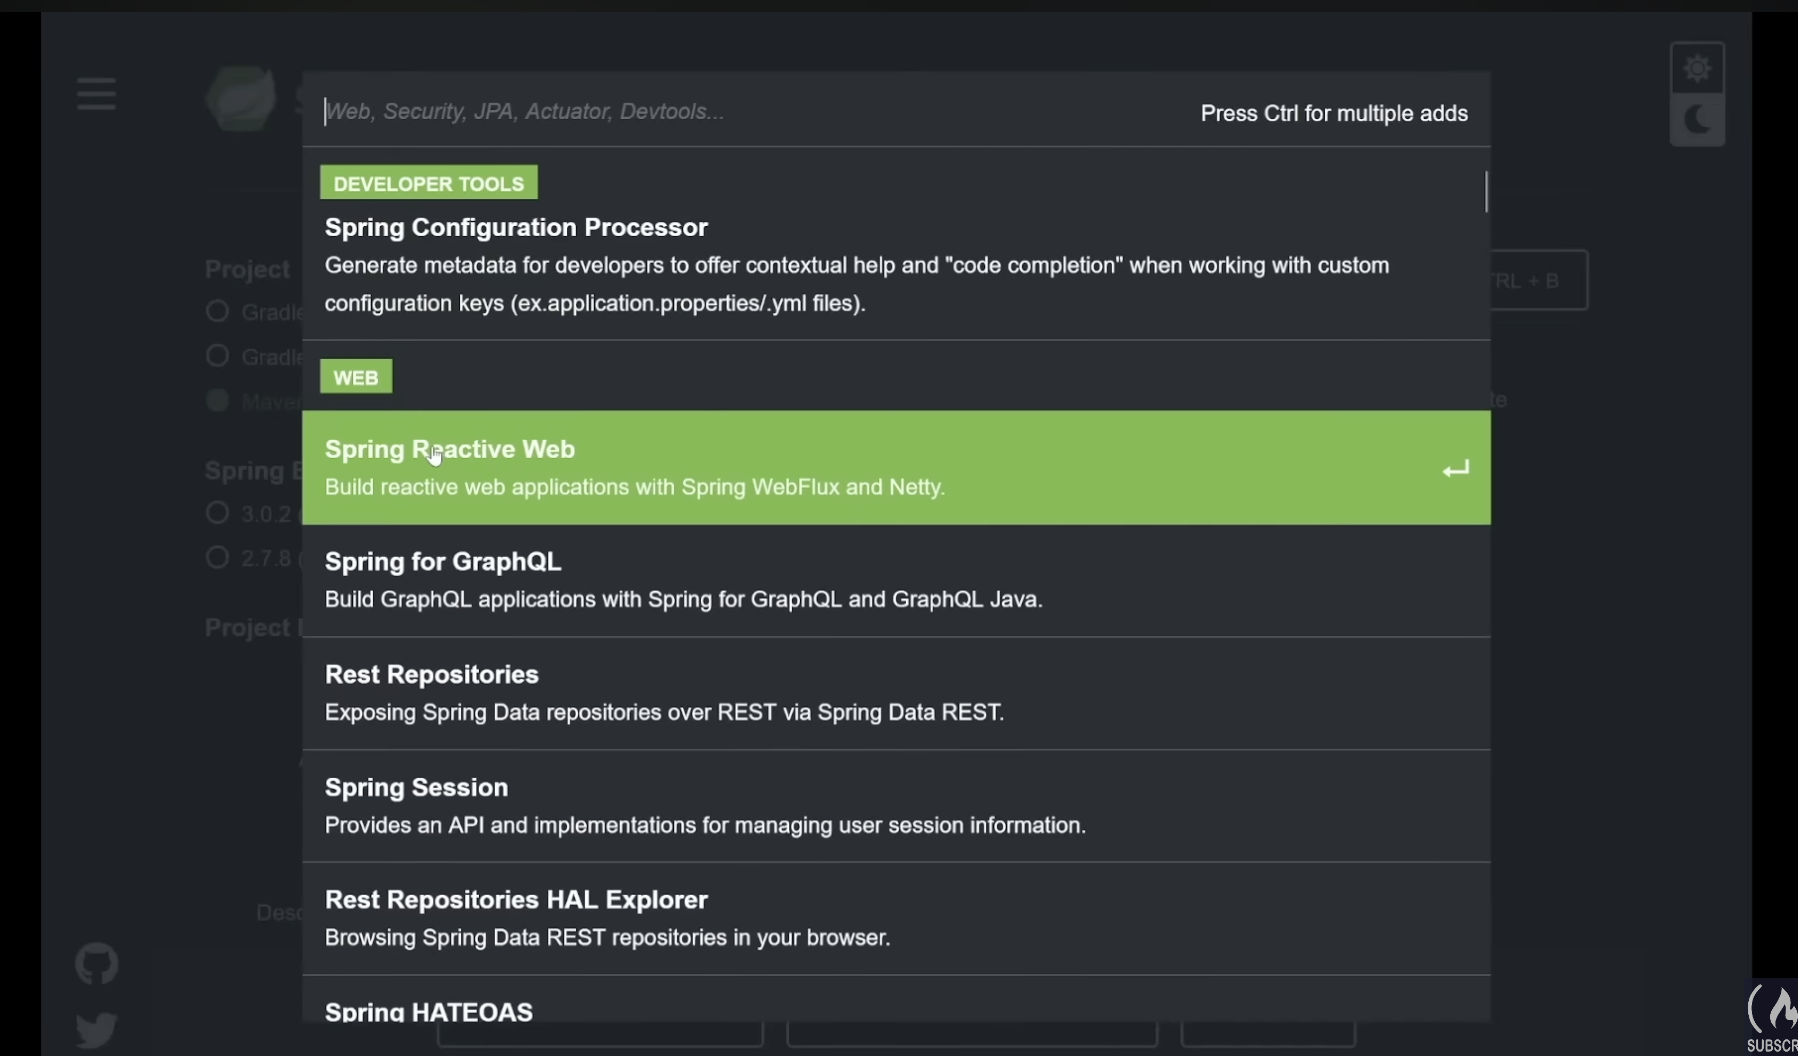
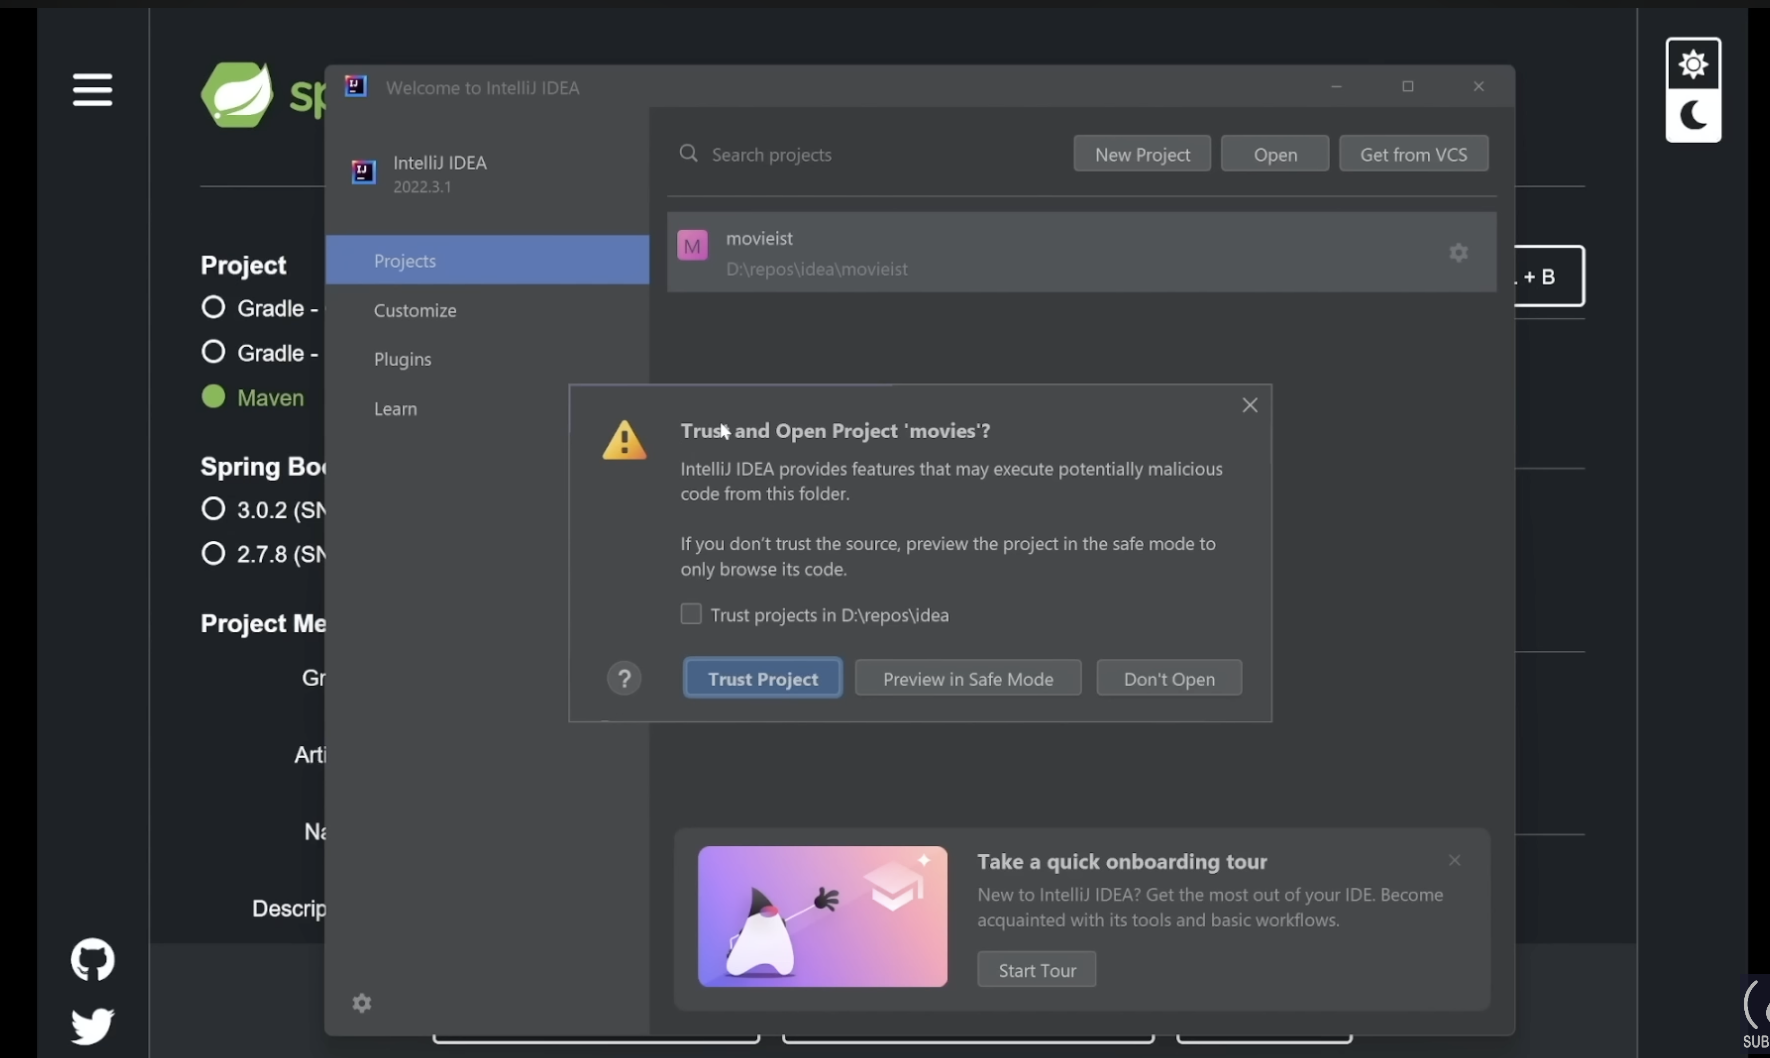
After adding the required dependencies, click the generate. Once the initializer generates the file, open the IntelliJ IDEA and the file we generated. (Click the Trust Project)
Folder and Basic file structure
It is similar to React, but let’s briefly skim through the folder structure.
Maven manages the .mvn folder, and we will not touch it in this project.
The src folder or source folder contains main and test.
The main folder is where all the logic and algorithms lie. The test folder is where the developer writes the testing codes. The instructor did not write the testing code because of the course difficulty.
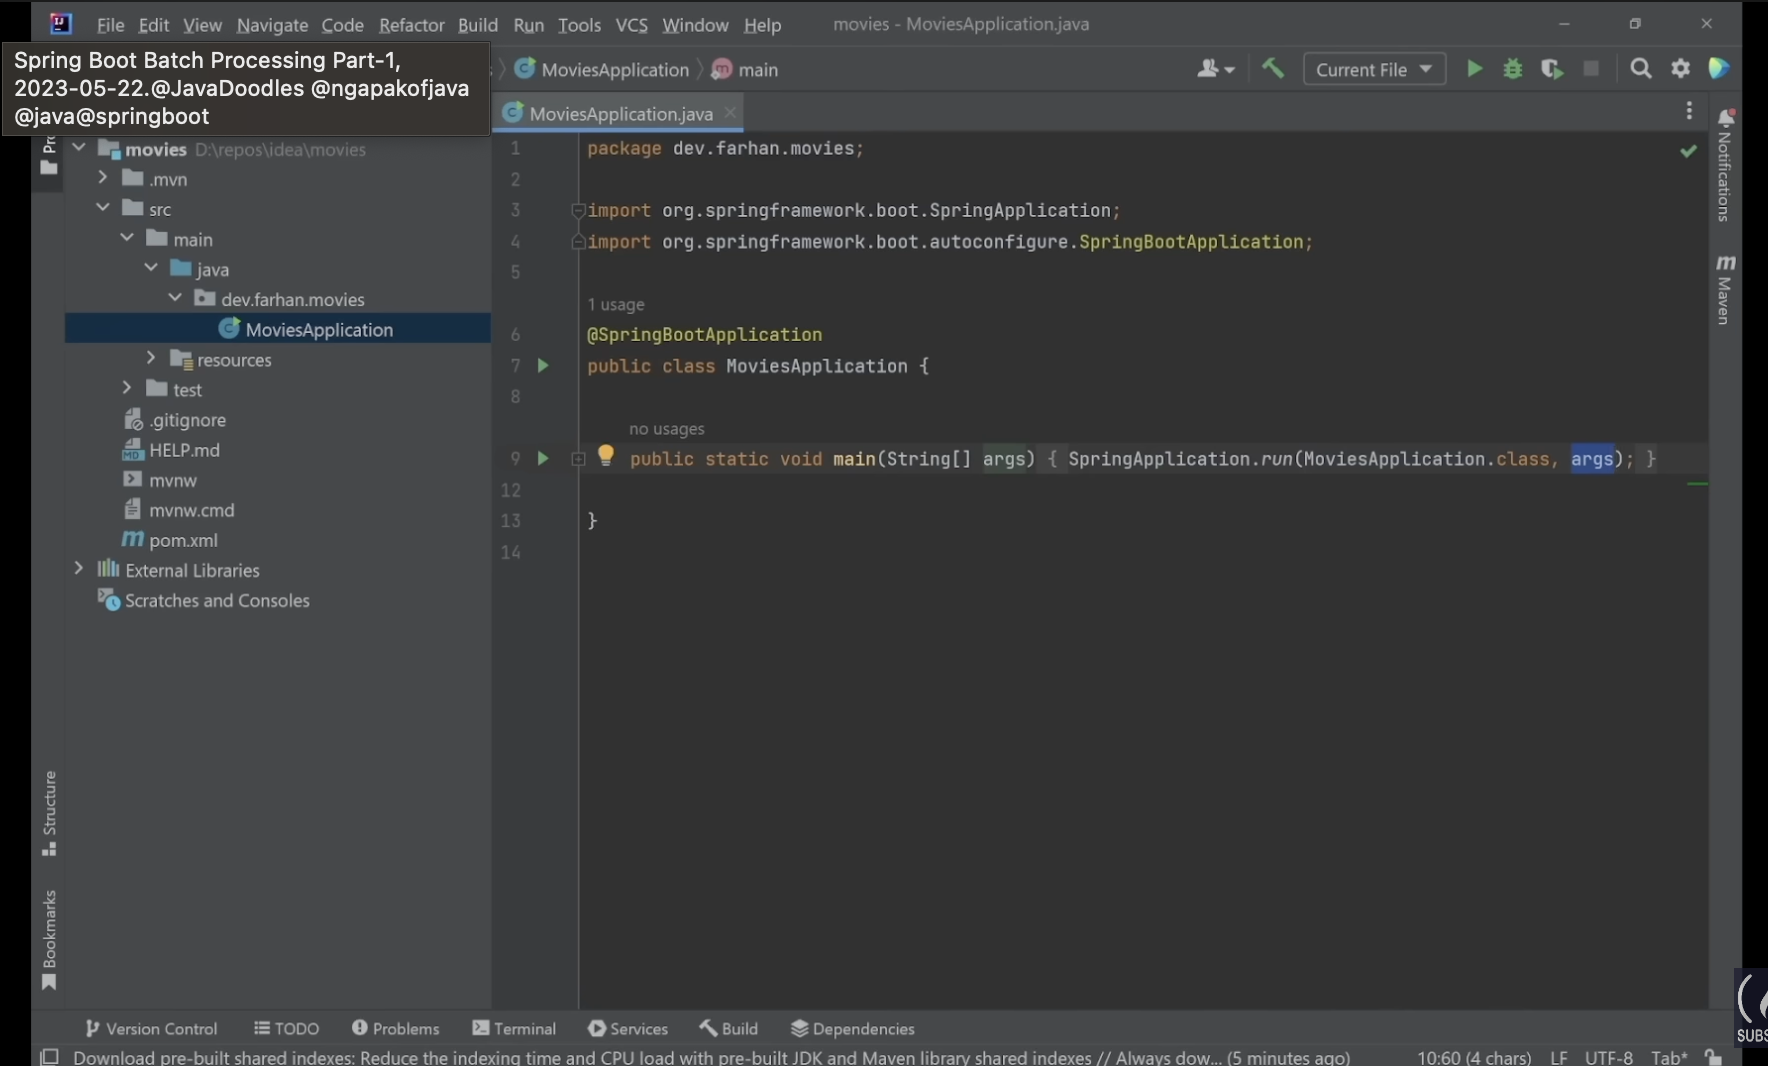
Inside of MoviesApplication, it contains about ten lines of codes, and I’ll skim these codes.
The first line, package - declares a self-explanatory package.
The next part is the import - part. SpringApplication has the method .run().
To start the spring application, we have to call the .run() method and, pass the application class(MoviesApplication) and pass some command line arguments(args).
public static void main(String[] args) {
	SpringApplication.run(MoviesApplication.class, args)
}
The second import statement is importing the SpringBootApplication annotation.
In Java, annotations are used to let the compiler know what this class does.
Run Java file
Let’s run this code to see if we have anything on the browser by ctrl + R for Mac users.
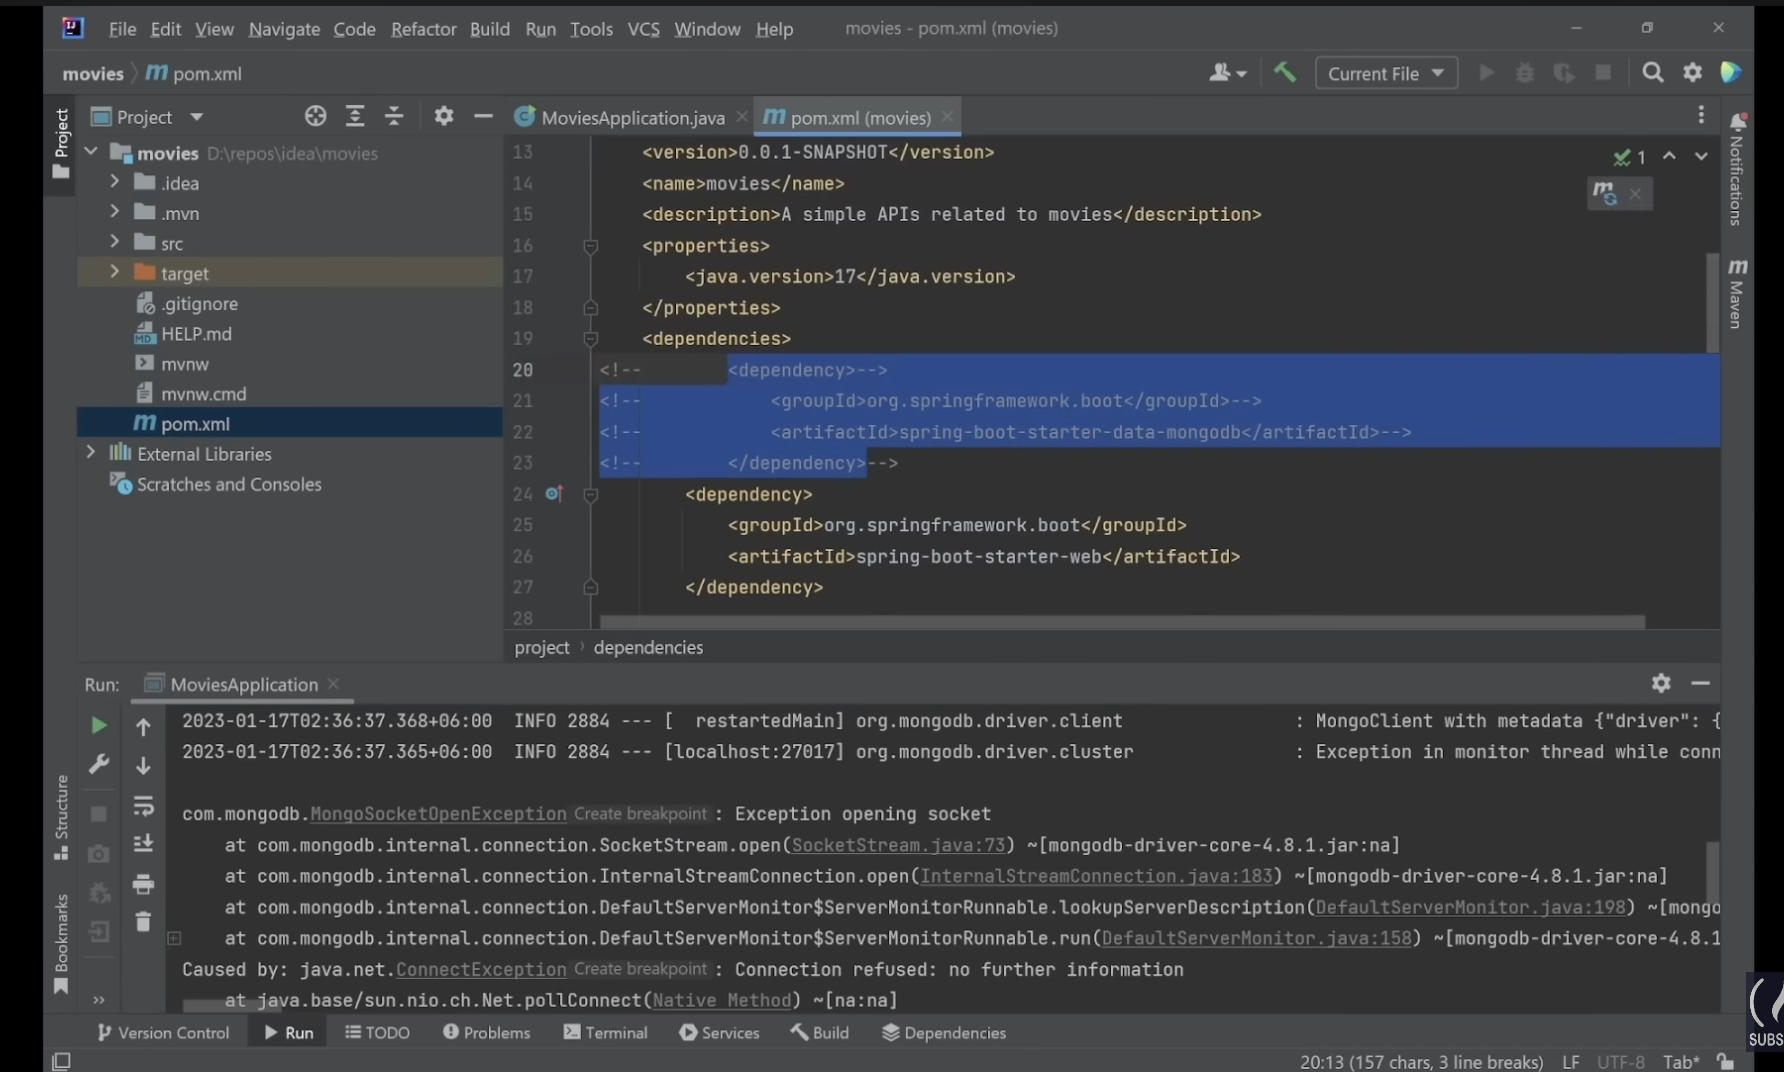
You will encounter the following error, which is correct since we haven’t yet connected to the mongoDB.
It is okay to leave it like that or go to pom.xml and comment on the mongoDB part if you wish to eliminate the error.
If you commented out or made any changes to
pom.xml, reload the project. Right-clickpom.xml- maven - reload or shortcut key.
After the setting, run the file again and go to localhost:8080.
You will see the following page.

This white page means there is no endpoint. Although we have an API, there is no API to hit.
We will add RestController, the annotation that lets the framework know this class is a REST API Controller.
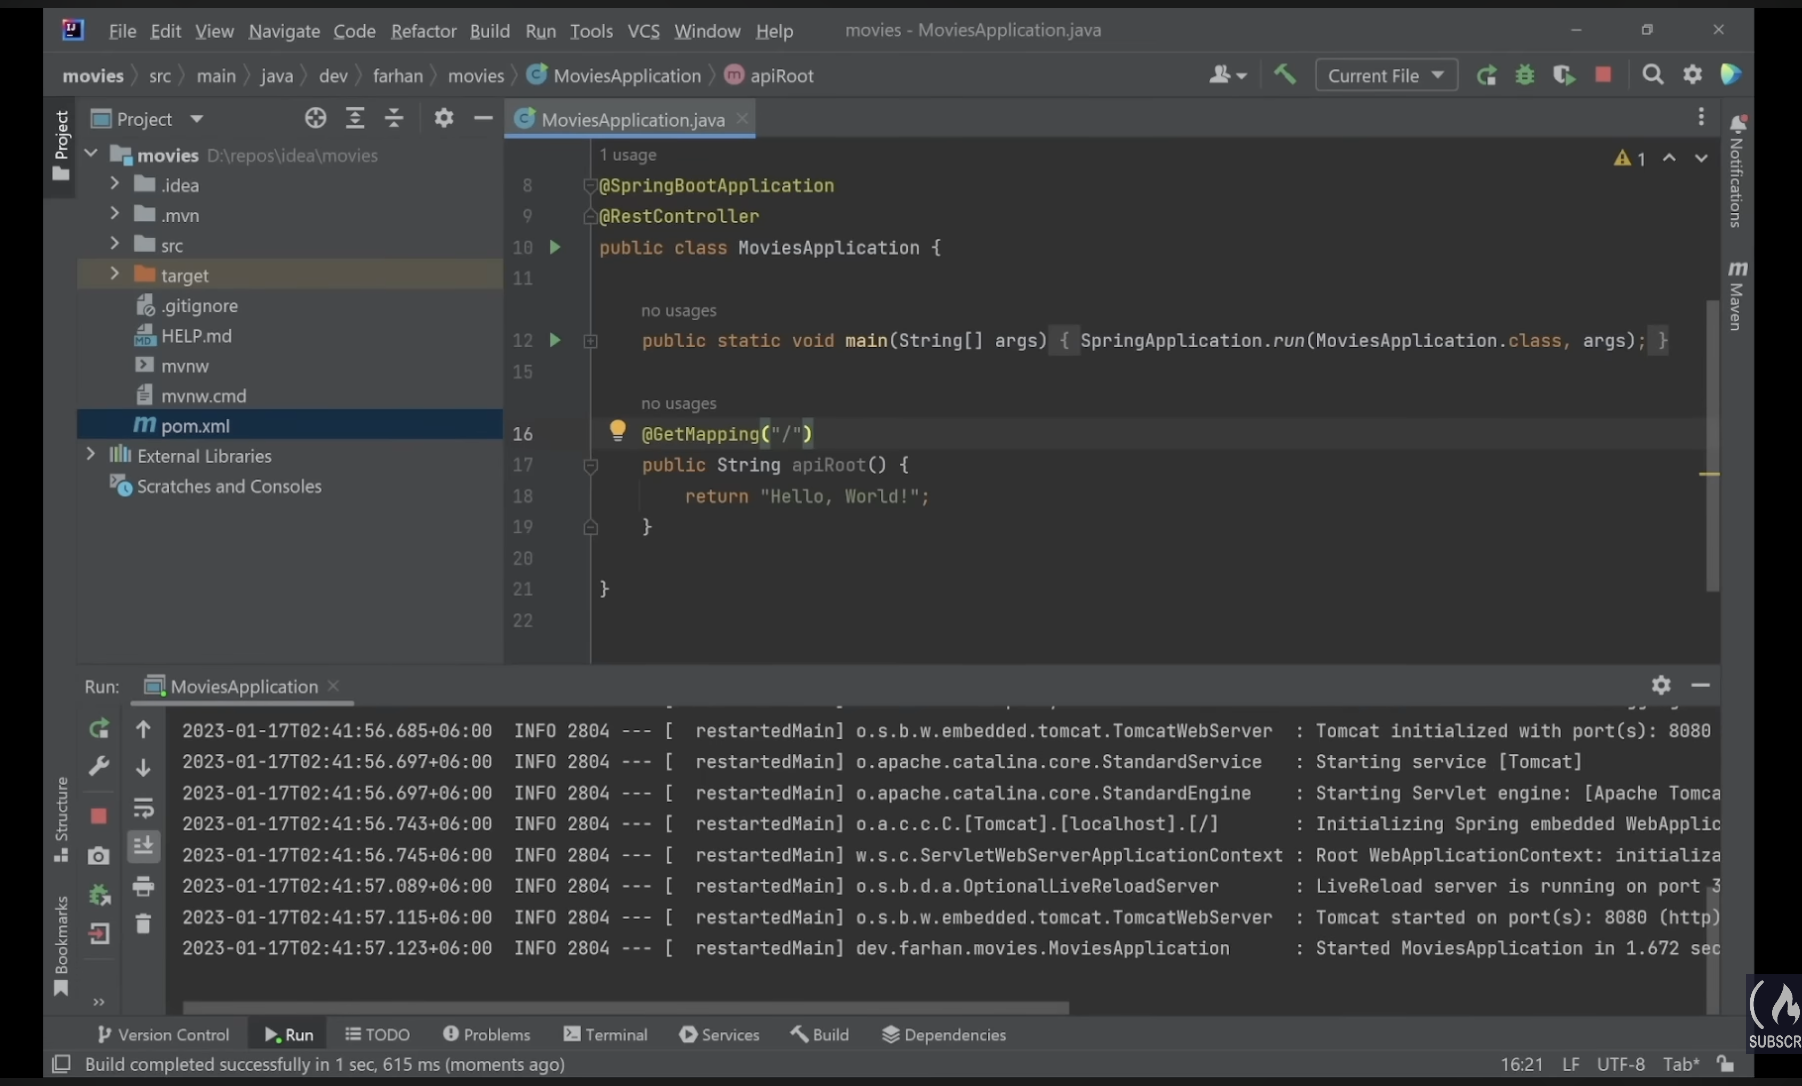
The GetMapping lets the framework know the following method is a GET endpoint.
@GetMapping("/")
public String apiRoot() {
	return "Hello, World!";
}
If you re-run the application and go to localhost8080/root, you will be able to see the "Hello World!" in your browser.
The above code is only for education purposes, and we won’t make APIs similarly.
We are going to divide the application into separate layers, which there will be a service layer, a data access layer and an API layer.
Connect MongoDB with Java
Before jumping into the layers, we have to resolve the error we previously commented out.
In the ‘resources’ folder below the current folder, there is a file called application.properties.
We will have to write the different application properties related to this project.
For instance, we would need spring.data.mongodb.database= and spring.data.mongodb.uri= to connect a database that we created.
If you have made a React project, the .env structure will be familiar to you. If not, we would need the structure shown in the below picture.
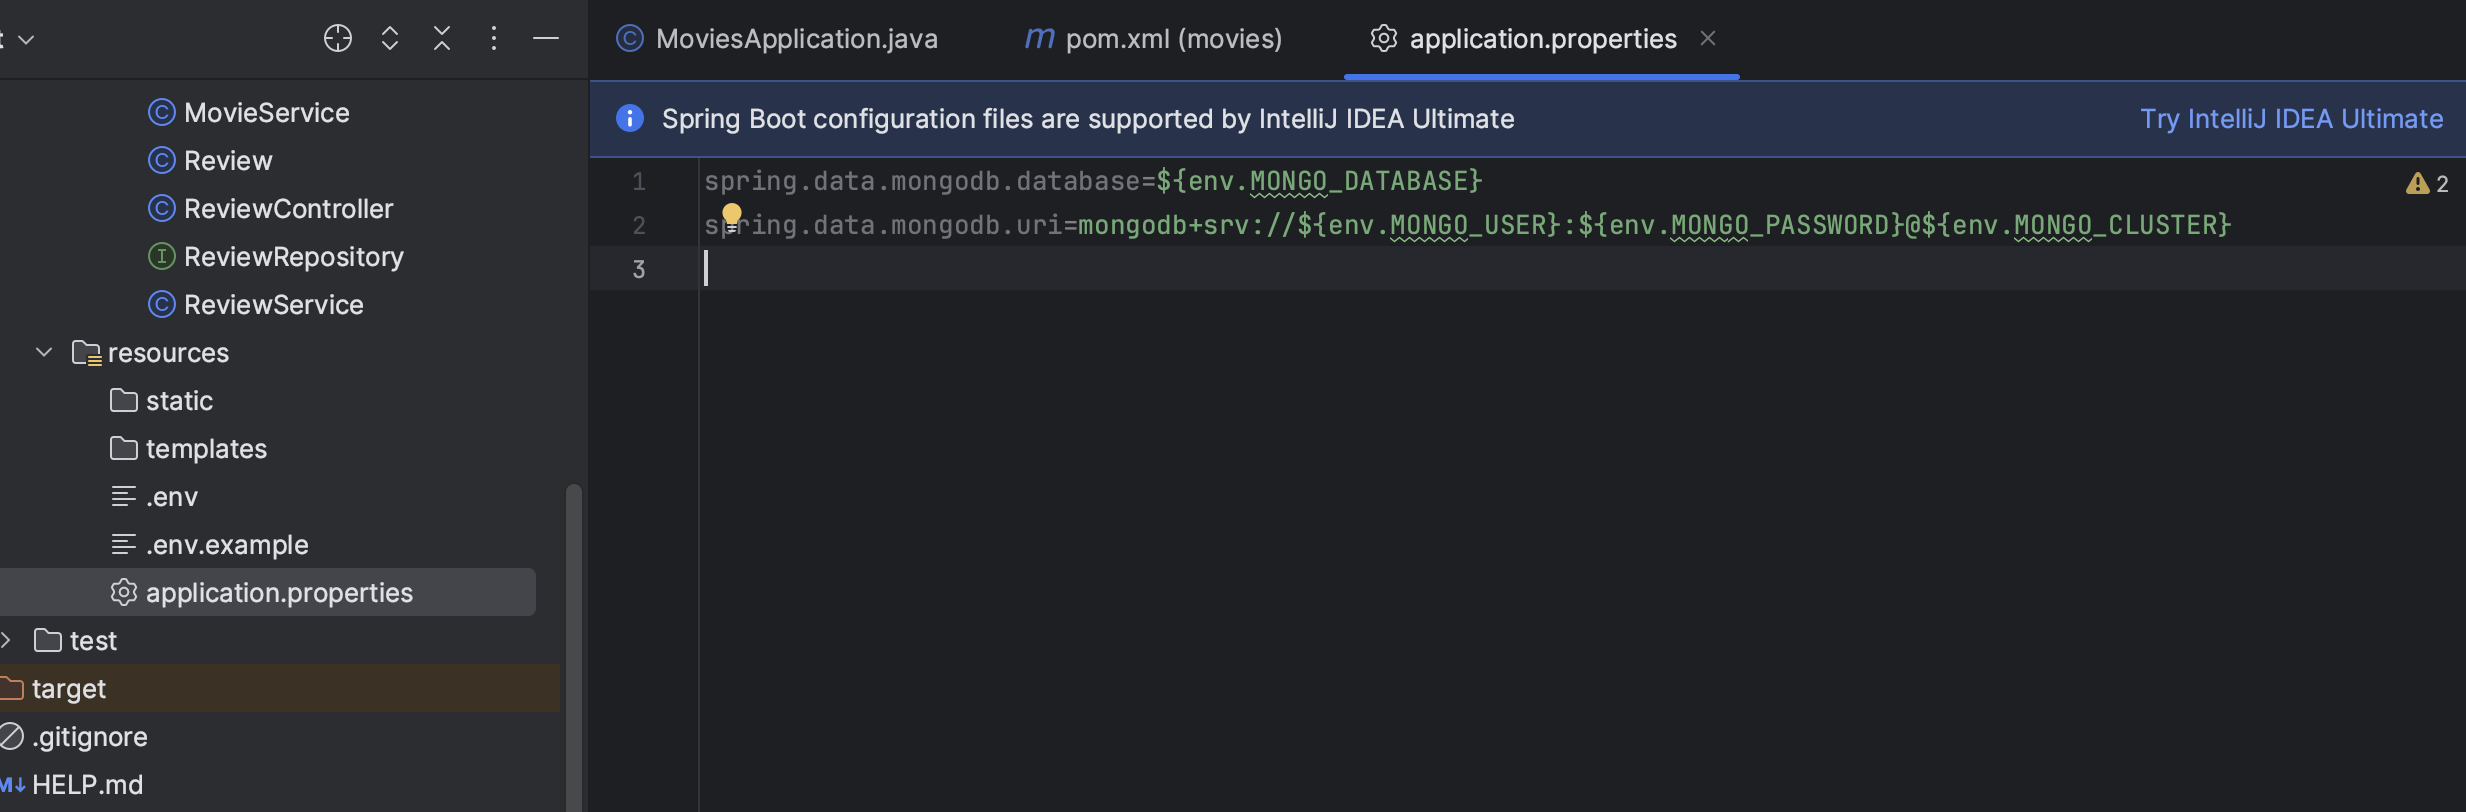
We will have the .env file and .env.example for later reference.
We need to install a new dependency to use the .env file in Maven. Search Maven dependency or go to the website below and search for the spring dotenv.
https://mvnrepository.com/
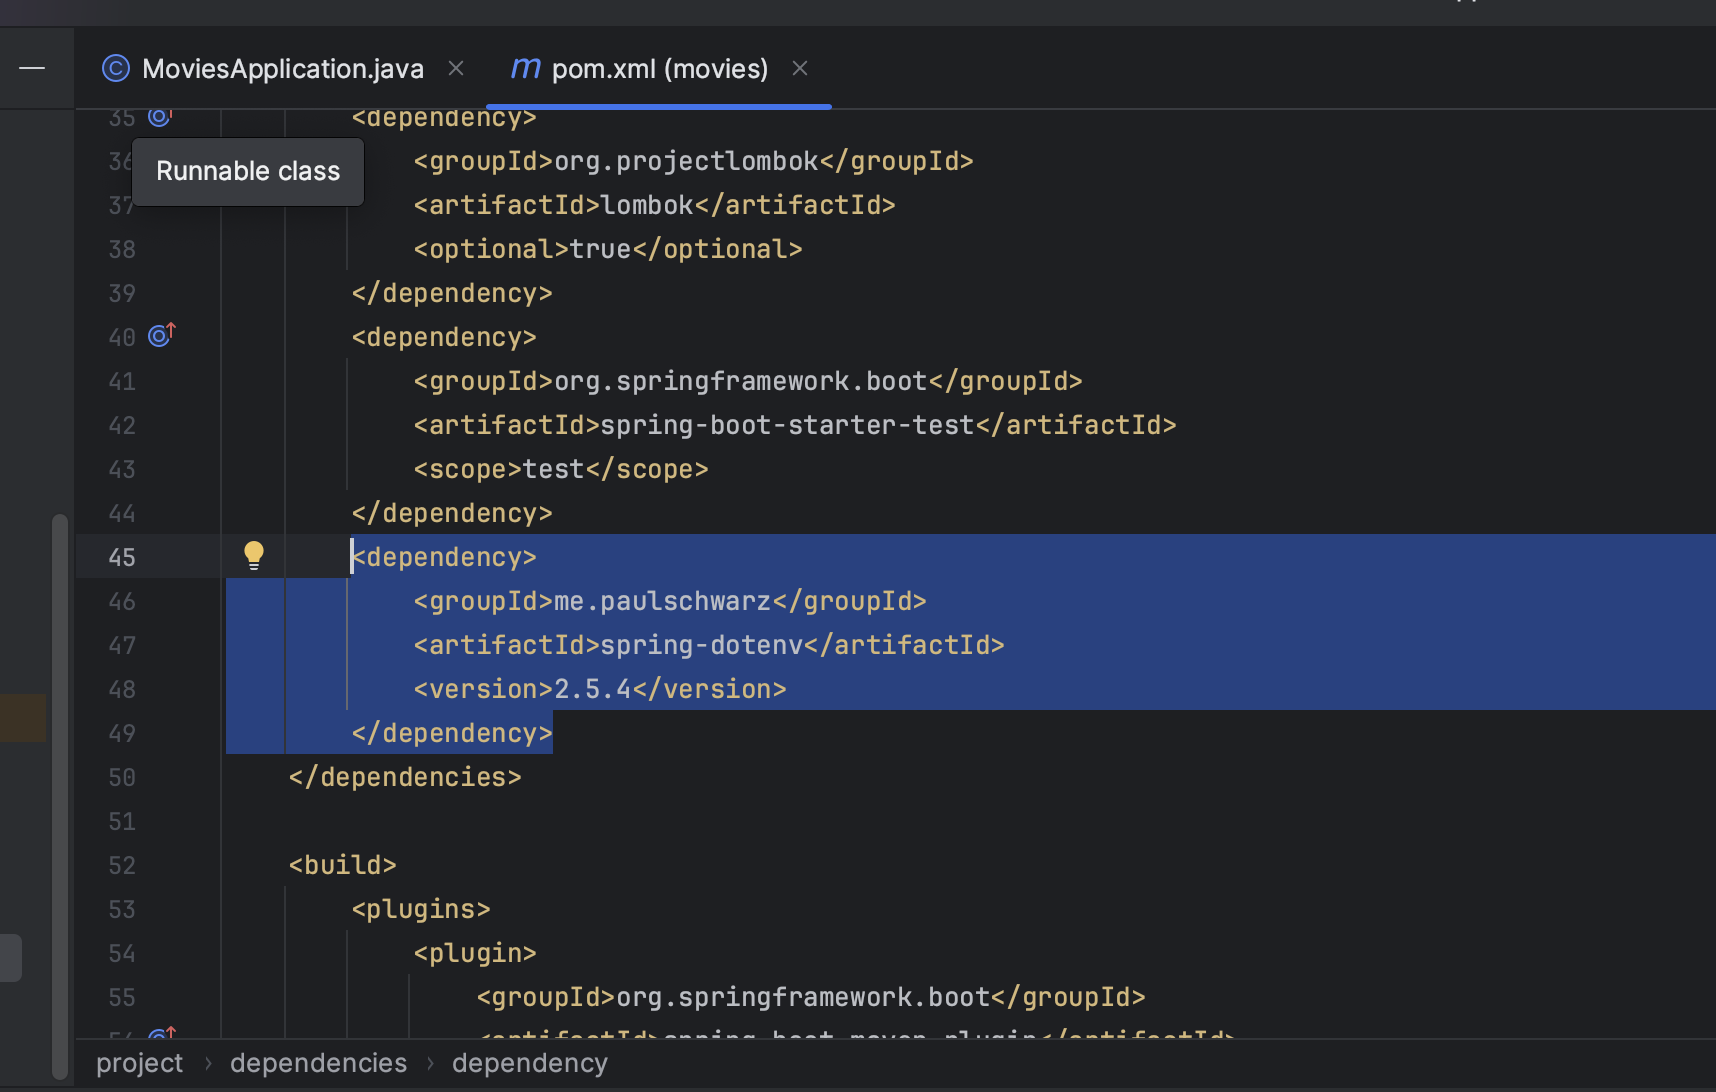
At the end of the dependency lists, we will add a new <dependency>. You can find the groupId and artifactId under the search bar.
Although we don’t have to define the version, if you wish, you can select the version. Choose the version you want to install and add it to the version tag.
Reload the maven and check if mongoDB is connected to your Java file.
🎯 Project Set up
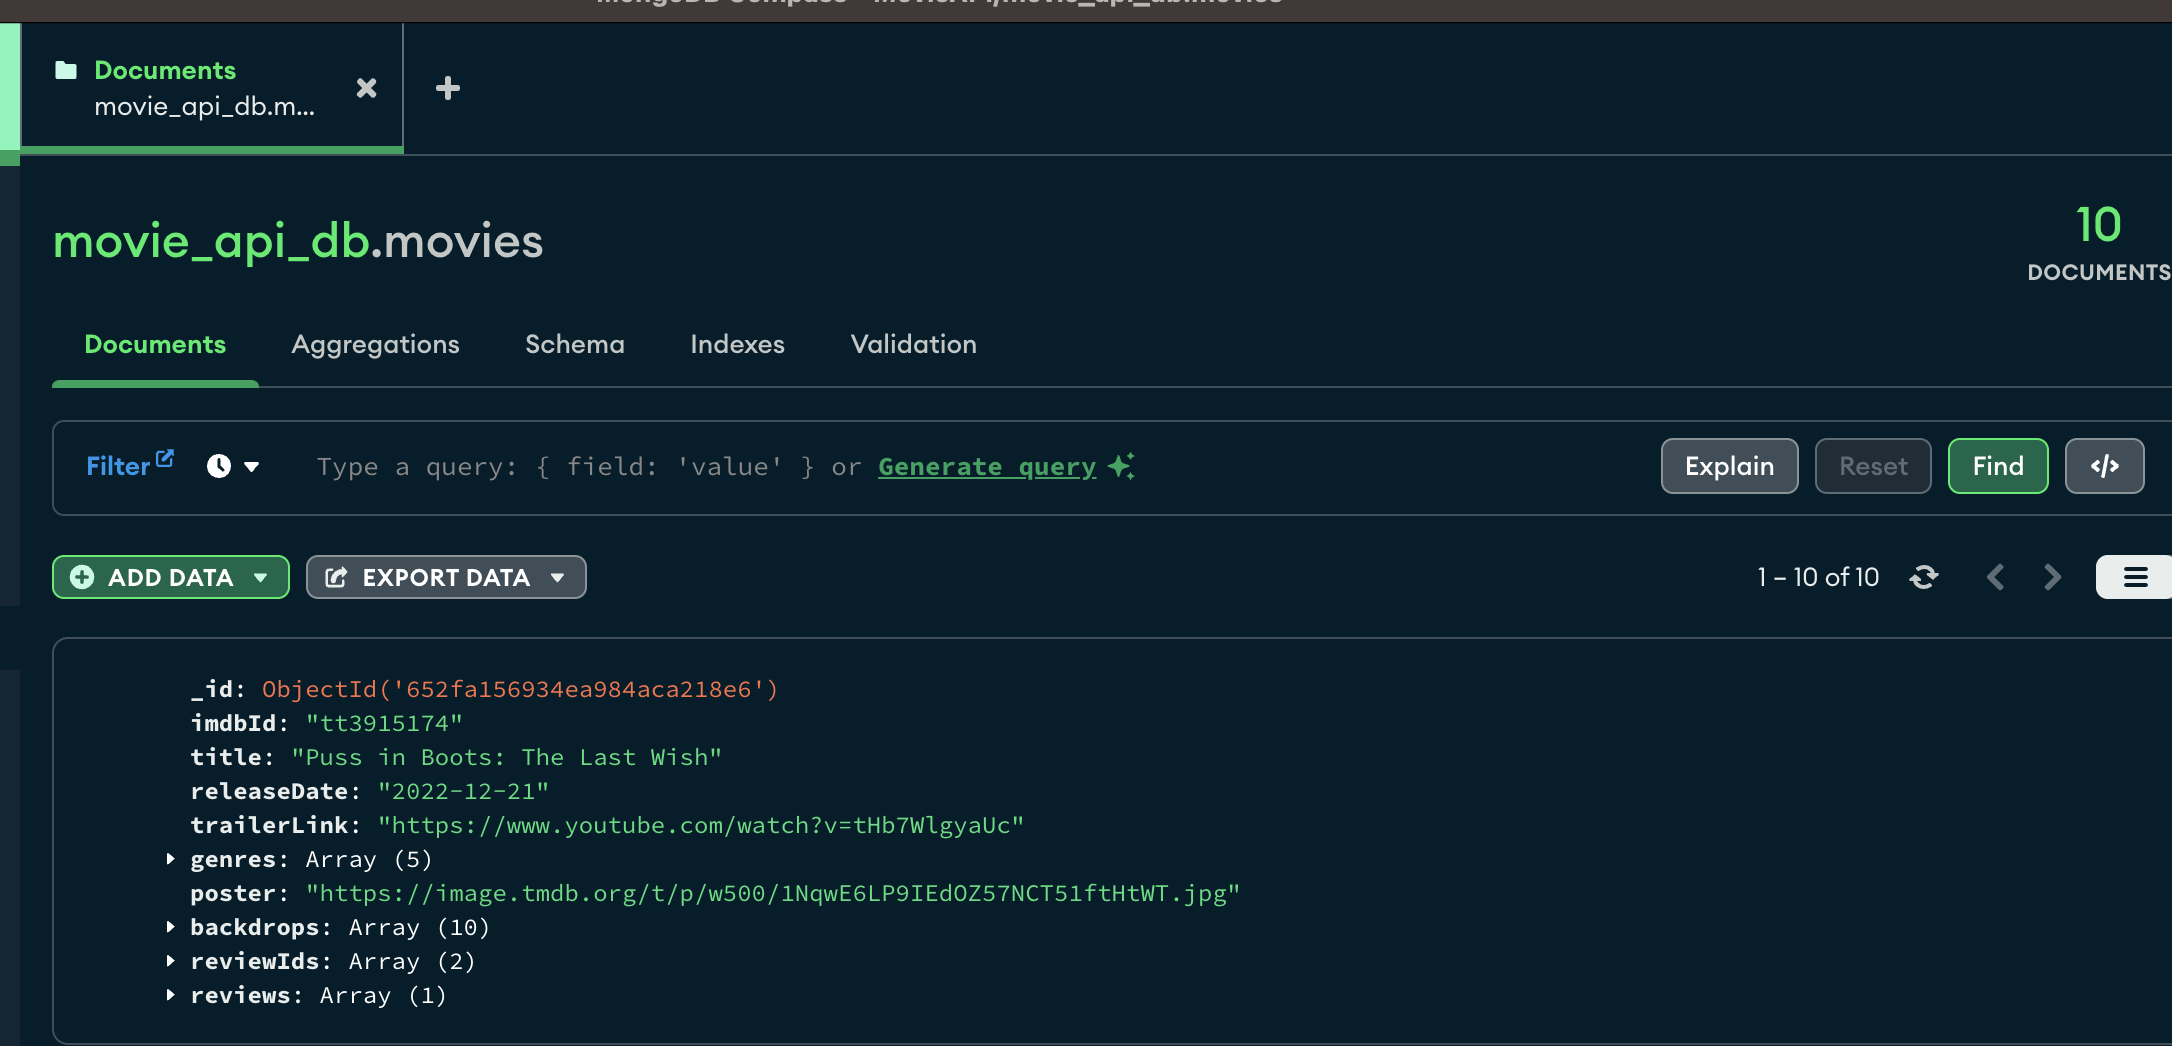
Movies and Reviews
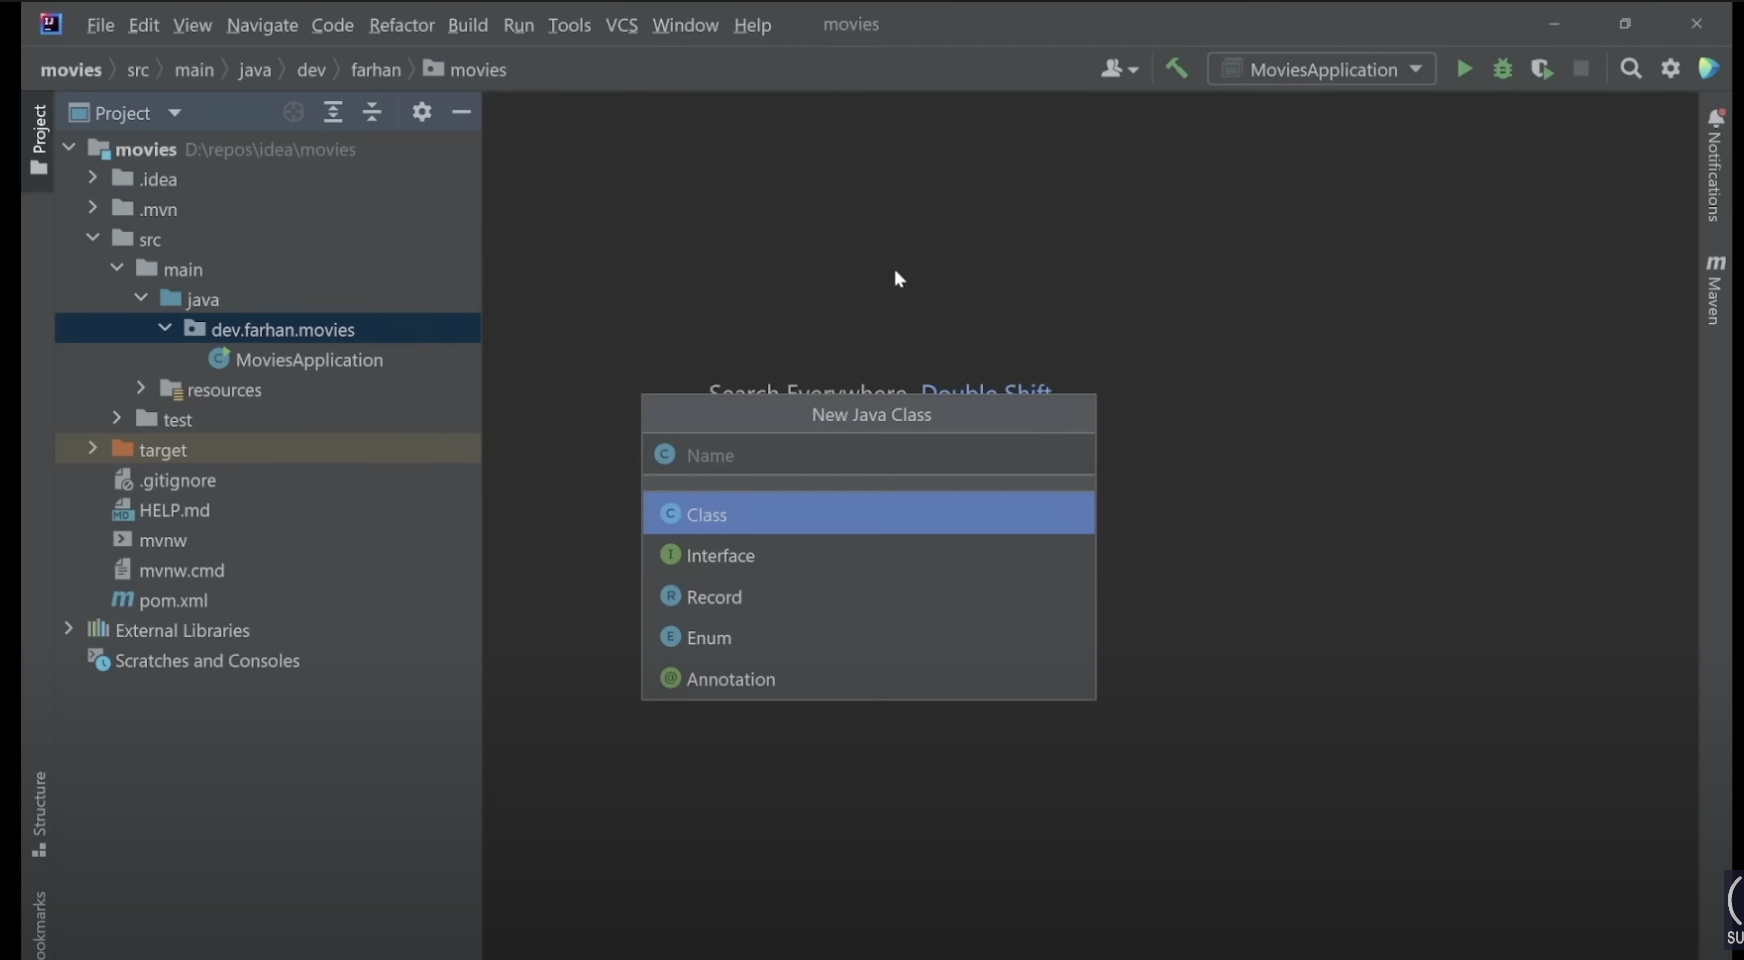
In our application, there are two types of data that we are going to work with.
We will need to create separate classes to represent these two entities.
Movie Setup
In IntelliJ, we can decide if this file works as a class, interface or annotation.
Before we create another logic, we will make the document for the mongoDB since it is a document based database.
Foremost, we have to define or annotate this class as a document. Add the following code to do so.
@Document(collection = "movies")
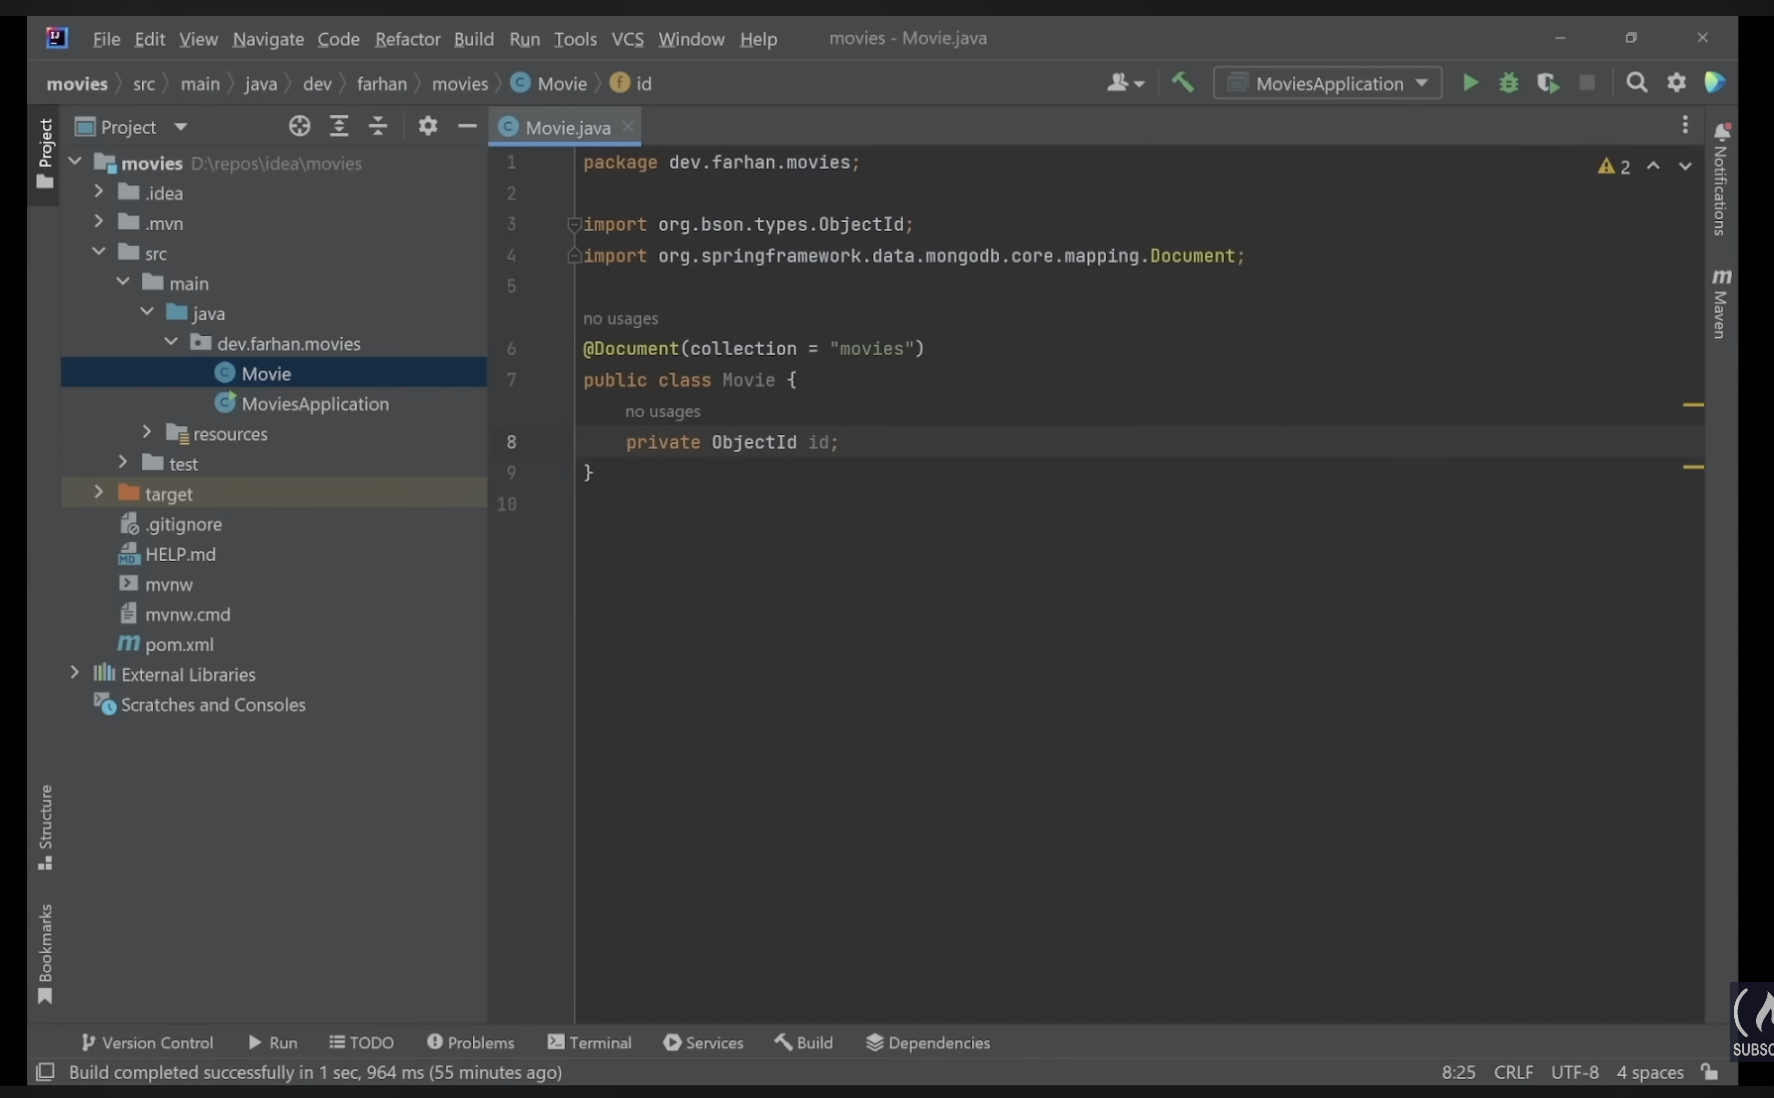
This will let the framework know that this class represents each movie collection. We can decide on the collection name in the parentheses.
(collection = "movies")
Inside this Movie class, we will have private data with the same property names as mongoDB.
We need to annotate the ObjectId as an actual ID with @Id.
This will let the framework know that the private ObjectId id; property should treated as a unique identifier for each movie inside of the database.
If your List is in red, you have to import the List class from util.
Compare with mongoDB and check if necessary property names are missing.
After adding all the private data, we need to add getters and setters for the String methods and some constructors.
That is the time when our handy tool Lombok comes.
Lombok is an annotation-based Java library tool that allows the reduction of the boilerplate code.
In Vanilla Java code, the code for a user will be like this.
public class User {
	private int id;
    private String name;
    private String address;

    public int getId() {
    	return id;
    }

    public void setId(int id) {
    	this.id = id;
    }

    public String getName() {
    	return name;
    }

    public void setName(String name) {
    	this.name = name;
    }

    public String getAddress() {
    	return address;
    }

    protected void setAddress(String address) {
    	this.address = address;
    }
}
With Lombok, we can reduce these lines of code as below.
@Getter
@Setter
public class User {
	private int id;
    private String name;
    @Setter(AccessLevel.PROTECTED)
    private String address;
}
Since this is not a post for
Lombok, I won’t write details of it.
Hence, instead of writing the getter method in each String, we can add @Data. This will take care of all different getters and setters.
Also, we will add @AllArgsConstructor. This annotation means the Lombok automatically generates a constructor and will generate the constructor with one parameter for each field in your class.
When the class is annotated with @NoArgsConstructor, The Lombok generates a constructor without parameters.
public class Movie {
    ...
    private String imdbId;
    private String title;
    private String releaseDate;
    ...

    // @NoArgsConstructor
    public Movie() {}

    // @AllArgsConstructor
    public Movie(..., String imdbId, String title, String releaseDate, ...) {
      ...
      this.imdbId = imdbId
      this.title = title
      this.releaseDate = releaseDate
      ...
    }
}
We will look for more details on reviews in the next section.
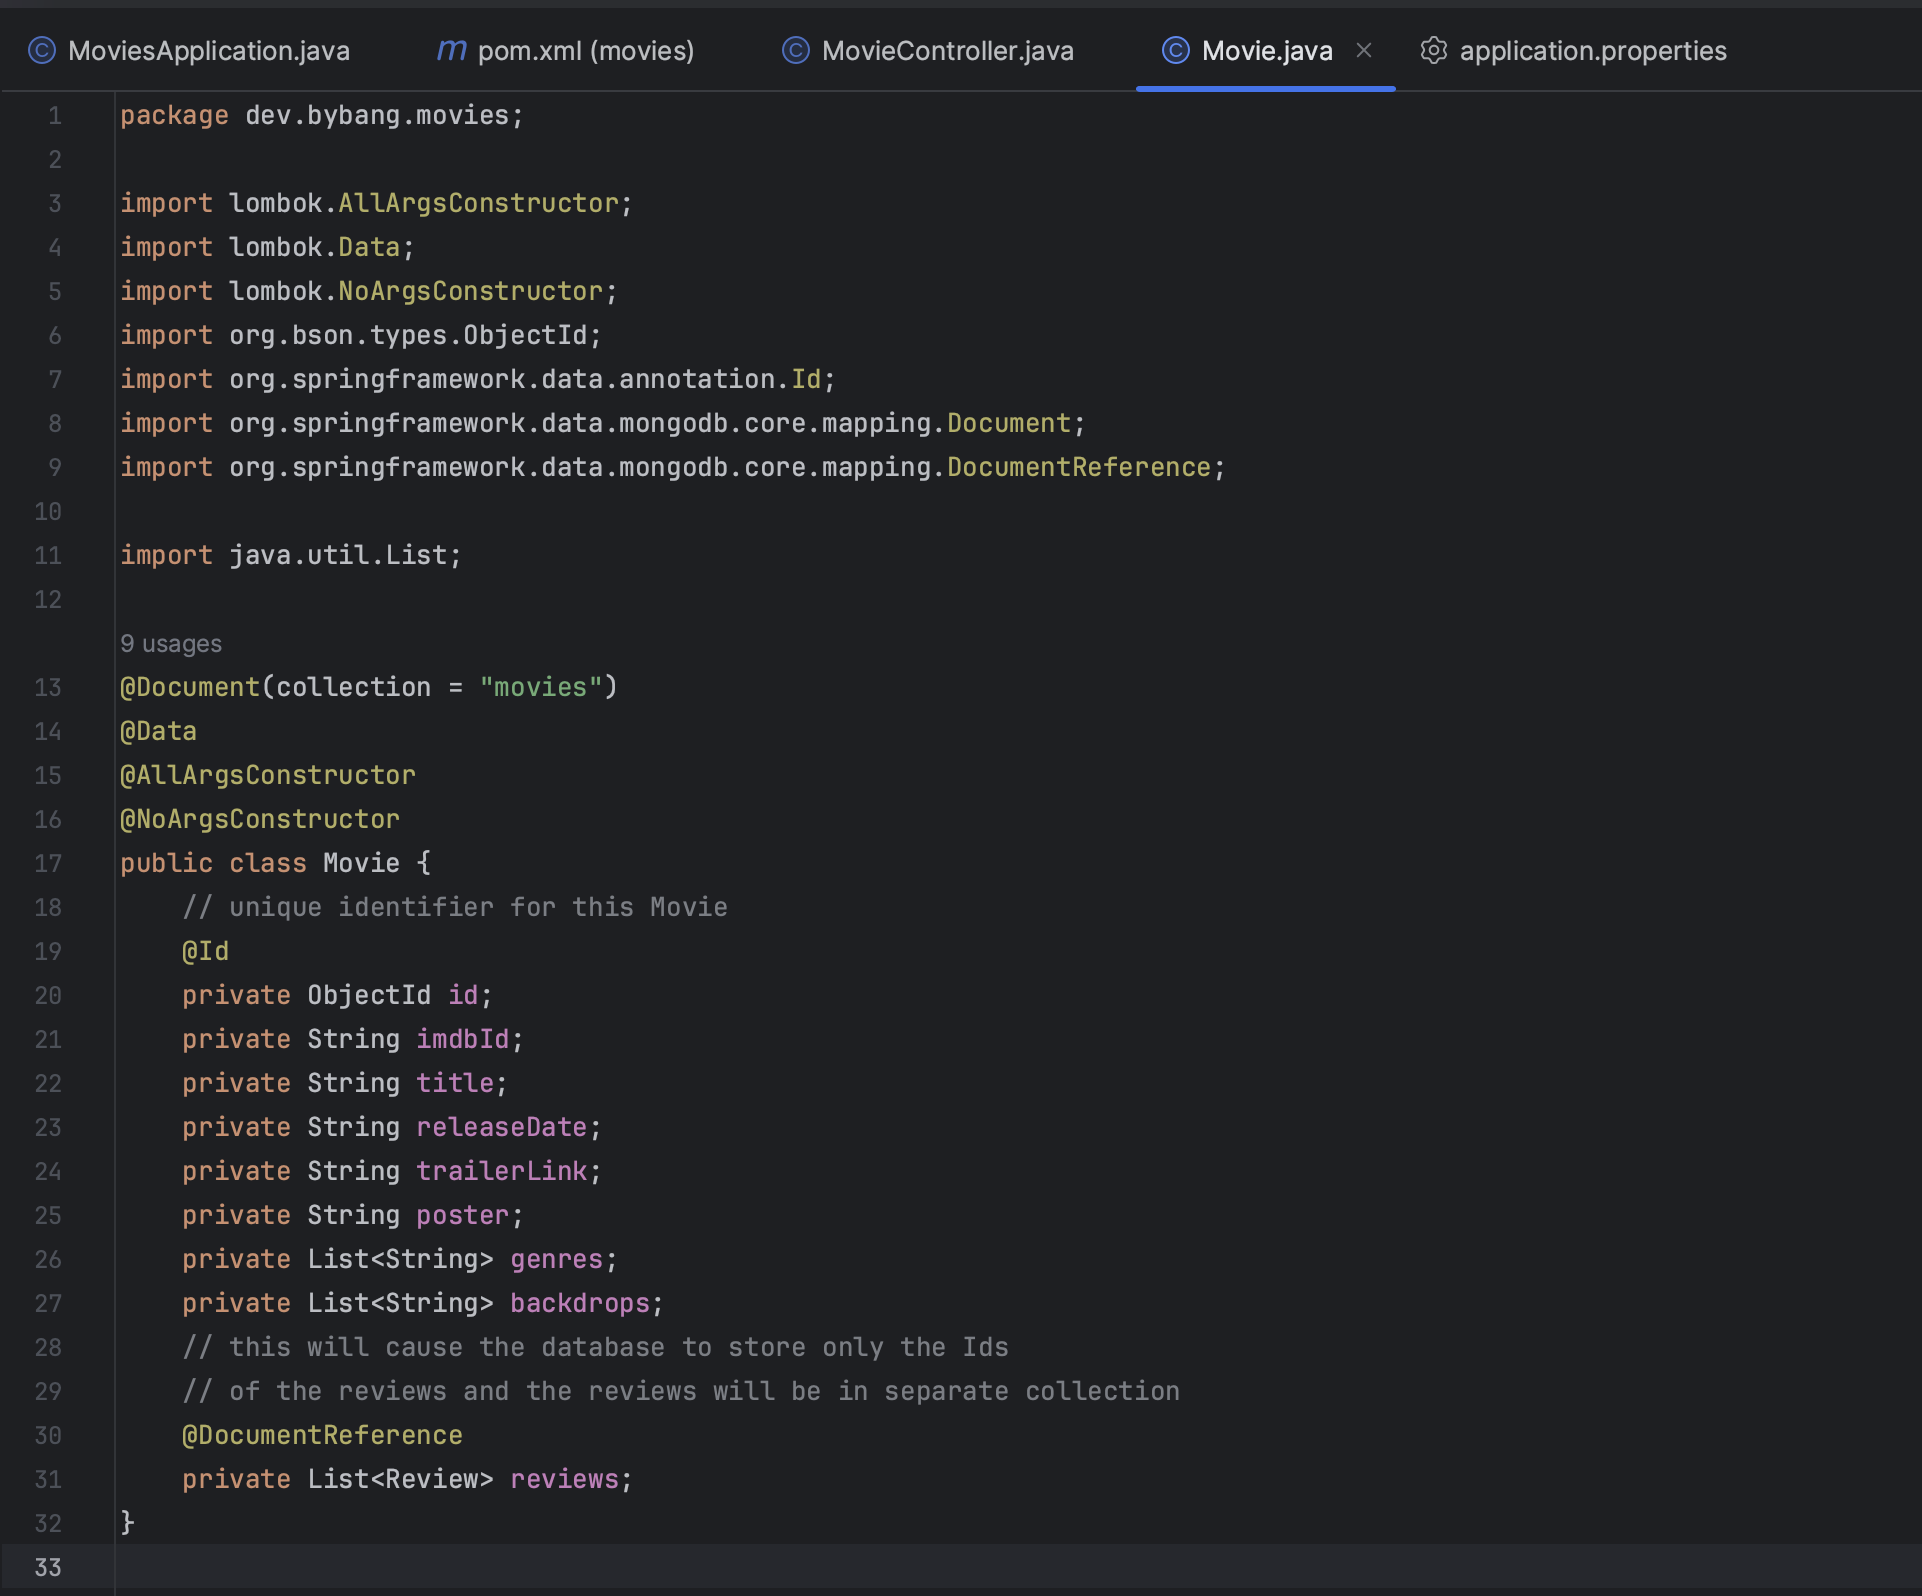
After adding all of the required fields, your Java file will look like below:
Review Setup
Review is also a document, but we didn’t create the review collection on mongoDB yet.
It works the other way around because we can write the code in a Java file first and then create the collection.
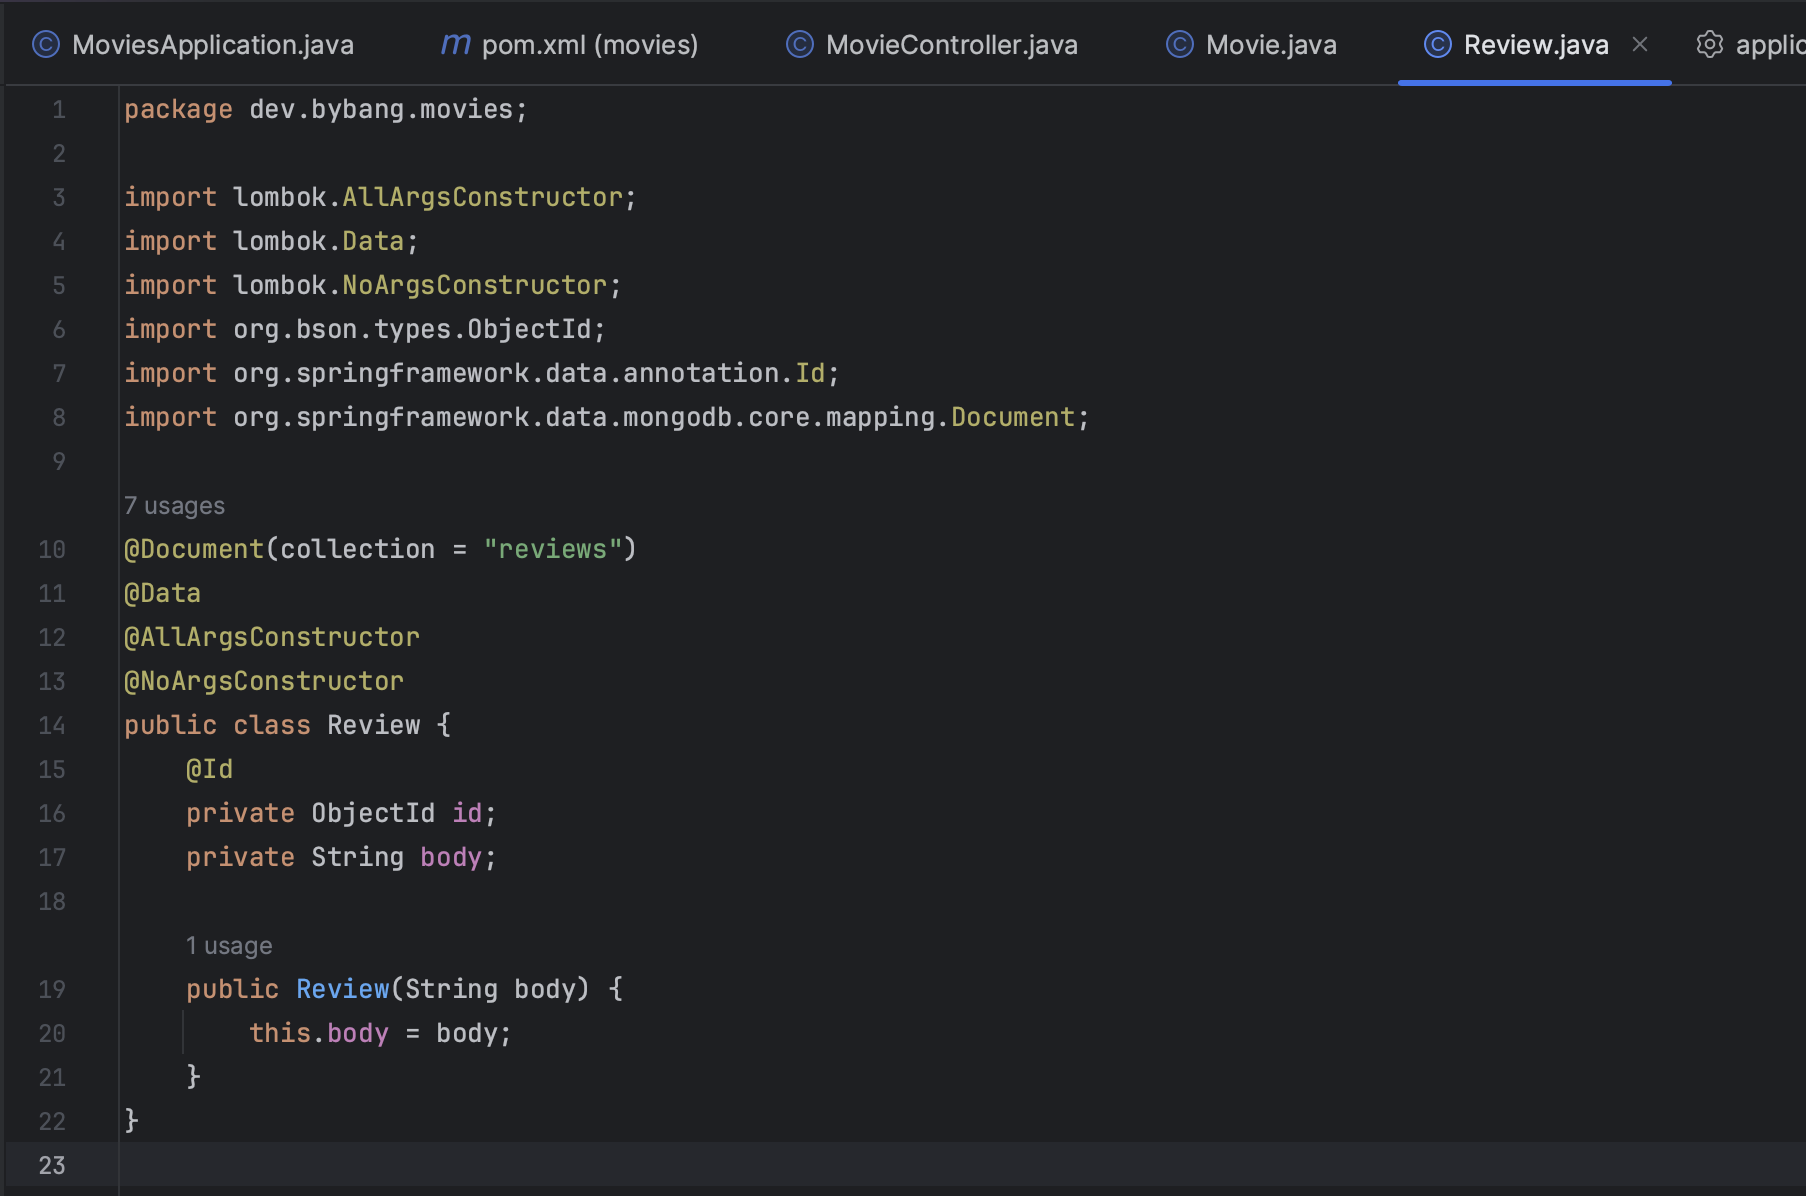
We will have two private properties similar to the Movie collection.
The first is a unique identifier, and the second is a body, which we will get from the user.
Name this collection as reviews, and add the required properties and annotations. If you follow along, your code will be similar to this except for the last constructor.
Now it’s time for the reviews from the Movie class.
As we see from the database, each single movie has an array of reviews. We can add private List<Review> reviews; at the bottom, similar to the previous properties.
This is an embedded relationship since we have the Movie and Review models. It means all the reviews related to the Movie will be added to the list of reviews.
This structure is good to go, as we are modelling a one to many relationship because one movie can have multiple reviews. But since this is a Spring Boot course, the instructor explained the @DocumentReference.
The DocumentReference function acts as a mapping layer and extracts the id from the <Reivew> class, which is the referenced entity storage, and loads the referenced document on read.
This is why the instructor explained to store ids of the reviews and those reviews are in separate collections.
More info on https://spring.io/blog/2021/11/29/spring-data-mongodb-relation-modelling
We will go over more details about the constructor when we create the createReivew method. Also, we will learn how to make a custom constructor that takes the body of the review.
📌 Takeaway
Through this post, I learned about
- how to create and connect the
mongoDBcollections with Java. - setting up the Spring Boot project with initializer was refreshing because I mostly created react projects through the terminal until now.
- unlike VScode, IntelliJ requires to install dependencies manually with Maven(at least in this course)
- Java needs an Application file to run, which is similar to App.js in React.
- A basic feature of Lombok and relation modelling manual references.
💻 Solution
- None
🔖 Review
-
The Spring Boot project uses a spring initializer for the boilerplate codes. Customization for dependencies, names, and Java and Spring Boot versions are allowed here.
-
Maven is a build automation tool used for Java projects, but for modern projects, gradle is preferred because of its performance.
-
Jar stands for Java ARchive, and War stands for Web Application aRchive. Jar is more commonly used for Spring Boot projects.
-
Similar to the React project’s
App.js, Java has theApplicationfile, and by running this file, we can see the app in the browser. -
When editing
pom.xml, the Maven-reload is required. -
The
envsettings are the same as the React, but the.envfiles andapplication.propertiesreside in theresourcesfolder. -
The
mongoDBis a document-based database, so eachMovieandReviewshould have@Documentannotation. This annotation can have the collection name property@Document(collection = "movies") -
Lombok is a Java library tool that minimizes/reduces the boilerplate code and saves time for developers.
-
We can remove many lines of code by using
@Data,@AllArgsConstructor, and@NoArgsConstructor. -
Relation modelling for manual reference can vary, and the point of use is to get all the reviews from the
Reviewand use it as a reference to save and edit the reviews inMovie. Also, reviews are stored in a separate collection.
Comments